Laatste video's

I got a bit creative and wanted to make a trailer that would sit on my channel page. In this video, I used videos dating all the way back to when I got my channel first started all the way until now. The first clip you see is part of a drawing I am working on for the next tutorial that will be out shortly.
Follow me!
Facebook: http://www.facebook.com/tylersartshack
Twitter: https://twitter.com/#!/TylersArtShack
Google+: https://plus.google.com/115405....344518849808905/post
Music is from CCmister.org
song is from George ellinas called Pulse

Welcome back everyone to a new real time drawing tutorial series. In this series, I will take you step by step to show you how to draw a spring meadow.
Other Places to Find my Art
Website: http://www.tylersartshack.com
Facebook: http://www.facebook.com/tylersartshack
Twitter: https://twitter.com/#!/TylersArtShack
Google+: https://plus.google.com/115405....344518849808905/post
Deviant: http://tylersartshack.deviantart.com/
In this video, I build upon what was done last video. I wanted to bring out the sky more and also bring out the far background trees. So to do this, I used a B or a 2B pencil to darken in the sky sections of the drawing. Once that was done, I used a blending stump to smooth out the area and create all the rough shadows into the clouds. After which I used a blending stump to start working in some of the cloud in full detail.
Drawing clouds can take a bit to get the hang of but with practice it will become easier. I have a full video dedicated on how to draw clouds on my channel as well. I will be linking to it at the end of the video.
Thanks a lot everyone for watching and ill see you next week with part 2!
Music Info:
Artist; Ghost
Song: Reverie Small Theme
music can be found on cc.mixter.org

Request by Skippman.
Had quite a difficult time drawing a desert scene. Never done anything like before.
Took me well over 2 hours to produce this.
Used many different brands of pastels ranging from Derwent, Sennelier, and Prisma Color. I also used Sennelier oil pastels as well. Drew it on High quality paper.
Song: Magnificent
Artist: Ryan Farish
Farish Music International (BMI)
Licensed with permission, RYTONE Entertainment
you can purchase this song from this link. http://itunes.apple.com/us/album/bloom/id360509452

Did this drawing on 19 by 24 inch paper. This was the only angle that I could do a speed drawing from. Please visit my Deviant art page to see all my other works of art including this one.
http://digg409.deviantart.com/gallery/
Song: Colortones
Artist: Ryan Farish
Farish Music International (BMI)
Licensed with permission, RYTONE Entertainment
www.ryanfarish.com
You can purchase this song by this link.
http://itunes.apple.com/us/alb....um/movement-in-light
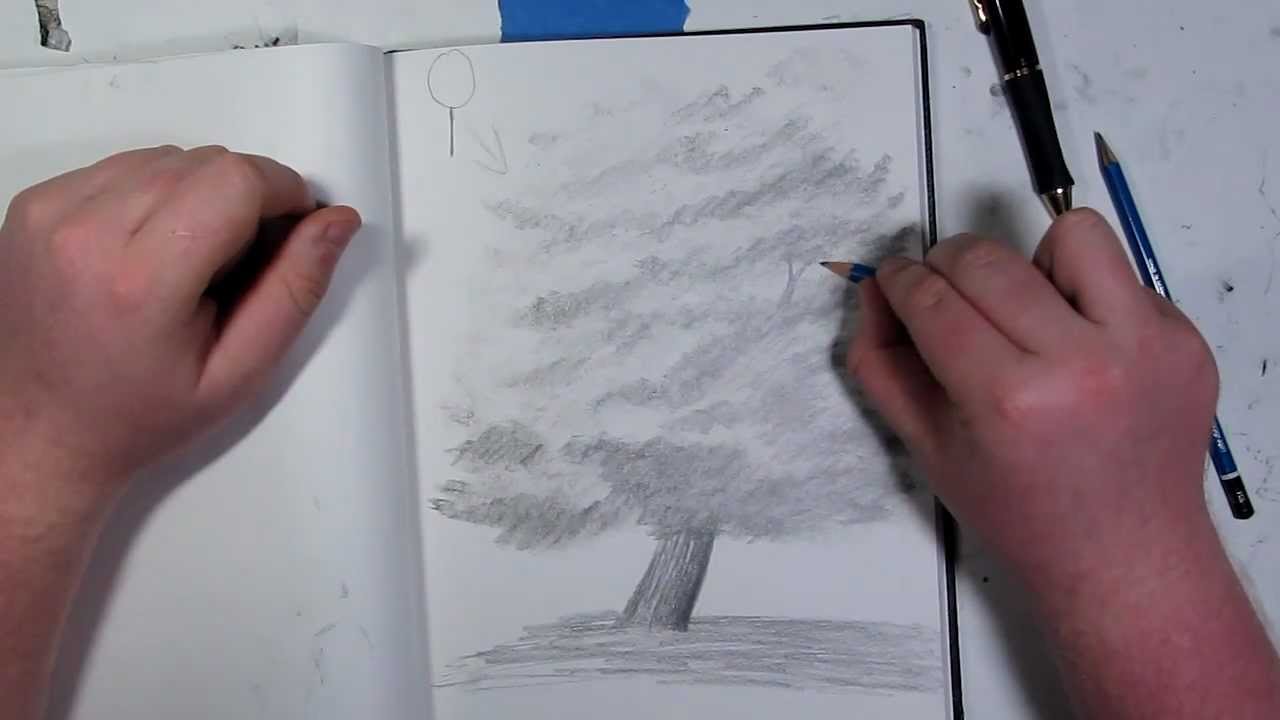
This tutorial will take You through the steps to complete a drawing of a tree. I show you the all pencils and techniques that are needed.
Check out my facebook fan page here. http://www.facebook.com/pages/....Tylers-Art-Shack/181
Welcome back everybody, This is the continuation of how to draw trees with leaves tutorial. I recombine that you see part 1 first before this one. That way you know what is going on in this video. Also, if you have not seen my other tree tutorial drawing. That was how to draw a dead tree part 1 and 2. I recommend that you see that one before you watch part 1 or part 2 of this video.
This whole tutorial thus far has only been done with using a 4h pencil. as you can see this pencil is light and the whole tree is mainly one tone. When I divided the page or tree down the center, everything to the right will be darker than everything to the left of that line. This will help you later with the shading and overall progression of the tree.
For shading the tree darker, I used an HB pencil and a 2B pencil. Wherever I used the 4H to make a darker tone on the tree, I am going to use the HB to make that area darker. I shade darker on the right side of tree than the left. The bottom of the tree will be the darkest part of the tree. The top left of the tree will be the lightest while the bottom right will be the darkest. The area between those two parts will transition slowly from light to dark.
I start to fill in the trunk area of the tree. I fill it in using a method called hatching. That is putting parallel lines close to each other to make dark tones. I use this to help give the tree a realistic look along with some character. It mimics the bark and other details of the tree. You also want to be able to decipher where the tree trunk ends and the leaves begin.
A cool way to situate the tree into the ground is to take a dark pencil and shade where the tree trunk is. Shade in that area to give the tree a nice large shadow.
The tree is pretty much complete from this point. You can go back in and add in little details at this point. I go back in with an eraser and put some highlights in some areas to make it look like light is hitting it.
You can add some tree branches here and there around the tree to make it look like there is a tree under all the leaves. I do this by just adding little branches and cover them up with leaves. I also add a few branches sticking out of the tree as well. it sort of adds a likeness to it.
I hope you learned from this tutorial.

Welcome back everyone to How to Draw - Summer in the Mountains Part Six - Drawing Tree Texture
Other Places to Find my Art
Website: http://www.tylersartshack.com
Facebook: http://www.facebook.com/tylersartshack
Twitter: https://twitter.com/#!/TylersArtShack
Google+: https://plus.google.com/115405....344518849808905/post
Deviant: http://tylersartshack.deviantart.com
Besides from polishing over a few things in this video, I mainly focused on finishing up the main tree within the drawing. I wan'ted to get that out of the way so that for the next video, I would be able to clearly see where I would need to add in some finishing touches.
I used a combination of pencils for drawing in the tree. I wanted a lot of bark texture for it and a great way of using that is starting off with 2 different pencils. I used a 4H or 2H pencil and gave the tree a general shading. Then using either an HB or 2B, shade over the area to create a textured bark effect. The texture will happen as you draw. H and B pencils don't mix well so it will create a nice effect for it. Getting up towards the top of the tree, I started to draw in some branches that I will later fill in with leaves.
The leaves are very much like any other leaves I will draw. I start off with the underhand grip and work in some details in small circular motions. Ill leave little details towards the outer most branches while making more compact texture for areas with a lot of leaves.
I hope you are all enjoying the series and I hope to see you again for the next one! Thanks a lot everyone!
Music Info:
Artist: DanoSongs
Song: Remember How it Started
Music can be found at DanoSongs.com

Welcome back everyone to my new series on How to Draw - Summer in the Mountains Series Part One - Using a Grid to Start a Drawing
Other Places to Find my Art
Website: http://www.tylersartshack.com
Facebook: http://www.facebook.com/tylersartshack
Twitter: https://twitter.com/#!/TylersArtShack
Google+: https://plus.google.com/115405....344518849808905/post
Deviant: http://tylersartshack.deviantart.com
I started in this video by going over and describing a sketch that I had done and I am going to be using that as the basis for this drawing. I will also discuss a method of using a grid to help more accurately transfer over the drawing that was already created. I have always found that the initial sketch is the most important part of a drawing. It is the foundation and everything else gets placed on top of it. Make sure to fix any mistakes in this stage before moving forward. Once a nice solid foundation sketch has been created, some detailing can then come after. I will usually detail the elements of the drawing to an extent to help see more of what is going to take place in the drawing.
I hope that you all enjoyed part one of this new drawing series. Next part will show you the basic tonal ranges of the drawing as well as shading everything to a pretty close range of where they should be. I hope you all join me for part 2! Thanks a lot for watching everyone!!
Music Info:
Artist: DanoSongs
Song: Remember How it Started
Music can be found at DanoSongs.com

This video shows you how I painted a beach scene using oil pastels. I use sennelier pastels because of their rich pigment and creamy consistency.
Sorry about the lighting. The black paper has an odd effect with the light and the camera kept on auto adjusting to compensate for it.
Be sure to check out Tim's music on his channel. His channel name is 007Regent. Here is a link: http://www.youtube.com/user/007Regent
Information about the drawing
Supplies:
Sennelier oil pastels
Artagain black paper
pencil for sketching
Drawing time: 3 and a half hours
Become a fan of my facebook fan page to view this completed drawing as well as many others. http://www.facebook.com/pages/....Tylers-Art-Shack/181
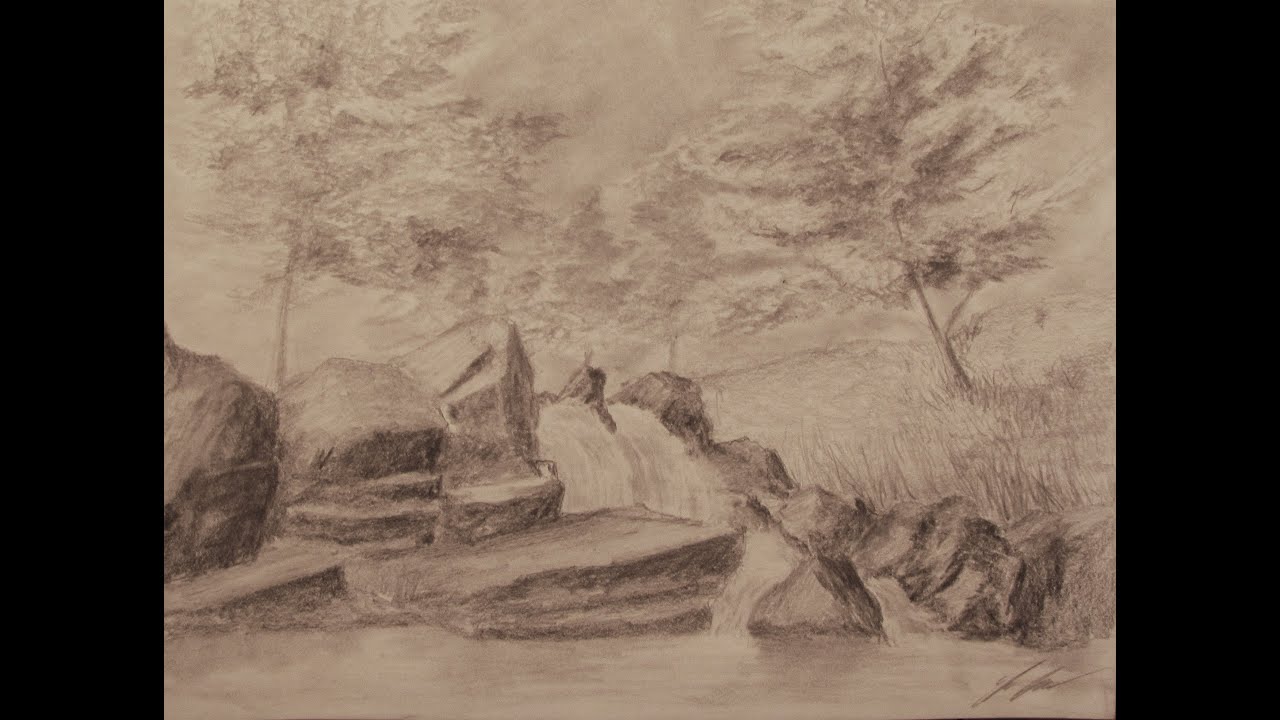
I show you how to draw a waterfall landscape from beginning to end showing you the pencils and tools you need.
Original Drawing is for SALE!!! http://cgi.ebay.com/ws/eBayISAPI.dll?ViewItem&item=200825632879
Follow me!
Facebook: http://www.facebook.com/tylersartshack
Twitter: https://twitter.com/#!/TylersArtShack
Google+: https://plus.google.com/115405....344518849808905/post
Deviant Art: http://tylersartshack.deviantart.com/
Drawing duration: 2 hours
Welcome back everyone to another drawing video and this time I draw a waterfall landscape. I started this one off with a darker outline so that it can be easily seen on video. I did it with a 4B pencil and normally I would use an HB pencil for the initial outline/sketch just so that it can be easily erased.
I started the sketch by drawing out the rocks and their general placement. I then moved on to a quick sketch of where the trees would be.
I first started by shading in the sky and then going into the leaves of the tree. To draw them, I use an underhand grip with the pencil and use a circular motion resemble the leaves. I make some spots darker than others to show volume and depth within the trees. It helps to make them look more realistic.
Once the trees were finished up I moved onto the rocks. I had to make a lot of texture to make them look realistic. I do this by using a varying amount of pencils. Use a lighter pencil to create details then go over the same area with a darker pencil. It will create a varying texture to help simulate a realistic texture.
Once the rocks were completed, I added the water and some grass on the right side of the image. That just about wrapped up the image.
Thanks everyone for checking out this video and I hope you enjoyed it!

This video takes YOU through the steps needed to complete a tree drawing. I show you all the steps and techniques to get you there in a breeze.
Check out my facebook fan page for this completed drawing as well as many other completed drawings I have done.
http://www.facebook.com/pages/....Tylers-Art-Shack/181
Just scroll down on the fan page till you get to the photos section. The album with all these pictures in it is called Reference images from drawing tutorials.
Welcome to how to draw trees with leaves part 2.
This drawing builds off the last tutorial on how to draw a dead tree and shows how to add leaves to a tree. The approach to this drawing is much different than the last tutorial but It will help to watch that drawing before this tutorial. It will help with the anatomy of the tree and just the basic shapes.
I start off the tutorial by creating a ground to plant the tree into the ground so that it is not floating in the air. The tree is going to resemble that of a lollipop tree but after adding detail to it, it will take on a very realistic look of a tree.
For the trunk of the tree, I like to avoid in making a perfectly vertical trunk shape. Instead, I like to put it on the side or draw it on an angle to give it some more character and it separates it from other trees because it looks unique.
After the stump is in place, draw a basic light outline of what you would like the tree shape to look like. You can go as crazy as you would like with this. After the outline is completed, Use the underhand grip to hold the pencil at an angle and work the pencil in very quick circular motions. This will be the motion that you need to draw most of the tree.
I like to start out at the bottom of the tree. I start to shade it in with a 4H pencil. This pencil is very light and no matter how hard you press, it is always going to be light on the page. I use this to add some texture to the whole entire tree. This is the most time consuming part of this drawing. It took me about a half hour to do this part.
You want to start at the bottom and work your way up. Also, shading areas in groups help to give the tree a more real to life look.
After starting to shade I realize that I need to establish a light source. Deciding where this is in the beginning of the drawing is the best way to do it. Adding a light source helps to give your piece a 3 dimensional look and more realistic.
With the light source added in, The bottom right of the tree will be very dark while the top right of the tree will very light. I have also put in a center dividing line down the tree. Anything to the right of that line will be significantly darker than anything on the left of that line.
That concludes part one of the drawing tutorial. Please be sure to stop back and watch part 2 when it is up. Also check out my channel Tylersartshack and please subscribe!

Welcome back everyone to a new real time drawing tutorial series. In this series, I will take you step by step to show you how to draw a spring meadow.
Other Places to Find my Art
Website: http://www.tylersartshack.com
Facebook: http://www.facebook.com/tylersartshack
Twitter: https://twitter.com/#!/TylersArtShack
Google+: https://plus.google.com/115405....344518849808905/post
Deviant: http://tylersartshack.deviantart.com
So, this is the final video of this series where I show you how to make some quick finishing touches to really bring out the final product. Some of the main aspects that I left to this very part was the water. Water is something that can be easily overdone if too much detail is added. But it also depends on the look that you are looking for. In this one, I just wanted some simple details to help bring out the drawing.
I also left out the details beneath the tree where the water line is. This area I made very dark just to show the shadows that would be there. I also took an eraser and erased out some roots that would be in the area to help add in some details. Once I erased them out a little bit, I went back in with the pencil to add some more detail and shadow to them.
A bit later in the video, I also add in another longer waterfall towards the bottom of the page. This waterfall took quite a lot of steps to achieve the effect but it is mostly layering. I would start by adding in a tone of pencil and then using the eraser to start to create the water fall. Once I have erased some parts out, I would then go back in with my pencil and just try and darken some of those areas to help make them pop. Going back and forth like this is what in the end really helped to make the waterfall turn out well.
I hope that you all enjoyed this drawing series and I hope to see your results on Facebook! Thanks a lot everyone for watching!!
Music Info:
Artist; Ghost
Song: Reverie Small Theme
music can be found on cc.mixter.org

Managed to find some time and get one of these done. I did this for my Grandmothers Birthday coming up soon and I wanted to give her something nice.
Took me a little over 2 hours to complete this drawing.
I mainly used pastels for this. I also used some charcoal here and there.
You can find a picture of the completed drawing on my deviant art page. As well as all my other works of art. http://digg409.deviantart.com/gallery/
Song: Believe
Artist: Ryan Farish
Farish Music International (BMI)
Licensed with permission, RYTONE Entertainment
www.ryanfarish.com
You can purchase this song from Itunes here.
http://itunes.apple.com/us/alb....um/believe-ep/id3001
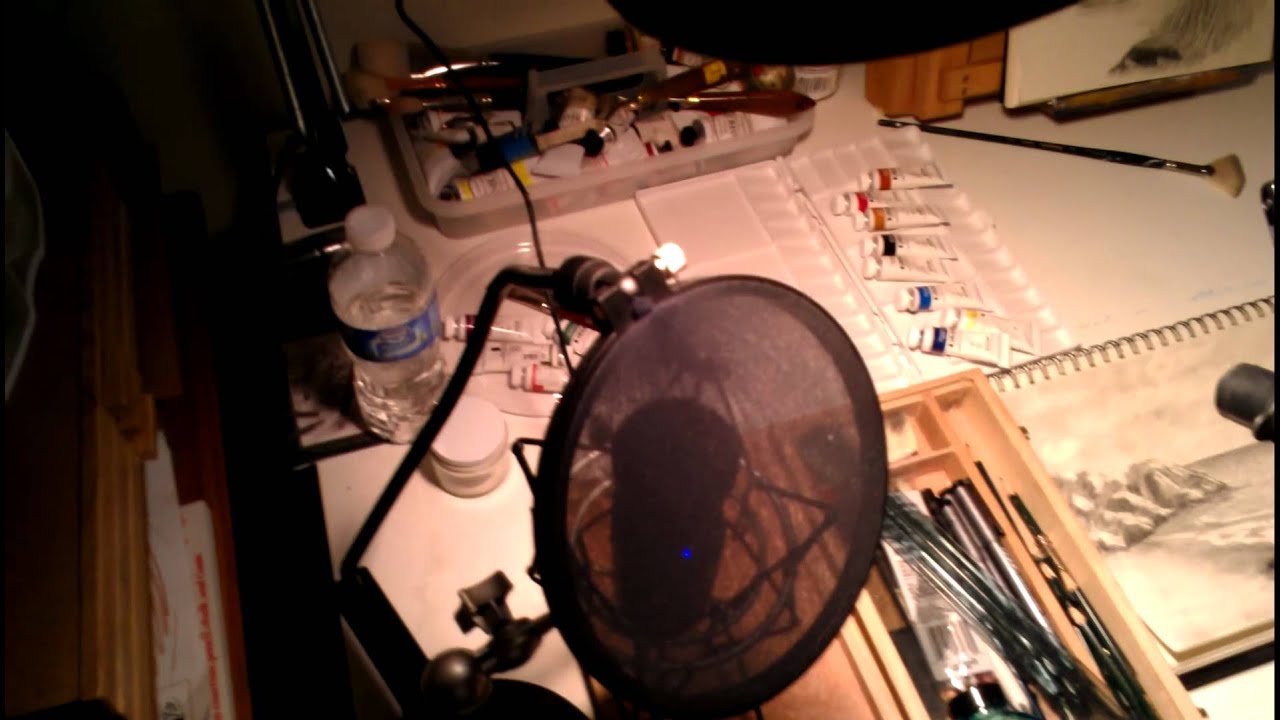
Here in this video, I do my best to explain how I set up my camera to record drawings so that you may better understand and maybe get some ideas on how you can do it.
video recorded on my HTC Rezound
Info about things I use in the video:
Main camera: Canon SX20IS 720P Digital Camera
Web Cam: Microsoft Studio LifeCam 1080P camera.
Microphone: Audio Technica AT2020
Camera Stand: Photo Basics reflector stand.

This is the way I have setup my drawing "studio". It used to be very basic and only consisted of the original reflector holder stand and a simple camera. But now that I am getting more of an audience and want to deliver better quality content, I have upgraded my setup.
I still use the reflector holder as the main camera mounting system. They can be found on amazon as well. I am also sure that stores that specialize in cameras and studio equipment would have the reflector stands. And I just use a pipe clamp to hold the cameras in place. The newer pipe clamps have hinge on one side so I needed to get a 3/4 inch size instead of a 1/2 like my older one that I have. Wit the pipe clamp, there is a hole on the top in which you can put a 1/4 inch screw and use a nut to secure it down in place. I then use the ballmounts and secure those on so that all I have to do is use that to adjust the camera angle.
Lighting is basic. I have very simple lamps with full spectrum bulbs in them. The bulbs cost more than the lamps haha. I then got some translucent 12 inch filters from interfit. I also got some 18 gauge wire so that I could have them hang from the lamps.
I use an Audio Technica AT2020 USB microphone for recording. There are parts of this video where the microphone does not sound all that great due to moving around so much haha. The microphone is Unidirectional which means that it only records good audio from 1 direction. Anything else it does not perform well. This is to help eliminate background noise that might occur. So keep that in mind :)
Other than that. I have a computer rig with high end components to help with the video editing and rendering. I use Audacity while recording with the microphone and use Adobe Premeire Pro CS6 to put it all together.
Hope you all enjoyed this one and ill see you all later!

Welcome back everyone to the start of my series on how to draw the mountains in the mist!
If you need a reference photo, try this one! http://sphotos-c.ak.fbcdn.net/....hphotos-ak-snc7/4793
Other Places to Find my Art
Facebook: http://www.facebook.com/tylersartshack
Twitter: https://twitter.com/#!/TylersArtShack
Google+: https://plus.google.com/115405....344518849808905/post
Deviant: http://tylersartshack.deviantart.com/
How to draw the Misty Trees
In this video, I highly recommend having a range of pencils. Pencil drawing is by far one of the cheapest artist mediums to get into and buying a set of pencils will run you about 10 - 15 dollars. I would recommend having pencil set or buying individual pencils. For this video I used 4H 2H HB 2B and a 4B for finishing touches. That is my general range of pencil usage for any type of drawing. I do not usually go much higher than that because the higher number B pencils can give off a shine.
Getting back to the drawing, I started off way in the background with a 4H and 2H pencils. I usually create a vertical line close together sort of like hatching and place those marks in moving along the image horizontally. The best way I can describe how to draw this is to make it look sort of like a sound file or one of those meters that measure an earthquake activity. Those up and down vertical lines that are created by these devices are very similar to what I am doing here. After the light layer is placed, I switched to an HB pencil to lay in a slightly darker line in the same way. Also I try to avoid creating a tree line that is too even. I try to vary it so that the natural mist that I drew in last video can move around and about the trees that we are drawing in. After the HB layer, I will usually go for a 2B for the final layer. this layer will also go all the way down the the bottom of the page. After this layer is added, I go back in and pick out some individual trees to add in details to. I don't want to over do the details here because I want to convey that the trees are far away. Far away objects tend to have less details.
I also go in to show you the details of adding in the river bank. For this all I do is put the pencil on its side so that the maximum amount of graphite on the pencil is on contact with the paper. And with a quick motion, I hold the pencil horizontally on the page and go in a side to side motion. this helps to just create a "filler" texture that takes the shape of a river bank. It is a neat little trick.
I hope you all enjoyed this video and stay tuned for next week for the continuation of this series. Thanks everyone!
Music info
Artist: Dokashiteru
Song: Echo
Music can be found on CC.mixter.org

Welcome back everyone to the start of my series on how to draw the mountains in the mist!
If you need a reference photo, try this one! http://sphotos-c.ak.fbcdn.net/....hphotos-ak-snc7/4793
Other Places to Find my Art
Facebook: http://www.facebook.com/tylersartshack
Twitter: https://twitter.com/#!/TylersArtShack
Google+: https://plus.google.com/115405....344518849808905/post
Deviant: http://tylersartshack.deviantart.com/
How to Draw a Tree
I usually start off my trees with just a simple guide line to show the full height of the tree before I even get started. This is so that I know the tree will fit within the composition of the drawing and fit in well. I like to start off with a 2H or B pencil and putting in very fine and small details for the top of the tree. The top of the trees I think are the most important. I put the most detail there.
After I get the first layer down. Ill go back in with a darker pencil like a 2B and just add in some darker shadows to help bring it out.
When drawing in the details of the tree, I like to stagger and separate some of the details to help bring out a natural look to the tree. I also like to give it a bit of character by adding in some dead branches and having some branches smaller or larger than others. It just needs a little bit of variation to help give it that nice natural look. It can be easily overdone so just be careful.
I hope you all enjoyed this video, please give it a thumbs up as it always helps out and thanks everyone for watching!!!
Music Info:
song: Revolve
Artist: HisBoyElroy
Music can be found on dig.ccmixter.org

This is great drawing practice if anybody wants to gain a boost in artistic talent. Believe me, when I first started drawing, I could only draw stick figures. After drawing like this for about a year or so, I can do all the things I do now. I do believe that art is something you are born with but I also believe that one can also learn the skill. Try and draw at least 1 thing every day and you will get much better as time goes on.
Song: Indian Summer
Artist: Ryan Farish
Farish Music International (BMI)
Licensed with permission, RYTONE Entertainment
www.ryanfarish.com
You can purchase this song from this link.
http://itunes.apple.com/us/album/beau...

Welcome back everyone to my drawing tutorial on how to draw a hollyhock flower.
Other Places to Find my Art
Website: http://www.tylersartshack.com
Facebook: http://www.facebook.com/tylersartshack
Twitter: https://twitter.com/#!/TylersArtShack
Google+: https://plus.google.com/115405....344518849808905/post
Deviant: http://tylersartshack.deviantart.com
The supplies for this drawing remain relatively simple. I used an HB pencil for the sketch and used a 2B for starting process of shading. For the real dark areas, I used a 4B.
This drawing started with a sketch on the page just for the rough placement of all the objects. I also used a grid method again for this drawing. It is a good process for aiding in the accuracy of object size and placement. I don't always use it but when I do, it is a big help.
Starting with the flowers, I used a 2B pencil to start working in some dark lines. Work them in a radial direction working out from the center. Then I used a blending stump to smooth everything out and added in some lines again just to bring out some more details.
The leaves are done in a similar way. I used a 2B pencil to give it a general shading and then used the eraser to bring out the vein lines in the leaves. Then using a regular pencil again, I made a line that follows the highlight to give it some depth.
Music Info:
Song: The Owl Named Orion
Artist: DanoSongs
Music by Dan-O at DanoSongs.com

Be sure to visit my Facebook Fan Page. http://www.facebook.com/pages/....Tylers-Art-Shack/181
Welcome to how to draw dead trees part 1. This video will show you a technique I saw and I thought it was very cool. I think you will be able to learn from it quite easily.
The process starts off with drawing cylinders and being able to shade them. Another shape to learn to draw is a cone like shape. Combining and altering these shapes help to form a tree shape. After that is done. The shading part comes in next. You need to make a big decision and decide where the light will be coming from. The spots where the light would hit would be the lighter areas on the tree or "highlight" and the are of the tree that the light isnt hitting would be the "shadow" area. This adds volume and 3d to the drawing. It also makes it more interesting.
After this, you could add more tree branches as you see fit. Put in a ground or foundation for the tree to sit by scribbling in some lines or actually spending time to put in some grass and some roots popping out of the ground.

Welcome back everyone to a new real time drawing tutorial series. In this series, I will take you step by step to show you how to draw a spring meadow.
Other Places to Find my Art
Website: http://www.tylersartshack.com
Facebook: http://www.facebook.com/tylersartshack
Twitter: https://twitter.com/#!/TylersArtShack
Google+: https://plus.google.com/115405....344518849808905/post
Deviant: http://tylersartshack.deviantart.com/
In this video I show you the basics of how to sketch out the scene. I start out by showing a grid to help line up all the objects with better accuracy. The paper I am using is 6 1/4 inches by 10 inches. I use the paper horizontally so the vertical lines fall at 2 1/2 inches 5 inches and 7.5 inches dividing the page into thirds. The horizontal line falls 3.1/2 inches from the top of the page making the line below center.
These lines help with the accuracy of line placement of the objects of the drawing. This method is great for drawing from a reference image. Just make sure that the lines you create can be easily erased.
Music Info:
Artist; Ghost
Song: Reverie Small Theme
music can be found on cc.mixter.org
