Últimos vidéos

Welcome back everyone to a new real time drawing tutorial series. In this series, I will take you step by step to show you how to draw a spring meadow.
Other Places to Find my Art
Website: http://www.tylersartshack.com
Facebook: http://www.facebook.com/tylersartshack
Twitter: https://twitter.com/#!/TylersArtShack
Google+: https://plus.google.com/115405....344518849808905/post
Deviant: http://tylersartshack.deviantart.com/
Drawing trees is probably going to be one of the more time consuming aspects of the drawing. With some practice and patience, they will begin to take shape on their own. For drawing these trees, I wanted to use a darker pencil so that they would stand out more against the sky. So I used more of an HB to 2B pencil range. After the skeleton work of the tree is completed, that is when I start to work on the leaves.
Drawing in the leaves can present its challenges. First off the average tree probably has over a few hundred leaves. So drawing that many objects is very time consuming. Although drawing each leave would make an amazing looking tree, I just really don't feel like doing that so I spent time finding textures that would best be suitable for drawing them. So what I ended up doing was using a sharp pencil and using it on its side. Making small scribble like movements helps to replicate thee leaves of the tree. This method eliminates a lot of time that would otherwise be spent on drawing each individual leaf. I also enjoy doing it this way because it gives the tree a bit more character.
I hope you all enjoyed this video and stay tuned next week for part 5! Thanks everyone for watching!
Music Info:
Artist; Ghost
Song: Reverie Small Theme
music can be found on cc.mixter.org

Taking advantage of having internet but still no power to bring you all an update as to how I am doing and basically what has been going on this week.
FOR MORE UPDATES:
http://www.facebook.com/tylersartshack
Alright everyone! Welcome back to my "in the dark" edition of Tyler's Art Shack haha. Still have no power after being hit by Hurricane Sandy 1 week ago. Also known as Frankenstorm or Super Storm Sandy. They always give these things nicknames haha. But still no power a week after the event and just hopeful that maybe next weekend ill be able to get it back. Things have been interesting with no power and I am just thankful to have the generator so that I can at least have the basics like heat and light haha. We can also at least run our laptops on it. And having the internet now makes that so much nicer. I can actually connect with the world to see how everyone else did during the storm.
The damage along the New Jersey Shore was pretty bad. A lot of the famous boardwalks got destroyed along with piers such as the Casino Pier and the Fun Town Pier both in Seaside Heights. Also a lot of the natural sand dunes are gone which is making any storm pretty serious because the only protection against the ocean is gone.
It is sure going to be interesting how things turn out for the Jersey coastline in the future.
What is interesting about this whole situation as well is the gas lines. Because there was no power anywhere, the only gas stations running were on generators. And they sold out so fast and the lines were miles long for them. I have never in my life had to wait over an hour to fill up a tank of gas. It is luckily getting a bit better though as power is being restored around the state.
Just really wanted to let you all know that I am doing well and wanted to give you all a quick update as to what happened. I hope that you are all doing much better than I am haha. Take care everyone!

Oil on canvas painting in a Bob Ross classic mountain style painting.
Used Grumbacher oil paints. The ones I got in the garage sale.
Took me just about an hour to paint this.
===============================================================
Follow Me!
Facebook: http://www.facebook.com/tylersartshack
Twitter: https://twitter.com/#!/TylersArtShack
Google+: https://plus.google.com/115405....344518849808905/post
===============================================================
I scored a lucky find at a garage sale and ended up getting a whole lot of Grumbacher oil paint colors for less than 20 bucks. I also picked up a whole assortment of oil paint brushes. This was one of my first attempts at a Bob Ross Style painting. I followed his classic method and style of painting and still use his techniques today.
The painting started off with a simple sky and large clouds. I used a mix of a few different shades of blue and white for the very top of the sky and lightened the color as I moved down. Clouds were then added into the scene.
After which I started to map out whwere I wanted to have the mountains placed. I decided right smack in the middle of the canvas would be a great place form them. After I got the dark background color down I used the classic roll of paint and started to map out the mountains.
After a few tries and experimenting, I got something that I liked and just left it at that. I then added in some distant grass and trees. The water is real simple. Just use the same color as the sky and brush it down. Add in a lighter color closer to the middle of the canvas. In this case I added a bit more of a green to pull the treeline reflections down into the water.
A really neat way to make nice water is to take a large brush and just dip it in some white. Then take that brush and quickly stroke it across the water to make a couple of streaks. this helps to show some movement and reflections happening in the water and adds a nice effect.
I quickly added in the foreground with some dabs of dark green for grass and pretty much called it a finished painting.
thanks for watching and I hope you enjoyed!
Song: Coloring Silence
Artist: Ryan Farish
Farish Music International (BMI)
Licensed with permission, RYTONE Entertainment
You can purchase this song from this link.
http://itunes.apple.com/us/album/let-it-rain/id360509452?i=360509579&ign-mpt=uo%3D4

This is one of my first attempts at a still life drawing. This video I originally did quite a long time ago and re uploaded it.
The actual drawing itself is 24x18 inches on bristol vellum paper. The whole drawing is done with pastels. It took me about 4 hours to completely draw the picture.
I really have never done a still life before and thought it would be a good Idea to give it a shot and see how well it would come out.
I started out by taking a small coffee table from the other room and setting that up with a small flower vase, wine bottle and some fruit. After that, I hung a green cloth behind the whole thing and draped it over the back half of the table. So, I had a whole live setup for this drawing to draw from.
I started out lightly sketching where objects would eventually appear on the page. After that, I started to go a bit bolder with the lines to finalize where everything would eventually be placed. I drew in the back drapery first and added highlights and shadows to it to show depth and to make it actually resemble cloth. After that, I erased out where all the objects would be placed so it would be easier to put more color down. The vase was hard because it was clear and I had to show the colors from the drapery reflecting through the glass. The apple and the pear were quite simple to draw in just by using a variety of colors and using them to make the apple and pear more 3D like. The wine bottle was a bit difficult. I tried my best to replicate what was on the label but it wasn't easy. The table was simple since it was mainly a single color and just colored the whole thing in.
The music is by Kevin MacLeod and the song is called Modern Jazz Samba

In this video I show you how I drew a castle in the mountains every step of the way.
Follow me!
Facebook: http://www.facebook.com/tylersartshack
Twitter: https://twitter.com/#!/TylersArtShack
Google+: https://plus.google.com/115405....344518849808905/post
Deviant Art: http://tylersartshack.deviantart.com/
This drawing starts out like I usually do. I will use a pencil that ranges from 2H to about an HB pencil. These are rather neutral pencils and are not too light or too dark. They are also easier to erase for making the general pencil lines. I used a lot of perspective to aid me into being able to create this drawing. It took me quite a while to get the sketch done because the drawing changed as it progressed. It was once just going to be a mountain, then it turned into some sort of aqueduct of sorts. but later on, I decided to just turn it into a castle.
This is why I do like drawing from imagination. Even though the drawing is not always accurate, you get to draw what you see fit and create some pretty cool images. I always found it to be a blast.
Thanks everyone for checking this video out! and I hope you all enjoyed it! Hit the like button and subscribe!
See you all later!!!
Music info:
Artist: freestylemix
song: hisboyelry-revolve
you can find this song on cc.mixter.org

Decided to take a Sunday off and go to Island Beach state park New Jersey. I took along my painting set along with the camera and had a great time.
I brought along my french easel and used a 10 by 20 inch canvas.
I always use gamblin oil paints. I have quite a large variety of colors.
For the sky colors:
Used a mixture of 80% prussan blue and 20 % titanium white for darkest blue part of the sky.
I kept adding more and more titanium white to lighten the color until I got to the horizon line.
I did the same for the sand. Starting out with about a 80% raw siena and 20% titianium white for the darker areas and mixed more and more titanium white to get the lighter shades.
The song is called Isolated and it is performed by Kevin MacLeod

Welcome back everyone to a new real time drawing tutorial series. In this series, I will take you step by step to show you how to draw a spring meadow.
Other Places to Find my Art
Website: http://www.tylersartshack.com
Facebook: http://www.facebook.com/tylersartshack
Twitter: https://twitter.com/#!/TylersArtShack
Google+: https://plus.google.com/115405....344518849808905/post
Deviant: http://tylersartshack.deviantart.com/
In this video I get back into the landscape and start to add in some of those shadows and highlights that will be showing up in and around different objects in the drawing. This is a pretty good time to get that out of the way because I am getting towards the end of the drawing process and don't want to wait too long. Also by doing this, it enables me to make some last minute decisions about the drawing if I want to add or take away different elements of the drawing.
I also start to shade in the main tree on the left side of the drawing. That is something that I have been waiting on to do and something quick to get out of the way for the next video. This will help me on my way to creating the leaves on the tree as well.
So, this video was mainly just setting up everything so that it can be finished up in the future videos. I hope you all enjoyed and thanks a lot for watching!
Music Info:
Artist; Ghost
Song: Reverie Small Theme
music can be found on cc.mixter.org

I show how to draw with using value only. Its a technique to make a drawing come alive in a step by step process.
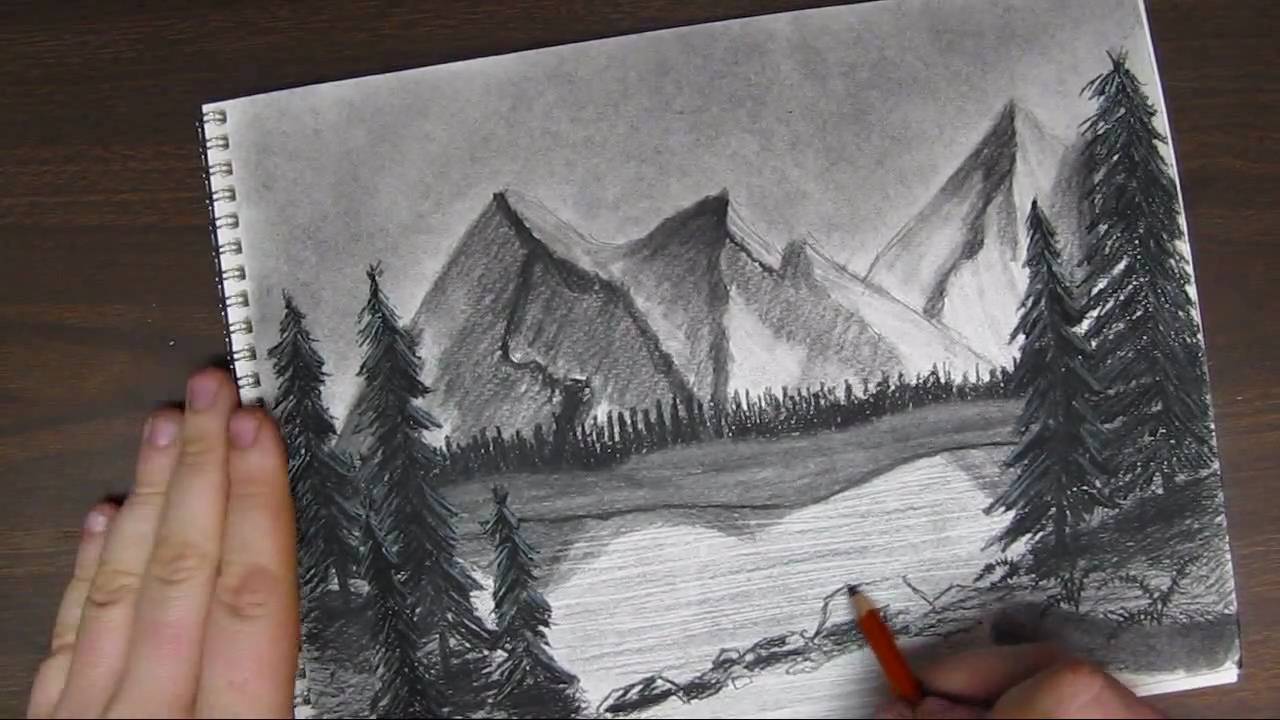
Welcome to the final part of how to draw a landscape series. In this part ill go over the rest of the trees and add some highlights and shadows into the mountains to give them a nice effect. I also go for it and add a nice waterfall at the end for a nice effect.
You can find this drawing and any other works of art for a reference to draw you very own picture.
http://digg409.deviantart.com/gallery/
GOOD LUCK!!! :)

Welcome back everyone to this weeks drawing tutorial about thumbnailing.
Other Places to Find my Art
Website: http://www.tylersartshack.com
Facebook: http://www.facebook.com/tylersartshack
Twitter: https://twitter.com/#!/TylersArtShack
Google+: https://plus.google.com/115405....344518849808905/post
Deviant: http://tylersartshack.deviantart.com/
In this video, I go over and show you different ways to go about thumb nailing your artwork so that you can work out you thoughts on a concept or idea or for future ideas.
This starts off by just having a small idea of some sort of design you wish to have in a final composition. The thumb nailing comes in handy when you need to work out certain problems or working out different angles and placement of objects. It is a very fast and efficient way to get ideas down quickly without spending a tremendous amount of time doing a large format drawing. These types of drawings are great for keeping yourself motivated and helps to bring up new ideas for future work.
I hope you all enjoy the video and thanks for watching!
Music info
Song: Coriolis Effect
Artist: MseQ
Music can be found on cc.mixter.org

Merrill Kazanjians Video on this topic: http://www.youtube.com/watch?v=aHvcc6NI8Tk&feature=g-u&context=G2e939cbFUAAAAAAACAA
Merrill's channel http://www.youtube.com/user/kazanjianm
Forum Post http://www.google.com/support/forum/p/youtube/thread?tid=28243f573c273478&hl=en&start=40
If you decide to make a vlog, post it as a video response to my video AND also do the same to Merrills original video. We need to get a large audience backing this up.
Here at youtube, there is no visual arts category. This leaves thousands of art videos with no home. They are scattered across multiple categories like howto and style, entertainment, film and animation, and education. With this massive separation in the visual artists, many of the artists dont know one another. If we can build up a gathering and get more people to help respond, we can make something happen. We need to get the art community together. Art is what adds color to the world.

Welcome back everyone to my first drawing video in 2013! This is something a bit different but something I have wanted to try for a while now. Drawing a bird sure did prove to be a challenge but I really did enjoy doing it! Thank you all for joining me on this one!
Other Places to Find my Art
Facebook: http://www.facebook.com/tylersartshack
Twitter: https://twitter.com/#!/TylersArtShack
Google+: https://plus.google.com/115405....344518849808905/post
Deviant: http://tylersartshack.deviantart.com/
This drawing mainly started out with just trying to get the overall shape for the bird correct. That took me quite a bit of time considering that I am not really used to drawing birds. I had to draw a series of lines for a rough shape and then just erased the lines that were no longer needed and was left with a pretty close representation of what the bird actually looked like.
To get myself started with the bird, I used a 2H pencil and just made a general shading all over the bird just to get the tone down. It was difficult to see how the bird was going to turn out so just getting that tone down helped.
After which, I started to work on the details of the wing. This is probably the most detailed part of the bird. I had to draw a lot of straight lines which I still can't do very well at all. So I had to break out one of my french curves to help me with the line work of this one just so that it would look better in the end.
The wing and other darker parts of thebird were mainly done with a B pencil. I didn't go to dark for these areas at all.
After the bird was finished up it just came down to drawing the tree branch. These branches I think were birch branches which are easy for me to draw because of the details that they have. They tend to have very dark nots and other such details as well as dark lines going around the branch. So using a B pencil for those details then using a 2H and 4H for the overall shading, it came out pretty well.
The snow was a challenge. I had to figure out how to make it pop without shading the tops of the snow in. I ended up using a 4H pencil to shade around the tops of the snow to make them pop more. So in the end it worked out really well.
In the end this drawing was very foreign for me to try and do but I am very happy to have tried it. It came out really well and really surprised myself. Every once in a while you get one of those and it just makes drawing really fun.
I hope you all enjoyed this one and I will see you all later!
Music Info
Song: Momentums
Artist: Chuck Berglund
Music can be found on cc.mixter.org
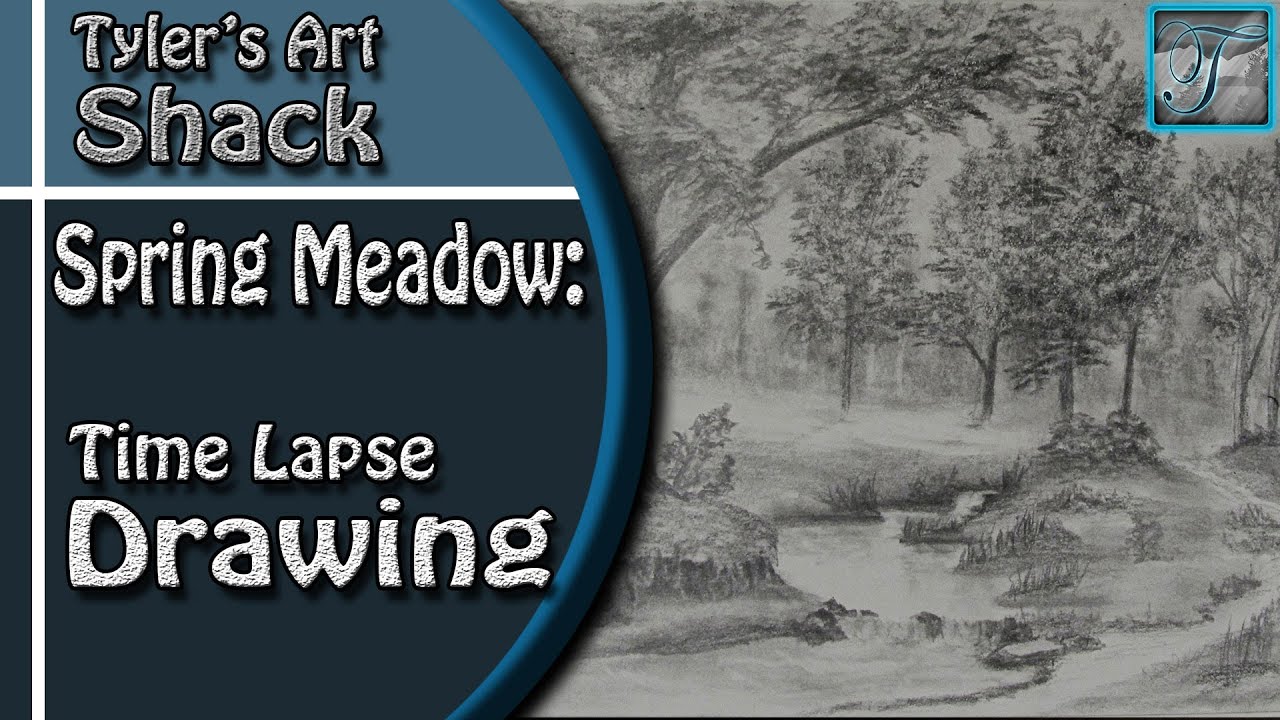
Welcome back everyone to the Art Shack, this video is going to be a time lapse video that puts parts 1-7 of my how to draw a spring meadow series all in one video to show you how everything came together in part 7 of the video series.
Be sure to check out the real time drawing series so that you can get a much better idea of how every part of this drawing was done in real time. Here is a link. http://www.youtube.com/watch?v=1pgwc5IxeE0&list=PLQ2Zh_NCUBvSMUQpSR5p42SX6m8AaOe2A&index=1
Other Places to Find my Art
Website: http://www.tylersartshack.com
Facebook: http://www.facebook.com/tylersartshack
Twitter: https://twitter.com/#!/TylersArtShack
Google+: https://plus.google.com/115405....344518849808905/post
Deviant: http://tylersartshack.deviantart.com
Music Info:
Artist: DJ Lang59
Song: Drops of H2O
Music can be found on cc.mixter.org

My e-mail to send photos... Tyler@tylersartshack.com
Did this drawing for a good friend of mine.
Drawing done with Sennelier oil pastels on 11 by 14 inch paper.
Approx drawing time was about 2 hours and 40 minutes.
Song: You May Run
Artist: Ryan Farish
Farish Music International (BMI)
Licensed with permission, RYTONE Entertainment
You can purchase this song by this link here
http://itunes.apple.com/us/album/bloom/id360509452?i=360509569&ign-mpt=uo%3D4

Did this for my art class. I drew 3 eggs in a glass bowl with a light on it.
You can view this drawing as well as all my other works of art from my deviant page. http://digg409.deviantart.com/art/Eggs-156738199
Song: Closer Away
Artist: Ryan Farish
Farish Music International (BMI)
Licensed with permission, RYTONE Entertainment
www.ryanfarish.com
You can purchase this song from itunes here
http://itunes.apple.com/us/alb....um/movement-in-light
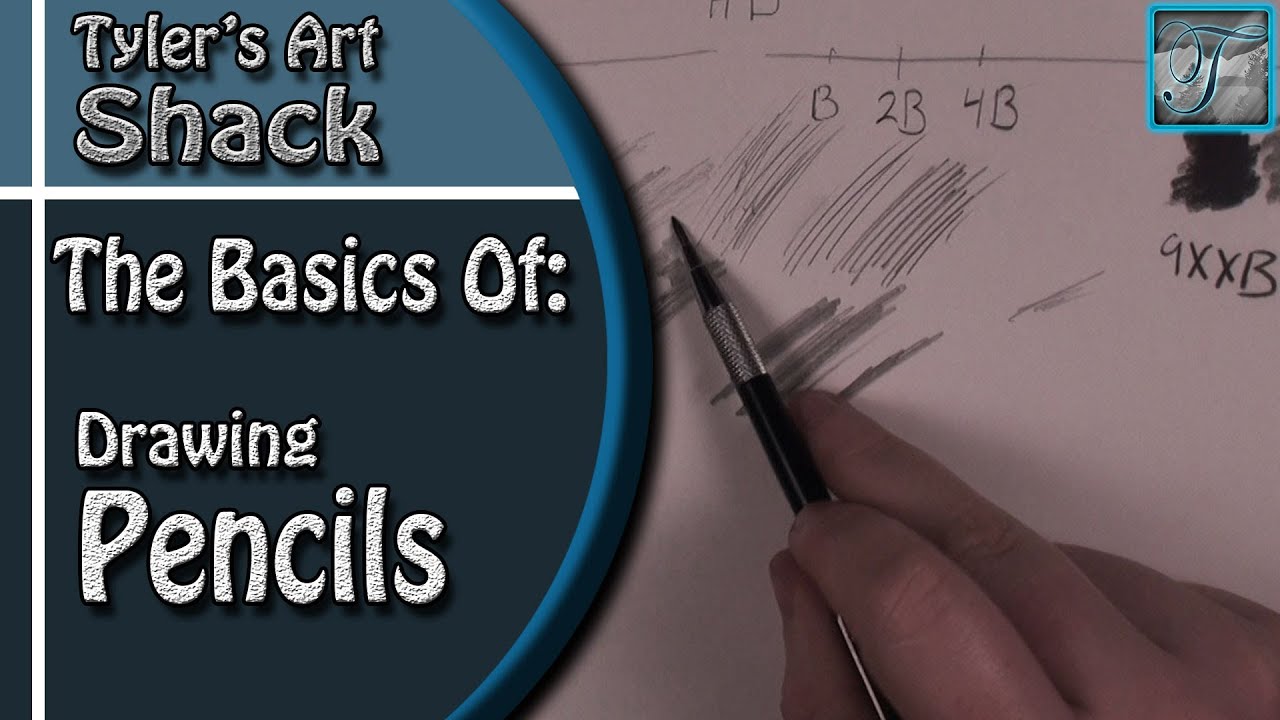
The Basics of Drawing Pencils:
Other Places to Find my Art
Website: http://www.tylersartshack.com
Facebook: http://www.facebook.com/tylersartshack
Twitter: https://twitter.com/#!/TylersArtShack
Google+: https://plus.google.com/115405....344518849808905/post
Deviant: http://tylersartshack.deviantart.com/
Welcome back everyone to a video where I talk about the basics of pencils and the pencils that I use. A lot of different pencil brands work just fine but Faber Castell is what I use. Here is a list of the Pencils that I have and Use.
6H 4H 2H HB B 2B 4B
Mechanical Pencils
2 of each: .7mm .5mm .3mm
I have 2H and B for most of them that I use.
Clutch Pencils
6H 4H 2H HB 2B 4B
Faber Castell Graphite 2mm Refills found off Ebay
Rosetta Clutch Pencils off Ebay
Going for clutch pencils or regular pencils personal preference. They are very similar but both have their advantages.
Kimberly 9XXB Drawing Pencil
This is the one I was talking about in the video that is almost black and has no shine while drawing.
I just want to let everyone know that in my experiences, any "artist drawing pencils" are pretty good. Faber Castell is just the name brand that I have gotten used to seeing and using. Also I use a range from 6H to 4B because of the camera and making sure that anything that I draw will show up on camera. Anything lighter than 6H has a hard time showing up on camera and anything higher than 4B has a lot of shine.
I hope you all enjoyed this video that gives you a little bit of information about drawing pencils and which ones that I use in drawings. Next video I will be talking about general use and textures that you can use to help in your drawings.
Thanks for watching everyone!

Facebook fan page
http://www.facebook.com/pages/....Tylers-Art-Shack/181
The best way to start any drawing no matter what it is would be to have some sort of reference image. This helps you whenever you are stuck and don't know where to go next.
I first start out with toning the sky. This process requires taking a stick of charcoal and applying to a separate sheet of paper. Then use a cloth and blend it onto the actual page where you would like the whole sky. You want to be careful of finger prints during this process. Keep blending the page out until you have a smooth transition all around the sky area.
When I make clouds, I don't draw them in. I usually erase them out. So eraser is usually made to correct mistakes. In this case it is being used to create shapes. I use a kneaded eraser for the first part because you can shape it to the shape you want and it makes it easier to use. I first start by pulling out very general shapes in the sky. There are only a few clouds in this picture so I don't have that much to do for this step. The clouds on the horizon should only be represented by simple gestures and strokes. You do not want to put too much detail for this part because you want to show the viewer that they are in the distance.
The kneaded eraser really comes in handy when you need a specific shape because it can be molded into that shape.
After you get all the general shapes with the kneaded eraser, I go back in with a mechanical eraser. This eraser is very good for putting in small details. I was able to refine all the edges when using this eraser.
At the very end you can go back in with some light pencil and add some more depth to the clouds by adding in some shadows. You can also add some charcoal to the top of the paper and blend that in to make the sky darker.
I hope this video helped everybody
Thanks for watching
drawing process took me about 20 minutes.

Welcome back everyone to How to Draw a Beach Series Part 1 - How to Start a Sketch
Other Places to Find my Art
Website: http://www.tylersartshack.com
Facebook: http://www.facebook.com/tylersartshack
Twitter: https://twitter.com/#!/TylersArtShack
Google+: https://plus.google.com/115405....344518849808905/post
Deviant: http://tylersartshack.deviantart.com
Make a Donation Via Paypal! http://tinyurl.com/o6cnnpv
I know many of you have been asking for colored tutorials and I hope that this series will be a great addition to my tutorials on the channel. This one will be about how to draw a sand dune beach scene with pastels. This first episode will mainly be about drawing in the sketch. You will primarily only need an HB or 2B pencil for the sketch and perhaps an eraser to fix any quick mistakes.
I did not use the grid method like I did for a lot of my other real time videos. The composition was simple enough to transfer over without too many issues. My other real time drawings had a lot more detail and needed more careful attention to placement. Although the composition is rather simple, there still will be a pretty good amount of detail added into the drawing.
I hope you all enjoyed the drawing and ill see you all next time for part 2 where I start to draw in the sky in pastel.
Music Info:
Intro/Outro
Song: Corporate Uplifting Rock
Artist: Plastic 3
http://tinyurl.com/nthpoga
Background
Song: The Red Chair
Artist: Brown House Media
http://tinyurl.com/koekde7

Welcome back everyone to the start of my series on how to draw the mountains in the mist!
If you need a reference photo, try this one! http://sphotos-c.ak.fbcdn.net/....hphotos-ak-snc7/4793
Other Places to Find my Art
Facebook: http://www.facebook.com/tylersartshack
Twitter: https://twitter.com/#!/TylersArtShack
Google+: https://plus.google.com/115405....344518849808905/post
Deviant: http://tylersartshack.deviantart.com/
How to Draw Mountains
The mountains start out by lightly shading in the highlight and shadow sides of the mountain. Keep the shadow side rather dark and keep the highlight side lighter. When all the mountains have some shading in them, you will be able to tell much more easily how they are going to end up looking towards the final stages. Using a combination of H pencils and B pencils. I add a lot of texture along the way to really give the mountains a lot of details. This takes time and constantly going back and forth between pencils and erasers to get the desired effect.
Remember, it just takes time and practice. But most of all, drawing takes patience.
Thanks everyone for watching!
Music Info
Artist: DJ Rkod
Song: Faster Than the Eye Can Persieve
Music can be found on cc.mixter.org

Welcome back everyone to a new drawing video. This time I draw a Hawaiian sunset in colored pastels.
Follow me!
Facebook: http://www.facebook.com/tylersartshack
Twitter: https://twitter.com/#!/TylersArtShack
Google+: https://plus.google.com/115405....344518849808905/post
Deviant Art: http://tylersartshack.deviantart.com/
This drawing started off with a fairly simple outlining sketch of the background mountains and some of the foreground details such as the wave and the rocks on the left side of the page. I did not want to define too many things at first. I wanted to leave most of it up for interpretation for when I actually got to drawing it. Some areas of the drawing I had an original intent on how I wanted it to look but when it came time for drawing it, I decided to do slight changes here and there. So keeping a light sketch helps this process.
Once the sketch is done the sky is almost always the next step since it is the furthest thing in the background and everything else gets drawn on top of it. Even though this was more of a sunset type scene, I still wanted to keep the sky light in color. I used a lot of washed out yellows and a few oranges to get a nice calm tone going. The tone gets lighter and lighter as it hits the horizon. I also made the sky more blue towards the top of the page. I made the dividing area between these 2 colors clouds. Just to help separate them. Using the white pastel sometimes does not always do its job with sitting on top of all the other colors so using white charcoal can help that process a lot. The white charcoal can really show up much better and helps with drawing in the clouds with the strong whites.
Next area I drew in was the mountains. I had a difficult time getting the right shades in and took some practice to figure out how to do it the way I wanted it to look. The distant mountains I added a lot of blues and purples into to help push it into the distance. I also used some yellows and greens to add just a hint of highlights to them.
The closer set of mountains I used a lot of black to really silhouette them out. But for the areas where I did highlight them, I used more of an olive green instead of an emerald green just to fit the sunset tone that the image had. Colors are going to be much warmer for the highlights because of the sunset.
The closer hills I filled in with vegetation. Used several varying shades and colors of green to create the vegetation. I also used a lot of black to create some of the rocks that make their way down to the beach. And shades of brown for where the water meets the dirt and rocks.
Adding in the water I used shades of dark blue with some purple and dark green. And used black to darken the whole thing down and then blended horizontally to create the water. I added in highlights by where the sun was setting.
The large wave I used several shades of dark blue and a lot of the white charcoal again to really punch those highlights. I did the same for the foam on the beach. For the sand I used quite a few shades of tan and brown for where the foam meets the sand.
I added in a few rocks on the beach to add in a nice touch. The left side of the page was filled in with mostly rocks and a few bushes. I finished up the image with some palm trees mostly silhouetted out. Added in just a hint of color
I hope you all enjoyed this one and stay tuned for next weeks video!
Music Info:
song by Alex Beroza
Song: Improvisation on Friday
Music can be found on cc.mixter.org
