Лучшие
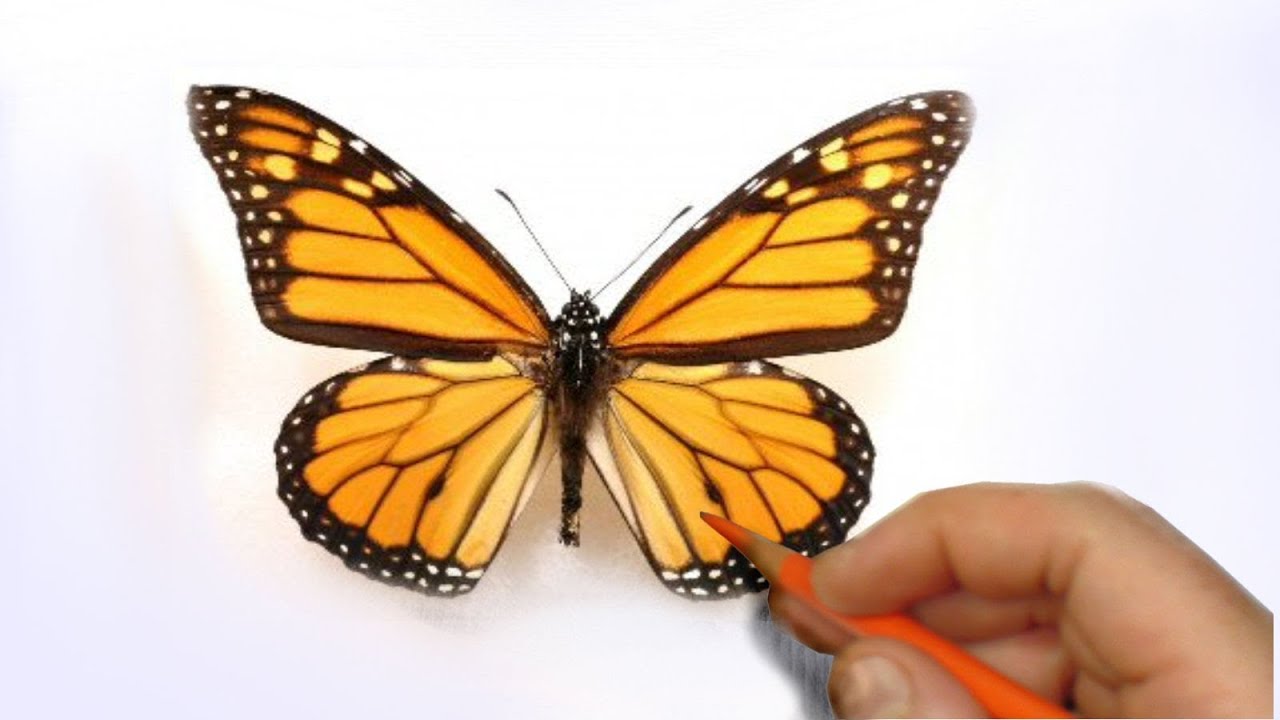
Learn a really cool illustration technique to achieve a realistic likeness! I mixed pencil, illustration marker, colored pencil and oil paint to illustrate a butterfly.
Subscribe to kazanjianm (Don't miss any new videos that I make)- http://www.youtube.com/subscri....ption_center?add_use
Facebook: Like me on Facebook to find out about live hangouts or to post your work!- http://facebook.com/kazanjianm
Twitter: I tweet! Do you? http://twitter.com/kazanjianm
My Website: http://merrillk.com
Art Supplies I Use in my Art Work- http://merrillk.com/?sid=135&idpage=supplies_i_use
YouTube Visual Arts Category Petition: http://www.change.org/petition....s/create-a-visual-ar
Step by Step Drawing Playlist: http://www.youtube.com/playlis....t?list=PLD6E34C7CD58

You requested it and I listened. This video will teach you how to draw Drake. What's that you say, you failed art class? You have a low frustration tolerance and you have a fear of pencils. No problem! Check out the gallery on my website or my facebook like page and you'll see that thousands of people successfully completed my tutorials. And many had no previous art training. So even if you've had all of your fingers amputated and a nervous twitch, I got you covered. If you can draw shapes, you can successfully draw Drake. So hit the subscribe button, grab your pencil and paper and lets begin.
WE NEED A VISUAL ARTS CATEGORY ON YOUTUBE THREAD-http://www.google.com/support/forum/p/youtube/thread?tid=2a9806f929074cbd&hl=en&fid=2a9806f929074cbd0004b630ad37cc3e
Facebook- http://facebook.com/kazanjianm
Twitter- http://twitter.com/kazanjianm
Website- http://merrillk.com
(Merrill) Supplies I Use- http://www.jdoqocy.com/click-4....247664-805536?url=ht
Step 1: Make the shape that you see.
Step 2: Make the second shape, notice that it is about the same height as the first shape.
Step 3:Round out the shape for Drake's hair. Notice that it is slightly wider on your right side.
Step 4: Make the two egg shapes.
Step 5: Make the shape that you see, notice that it is the same height as the forehead shape and the hair shape.
Step 6: Make the lines for the nose. Notice the placement of these lines, compared to the egg shapes for the eyes.
Step 7: Drake needs ears. Dont stress out about the minor details. Notice that these shapes line up with the nose shape.
Step 8: Make the bowl shape for the chin. Notice that it is slightly taller than the main shapes above it.
Step 9: Make the neck and the body. Do it fast and save all of your concentration for the proper placement of the face shapes.
Step 10: Add the two shapes for Drake's lips.
Step 11: Add Drakes super thick eyebrows to the tops of the egg shapes from step four.
Step 12: Add the upper eye lines. Notice the shapes that are created in between the eyebrow shapes and the upper eyes. This will help you get the placement correct. Also, as a general rule, there is one eye length in between each eye. This is not the case for Drake. There is slightly more space between the eyes.
Step 13: Make the U shapes for the pupil and iris and close the eye shapes.

Even if you are new to art, YOU will be able to draw Wiz Khalifa with a pencil. I break the drawing process down in to simple steps that anybody can understand. This video is also translated in to 15 different languages.
Subscribe to kazanjianm (Don't miss any new videos that I make)- http://www.youtube.com/subscri....ption_center?add_use
Facebook: Like me on Facebook to find out about live hangouts or to post your work!- http://facebook.com/kazanjianm
Twitter: I tweet! Do you? http://twitter.com/kazanjianm
My Website: http://merrillk.com
Art Supplies I Use in my Art Work- http://merrillk.com/?sid=135&idpage=supplies_i_use
YouTube Visual Arts Category Petition: http://www.change.org/petition....s/create-a-visual-ar
Step by Step Drawing Playlist: http://www.youtube.com/playlis....t?list=PLD6E34C7CD58
As we go through the steps, I will teach you how to shade your drawing to make yours look like a realistic portrait of Wiz Khalifa.
Learn to draw Rihanna step by step (easy). Instruction by Merrill Kazanjian (kazanjianm).
Supplies I Use- http://www.jdoqocy.com/click-4....247664-805536?url=ht
You found art. But you are not in a hopeless place ........I heard your "S.O.S" through a lot of requests and today, I am going to be your artistic "Umbrella"........I am going to give you simple, easy to follow Step by Step instructions on how to draw Rihanna. My steps will be so descriptive, someone with limited artistic experience can create a successful drawing. In other words, its not going to be "Hard".
You will also learn about S&M in this video. S stands for SHADING and M stands for MODELING and the proper use of both will allow you to create areas of light and shade, and achieve a likeness of Rihanna.
All you have to do is grab a pencil, some paper.....and ....."Watch n Learn". We are not going to let this "Good Girl go Bad", your drawing is going to be "the hotness". What's that Rude boy? You "love the way I lie"? HUH!.... If you need proof, hit the button that says playlist to look at some amazing video responses from my viewers. But I promise that I don't just "talk that talk" I walk that walk! So don't play Russian Roulette with hit or miss drawing instruction on YouTube, subscribe to kazanjianm for quality art instruction.......And silly introductions like this one.
WE NEED A VISUAL ARTS CATEGORY ON YOUTUBE THREAD-http://www.google.com/support/forum/p/youtube/thread?tid=2a9806f929074cbd&hl=en&fid=2a9806f929074cbd0004b630ad37cc3e
Facebook- http://facebook.com/kazanjianm
Twitter- http://twitter.com/kazanjianm
Website- http://merrillk.com
Step 1: Notice the perfect square that is formed between the center points of Rihanna's eyes and the two corners of her mouth. Start your drawing by making four dots on your paper that form a perfect square.
Step 2: Make the circles exactly as you see them. No, Rihanna doesn't have a floating eye, just trust me.
Step 3: Put in the shapes for Rihanna's eyes. Notice how the new shapes overlap the circle shapes from step 2.
Step 4: Add the eyelids.
Step 5: Rihanna has a contract with Cover Girl so add a lot of mascara to the eyelashes.
Step 6: You need to do two simple things for step six. Center the pupil for the eye on the left and connect the two lines for the mouth.
Step 7: Add the M shape for the upper lip. Notice that it's height is similar to the height of the white part of the eye.
Step 8: Add the banana shape for the bottom lip. Notice that it is about twice the thickness of the upper lip. Also, be sure to notice the shape in between the two lips.
Step 9: Now add Rihanna's nose. Oh relax, this is the hardest thing that I am going to ask you to do. Notice how the septum fits perfectly in to the indentation at the top of the upper lip Also notice that the nostril line is about two thirds down the square shape that we began with.
Step 10: Add the eyebrows.
Step 11: Now its time to add the chin. Here is a tip to make it easy. Measure the distance from the eyebrows to the bottom of the nose. It will be the same distance from the bottom of the nose to the chin and from the hairline to the eyebrows.
Step 12: Give Rihanna her Marge Simpson hair. Hair moves all the time. Do not feel the pressure to copy the hair in my drawing perfectly.
Step 13: Rihanna has an album called "Loud" so I guess that we should give her ears. Notice that the ears line up between the eyebrows and the bottom of the nose.
Step 14: I promised you S&M so now its time to shade and model. Lightly put in these shadow lines around the eyes and the nose.
Facebook: http://facebook.com/kazanjianm
Twitter: http://twitter.com/kazanjianm
I used this image - http://www.flickr.com/photos/5....1051231@N06/47365468 It has a creative commons license

"Come as You Are", but bring a pencil......because you are going to learn how to draw Kurt Cobain step by step, "On a Plain" piece of paper. "All Apologies" if this intro gives you an "Aneurysm", I just want to state that if you think that your drawing skills have "Plateaued" you should try my step by step videos to get them "In Bloom". My videos wont "Drain you" and you wont think they're "Dumb"....unless if you're a "Negative Creep"......and I have over 100 on my channel so be sure to "milk it"........... So, unless if you have "Something in the Way", please commit a "Sliver" of time to learning how to draw Kurt Cobain. Please don't forget to Subscribe. Just click on my "Scentless Apprentice" who "Smells Like Teen Spirit"..................SUBSCRIBE........................Sorry, I have "Tourettes".........Err "Nevermind.
Step 1: Draw the arch and the two shapes. Notice that the shape on the left is egg shaped and the shape on the right is shaped like home plate in the game of baseball.
Step 2: Add the hair shape on the left side of the page. Dont stress, this shape doesnt have to be perfect but it should be proportionately larger than the shape from step one.
Step 3: Add the hair shape on the right side. Dont stress out on the hair shape, but take extra time on the shape of the face.
Step 4: Add the nose shape. Draw what you see rather than what you know. The nose looks like this because of a strong shadow shape. Just trust me and draw it.
Step 5: Add the mouth shape. The top lip is like a flattened M and the bottom lip is like a cereal bowl. Be sure to notice its placement compared to the other features of the face.
Step 6: Fill in the eye shapes. Take extra time on this step. The eyes are the key to the likeness.
Step 7: Add the shapes to the hair. These do not have to be placed perfectly since hair is a "Radio Friendly Unit Shifter".
Step 8: Add the shapes for the facial hair.
I am combining two methods called 1.) cross hatching and 2.) smudging.....right now. Pause the video at different points and use the image on the screen as your reference image. It doesnt get very dark under the eyes.......however, above the eyes (between the eye and the eyebrow) it gets very dark. Kurt has dark and full eyebrows. Use a #2 (HB) pencil to start. Dont be scared to press hard in the eye region. The nose is tricky. The darkest part is the nostril (not part of the step by step video). But the entire shape of the bottom of the nose gets pretty dark. After, I fill it in, observe it, then draw it. I am using a #7 Bristle Flat brush for the shading. The top lip is dark and solid in shape. The LEFT side of his face (the side on YOUR right) is lighter in tone than the right side. The bottom left corner of the page will get very dark. I "went right in" with a 6B pencil. REMEMBER, shading is all about RELATIVITY, so compare the tones of the different areas of the image, The shape at the bottom of the face will eventually be blended in with other dark tones. In order to make the hair "pop out" you need to darken the background. (Its all about relativity!!!) The hair is a LOT of Adding....then erasing.....adding...then erasing ....Be sure to make your strokes in the same direction at the hair in this reference image.....Notice that I am using the eraser to "draw". Now the "PORTRAIT" begins....Now it looks like a human being......but I have to "wrestle" with it to make it look like Kurt Cobain. Use a slip sheet (look under my hand) when you get this far. The darkest areas have several layers of hatching. (8B pencil).

http://merrillk.com/?part=fineart&articles_id=8053&act=artist1&artist=69&collection=114- Today, I am going to give you step by step instruction in order to help you draw a hand holding a pencil. What? Worried that you cant draw? Check the comments posted on my previous videos. Many people who have never drawn before have successfully completed other challenging drawings with the help of my step by step videos and you will have the same success if you follow the steps in this video. I recommend that you download the free PDF print resource by hitting the link in the video description. This resource will give you 12 steps with pictures to help you follow along as I narrate. Be sure to pause the video and observe the reference image at the end of each step. Good Luck.
Step 1: Draw the three shapes that you see. The one on the left will be the tip of
the pencil and the two on the right will be fingertips.
Step 2: Observe, then draw the thumb shape. Notice that it seems slightly thinner at
the fingertip.
Step 3: Draw the K shape above the thumb
Step 4: Use a ruler to draw the top of the pencil. It should measure just less that three thumb
lengths.
Step 5: Observe and draw the line to complete the finger over the K shape
Step 6: Finish the hand shape by drawing in the heel of the palm and the wrist.

LINK- http://merrillk.com/?part=fineart&articles_id=12100&act=artist1&artist=69&collection=461
WE NEED A VISUAL ARTS CATEGORY ON YOUTUBE THREAD-http://www.google.com/support/forum/p/youtube/thread?tid=2a9806f929074cbd&hl=en&fid=2a9806f929074cbd0004b630ad37cc3e
Facebook- http://facebook.com/kazanjianm
Twitter- http://twitter.com/kazanjianm
Website- http://merrillk.com
(Merrill) Supplies I Use- http://www.jdoqocy.com/click-4....247664-805536?url=ht
How to draw sketch Carmelo Anthony Step by Step. I recommend that you hit the link in the video description and watch this video with the photo and text resource that I made for you. It will make the difficult task of drawing a NBA superstar a lot easier.
This video will give you step by step instruction on how to draw Carmelo Anthony of the New York Knicks. Pause the video at the end of each step, listen to the narration and watch the shading tutorial at the end and ill bet that you will make a quality drawing.
Step 1: Draw the three shapes that you see and notice their relationship with one another. The headband shape is about 1 and 1/2 times the height of the top of the head and Melo's hairline forms another shape between the headband and the top of the head. Notice that the hairline shape starts at the mid way point of the head.
Step 2: Observe, then draw in the ear and the two eye shapes. Notice that the ear fits perfectly in to the indentation of the headband. Notice that Melo's right eye shape starts at the same point as the hairline shape above it. His left eye shape is heart shaped because of the angle of his head. Finally, notice the triangular shape in between the two eye shapes and the downward angle that the eyebrows point.
Step 3: Add the nose shape and the shape for the cheek.
Step 4: Add the smile line. the moustache and the upper lip. Notice that the smile line goes slightly past the edge of the eye shape from step 2. The moustache and the lip are about the same width.
Step 5: Here is the trickiest step. I added 5 rows of shapes in this step. The top row is the gum line. Notice that there are seven points to the gum line. The next row is the teeth. There are eight teeth visible and due to the turn of his head, each tooth gets bigger from left to right until we reach the last tooth. The next row is a narrow dark space under the teeth. The row below the dark space is slightly thicker than the previous row, but not as dark. Leave the bottom row unshaded for now.
Step 6: Add Melos chin line and neck line.
Step 7: Add the shapes for his body.
Step 8: Add the details to Melo's eyes.
Carmelo makes huis debut with the Knicks against the Bucks at Madison Square Garden on the same day that I uploaded this video

WE NEED A VISUAL ARTS CATEGORY ON YOUTUBE THREAD-http://www.google.com/support/forum/p/youtube/thread?tid=2a9806f929074cbd&hl=en&fid=2a9806f929074cbd0004b630ad37cc3e
Facebook- http://facebook.com/kazanjianm
Twitter- http://twitter.com/kazanjianm
Website- http://merrillk.com
(Merrill) Supplies I Use- http://www.jdoqocy.com/click-4....247664-805536?url=ht
How to draw the WTF expression step by step. How to draw a shocked face. how to draw a surprised person. How to draw a surprised man. How to draw somebody shocked. How to draw a person with gaping mouth. Draw a surprised expression. Pencil Drawing tutorial. Shading with drawing pencils. How to shade with pencil. How to draw a face. How to draw step by step. How to draw huh wtf. Misery. Pencil drawing tips. How to use a Tortillion. How to use a blending stump. How to shade with a paint brush. How to cross hatch. How to smudge. How to build tones in a drawing. How to draw a mourning person. How to draw a person in rapture. Click on any of the pictures to go to my other facial expression videos, or hit the subscribe button. There will be lots more coming soon.
This video will give you step by step instruction on how to draw the huh facial expression........Just pause the video at the end of each step and follow the instruction and you will master the huh facial expression. Lets begin.
Step 1: Draw the two circular shapes and the rainbow shape for the forehead. Be sure to notice the size of the rainbow shape compared to the circular shapes.
Step 2: Draw in the nose shape. Notice that it is perfectly symmetrical. Also notice that it resembles a long winged bird in flight.
Step 3: Draw in the mouth. Notice that it is comprised of four distinct shapes- the upper lip, the upper teeth, the inner mouth and the bottom lip. Notice that the bottom teeth are not shown.
Step 4: Complete the outline of the face. Be sure to add the double chin.
Step 5: Add the eyebrows and the ears. Be sure to notice that the eyebrow shapes are at the top of the circle shapes from step one. If you need more help with the ears, check out this ear tutorial.
Step 6: Add the eyes. Notice that the eyes are almond shaped. For this facial expression, notice that the pupil and iris is separated from the eyelids. If you need more help with the eye, check out this eye tutorial.
Step 7: Draw in the hair. You are probably saying WTF. Just trust me and draw what you see.

Music has a special relationship with each person's memory. It ages with us. The music that we listen to as our lives elapse, stays with us and leaves an imprint that is unique for each person. Listening to an old song is quite possibly the most powerful way to recall the past. The death of Whitney Houston rocked my generation this week. She contributed to the soundtrack to many of our lives. In this video, I am going to do what I do best. I am going to give you a step by step formula so that you can draw Whitney Houston. While this might sound challenging, I want to reiterate that this is what I do best. So grab a pencil and paper and get ready to surprise yourself. Thousands of people have successfully completed my drawing tutorials and you are the next person to do so.
Step 1: Make the five dots that you see. While this step appears to be easy, the relationship between the dots is crucial so pause the video and take your time. Notice that if you connect the dots, we will have two triangles. Notice that the top triangle is larger than the bottom one.
Step 2: Add the nostrils and the line that connects them.
Step 3: Add circles around the top row of dots. This will eventually be the irises of each eye.
Step 4: Complete the eye shapes.
Step 5: Add the rainbow shapes for the eyelids.
Step 6: Add eyebrows
Step 7: Add the very soft line on your left and the backwards C shape on your right.
Step 8: Add the flattened M shape for the upper lip.
Step 9: Add teeth.
Step 10: Add the bottom lip.
Step 11: Add the oval shape for the face
Step 12: Add the shapes for the neck.
Step 13: Add the lines for the blouse.
Step 14: Add the shape for the hair. Just generalize it. It doesnt have to be perfect.
Step 15: Add the stray ends to the hair and the bangs. It was the 80's.
Step 16: Now its time to shade. If you feel that you made an unfixable mistake after you start shading, hit the first link in the upper right corner. This will give you an easy way to start over from this point rather than from the beginning. The method of shading that I am using is called cross hatching. To see my tutorial on cross hatching hit the second link in the upper right corner.
Start off by darkening the eye area. Whitney is wearing mascara in this picture so you can darken the lashes above and below the eye. The upper set of lashes will be thicker than the bottom set. The area between the eyebrows and the upper eyelid will be hatched to a tone that is almost as dark as the eyebrows. Notice that there are highlight areas though. Do not make a solid line for the bridge of the nose. That will remain as a smudge. You can use a paintbrush, a blending stump or a q-tip to soften it. Notice the difference in tone between the left side and the right. The white stick that you see me using is called a tortillion or a blending stump. Do some light hatching over the cheeks and the nose and some extra hatching to round the face by where the hair is on each side of the face.
Step 17: Its time to shade the forehead. be sure to continue the tones that exist from the previous step. The center of the forehead will be in highlight and the hair will be darkened relatively dark. Make the temple area almost as dark as the hair. Use a paintbrush, blending stump or Q-Tip if you wish to smooth the transition from dark to light.
Step 18: The top lip will be darker than the bottom lip and the top lip will be at its darkest point as it moves towards the opening for the mouth. Shade around the bright highlight on the bottom lip. It should be similar in tone to the teeth. The tones on the bottom of the face are tricky. You will have to round the face at the jaw line without making her look like she has a beard. There is a solid line at the jaw line and the area below the chin will be in heavy shadow, as you will see in our next step.

WE NEED A VISUAL ARTS CATEGORY ON YOUTUBE THREAD-http://www.google.com/support/forum/p/youtube/thread?tid=2a9806f929074cbd&hl=en&fid=2a9806f929074cbd0004b630ad37cc3e
Facebook- http://facebook.com/kazanjianm
Twitter- http://twitter.com/kazanjianm
Website- http://merrillk.com
(Merrill) Supplies I Use- http://www.jdoqocy.com/click-4....247664-805536?url=ht
Hey Hey..... Wanna see a really annoying tutorial? Hey ....Yeah me too.....This video is going to give you step by step instruction on how to draw The Annoying Orange. As soon as the helium wears off, lets begin.
Ah much better.... Step 1: Make a circular shape because oranges are circular.....even annoying ones.
Step 2: When you make the eyes, remember that there is one eye length between each eye. The top of the eye shape is rainbow like. The bottom of the eye shape is almost flat, and slightly curves up at each end. Notice that the top of the pupil and iris is hidden behind the upper lid. Unlike human proportions, oranges eyes are closer to the top of his head....I mean .......skin.....ahh whatever.
Step 3: Add the mouth. This is the toughest step but it will be easier if you put it in as a big half circle, then break it up in to six smaller shapes. Here are the smaller shapes from top to bottom- the upper lip, the upper teeth, the mouth, the tongue, the lower teeth and the bottom lip. Pause the video at the end of this step and observe before you go on to the coloring part.

Step by Step drawing instruction. Learn how to draw a hand holding a sword.

LINK- http://merrillk.com/?part=fineart&articles_id=8462&act=artist1&artist=69&collection=114
Facebook- http://facebook.com/kazanjianm
So. you wish to draw Bruce Lee do you?
Hahahahahaha
Oh you are serious?
Well then?
You must Enter the Dragon with me
I will train you to be deadly with a pencil. This video will teach you how to draw Bruce Lee's Head. Video two will teach you how to draw Bruce Lee's body.
Simply follow my step by step instructions and eat fish heads twice per day and you will have no problems with your drawing.
If you do not like fish heads, I recommend that you hit the link in the video description. You will be taken to a resource with words and pictures. Simply download and print and you will not need the protein content of the fish heads.
One more thing before your training begins. It would be prudent for you to click on Little Old Pai Mei and his Pikachu friend so that you can subscribe to this channel. Because, you will never be able to spell it again!
I will act normal again in three seconds.......
Step 1: Observe then draw the shape that you see. The bottom is a semi circle
and the top is trapezoidal.
Step 2.) Add the two shapes that you see. They will be the area around Bruce
Lee's eyes.
Step 3: Add the shapes which will make up Bruce Lee's nose. Be sure to notice that
the size of these shapes when together is slightly smaller than the eye shapes
from the previous step.
Step 4: Step four is the most complicated step. Be sure to observe it for a few
seconds before you draw it. Notice that the trapezoidal mouth shape is as wide as
the nose shape above. The shadow shape encircles the mouth and then forms a
shape that slightly resembles the State of California to the right of the mouth.
Step 5: Put in the lines which will separate the eyebrows and the area above Bruce
Lee's eyes.
Step 6: Is tricky. Be sure to give it extra time. Add the eyes and be sure to notice
that they lie directly in the middle of the shapes added in step two. Bruce will have
an angry expression in this picture so his eyes will be wide open and his eyebrows
will be pushing downwards.
Step 7: Add Bruce Lee's vintage 70's Emo haircut.
Step 8: Add the two shapes for his neck.
"how to draw famous people step by step"

This is an oil paint portrait that I made for a friend. I haven't made one (a pure oil painting) in years. I am now a mixed media artist but it feels good to try this again. I used Old Holland, Vasari, Bloxx and Gamblin Oil paint on paper. It has some details added with color pencil and paint marker. The medium that I used was Liquin.
oil paints, oil painting, oil paint, oil paintings, artist oil paint, oil paint color, oil paint sets, how to oil paint, oils paint, oil painting supplies, oil paint water, oil paint brushes, oil paint set, oil paint brush, acrylic oil paint, oil paint techniques, oil paint art, oil paint canvas, oil paint varnish, oil paint palette, oil paint technique, oil paint medium, mixing oil paint, oil paint colors, oil paint artists, oil paint supplies, oil painting techniques, clean oil paint, cleaning oil pain, oil paint stain, oil paint dry, oil based paint, oil paint materials, oil paint flowers, oil paint wash, oil paint portrait, oil paint mediums, oil paint lessons, oil paint landscape, airbrush oil paint, gesso oil paint, learn to oil paint, artist oil paints, oil paint colours, oil paint glass, learn oil painting, oil painting lessons, oil painting technique, how to paint with oils, oil painting tips, oil paint pigments, oil paint tips, oil paint wood, spray oil paint, oil paint primer, oil paint finish, exterior oil paint,
removing oil paint, oil paint pigment, oil vs latex paint, oils paints, make oil paint, oil paint history, oil paint pictures, oil paint sale, oil paint use, old oil paint, oil paint reviews,
oil paint brand, gold oil paint, oil paint instructions, making oil paint, thick oil paint, oil paint products, best oil paint, oil paint brands, oil paint review, how oil paint, oil paint tube, oils painting, oil paint container, oil paint tubes, buy oil paint, using oil paint, thin oil paint, oil paint effect, graham oil paint, charvin oil paint, old holland oil paint, learning to oil paint,

My Alternative to oil painting by Merrill Kazanjian- Recently, I have made a lot of videos teaching about the techniques that I use to make art. But, for once, I want to talk to you about choices that I made with my own art. The first medium that I was proficient in was oil painting. But after college ended, I was too drained to paint after I got home from a day of work. The setup and clean up of paints took as long as the process of painting and the drying time was way too slow for my needs. I estimate that I painted only once or twice per week for about three hours per day and I only produced about two finished paintings per year. I did this for six years.
I slowly started dabbling with mixed media art. What you are seeing now is a process that I have worked out over the past 2 years for the past two years. This process allows me to have results similar to oil paintings, done in one day rather than six months. I even incorporate oil paint in to one of the steps.
Here it is:
1.) Pencil Drawing
2.) Illustration Markers (prismacolor, Ad, Decocolor)
3.) Color Pencil
4.) Thin Layer of Oil Paint
5.) Digital Additions (Photoshop, Paint Shop Pro)
I use this process to make my characters. Over the last 2 years I have made over 1500 characters. I scan them and save them as PNG files and I use them over and over in my artwork. PNG files stand for Portable Network Graphic and they are basically a filetype that works like a sticker. Stay tuned until the end of the video and I will show you what I mean. Contact me through my website merrillk.com or leave me a youtube comment and I will be sure to get back to you.

Love him or hate him, Allen Iverson plays the game of basketball with a lot of heart. I remember him when he first came in to the NBA from Georgetown University and I followed his career through Philadelphia (76ers), Denver (Nuggets) and now the Detroit Pistons. Hes known for his killer cross over dribble and his tenacious drives to the basket, despite his small frame. He has not won a championship as of yet but reached the finals when he was with the Sixers- Practically carrying that team on his back. There are plenty of highlight / mix tapes out there so my tribute comes in the form of a drawing. I documented the different steps that I took: 1.) Pencil Drawing 2.) Markers 3.) Color Pencils and you can download a print version that shows you step by step how to draw AI at my website merrillk.com. The first part is stop motion with a scanner and the second part is a time lapse. Hopefully its a slam dunk. Please rate and comment! Merrill Kazanjian
WE NEED A VISUAL ARTS CATEGORY ON YOUTUBE THREAD-http://www.google.com/support/forum/p/youtube/thread?tid=2a9806f929074cbd&hl=en&fid=2a9806f929074cbd0004b630ad37cc3e
Dear Youtube
We need a visual ar

Link- http://merrillk.com/index.php?part=fineart&articles_id=5850&collection=114
Thank you for picking my nose video....UMMM....Yeah lets start over....Today I am going to teach you how to draw the male nose. Drawing is much easier when we break things down in to shapes. So lets do that with the nose. Notice that there are two trapezoids and an oval. These are our primary shapes with the nose. So grab a piece of paper and draw them now. Don't forget to put in the nostrils.
Now, I will show you how to shade the nose. Don't worry, its going to be easy this time! You have two options to learn shading. Option one- click the link in the video description to go to a webpage that I made for this video..... this page has eight super easy steps and still images from this video. Option two is to keep watching this video. I think that you should do both!
STEP 1- In step one of drawing the male nose, focus your attention on the shapes. There are three main shapes. 1.) An oval at the bottom, 2.) A tall trapezoid for the bridge of the nose. 3.) An upside down trapezoid at the top of the nose. 4.) Don't forget to add the shapes for the nostrils.
STEP 2- For step two, simply erase the lines on the inside of the nose. It doesn't look good yet......So let's do a "nose job" with the shading, to make it look more realistic!
STEP 3- For this step, darken the nostrils. Te nostrils will be the darkest tone on any persons nose.
STEP 4- *****Notice that I ERASED the lines on the sides of the bridge of the nose!******* This is where most people go wrong in drawing the nose! The only part of the nose that can be expressed as a line is the bottom (Below and to the sides of the nostrils...especially the sides).
STEP 5- While I am not drawing eyes for this part, at the top of the bridge of the nose is the inner part of the orbit (of the eye). The orbits are also known as the eye sockets. They are the indentations where each eye sits. There is an orbit on either side of the nose. The tool that I am using in this picture is called a tortillion (also known as a blending stump or stub). It is condensed paper, shaped to the form of a pencil. It is used for blending. It is better to smudge or blend with this, rather than your hand, because your hand has oil that will be absorbed by the paper. Once the oil is absorbed in to the paper, the blending will be uneven, and over time, the paper will decay.
STEP 6- Notice the long trapezoid that I shaded in the middle of the nose. It is shaded very lightly. I put it is to differentiate the drawing from the white background. Please note that this will NOT always appear. All shadows are DIRECTLY RELATED to lighting. For this drawing, I assumed that the light was bright and directly above the nose.
STEP 7- I am putting on the finishing touches. I used my eraser to make two light highlights on the sides of each nostril. Often light bounces off surfaces and causes a "glare" effect rather than a "spotlight" effect. I also darkened the shadow below the nose.
STEP 8- In the final step I darkened the nostrils.

Subscribe to kazanjianm (Don't miss any new videos that I make)- http://www.youtube.com/subscri....ption_center?add_use
Facebook: Like me on Facebook to find out about live hangouts or to post your work!- http://facebook.com/kazanjianm
What i've been up to- https://sites.google.com/a/bro....nxlighthouse.org/blc
Twitter: I tweet! Do you? http://twitter.com/kazanjianm
My Website: http://merrillk.com
Art Supplies I Use in my Art Work- http://merrillk.com/?sid=135&idpage=supplies_i_use
YouTube Visual Arts Category Petition: http://www.change.org/petition....s/create-a-visual-ar
Step by Step Drawing Playlist: http://www.youtube.com/playlis....t?list=PLD6E34C7CD58

Learn how to draw the emotion of anger in a portrait.
Facebook- http://facebook.com/kazanjianm
Petition- We need a visual arts category on YouTube- http://www.change.org/petition....s/create-a-visual-ar
Twitter- http://twitter.com/kazanjianm
Rant 1- http://www.youtube.com/watch?v=hkyS83A9cQk (creative commons)
Rant 2- http://www.youtube.com/watch?v=Qxj32QefYAE (creative commons)

What do you get if you merge the likenesses of six hockey players? (Wayne Gretzky, Sidney Crosby, Alex Ovechkin, Teemu Sellane, Henrik Zetterberg) Click to find out!I used Photoshop CS3 and Paint Shop Pro 9 to merge the faces of these movie superheroes. I depended heavily on the digital scissor/ quick selection and magic wand tools as well as the smudge brush and the lighten and darken tool. Qu'est-ce que vous obtenez si vous fusionnez les portraits des six joueurs de hockey? (Wayne Gretzky, Sidney Crosby, Alex Ovechkin, Teemu Sellane, Henrik Zetterberg) Cliquez pour le savoir! J'ai utilisé Photoshop CS3 et Paint Shop Pro 9 de fusionner les visages de ces super-héros de cinéma. Je comptais beaucoup sur les ciseaux jeremy roenick milbury eurotrash comment vancouver olympics numérique / sélection rapide et baguette magique des outils ainsi que la brosse et la tache alléger et d'assombrir l'outil. Vad får du om du kopplar likheten av sex hockeyspelare? (Wayne Gretzky, Sidney Crosby, Alex Ovechkin, Teemu Sellane, Henrik Zetterberg) Klicka för att ta reda på! Jag använde Photoshop CS3 och Paint Shop Pro 9 för att slå ihop ansikten film superhjältar. Jag berodde i hög grad på den digitala sax / snabbval och trollspö verktyg samt smutsar pensel och ljusare och mörkare verktyg. Mitä saat, jos yhdistää likenesses kuuden pelaajan NHL? (Wayne Gretzky, Sidney Crosby, Alex Ovechkin, Teemu Sellane, Henrik Zetterberg) Klikkaa selville! Käytin Photoshop CS3 ja Paint Shop Pro 9 yhdistää kasvot näiden elokuvan supersankareita. Olen riippui vahvasti digitaaliseen leikkaava / nopea valinta ja taikasauva välineitä sekä sotkea harjalla ja vaalentaa ja tummentaa työkalu. Hva får du hvis du flette likhet seks hockeyspillere? (Wayne Gretzky, Sidney Crosby, Alex Ovechkin, Teemu Sellane, Henrik Zetterberg) Klikk for å finne ut! Jeg brukt Photoshop CS3 og Paint Shop Pro 9 til å flette ansiktene til disse filmen superhelter. Jeg var avhengig tungt på digitale tannsett / rask utvalg og tryllestav verktøy samt smudge pensel og lysere og mørkere verktøyet. Что вы получите, если объединить подобия шесть хоккеистов? (Уэйн Грецки, Сидни Кросби, Алекс Овечкин, Теему Sellane, Хенрик Зеттерберг) Нажмите, чтобы узнать! Я использовал Photoshop CS3 и Paint Shop Pro 9 объединить лица этих фильмах супергерои. Я сильно зависят от цифровых Scissor / быстрого отбора и волшебная палочка, инструменты, а также размазать кистью и облегчить и темнеет инструментом. Co získáte, pokud vracíte podobizny šest hokejistů? (Wayne Gretzky, Sidney Crosby, Alex Ovechkin, Teemu Sellane, Henrik Zetterberg) Kliknutím zjistit! Jsem používal Photoshop CS3 a Paint Shop Pro 9 sloučit tváře těchto film superhrdiny. I závisela těžce na digitální nůžek / rychlý výběr a kouzelná hůlka nástrojů, stejně jako šmouha kartáčem a zesvětlit a ztmavení nástroj. Was bekommen Sie, wenn Sie die Bildnisse von sechs Hockeyspieler fusionieren? (Wayne Gretzky, Sidney Crosby, Alex Ovechkin, Teemu Sellane, Henrik Zetterberg) Click to find out! Ich habe Photoshop CS3 und Paint Shop Pro 9 zu verschmelzen die Gesichter dieser Film Superhelden. Ich hänge sehr stark von der digitalen Schere / Schnellauswahl und Zauberstab-Tools sowie die Bürste und der Fleck heller und dunkler Werkzeug.