تازہ ترین ویڈیوز

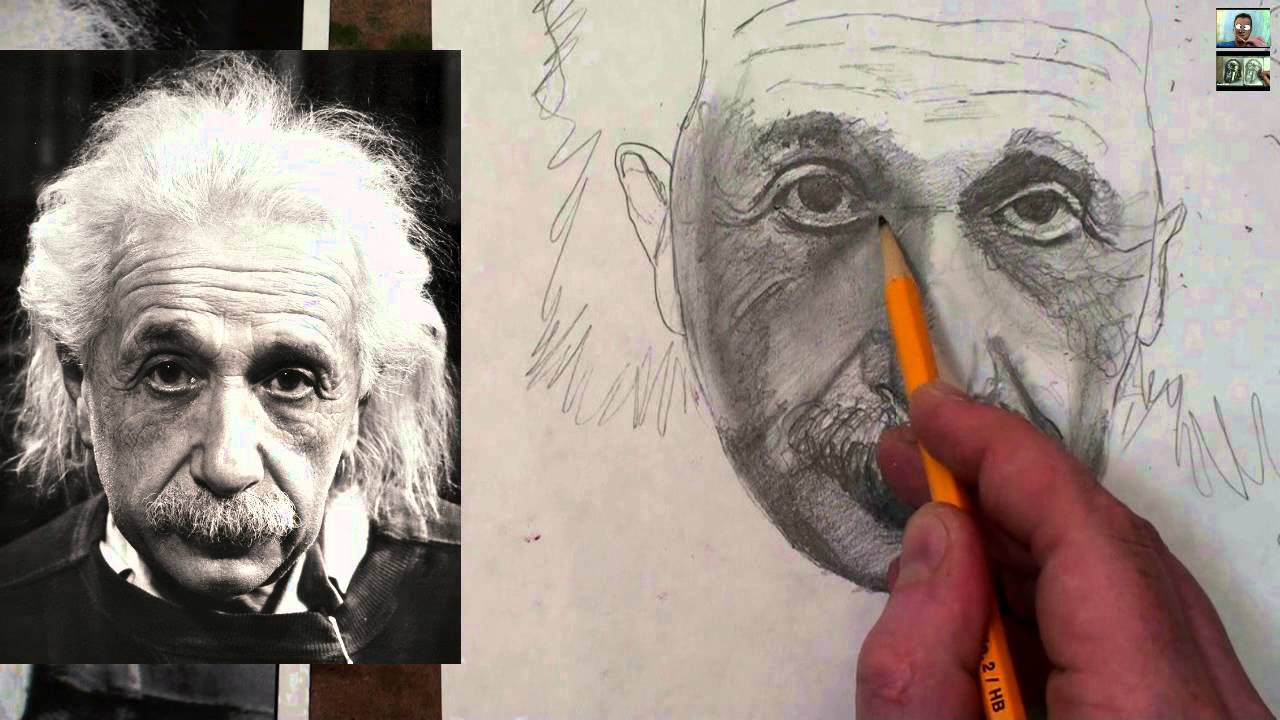
Artist Merrill Kazanjian breaks down the process of drawing from a photograph and simplifies it in to three steps. A time lapse demonstration is done at the end. Kazanjian's videotaped himself drawing a pencil portrait over the course of an hour. Kazanjian narrates as the hour-long drawing is sped up in to three fact filled minutes. It is a great video to see if you want to impove your portrait drawing skills. This video covers, contour drawing, drawing from observation, crosshatching, tones, breaking drawings in to shapes to simplify the drawing process and drawing the features of the human face. It is an instructional, traditional drawing, video. For more drawing tips from Merrill Kazanjian or to see his art, contact him through his website; merrillk.com
Künstler Merrill Kazanjian bricht den Prozess der Zeichnung aus einem Foto und vereinfacht es sich in drei Schritten. Eine zeitliche Verschiebung Demonstration erfolgt am Ende. Kazanjian's Videoband selbst ein Bleistift-Zeichnung Porträt im Laufe einer Stunde. Kazanjian erzählt, wie die Stunden langen Zeichnung ist beschleunigt in der Tat zu drei Minuten gefüllt. Es ist eine große Video zu sehen, wenn Sie möchten Ihre impove Porträt-Zeichnung Fähigkeiten. Dieses Video umfasst, Kontur Zeichnen, Zeichnung aus der Beobachtung, crosshatching, Klingeltöne, brechen Zeichnungen in Formen zu vereinfachen die Erstellung und Zeichnung der Merkmale des menschlichen Gesichts. Es handelt sich um eine Lehr-, traditionelle Zeichnung, Video. Für weitere Tipps Zeichnung von Merrill Kazanjian oder um zu sehen, seine Kunst, wenden Sie ihn durch seine Website; merrillk.com (mehr)

Link- http://merrillk.com/?part=fineart&articles_id=13264&act=artist1&artist=69&collection=462
WE NEED A VISUAL ARTS CATEGORY ON YOUTUBE THREAD-http://www.google.com/support/forum/p/youtube/thread?tid=2a9806f929074cbd&hl=en&fid=2a9806f929074cbd0004b630ad37cc3e
Facebook- http://facebook.com/kazanjianm
Twitter- http://twitter.com/kazanjianm
Website- http://merrillk.com
(Merrill) Supplies I Use- http://www.jdoqocy.com/click-4....247664-805536?url=ht
People, get ready. Three Little Birds asked me to do a step by step tutorial on how to draw Bob Marley. So Get up! Stand up. Grab a pencil because today YOU are going to draw one of the greatest musicians that ever lived. What? No art experience? No woman no cry! Don't worry about a thing...... in other words everything is gonna be alright. This train is bound for glory and you are a passenger my friend. Just listen to my step by step instructions and pause the video at the end of each step and I think that you will surprise yourself. Could you be loved? I dont know. Thats a multi faceted question with a lot of factors. Go ask Dr. Phil. Could you make a successful portrait of Bob Marley? I can answer that. Yes you can.
Before we begin, I recommend that you watch this video on my website. I made an additional cheat sheet tutorial with photos and text. There is also a supply list and an extended shading tutorial. Just hit the link in the video description below the video player. Lets get started.
Step 1: Draw the shape that you see. Really it is two shapes, Bob Marley's silhouette and the background. These shapes do not have to be perfect in order for this portrait to be successful.
Step 2: Draw the M shape that I just added, Notice where it intersects with the shape from step one.
Step 3: Add the shapes for the collar on his shirt.
Step 4: Add the shape for the neck. It kind of looks like a cat's head.
Step 5: Add the shape for Bob Marleys face. Notice the tilt of his head and the placement within the hair shape and above the cat's head shape from the previous step.
Step 6: Add in the shapes for the eyes. Here is a close up.
Step 7: Add in the shape for the nose. The other shapes surrounding the nose are shadow lines and facial hair. All together, this shape sort of resembles a crab.
Step 8: Add the four shapes for the mouth. Notice that the top two are slightly bigger than the bottom two.
Step 9: Draw in the shape for the eyes. Take some extra time to observe where each shape falls within the eye shape.
Step 10: Draw in the shape for the teeth. There are 8 teeth visible. Notice the dark values in the corner of the mouth.
Step 11: Add the shapes in to the hair and in to the clothing. Don't stress, these shapes do not have to be super accurate.
Step 12: Partially erase the lines from step 11. We are going to use charcoal and the dry brush technique. Dark pencil lines will show through.
MERRILL'S SUPPLY LIST: BOB MARLEY
- Bristle Brushes
- Mineral Spirits
- Black Oil Paint
- Watercolor Paper
- Charcoal
- Black and White Colored Pencils
- Prismacolor Art Stix Colorless Blender

LINK- http://merrillk.com/?part=fineart&articles_id=11223&act=artist1&artist=69&collection=188
WE NEED A VISUAL ARTS CATEGORY ON YOUTUBE THREAD-http://www.google.com/support/forum/p/youtube/thread?tid=2a9806f929074cbd&hl=en&fid=2a9806f929074cbd0004b630ad37cc3e
Facebook- http://facebook.com/kazanjianm
Twitter- http://twitter.com/kazanjianm
Website- http://merrillk.com
(Merrill) Supplies I Use- http://www.jdoqocy.com/click-4....247664-805536?url=ht
This video will give you step by step instruction on how to draw hands folded in prayer.......But we are not going to draw just any pair of praying hands, we are going to recreate Albrecht Durer's study of praying hands, in pencil. If you are nervous to attempt one of the most spectacular drawings of the Northern Renaissance and one of the most famous drawings of all time, have no fear, you will not need to rely on divine intervention.....
As I was saying.....I got your back. Just hit the link in the video description and you will be taken to a page with text and photo resources to help you along. Are you ready? Lets do this!
Step 1: Draw the three shapes that you see. The bottom shape resembles a bowl, the middle shape is trapezoidal and the top shape is triangular. Together, these shapes resemble a Christmas tree.
Step 2: Add the double shape for the thumbs. Notice that the closer thumb is the exact height of the trapezoid.
Step 3: Add the palm of the right hand.
Step 4: Add the fingers of the right hand.
Step 5: Add the shapes at the bottom.
Step 6: This is a tricky and important step. We are carving out fingers. Use the lines left from previous steps as comparison points. Notice that the fingertips go above and outside of the triangle shape. Also notice where the lines that separate the fingers, end in the trapezoid shape. Here is a close up.
Step 7: Add the details on the right hand. Here is a close up.
Step 8: Now, we are going to put in the shapes for shading. DO NOT feel the pressure to be exact. If its slightly different than mine, IT IS OK!!!!.....Lets start with the thumb. Add the shadow shapes that you see. DO NOT press too hard on the pencil.
Step 9: Add the shading to the lower part of the left hand.
Step 10: Shade the middle of the left hand.
Step 11: Shade lightly between the fingers.
Step 12: Add the fingernails and the oval shapes at mid finger. Notice that the oval shapes are not parallel with each other.
Step 13 Add the shading to the palm and wrist of the right hand.
Step 14: Add the shading to the top of the right hand.
Step 15 Shade the fingers of the right hand.
Step 16: Use the blending stump (tortillion) to smudge the edges of the shapes (see the process in the video above)
Step 17: Fingers are rounded shapes. Use the blending stump to smudge the lines between the fingers. Leave some space for a highlight towards the left (your left); where the light is coming from.
Step 18: The shading should get darker as you move from left to right. Press a little harder and use the higher number B pencils. I used a 2B and 6B pencil as I progressed.
Step 19: By now, your drawing should look similar to this. The bony structure of the back of the hand is starting to get "defined". Use your eraser and HB pencil to draw what you see here. Do your best, this is a DIFFICULT task; but it gets easier if you look back at your reference image often.
Step 20: Now, Start pressing a little bit harder with your B pencils (2B.3B,4B,5B,6B,7B,8B). Focus on the edges.
Step 21: NOTICE the DIFFERENCE of EDGES. They are NOT all the same!!!!!! Some are hard, some are soft, some are dark, some are light.
Step 22: USE THE ERASER! It is a fantastic drawing tool. In the video you will see me use a kneaded eraser as well as the one on the back of a pencil.
Step 23 is optional. I decided to shade the background to bring the highlights out on the hand. WHITE highlights on WHITE background does not work!!!!!!
Step 24: Its OK to use your fingers..........Sometimes......but especially at the end of a drawing rather than the beginning (the oils in your hand will affect the paper at the beginning of a drawing).
I also dedided (very late) to add the shirt sleeve. MY BAD!!! See the video (above) for tips on this.

You requested it and I listened. This video will teach you how to draw Drake. What's that you say, you failed art class? You have a low frustration tolerance and you have a fear of pencils. No problem! Check out the gallery on my website or my facebook like page and you'll see that thousands of people successfully completed my tutorials. And many had no previous art training. So even if you've had all of your fingers amputated and a nervous twitch, I got you covered. If you can draw shapes, you can successfully draw Drake. So hit the subscribe button, grab your pencil and paper and lets begin.
WE NEED A VISUAL ARTS CATEGORY ON YOUTUBE THREAD-http://www.google.com/support/forum/p/youtube/thread?tid=2a9806f929074cbd&hl=en&fid=2a9806f929074cbd0004b630ad37cc3e
Facebook- http://facebook.com/kazanjianm
Twitter- http://twitter.com/kazanjianm
Website- http://merrillk.com
(Merrill) Supplies I Use- http://www.jdoqocy.com/click-4....247664-805536?url=ht
Step 1: Make the shape that you see.
Step 2: Make the second shape, notice that it is about the same height as the first shape.
Step 3:Round out the shape for Drake's hair. Notice that it is slightly wider on your right side.
Step 4: Make the two egg shapes.
Step 5: Make the shape that you see, notice that it is the same height as the forehead shape and the hair shape.
Step 6: Make the lines for the nose. Notice the placement of these lines, compared to the egg shapes for the eyes.
Step 7: Drake needs ears. Dont stress out about the minor details. Notice that these shapes line up with the nose shape.
Step 8: Make the bowl shape for the chin. Notice that it is slightly taller than the main shapes above it.
Step 9: Make the neck and the body. Do it fast and save all of your concentration for the proper placement of the face shapes.
Step 10: Add the two shapes for Drake's lips.
Step 11: Add Drakes super thick eyebrows to the tops of the egg shapes from step four.
Step 12: Add the upper eye lines. Notice the shapes that are created in between the eyebrow shapes and the upper eyes. This will help you get the placement correct. Also, as a general rule, there is one eye length in between each eye. This is not the case for Drake. There is slightly more space between the eyes.
Step 13: Make the U shapes for the pupil and iris and close the eye shapes.
Subscribe to kazanjianm (Don't miss any new videos that I make)- http://www.youtube.com/subscri....ption_center?add_use
Facebook: Like me on Facebook to find out about live hangouts or to post your work!- http://facebook.com/kazanjianm
Twitter: I tweet! Do you? http://twitter.com/kazanjianm
My Website: http://merrillk.com
Art Supplies I Use in my Art Work- http://merrillk.com/?sid=135&idpage=supplies_i_use
YouTube Visual Arts Category Petition: http://www.change.org/petition....s/create-a-visual-ar
Step by Step Drawing Playlist: http://www.youtube.com/playlis....t?list=PLD6E34C7CD58
This video will teach anyone, regardless of artistic ability, how to draw Albert Einstein Step by Step.

Welcome to part two of my triple tutorial, which will show you how to draw the ear at the three most common angles. Part two will specifically show you how to draw the ear at the side profile angle. I recommend that you pause the video at the end of each step and listen to the instructions. Lets begin.
Step 1- Make a closed C shape. The placement of the ear falls between the bottom of the eyebrows and the bottom of the nose. Be sure to notice that the angle of the ear follows the jawline. It is not straight up and down.
Step 2- Make the candy cane shape. Notice that the candy cane closely resembles a smaller C shape.
Step 3- Make a bubble letter C shape. Notice that the bottom of this shape is a triangle. How to draw ears. Drawing the ear made easy. classroom demonstration of how to draw the ear. parts of the ear shapes of the ear. earring draw wear earrings ears cool trick shading tones smudging drawing tips blending

Where are video responses? Where did video responses go? Relax! They are still here. This is a tutorial on the NEW way of how to post video responses on youtube, since the new format was implemented March 2nd, 2010. A very short demonstration, answering, how do you post a video response? how to post video response 2010

Want to learn to shade a drawing? This video will make it easy! I usually focus on breaking down images in to simple shapes, but this video is different. We chose a simple object (a seashell) and the focus of this video is learning to shade, step by step. Music by Kevin McLeod: Song- Local Forecast - Elevator http://incompetech.com/music/r....oyalty-free/index.ht
Subscribe to kazanjianm (Don't miss any new videos that I make)- http://www.youtube.com/subscri....ption_center?add_use
Facebook: Like me on Facebook to find out about live hangouts or to post your work!- http://facebook.com/kazanjianm
Twitter: I tweet! Do you? http://twitter.com/kazanjianm
My Website: http://merrillk.com
Art Supplies I Use in my Art Work- http://merrillk.com/?sid=135&idpage=supplies_i_use
YouTube Visual Arts Category Petition: http://www.change.org/petition....s/create-a-visual-ar
Step by Step Drawing Playlist: http://www.youtube.com/playlis....t?list=PLD6E34C7CD58

Im bringing artsy back
My YouTube channel it deserves a plaque
Im gonna teach you how to draw like that
Go grab your pencil and your sketching pad
Take em to the bridge
Artsy babe
Dont waste your money on an MFA
Watch me on YouTube and subscribe its free
Follow my steps and you will draw JT (Justin Timberlake)
Take em to the chorus
Subscribe to kazanjianm (Don't miss any new videos that I make)- http://www.youtube.com/subscri....ption_center?add_use
Facebook: Like me on Facebook to find out about live hangouts or to post your work!- http://facebook.com/kazanjianm
Twitter: I tweet! Do you? http://twitter.com/kazanjianm
My Website: http://merrillk.com
Art Supplies I Use in my Art Work- http://merrillk.com/?sid=135&idpage=supplies_i_use
YouTube Visual Arts Category Petition: http://www.change.org/petition....s/create-a-visual-ar
Step by Step Drawing Playlist: http://www.youtube.com/playlis....t?list=PLD6E34C7CD58
Link- http://merrillk.com/?part=fineart&articles_id=8315&act=artist1&artist=69&collection=0
Ah paintings, there is nothing like staring at a painting all day and night.....its quite riveting .....Dont you think?
Riveting? Well, yes and no. While I appreciate painting and enjoy visiting museums. Every artist making work today has to acknowledge that art has changed with the times, and perhaps a canvas is not the best place to display your artwork. Think about it. 2D works painted on canvas are competing for wall space with flat screen televisions. Even if you dont have it, imagine yourself with ADHD.....what would you choose?.....exactly my point.
This tutorial is going to give you an alternative to the gallery wall. A T-Shirt. If you want publicity for your art, dont stick it in a local library exhibition, wear it proudly on your chest.
Here is what you will need: 1.) Scanner 2.) Ink Jet Printer 3.) Iron 4.) Fabric Transfer paper. What is Fabric Transfer Paper you ask? All it is, is a special type of paper that gets ironed on to a shirt, after a design is printed on it, from an inkjet printer. (I use Avery Dark Fabric Transfers for the shirts I make).
1.) The first thing that you will need to do is to scan or photograph your favorite artwork and save it as a JPEG file on your computer.
2.) After that, open up the scanned file in any photo editing program and crop your image. Please note that if you use Avery dark transfer paper, you will not need to flip the image. If you use another brand, be sure to read the directions carefully, because most brands of transfer paper require you to flip the image during this step.
3.) Next, place the paper white side down in the printer and press print. You should get close to a perfect copy of your original artwork
4.) After you print, grab a scissor, its time to trim your image. Cutting is an art form so be sure to be neat when you cut. If you use the dark fabric transfers, any area that you do not cut out will be white. Usually I leave an eighth of an inch border around my artwork, but I did not for this image. Cutting is usually the longest and most annoying step of the process, but be sure not to rush yourself.
5.) After you cut, peel the paper off of the back of the image like you are seeing me do here. The image part is flexible and very difficult to rip so dont worry about that. It helped me to fold a corner before I peeled.
6.) For the final step, use the collar tag to center your image on the front or the back of a shirt. Make sure that neither the fabric of the shirt or the image is wrinkled. Avery supplies you with special heat resistant paper to place over the image and the t-shirt while ironing. After the iron is heated to a high setting, and the special paper is placed, press down firmly with the iron as you are seeing me do here.
Now lift up the paper and viola! you can now mass produce and wear your drawing. For information on where to buy the paper that I used in this video, hit the link in the video description. Thanks for watching!
Note, Vincent Van Gogh's Starry Night was shown at the beginning of the video. This artwork has entered the public domain. The musical track at the beginning was supplied by Kevin MacLeod of Incompetech,com. It is called "Ghost Dance" Thank you Kevin!!! creating photocopy art transfers on fabric, using fabric transfer t-shirt, best iron on paper for dark shirts, how can print a photo on t shirt by transfer paper, flip a picture backwards for iron ons, avery transfer printing
"blank t shirts" "t shirt quotes" "t shirt screen printing" "t shirts for sale""art gallery" "hoodies" "fine art" "pop art" "arts and crafts" "tee shirts" "wall art" "sweatshirts" "print screen" "modern art" "shirt printing" "contemporary art" "embroidery designs" "art prints" "mens clothing" "shirt design" "funny t shirts" "t shirt designs" "own t shirt" "art paintings" "shirts online" "graphic art" "hip hop clothing" "t shirts uk" "band t shirts" "art posters" "graphic artist" "graphic tees" "white t shirt"

http://merrillk.com/index.php?part=fineart&articles_id=5376&collection=114 Today, you are going to draw Lebron James...Never draw before? Thats OK! I broke this process down in to simple steps for you. Miami Heat. I recommend that you pause the video at the end of each step and get in the habit of looking at the reference image on the screen at least once every five seconds. To make this as easy as possible, I uploaded a print version of this lesson to my website. Go to http://merrillk.com and type in LeBron in the search box. Or, if you are watching on youtube, click the link to the right. All that you will need is a pencil and some paper to draw and a q tip or a blending tool to do the shading in the second part of this video. Good luck! Here we go!
This part has 24 steps and it will be followed by a Lebron shading tutorial.
Step 1- Make a rainbow shape
Step 2- Make another rainbow shape above the first, with a slightly higher arc. This will be LeBron's headband. At the end of this step, it should resemble a banana shape.
Step 3- Make one more rainbow shape slightly above the top of the headband this will be Lebrons hair.
Step 4- Is a little tricky. Add the 2 shapes that you see. Notice that the one on (your) left is slightly larger than the one on (your) right.
Step 5- Add the backward L shape that you see.
Step 6- Add the shape that looks like the "little dipper" (pot shape).
Step 7- Add the next 2 lines. Notice that these two lines connect with the bottom of the shape from step 4.
Step 8- Add the 2 small rainbow shapes for the tops of Lebrons Eyes, and take an extra second to notice how each end connects to form a new shape above the eye.
Step 9- Add 2 U shapes under each eye lid. Dont make circles though, leave the top blocked by the upper eyelid.
Step 10- Take a second to observe the gross outline of the nose. Notice that the shape is about the same height as the forehead.
Step 11- The next lines that you see are the outline of Lebrons moustache. Notice that the 2 vertical lines go DIRECTLY below the mid part of Lebrons eyes.
Step 12- Next, put in Lebrons upper lip. Notice that it looks like a flattened letter M.
Step 13- Now put in his bottom lip. It is shaped like a boat. The shape in between the 2 lips looks like the roof of a Pizza Hut.
Step 14- Now, do your best to put in the ear shapes. Notice that his head is turned slightly, so the ear on your right will be a little smaller.
Step 15- Try to observe the line for his chin and jaw and then draw it.
Step 16- Observe and add these lines for the neck.
Step 17- Add the shoulders
Step 18- This v shape will be an important shadow on the neck.
Step 19- Add the W shape between the chin and lower lip.
Step 20- Connect the W shape with the bottom of each ear.
Step 21- Add the nostrils
Step 22- Add the bottom line for the eye.
Step 23- Add two V shapes under the eyes
Step 24- For the final step before we shade, notice the three shapes that are being added on each ear.
Link- http://merrillk.com/index.php?part=fineart&articles_id=6509&collection=114
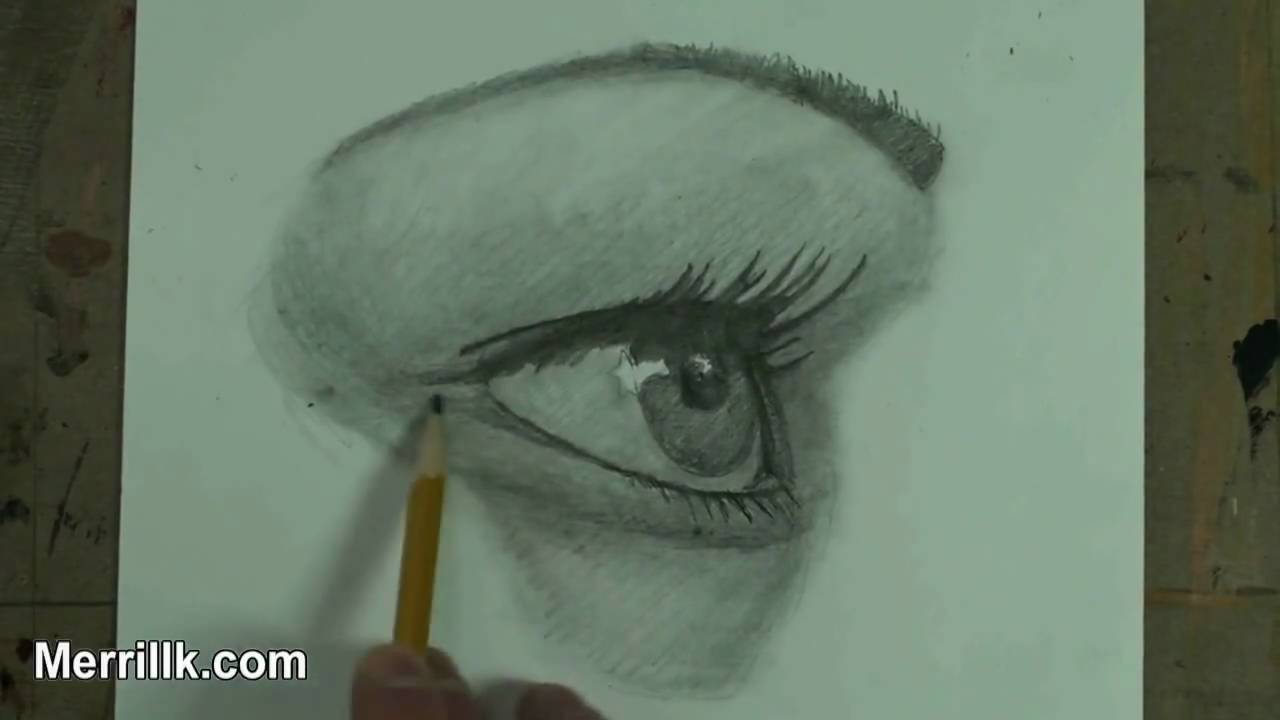
Today you are going to learn to draw the female eye from profile view. I went the extra mile to make this easy for you! Click the link in the videos description to download a printable PDF to assist you while you draw. The PDF has pictures and text and it is sequenced identically to the video. Use both resources to master the skills that I am trying to teach you in this lesson.....Grab your pencils and paper and lets get ready to draw.
Step 1: Draw the shape that you see. It looks like a heart shape turned to the side.
Step 2: Create the shape for the eyebrow at the top of the heart shape.
Step 3: Create the small bowl shape at the bottom. Notice that it overlaps the heart shape. Also notice how small it is compared to the heart shape.
Step 4: Create the shape that was just added. It looks like a sideways triangle with rounded sides. Notice its placement within the heart shape and its proximity to the bowl shape.
Step 5: Add the U shape for the iris. Notice that you can see the bottom of the iris, but not the top. Also notice that the iris is more oval like, rather than circular, since the head is turned.
Step 6: Add the shape to the inner corner of the eye.
Step 7: Add the crown like shape for the upper eye lashes. Notice that the longest ones seem to be on the inner corner of the eye. (This is actually not the case, the other lashes are foreshortened)
Step 8: Add the lashes on the inner corner of the eye.
Step 9: Add the bottom eye lashes. Notice that they are much shorter than the top lashes.
Step 10: Add the Pupil. Since the head is turned, the pupil is oval like.
Step 11: Add the highlight shapes that I just added
SHADING:
Step 12: Start shading the darkest areas first. The upper lashes and the pupil will be the darkest areas. Build it up slowly in "cross hatched" layers (the video will demonstrate). Dont do it all at once.
Step 13: Shade in the Iris. Notice that it is not as dark as the pupil. The shape added in step 6 is part if the eyelid. Shade it alightly lighter than the iris.
Step 14: Shade in the eyebrow. This can vary in tone depending upon hair color and make up. In this case, I left it lighter in tone than the eyelashes.
Step 15: Fill in the areas around the eye with hatching. Refer to the photo (above) as a reference. Use up to a 4B pencil at this stage.
Step 16: LIGHTLY shade in the white part of the eye (with the exception of the highlight areas drawin in before). Hint: The two lightest tones will be the highlight in the eye, followed by the bony area directly under the eyebrow. By this point, feel free to use up to a 6B pencil to help with the darker tones.
Step 17: Use the blending stump (tortillion) to smudge and spread your hatching.
Step 18: Develop the tones more by hatching over the smudges (from the tortillion). If you wish, smudge some more.
Step 19: Put on the finishing touches.
Step 20: Finished
Available in Closed captioning
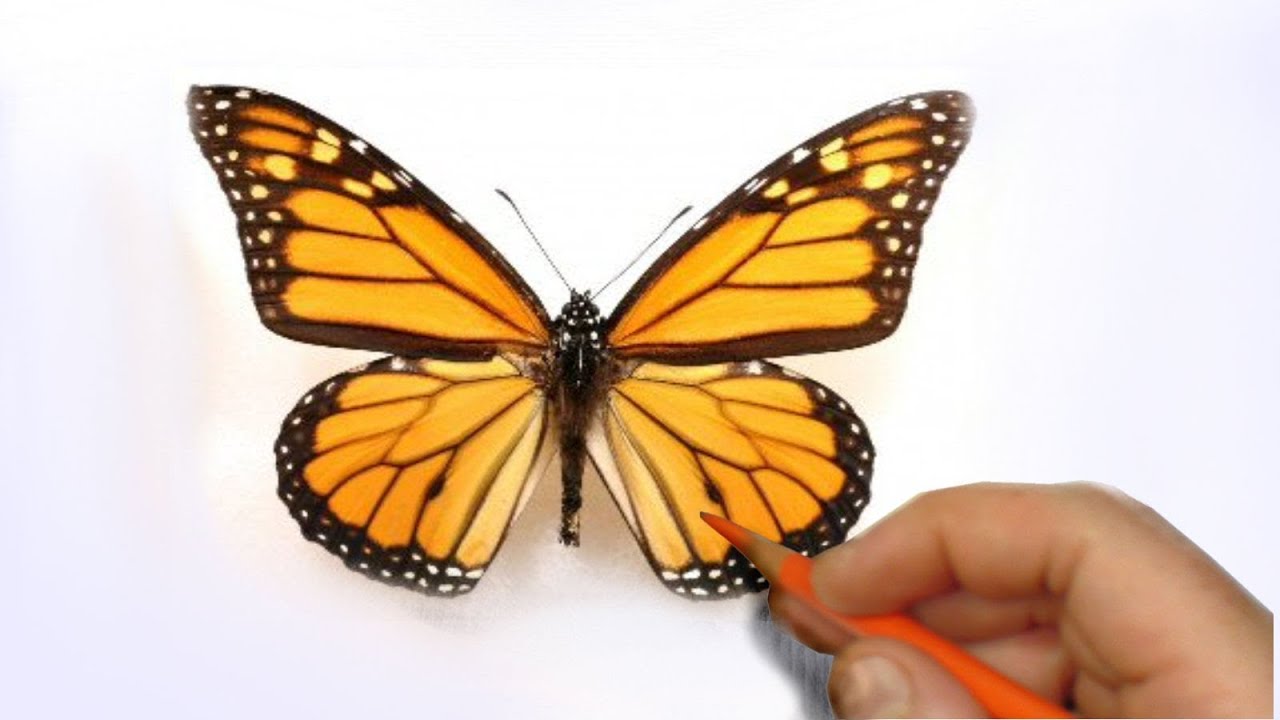
Learn a really cool illustration technique to achieve a realistic likeness! I mixed pencil, illustration marker, colored pencil and oil paint to illustrate a butterfly.
Subscribe to kazanjianm (Don't miss any new videos that I make)- http://www.youtube.com/subscri....ption_center?add_use
Facebook: Like me on Facebook to find out about live hangouts or to post your work!- http://facebook.com/kazanjianm
Twitter: I tweet! Do you? http://twitter.com/kazanjianm
My Website: http://merrillk.com
Art Supplies I Use in my Art Work- http://merrillk.com/?sid=135&idpage=supplies_i_use
YouTube Visual Arts Category Petition: http://www.change.org/petition....s/create-a-visual-ar
Step by Step Drawing Playlist: http://www.youtube.com/playlis....t?list=PLD6E34C7CD58

My Facebook- http://facebook.com/kazanjianm
YouTube Topics Search- http://youtube.com/topics
We NEED a Visual Arts Category Forum Thread (please advocate)- http://www.google.com/support/forum/p/youtube/thread?fid=2a9806f929074cbd0004ba24bfbc3fc4&hl=en
Visual Arts Category Playlist- http://www.youtube.com/playlis....t?list=PLEA626A08B26
Lets celebrate our progress in working towards a visual arts category on YouTube with a new contest. My goal whenever I hold a contest is to bring the art community together and highlight all of the insanely amazing art work that is on YouTube. I want to give talented artists the exposure that they deserve.
Last December, I held a contest called "Who is the most underrated artist on YouTube"? For that contest, I asked people to vote in the comments section of the video for who they consider to be the most underrated artist on YouTube. This contest got over 1000 comments and the winner of that contest, BarryPFinnegan2 got hooked up. The subscribership on his channel doubled from 500 to 1000 in less than a month.
I am still getting requests to repeat that contest so we are going to do it again. So welcome to Who is the most underrated artist on YouTube 2. Here are the very simple rules.
Question: What channel do you think is the most underrated visual arts channel on YouTube?
(We will define underrated as having less than 10,000 subscribers.)
To vote, simply write that channels name in the comments section of this video. That is all that you have to do. One week from today, I am going to tally up all of the comments and up votes, and I am going to do something special for the channel that gets the most votes.
Remember the whole point of this contest is for youtube artists to become more aware of each other. I recommend that you use the AWESOME new tool that youtube gave us called topic search. I will link to it in the video description. Try putting your favorite keywords in here. I guarantee that you will find some new and cool stuff.
If you want to showcase your work to recruit people to vote for you, please feel free to:
1.) post your best video as a video response to this video.
2.) post your best video to my facebook page. http://facebook.com/kazanjianm
So YouTube gave us a new toy called Topics. I am linking to it in the video description because is a great resource to navigate the many genres of art uploaded to YouTube. Im going to use topics to prove a point. There are a LOT of artists on YouTube.
So this is our new toy, Youtube topics, we are going to do a search for art. And then we will learn that there are amount one million art videos on YouTube and these videos have a viewership in the billions. Lets compare the art results from YouTube topics and compare it with some other popular keywords. Art beats sports, basketball, education and even cosmetics in the total number of videos. Please note that two of these topics are specific categories already and I know that I speak for a LOT of people when I say that art should be next.
It makes me mad when I see a great artist with a small following. Contests like this one are designed to change things fast.
Visit http://youtube.com/September11 to watch more perspectives on the 10th Anniversary of September 11 and to submit your own.
WE NEED A VISUAL ARTS CATEGORY ON YOUTUBE THREAD-http://www.google.com/support/forum/p/youtube/thread?tid=2a9806f929074cbd&hl=en&fid=2a9806f929074cbd0004b630ad37cc3e
Facebook- http://facebook.com/kazanjianm
Twitter- http://twitter.com/kazanjianm
Website- http://merrillk.com
(Merrill) Supplies I Use- http://www.jdoqocy.com/click-4....247664-805536?url=ht
Reflections on 9-11 .....Merrill Kazanjian's 9-11 story.
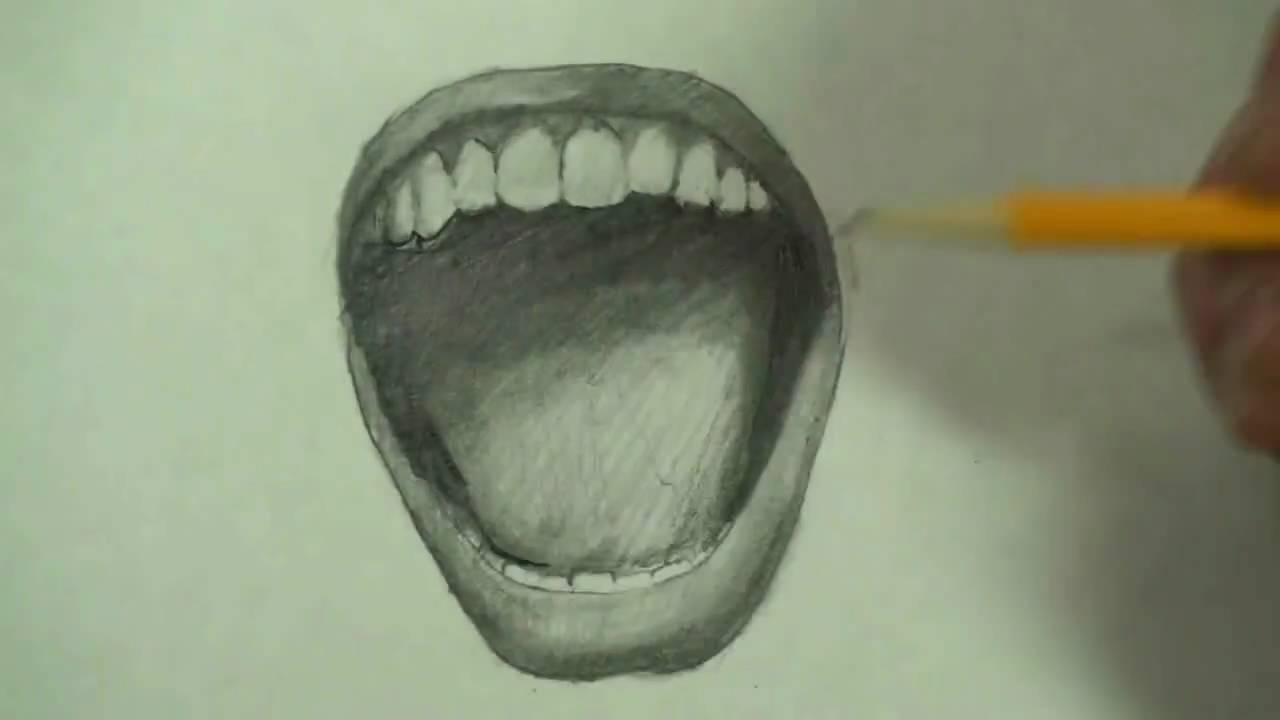
LINK- http://merrillk.com Today, I am going to show you, step by step, how to draw an angry mouth. Pause the video at the end of each step and be sure to look at the screen every few seconds while you draw. I am confident that you will surprise yourself if you take your time and listen carefully. Here we go.
Step 1- Draw a big U shape but make the two lines at the top of the U point slightly outwards and away from each other. Pause the video now and remember to look at the reference picture on your computer screen.
Step 2- Draw a second U shape above the first and close the lines to form a crescent moon shape. Notice that the widest point of this shape is the middle and that the shape gets narrow and pointy at the top where the edges of both lines meet.
Step 3- When a person screams, the bottom lip presses firmly against the bottom set of teeth. Only the tooth tops are visible. The shape of these tooth tops is somewhere between a square and circle. Make 8 to 10 and stay light with the lines in between the teeth. Pause the video now and don't forget to look every few seconds.
Step 4- Now we draw the tongue. It is a rounded shape that is wider at the top than the bottom. It is kind of like drawing a heart shape without a pointed bottom or an indentation at the top. Pause the video now and be sure to look every few seconds while you draw.
Step 5- Add a rainbow shape at the top. Be sure to notice the amount of space between the top of the tongue and the rainbow shape. Pause the video now.
Step 6- Add a second rainbow shape above the first. Like the bottom lip, the top lip gets more narrow at the edges and wider in the middle. Be sure to notice that the bottom lip is thicker than the top lip. This is true for every person. Pause the video now and be sure to look at the screen every few seconds.
Step 7- Now make a half circle shape beneath the top lip. Notice that the edges at the bottom protrude slightly. Pause the video now and remember to look.
Step 8- When a person screams, the top teeth are exposed because the top lip goes upwards. Your task is to draw 12 teeth. Notice that the front four face the viewer but the others start to turn away. Notice that as the teeth go further back in to the mouth, they get smaller. I know that molars and wisdom teeth are much larger in real life than a front teeth, but please trust me and pause the video and draw what you see. I will explain why this happens in the next part.
Ideally, you should have three things to do the shading. At the top is a blending stub. In the middle is a 2B pencil and at the bottom is a HB pencil.
When I shade, I:
- Use a method called cross hatcing
- Develop the shading evenly (I move the pencil around to the different parts of the drawing. step by step drawing lesson

This video will show you how to draw the hand, step by step (Thumbs up pose). Link- http://merrillk.com/?part=fineart&articles_id=6974&act=artist1&artist=69&collection=114 The link will take you to a page with print resources, including a printable PDF. The video makes it possible for anybody to draw the hand. It is simplified with the 1.) Step by step instruction of the video 2.) Website resource 3.) Print resource. It doesnt matter how much experience you have with art, you will be able to do this. This process makes it easy as possible. You dont have to pray that your drawing turns out OK...Thumbs up!!!!- Merrill Kazanjian
Este video te mostrará cómo sacar la mano, paso a paso (Thumbs up plantean). Link-http://merrillk.com/?part=fineart&articles_id=6974&act=artist1&artist=69&collection=114 El enlace te llevará a una página con los recursos de impresión, incluyendo un PDF imprimible. El vídeo hace posible que a nadie a sacar la mano. Se simplifica con el 1.) Instrucciones paso a paso de las 2 de vídeo.) Sitio Web de recursos 3.) De los recursos de impresión. Se doesnt importa cuánto usted tiene experiencia con el arte, usted será capaz de hacer esto. Este proceso hace que sea más fácil posible. Usted no tiene que rezar para que el dibujo resulta bien ... Thumbs up!!! Este vídeo vai mostrar como a chamar a mão, passo a passo (thumbs up pose). Link-http://merrillk.com/?part=fineart&articles_id=6974&act=artist1&artist=69&collection=114 O link levará você a uma página com recursos de impressão, incluindo um PDF para impressão. O vídeo possibilita que qualquer pessoa a desenhar a mão. É simplificado com o 1.) Instruções passo a passo do vídeo 2.) Website recurso 3.) Recurso de impressão. Não importa o quanto você tem experiência com a arte, você será capaz de fazer isso. Este processo faz com que seja mais fácil possível. Você não tem que rezar para que o desenho acaba bem ... Thumbs up!! Cette vidéo va vous montrer comment dessiner la main, étape par étape (Thumbs posent up). Link-http://merrillk.com/?part=fineart&articles_id=6974&act=artist1&artist=69&collection=114 Le lien vous amène sur une page avec des ressources d'impression, y compris un PDF imprimable. La vidéo permet à quiconque de tirer la main. Il est simplifié avec le 1.) Instructions étape par étape de la vidéo 2.) Site de ressources 3.) Ressources d'impression. It doesnt importe l'expérience que vous avez avec l'art, vous serez en mesure de le faire. Ce processus rend facile que possible. Vous n'avez pas de prier pour que votre dessin se révèle OK ... Thumbs up!! 此影片将告诉你如何绘制手,一步(竖起大拇指构成步骤)。链路http://merrillk.com/?part=fineart&articles_id=6974&act=artist1& amp;artist=69&collection=114的链接将带您到一个网页上打印资源,包括一个可打印的PDF。视频可让任何人利用手。它简化了1。)一步的视频2指令步。)网站资源3。)打印资源。它doesn't不管有多少经验,你对艺术有,你将能够做到这一点。这一过程可以很容易进行。您不应该祈祷您的绘图原来行...竖起大拇指!!इस वीडियो को आप कैसे दिखा हाथ खींचने के लिए कदम आगे बढ़ने की अनुमति (उत्तर प्रदेश मुद्रा से कदम,) है. लिंक-http://merrillk.com/?part=fineart&articles_id=6974&act=artist1&artist=69&collection=114 लिंक एक पृष्ठ पर आप एक मुद्रण योग्य PDF सहित प्रिंट संसाधन, साथ ले जाएगा. वीडियो इसके लिए किसी को हाथ खींचने के लिए संभव बनाता है. यह 1 से सरल.) है वीडियो 2 के कदम से कदम अनुदेश.) वेबसाइट संसाधन 3.) प्रिंट संसाधन. यह बात doesn't कितना अनुभव आप कला के साथ है, तुम यह करने में सक्षम होंगे. इस प्रक्रिया के रूप में यह संभव आसान बनाता है. तुम मत से प्रार्थना करती हूँ कि आपका चित्र बाहर ठीक है ... ऊपर अंगूठे! जाता है!!
Link- http://merrillk.com/?part=fineart&articles_id=13272&act=artist1&artist=69&collection=461#
WE NEED A VISUAL ARTS CATEGORY ON YOUTUBE THREAD-http://www.google.com/support/forum/p/youtube/thread?tid=2a9806f929074cbd&hl=en&fid=2a9806f929074cbd0004b630ad37cc3e
Facebook- http://facebook.com/kazanjianm
Twitter- http://twitter.com/kazanjianm
Website- http://merrillk.com
(Merrill) Supplies I Use- http://www.jdoqocy.com/click-4....247664-805536?url=ht
Do you want to know how Little Old Man got these scars? He kissed a pencil sharpener.......with his tongue. And while that was a big mistake I am going to prevent you from making drawing mistakes on your portrait of Heath Ledger as the Joker. Just follow my step by step instructions, pause the video at the end of each step and don't Christian Bale on me and you will surprise yourself on this drawing.
Do I sound like a man with a plan? Well I have one. Hit the link in the video description to go to my Joker cheat sheet on my website. It has photos and text and it will supplement the instruction that you receive in this video. Go grab your pencils and paper. Lets begin.

Hey everybody its Merrill. This video is going to teach you what I consider to be the three most important tips for making a realistic looking drawing or painting. I tell you what, Lets get right to the point. Tip number one is, eliminate lines whenever it is possible. The second rule that I am going to give you is to notice the edges. All edges are not the same. Some are soft, and some are hard and you have to really look to notice the tones and the hardness of the edges. If there is an overarching theme to all three of these points, it is tones. This video teaches you how to smudge pencil lines and blend tones. Its a good tutorial for those of you who want to build your knowledge in that area. Tips for making a realistic looking drawing. Tips for making a realistic looking painting. How to create a realistic drawing. How to create a realistic painting.
Link- http://merrillk.com/?part=fineart&articles_id=5413&act=artist1&artist=69&collection=464
Supplies I Use- http://www.jdoqocy.com/click-4....247664-805536?url=ht
Facebook: http://facebook.com/kazanjianm
Twitter: http://twitter.com/kazanjianm
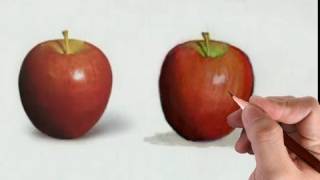
This video shows my process for making an illustration. I use prismacolor illustration markers for the first layer and color pencils (prisma once again) and a wax blending stick for the second layer. I make my illustrations in two steps. Step 1- I observe my reference drawings or photos and try to see what lies beneath. There is no way to blend markers in the same way that one can blend paint (ironically even with a marker blender) so I lie down the base tones with markers (the first layer). Step 2- Is created with color pencils. Color pencils are mixable / blendable and I mix the color pencils directly above my marker drawing. I use the wax stick to finish the surface and tie everything together. - Merrill Kazanjian
0:13 Take a second to observe the colors lying beneath the surface.
1.)Yellow/green/orange at the top
2.) Orange top/middle
3.) Brownish purple in the shadow on the left.
4.) Strong red on the right side. Everywhere else (but the red) is lower in chroma (intensity of color)
0:20- I start my drawing with the yellowed orange marker from prismacolor. I try to match the undertone.
0:38 I use marker color Apple Green at the top of the apple
0:48 I use the color Mahogany Red to add the general shape and color of the shadows
1:02 I use the marker Poppy Red to create the high chroma red on the area next to the highlight.
1:20 Now I use Tuscan Red to adjust the shadow. This color is a bot deeper than Mahogany Red.
1:28 I add the color Lemon Yellow (for the stem)
1:38 I use the Colored Pencil: French Grey 30% to drop the intensity of the color for the highlight. Highlights are NOT intense in color.
1:45 I use the colored pencil Goldenrod to get the yellow values towards the top of the apple.
2:15 I use the colored pencil White to create the bright highlight.
2:25 I use the color pencil Carmine Red to get the beautiful bright "fire engine red" hue on the side of the apple.
2:37 I alternated between the colors Canary Yellow and White to define the top of the apple.
2:54 Tuscan Red is one of the most important colors that you could get in your palette. It is strong (intense), dark in tone and purplish brown in hue. It is great for portraits as well!
3:06 I am using the colored pencil Carmine Red again. I am using it to start my blending so that my drawing does not look segmented.
3:10 I am using the Tuscan Red again and for the same reason as the previous color. I am trying to blend and make smooth color transitions.
3:20 For the first time in this illustration drawing, I am using the color Olive Green to do the shadow of the stem.
3:26 The colored pencil Magenta is a purplish red which makes a great bridge between the Tuscan Red and the Carmine Red.
3:31 Now, I am using the color Black Cherry which is a bit darker than the Tuscan Red. This color will help me define the edges a bit more.
3:42 The Prismacolor Art Stix Colorless Wax Blender is a very handy tool to finish an illustration. All it is, is the wax (the binder) for the colored pencils without the color. It is an incredible tool for colored pencil artists. Notice that I blend in the opposite direction as my cross hatching.
4:13 I use a variety of color pencils such as Black, White, Goldenrod, Carmine Red and Olive Green to finish my drawing.
I hope that this tutorial helped, if it did, please subscribe to my channel for more quality art instruction.
