Neueste Videos

Link- http://merrillk.com/?part=fineart&articles_id=9584&act=artist1&artist=69&collection=185
WE NEED A VISUAL ARTS CATEGORY ON YOUTUBE THREAD-http://www.google.com/support/forum/p/youtube/thread?tid=2a9806f929074cbd&hl=en&fid=2a9806f929074cbd0004b630ad37cc3e
Facebook- http://facebook.com/kazanjianm
Twitter- http://twitter.com/kazanjianm
Website- http://merrillk.com
(Merrill) Supplies I Use- http://www.jdoqocy.com/click-4....247664-805536?url=ht
Today I am going to give you step by step instructions on how to draw and shade Tupac Shakur. You should be able to get a strong likeness of Tupac even if you are new to drawing. Just, listen to the instructions and pause the video at the end of each step. I am going to do something slightly different, but very helpful, for the shading portion of the video so be sure to stay tuned after the step by step. Lets get started.
Step 1: Lets start off with a difficult but somewhat unimportant step. Draw in two crescent moon shapes to make the hat. Notice all of the smaller shapes within the hat shape, and their placements. Dont panic if your hat drawing from this step is not perfect, it is not a part of the likeness.
Step 2: Take extra time on this step. The eyes are the key to a likeness. First, notice 2Pac's eyebrows, they are very thick. Then notice their placement compared to the bottom of the hat. After the eyebrows are set, notice that the eyes are one eyelength apart from each other. Observe how closed the eye shape is as well as the placement of the pupil and iris. Finally, notice the upper eyelid fold, which is close to the eye and the lower eyelid fold, which is slightly further away.
Step 3: Add the line for the bottom of the nose and the ears. Be sure to notice the placement of the nose, compared to the eyes, and be sure to see that the ears go from the eyebrows to the bottom of the nose.
Step 4: Out of everything that I just added, the most important feature is the chin line. Take some extra time to observe its placement. As for the sweatshirt......add it but dont sweat it.
Step 5: Add Tupac's mouth and facial hair. Notice that the bottom lip is crescent moon shaped and much thicker than the top lip. Also notice that the corners of the mouth line up with the mid points of the eye. Here is a close up so that you can get the teeth. Trapped Soulja's Story I Don't Give A F-ck Violent Words Of Wisdom Something Wicked Crooked Ass Nigga If My Homie Calls Brenda's Got A Baby Tha' Lunatic Rebel Of The Underground
Part Time Mutha Holla If Ya Hear Me Pac's Theme (Interlude) Point The Finga Something 2 Die 4 (Interlude)
Last Wordz Souljah's Revenge Peep Game Strugglin' Guess Who's Back Representin' 93 Keep Ya Head Up Strictly 4 My N.I.G.G.A.Z. The Streetz R Deathrow I Get Around Papa'z Song 5 Deadly Venomz Intro
If I Die 2Nite Me Against The World So Many Tears Temptations Young Niggaz Heavy In The Game Lord Knows Dear Mama It Ain't Easy Can U Get Away Old School F-ck The World Death Around The Corner Outlaw Ambitionz Az A Ridah All Bout U Skandalouz Got My Mind Made Up How Do U Want It 2 Of Amerikaz Most Wanted
No More Pain Heartz Of Men Life Goes On Only God Can Judge Me Tradin War Stories California Love (remix) I Ain't Mad At Cha What'z Ya Phone # Can't C Me
Shorty Wanna Be A Thug Holla At MeWonda Why They Call U Bytch When We Ride Thug Passion Picture Me Rollin' Check Out Time Ratha Be Ya Nigga All Eyez On Me
Run Tha Streetz Ain't Hard 2 Find Heaven Ain't Hard 2 Find

Link- http://merrillk.com/?part=fineart&articles_id=12942&act=artist1&artist=69&collection
WE NEED A VISUAL ARTS CATEGORY ON YOUTUBE THREAD-http://www.google.com/support/forum/p/youtube/thread?tid=2a9806f929074cbd&hl=en&fid=2a9806f929074cbd0004b630ad37cc3e
Facebook- http://facebook.com/kazanjianm
Twitter- http://twitter.com/kazanjianm
Website- http://merrillk.com
(Merrill) Supplies I Use- http://www.jdoqocy.com/click-4....247664-805536?url=ht
This is my first step by step painting video. The subject is James Hetfield from Metallica and were going to do a drybrush portrait. You'll need watercolor paper, black oil paint, mineral spirits, a kneaded eraser and some bristle brushes. The supply list and a cheat sheet to this painting is listed on my website, so be sure to hit the link in the video description. I'm still going to lead you through this process step by step. To begin, you will need a pencil.
Step 1: Draw the shape that you see. It sort of looks like a caption cloud.
Step 2: Add the four shapes that you see for the eyes and eyebrows. Notice how they fit in to the shape from step one.
Step 3: Add the trapezoidal shape. The bottom of this shape will be the mouth line.
Step 4: is not as tricky as it looks. The mouth and the moustache make a mushroom shape and the nose connects the eye shape to the mushroom shape. The space in between the two shapes is for a shadow.
Step 5: Add the shape for the top of the hair. If this was the 1980's you would need bigger paper.
Step 6: No! That's not hard! It all depends on how you look at it......Your welcome.
Step 7: Draw the other hand.
Step 8: Draw the shirt line.
Step 9: Complete the shape of the head and add the C shape for the ear. Use the eye shape as a guide to where she C shape is drawn.
Step 10: Add the highlight shape by the mouth.
Step 11: Is the trickiest shape. Here is a close up to help you. Spend some extra time to observe the placement of each shape and then draw.
Step 12: Is optional. If you wish, add the shading for the hand. Know that the placement of this shading does not have to be perfect.

This video will teach you how to draw a vintage 1980's floating Chuck Norris head.......and whether you admit it or not...... you always wanted to learn how to draw a vintage 1980's floating Chuck Norris head. So pick up a pencil and be very afraid. Listen to every word that I say, because if you mess up, Chuck is going to find you. And its gonna get bloody fast. In fact, Chuck Norris likes his meat so rare he only eats unicorn. But if you listen to me, you wont mess up. And Chuck wont kill you and all will be right in the universe.
WE NEED A VISUAL ARTS CATEGORY ON YOUTUBE THREAD-http://www.google.com/support/forum/p/youtube/thread?tid=2a9806f929074cbd&hl=en&fid=2a9806f929074cbd0004b630ad37cc3e
Facebook- http://facebook.com/kazanjianm
Twitter- http://twitter.com/kazanjianm
Website- http://merrillk.com
(Merrill) Supplies I Use- http://www.jdoqocy.com/click-4....247664-805536?url=ht
Step 1: Make this circle with a trapezoid on top. It will become his facial hair which Chuck first grew at the age of 18.......seconds.
Step 2: Now that is Chuck Norris' nose. Notice that it is about the same height as the circle from step 1. Chuck uses his nose to smell fear in people and objects. In fact, Chuck Norris doesn't flush toilets, he scares the shit out of them.
Step 3: That crescent moon shape is Chuck's beard. Notice that it goes to the top of the nose shape. Be very careful with this step or it might start growing out of your paper. If it does, leave the room immediately and call poison control.
Step 4: Chuck Norris' tears cure cancer. Too bad he has never cried. Add his eyes if you dare, but dont stare at them too long. Just quickly notice that there is about one eye length between them.
Step 5: Look at that hair. Despite spending decades of time on abdominal training devices, and singlehandedly providing salt to the Pacific Ocean through his sweat glands, Chuck Norris has locks that would make Jon Bon Jovi jealous. Notice the general shape of his hair and draw it. Be sure to spend extra time on the shape of the face rather than the outline of the hair.
Step 6: Add Chuck Norris' mouth to make him resemble a bad assed version of Jesus.
Step 7: Add the shadows on the upper part of the face.

http://merrillk.com/?part=fineart&articles_id=8053&act=artist1&artist=69&collection=114- Today, I am going to give you step by step instruction in order to help you draw a hand holding a pencil. What? Worried that you cant draw? Check the comments posted on my previous videos. Many people who have never drawn before have successfully completed other challenging drawings with the help of my step by step videos and you will have the same success if you follow the steps in this video. I recommend that you download the free PDF print resource by hitting the link in the video description. This resource will give you 12 steps with pictures to help you follow along as I narrate. Be sure to pause the video and observe the reference image at the end of each step. Good Luck.
Step 1: Draw the three shapes that you see. The one on the left will be the tip of
the pencil and the two on the right will be fingertips.
Step 2: Observe, then draw the thumb shape. Notice that it seems slightly thinner at
the fingertip.
Step 3: Draw the K shape above the thumb
Step 4: Use a ruler to draw the top of the pencil. It should measure just less that three thumb
lengths.
Step 5: Observe and draw the line to complete the finger over the K shape
Step 6: Finish the hand shape by drawing in the heel of the palm and the wrist.

Subscribe to kazanjianm (Don't miss any new videos that I make)- http://www.youtube.com/subscri....ption_center?add_use
Facebook: Like me on Facebook to find out about live hangouts or to post your work!- http://facebook.com/kazanjianm
Twitter: I tweet! Do you? http://twitter.com/kazanjianm
My Website: http://merrillk.com
Art Supplies I Use in my Art Work- http://merrillk.com/?sid=135&idpage=supplies_i_use
YouTube Visual Arts Category Petition: http://www.change.org/petition....s/create-a-visual-ar
Step by Step Drawing Playlist: http://www.youtube.com/playlis....t?list=PLD6E34C7CD58

WE NEED A VISUAL ARTS CATEGORY ON YOUTUBE THREAD-http://www.google.com/support/forum/p/youtube/thread?tid=2a9806f929074cbd&hl=en&fid=2a9806f929074cbd0004b630ad37cc3e
Face Proportions For Portrait Drawing- Formula Hey welcome back everybody....Its Merrill, I recommend that you watch part 1 before you see part 2. Just click on the image if you havent seen part 1 yet.
This is a very important video for anyone who wants to learn portraiture. In this video, I will model the formula taught in part 1 to teach you how to draw a face from your memory. In order to make things easy to remember, I will demonstrate my process step by step. People who memorize these steps will be able to draw a human face from memory without a reference image. Lets get started.
Step 1: Draw an oval. Next put a horizontal line through the oval, slightly higher than the half way point. Then add four evenly spaced dots. These four dots will mark the inner and outer corners of each eye. Remember that there is one eye length in between the two eyes. It is imperative that the dots are evenly spaced. You will also need two bigger dots to mark the center of each eye.
Step 2: Now add a rectangular shape. The rectangle should be taller than it is wide. The corners of the rectangle should line up with the two dots that mark the center of each eye.
Step 3: Add the ears and eyebrows. The ears most often line up with the top of the eye and the bottom of the nose.
Step 4: Add the eye shape. Generalized eyes are almond shaped. You will see the bottom of the iris but not the top. Most eyes also have a second line for the eyelid above the eye.
Step 5: Add the nose. Notice that I did not add lines for the bridge of the nose. The only lines that exist on a nose are towards the bottom.
Step 6: Add the lips. Generally, the top lip is M shaped and smaller than the bottom one, which is bowl shaped. When the face is calm, the corners of the mouth usually does not line up with the middle of the eye.
Step 7: Add hair. Be creative.In this experiment, I have taken the most common formulas for facial proportion and tested them on a group of people in a similar pose. I used a computer program to help me take accurate measurements. I made sure that my control group was comprised of both males and females and were of many different races.
So lets get started with a very common proportion rule. The question is- Is it one eye length between each eye? The answer, as you can see, is yes. But this was the only rule that I found to be universally correct.
Lets stick with the eyes for question 2. It is often stated that it is five eye lengths across the face. It turns out that for 9 of the 10 people that I tested, that rule is incorrect. I found that if you included the width of the ear on to the face, then that rule would be closer to true, but definitely not universal. Of the control group, only one person, had a fit, so we can conclude that this proportion does exist, but it does not fit the majority of people and thus, shouldn't be part of a drawing formula.
I recently saw on the internet that the outer corners of the nose, should line up with the inner corners of the eye. Only one of 10 people that I tested proved that proportion to be true. There were also two people who came close. Once again, we can conclude that this proportion does exist, but it does not fit the majority of people and thus, shouldn't be part of a drawing formula. Most often, the outer nose lined up where the tear ducts met the white of the eye. For the record, I hope that the lady in the bottom left never catches a cold.
Question four asks: Does the pupil and iris line up with the corners of the mouth when the face is calm? I will warn you that this was the most difficult to answer, because the mouth is the most variable feature of the face. The shape slightly differs from person to person and it moves a lot. I found that only two people had eyes and mouths which lined up, but, everybody except the gentleman on the top left was extremely close. So, despite the results, I would include this measurement for a general face proportion formula, but I would also be sure to observe the person who I am drawing to get my answer. It is also important to note that 8 of the 10 peoples mouths fit between the lines drawn down from the middle of each eye.
Since question five is related to the placement of the ears, I changed a few of the photos in the control group. In order to gauge this, I had to be able to see the ears clearly. Most portrait formulas state that the ears go from the top of the eye to the bottom of the nose. This turned out to be a pretty accurate statement. Question six is directly related to question five and asks whether the nose and the ears are generally the same size. Although there were only two exact measurements, every other person was very close in measurement. So we can conclude that it is Accurate to say that the ear generally

A time lapse video demonstration of an illustration of artwork that I created of Sarah Palin, Gouverner of Alaska, former Vice Presidential Candidate. Artist Merrill Kazanjian uses illustration markers (AD Markers) and color pencils (Prismacolor) to create the illustrated portrait. First, he made a contour pencil sketch without shading. Second, he set the base tones with the markers and then proceeded with several layers of color pencil work. Kazanjian is a New York based contemporary artist who uses a wide range of media in his work. He is best known for his tradigital art work and for his youtube channel kazanjianm. his website is Merrillk.com.
Un lapso de tiempo de vídeo de demostración de una ilustración de Sarah Palin, Gouverner de Alaska, el ex candidato presidencial Vicepresidente. Merrill Kazanjian artista utiliza marcadores de ilustración (AD Marcadores) y lápices de colores (Prismacolor) para crear el retrato ilustrado. En primer lugar, hizo un lápiz de contorno sin sombreado. En segundo lugar, establecer la base de tonos con los marcadores y, a continuación, procedió a varias capas de color de lápiz trabajo. Kazanjian Nueva York es un artista contemporáneo basado que utiliza una amplia gama de medios de comunicación en su trabajo. Él es mejor conocido por su tradigital obras de arte y para la serie de internet, Galería de Arte Alfa Hombres. su sitio web es Merrillk.com Un laps de temps vidéo de démonstration d'une illustration de Sarah Palin, Gouverner de l'Alaska, l'ancien vice-candidat à la Présidence. Artiste Merrill Kazanjian illustration utilise des marqueurs (marqueurs AD) et les crayons de couleur (Prismacolor) pour créer le portrait illustré. Tout d'abord, il a fait un dessin sans contour shading. Ensuite, il a jeté les bases avec des tons et des marqueurs a ensuite procédé à plusieurs couches de couleur crayon travail. Kazanjian New York, est un artiste contemporain à base qui utilise une large gamme de médias dans son travail. Il est surtout connu pour son tradigital oeuvres d'art et de l'internet série, Art Gallery Alpha Males. son site est Merrillk.com. وهناك فاصل زمني الفيديو مظاهرة مثال سارة Palin ، Gouverner ألاسكا ، والمرشح السابق لمنصب نائب الرئيس. ويستخدم الفنان Kazanjian ميريل لتوضيح العلامات (علامات ميلادي) ، وأقلام ملونة (Prismacolor) لخلق صورة توضح. أولا ، انه قدم رسم كفاف القلم دون التظليل. وثانيا ، حدد قاعدة النغمات مع علامات وثم انتقل مع عدة طبقات من لون قلم رصاص. Kazanjian يوجد مقرها في نيويورك الفنان المعاصر الذي يستخدم مجموعة واسعة من وسائل الإعلام في عمله. وهو يعرف بآرائه tradigital الفن والعمل لسلسلة الانترنت ، معرض الفنون ألفا من الذكور. موقعه على الانترنت هو Merrillk.com.

A helpful trick with observational drawing is to see what you are drawing, as shapes. The basic shape of the human eye is similar to an almond shape. But this is only one of the several shapes that encompass the eye. Think of these shapes as puzzle pieces as you draw a persons eye in the near future. Remember that these shapes will slightly change based upon a persons facial expression. Today, I will show you step by step how to draw the human eye. Pause the video at any time if you need to. Here we go.
Step 1: Make a rainbow shape with a circle under it. The top of the circle should be partially blocked by the rainbow.
Step 2: Make the bottom lid. Notice that the lower part of the almond shape narrows as it approaches the tear duct on the inner corner of the eye.
Step 3: Make the pupil and leave an empty space in the middle for a reflection. The line above, is the eye lid folded back.
Step 4: Add the shape of the eyebrow.
Step 5: Add a light line below the eye to hint at the eye socket.
Step 6: Shade in the eyebrows. Try to notice that they are not one solid shape.
Step 7: Add the eyelashes. Try to notice that they are much thicker on the top eye lid.
Step 8: Add the final shading. The darkest areas should be directly under the eyebrow and under the eye.
I hope that this video helped you. If you still need help go to merrillk.com and download a print version of this lesson. This print version will give you step by step instruction through pictures and words. Once you are on Merrillk.com, click the gallery tag at the top of the page. Next, go to select an artwork at the top on the right, under the merrillk.com banner. Scroll down until you see Eye Worksheet 1, 2 or 3.
Un truco útil con el dibujo de observación es para ver lo que está dibujando, como las formas. La forma básica del ojo humano es similar a una forma de almendra. Pero esto es sólo una de las varias formas que abarcan los ojos. Estas formas de pensar como piezas como las personas que dibujar un ojo en el futuro próximo. Recuerde que estas formas se modifican levemente las personas sobre la base de una expresión facial. Hoy en día, yo te mostraré paso a paso cómo sacar el ojo humano. Pausa en el vídeo en cualquier momento si es necesario. Aquí vamos. Paso 1: Hacer un arco iris forma con un círculo en virtud del mismo. La parte superior del círculo debe ser parcialmente bloqueado por el arco iris. Paso 2: Hacer la tapa inferior. Observe que la parte inferior de la forma de almendra se reduce a medida que se acerca el conducto lagrimal en la esquina interior del ojo. Paso 3: Hacer que el alumno y dejar un espacio vacío en el centro de la reflexión. La línea anterior, se tapa los ojos recogidos. Paso 4: Añadir la forma de la ceja. Paso 5: Añadir una línea por debajo de la luz a los ojos en la pista de las órbitas. Paso 6: La sombra de las cejas. Trate de notar que no son una forma sólida. Paso 7: Añadir las pestañas. Trate de observar que son mucho más gruesa en el párpado superior. Paso 8: Añadir la última sombra. Las zonas más oscuras debe estar directamente bajo la ceja y en el marco del ojo. Espero que este video le ayudó. Si aún necesita ayuda para ir a merrillk.com y descargar una versión impresa de esta lección. Esta versión para imprimir le dará instrucciones paso a paso a través de imágenes y palabras. Una vez que esté en Merrillk.com, haga clic en la etiqueta de la galería en la parte superior de la página. A continuación, vaya a seleccionar una obra de arte en la parte superior de la derecha, bajo la bandera merrillk.com. Desplácese hacia abajo hasta que vea los ojos de trabajo 1, 2 o 3.

"Come as You Are", but bring a pencil......because you are going to learn how to draw Kurt Cobain step by step, "On a Plain" piece of paper. "All Apologies" if this intro gives you an "Aneurysm", I just want to state that if you think that your drawing skills have "Plateaued" you should try my step by step videos to get them "In Bloom". My videos wont "Drain you" and you wont think they're "Dumb"....unless if you're a "Negative Creep"......and I have over 100 on my channel so be sure to "milk it"........... So, unless if you have "Something in the Way", please commit a "Sliver" of time to learning how to draw Kurt Cobain. Please don't forget to Subscribe. Just click on my "Scentless Apprentice" who "Smells Like Teen Spirit"..................SUBSCRIBE........................Sorry, I have "Tourettes".........Err "Nevermind.
Step 1: Draw the arch and the two shapes. Notice that the shape on the left is egg shaped and the shape on the right is shaped like home plate in the game of baseball.
Step 2: Add the hair shape on the left side of the page. Dont stress, this shape doesnt have to be perfect but it should be proportionately larger than the shape from step one.
Step 3: Add the hair shape on the right side. Dont stress out on the hair shape, but take extra time on the shape of the face.
Step 4: Add the nose shape. Draw what you see rather than what you know. The nose looks like this because of a strong shadow shape. Just trust me and draw it.
Step 5: Add the mouth shape. The top lip is like a flattened M and the bottom lip is like a cereal bowl. Be sure to notice its placement compared to the other features of the face.
Step 6: Fill in the eye shapes. Take extra time on this step. The eyes are the key to the likeness.
Step 7: Add the shapes to the hair. These do not have to be placed perfectly since hair is a "Radio Friendly Unit Shifter".
Step 8: Add the shapes for the facial hair.
I am combining two methods called 1.) cross hatching and 2.) smudging.....right now. Pause the video at different points and use the image on the screen as your reference image. It doesnt get very dark under the eyes.......however, above the eyes (between the eye and the eyebrow) it gets very dark. Kurt has dark and full eyebrows. Use a #2 (HB) pencil to start. Dont be scared to press hard in the eye region. The nose is tricky. The darkest part is the nostril (not part of the step by step video). But the entire shape of the bottom of the nose gets pretty dark. After, I fill it in, observe it, then draw it. I am using a #7 Bristle Flat brush for the shading. The top lip is dark and solid in shape. The LEFT side of his face (the side on YOUR right) is lighter in tone than the right side. The bottom left corner of the page will get very dark. I "went right in" with a 6B pencil. REMEMBER, shading is all about RELATIVITY, so compare the tones of the different areas of the image, The shape at the bottom of the face will eventually be blended in with other dark tones. In order to make the hair "pop out" you need to darken the background. (Its all about relativity!!!) The hair is a LOT of Adding....then erasing.....adding...then erasing ....Be sure to make your strokes in the same direction at the hair in this reference image.....Notice that I am using the eraser to "draw". Now the "PORTRAIT" begins....Now it looks like a human being......but I have to "wrestle" with it to make it look like Kurt Cobain. Use a slip sheet (look under my hand) when you get this far. The darkest areas have several layers of hatching. (8B pencil).

This video will teach you how to draw a cat step by step, and then paint it. This video was made for aspiring artists who are new to drawing and painting. Just follow my steps and you should surprise yourself.
Reference Image by PCStock (deviantart)- http://browse.deviantart.com/?q=cat+stock#/d1jadwz
Subscribe to kazanjianm (Don't miss any new videos that I make)- http://www.youtube.com/subscri....ption_center?add_use
Facebook: Like me on Facebook to find out about live hangouts or to post your work!- http://facebook.com/kazanjianm
Twitter: I tweet! Do you? http://twitter.com/kazanjianm
My Website: http://merrillk.com
Art Supplies I Use in my Art Work- http://merrillk.com/?sid=135&idpage=supplies_i_use
YouTube Visual Arts Category Petition: http://www.change.org/petition....s/create-a-visual-ar
Step by Step Drawing Playlist: http://www.youtube.com/playlis....t?list=PLD6E34C7CD58

Welcome to part one of my three part tutorial, which will show you how to draw the ear at the three most common angles. Part one will specifically show you how to draw the ear at the three quarters 3/4 angle. I recommend that you pause the video at the end of each step and listen to the instructions. Lets begin.
Step 1: Draw a football shape. When the ear is foreshortened, it slightly resembles a football.
Step 2: Make a candy cane shape. Notice that the candy cane closely resembles a letter C.
Step 3: Make a bubble letter C shape. Notice that the bottom of this shape is a triangle. Notice that this c shape is slightly more narrow than the ear from the side view.
Facebook- http://facebook.com/kazanjianm
Twitter- http://twitter.com/kazanjianm
Website- http://merrillk.com
Supplies I Use- http://merrillk.com/?sid=135&idpage=supplies_i_use
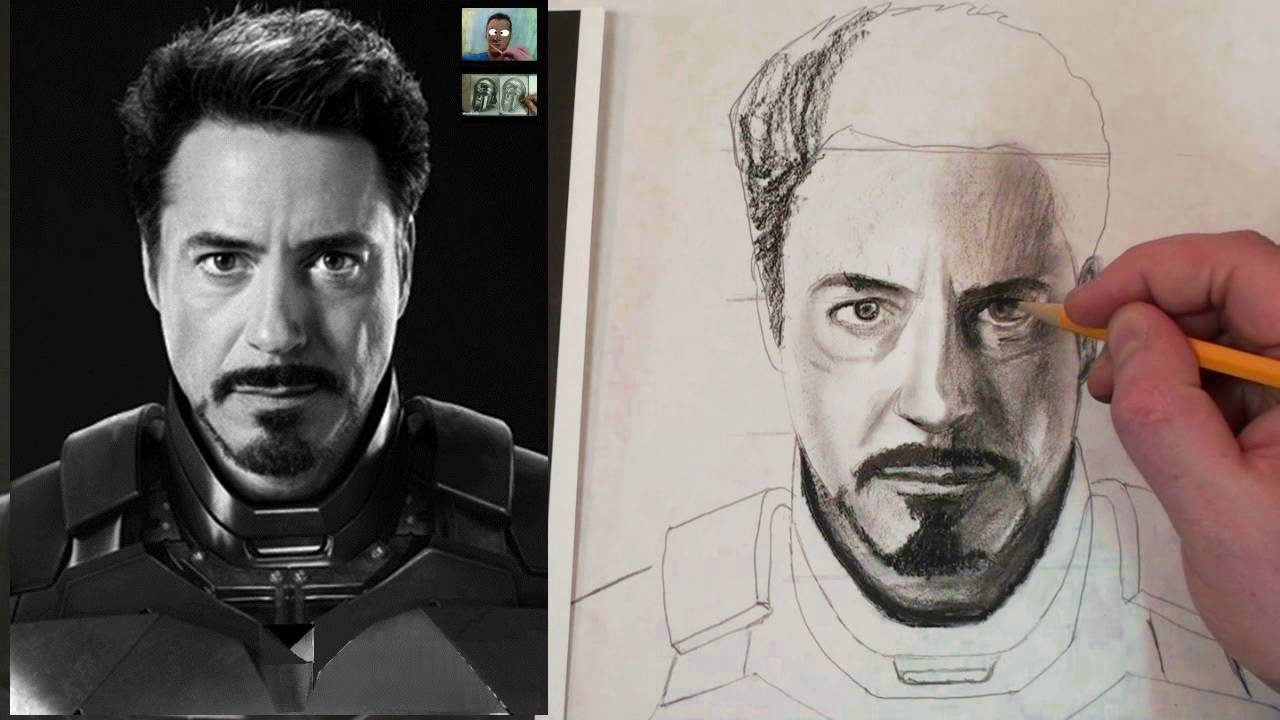
Last week, my audience voted for the tutorial that they wanted on my Facebook page. And Iron Man was the most popular choice. Since this tutorial was directly chosen by my viewers, I wanted to make it extra special. As always, I am going to give you step by step instruction on how to get a likeness of Iron Man. But after the steps, I am going to try to do something special. I am going to teach you how to incorporate charcoal and fixative in to a drawing so that you can layer it like a painting. This video will be a little longer than usual, but it will be packed with great information. Grab your pencils and some drawing paper. Lets begin.

WE NEED A VISUAL ARTS CATEGORY ON YOUTUBE THREAD-http://www.google.com/support/forum/p/youtube/thread?tid=2a9806f929074cbd&hl=en&fid=2a9806f929074cbd0004b630ad37cc3e
Facebook- http://facebook.com/kazanjianm
Twitter- http://twitter.com/kazanjianm
Website- http://merrillk.com
(Merrill) Supplies I Use- http://www.jdoqocy.com/click-4....247664-805536?url=ht
You've asked for it so here it is. This video will give you step by step instruction on how to draw Ms. Stefani Germanotta....also known as Lady Gaga. Grab your pencil and paper and pause the video at the end of each step and you will be able to draw her.
Step 1: Draw the shapes that you see. Notice that it is a slightly longer distance from the bottom of the sunglasses to the chin, than from the top of the sunglasses to the hairline.
Step 2: This shape does not have to be perfect so dont stress out. The hair is obviously widest at the bottom... but also notice that it is a similar distance from top of the head to the chin and from the chin to the bottom of the hair.
Step 3: In step three, we start to define Gaga's clothes. Also, add in the nose and some details to the sunglasses. There will be a close up of the face very soon if you cant see the details in this slide.
Step 4: Add the mouth and eyebrows.
Step 5: Add the details for the hair. Please note that the details do not have to be identical to mine.
Step 6: Add Lady Gaga's jacket.
This is the face detail slide. Take some time to check if your face proportions are correct.

A portrait of Vladimir (Wladimir) Lenin by Merrill Kazanjian. Dry Brush Oil painting on watercolor paper. I did a detailed pencil sketch on to the watercolor paper before laying down any paint. I am using Lamp Black oil paint (a black cooler in temperature). I am mixing the Lamp Black on Canvas paper. When I want to get a lighter tone, I mix the black with paint thinner (mineral spirits). When the black is more concentrated, it is darker. When the black is more diluted (with the mineral spirits) it does not have the same covering power and seems lighter in tone. FYI- Lenin died in 1924...but was NOT buried. He is "resting in state" for all to see in a mausoleum in Downtown Moscow. I used two round tipped brushes to do this artwork- One Size 5 medium and one Size three Medium. Both were (Synthetic) Sable. The only areas which I went dark black (pure paint no mineral spirits) right away were the eyes and the bottom of the eyebrows. I am working from three different reference images; all are within five years of his death. UMM.....yeah....thats Smirnoff Vodka to the left. To get inspired while drawing a Russian subject!!! Dont worry! Merrill RARELY gets "inspired" anymore! Kinda looks like Sean Connery now! ......But Lenin is not a "Shecks Shymbol" like "double O Sheven"..SHHHHHPLENDID! I usually finish the eyes first, but I wanted the eyes to be done last for Lenin, since his eyes are so intense. In other words, when the tones are set for the rest of the face, I can respond and stylize the eyes. When you darken the background, it allows you to draw more attention to the face. It also gives you a chance to "play up" the tones! The traditional approach is a criss cross- (Lighter side of face with darker background.....and vice versa) I am now putting on the finishing touches with prismacolor color pencils. Black White and Neutral Gray.
Music is by Kevin MacLeod of Incompetech.com. Songs- Song of the Volga Boatmen, Padanaya Blokov and Amazing Plan. Портрет Владимира (Владимира) Ленина Merrill Kazanjian. Картина маслом на бумаге акварелью. Я сделал подробный эскиз карандашом на акварельной бумаги, прежде чем заложить вниз от краски. Я использую лампы Черного масляной краской (черный кулер температуры). Я смешивания Лампа черного на бумаге, холсте. Когда я хочу получить светлый оттенок, я сочетание черного с краски (уайт-спирита). Когда черный более концентрированной, она темнее. Когда черный ослабляется (с уайт-спирита) он не обладает такими же полномочиями покрытие и, кажется, легкие тона. FYI-Ленин умер в 1924 году ..., но не похоронили. Он "отдыхал в состоянии" на всеобщее обозрение в мавзолее в центре Москвы. Я использовал две круглые щетки наконечником для этого работа-One Размер 5 средних и один размер 3 среде. Оба они были (синтетические) Соболь. Только области, которые я пошел черными (чистые краски не-спирита) сразу же были глаза, и в нижней части брови. Я работаю с трех разных образах ведения; все они в течение пяти лет его смерти. УММ ..... да .... тот Водка Smirnoff налево. Чтобы получить вдохновение во время рисования в русское подданство! Dont беспокойтесь! Merrill редко получает "вдохновил" больше!

Link- http://merrillk.com/index.php?part=fineart&articles_id=5315&collection=114 In this video, I will demonstrate how to build tones while drawing. I will teach you about drawing pencils and when and how to use them. And I will demonstrate the drawing technique of cross hatching. But, this time I am going to do something different....You have the option to follow along! I decided to go the extra mile and provide you with a worksheet for the final segment of this video. Take a second to go to http://merrillk.com and type in "shading resource"...print it out and do your best. We have a lot to cover, so lets start off with learning about pencils.
Key Points
- Start out with a light to neutral pencil and go darker as you go on.
- Each row of hatches should be done at a slightly different angle to the previous row.
-When you cross hatch you should build your tones up slowly
- You can differentiate your tones through adding pressure to the pencil but dont dent the paper or things will get more difficult.
- To make neat hatches, use the tip that I gave you (put a piece of paper by the edge)
-A slip sheet prevents smudges
This piece took me two hours to make! Take your time
supplemental supplement make making teacher master mastery linear marks course seeing draft best art skills worksheet range scale tool stub stump

Step by Step drawing instruction. Learn to draw John Lennon from the Beatles.
Link- http://merrillk.com/?part=fineart&articles_id=13483&act=artist1&artist=69&collection=461
WE NEED A VISUAL ARTS CATEGORY ON YOUTUBE THREAD-http://www.google.com/support/forum/p/youtube/thread?tid=2a9806f929074cbd&hl=en&fid=2a9806f929074cbd0004b630ad37cc3e
Facebook- http://facebook.com/kazanjianm
Twitter- http://twitter.com/kazanjianm
Website- http://merrillk.com
(Merrill) Supplies I Use- http://www.jdoqocy.com/click-4....247664-805536?url=ht
The Long and Winding Road of YouTube searches has brought you here and today, YOU are going to draw an excellent portrait of John Lennon with a little help from your friend Merrill of course. Under ideal circumstances I would want to hold your hand to directly assist you with this portrait; but since im a real Nowhere Man; your high speed internet connection and this step by step tutorial will have to do.
But Rest assured,we can work it out since this video is available to you on YouTube eight days a week! All that You will need ......Is Love, a pencil and workable listening skills. Ill take care of the rest. I recommend that you pause the video at the end of each step and hit the link in the video description to go to my cheat sheet for this video. It will definitely help you. Lets get started
Step 1: Draw the three shapes that you see. Notice that the three shapes resemble a childs drawing of a car.
Step 2: Make the two crescent moon shapes that I just added.
Step 3: Make the nose shape. Notice that the length of the nose is equal with the height of the forehead. Here is a close up
Step 4: Make the moustache and the mouth.
Step 5: Add the details that I just added to the eyes. Be sure to notice their placement within the frames of the glasses. Here is a close up.
Step 6: Observe and add the outline of John Lennon's face. Stop at the chin.
Step 7: Add the other side of John Lennon's face and then add the "P" shape.
Step 8: Add John's hair. But dont stress out if it's not perfect. Just let it be.

Hey its Merrill. I recommend that you watch parts 1 and 2 before you watch Part 3... Click on the pictures to see parts 1 and 2.Welcome to part 3 of my workshop on proportions for portrait drawing ... This series is made for art students and this part will cover the profile (side) view of the head. I hope to give you some easy to remember rules and a formula, so that you will be able to draw the human head from your memory. Lets get started by reviewing what we learned already. Videos one and two proved that 1.) The eyes are not at the center of the head. 2.) Its generally five eye lengths across the face if you include the ears. 3.) Its one eye length between the two eyes. 4.) The outer corners of the nose generally lines up with the outer edge of the tear duct in the eye. 5.) The corners of the mouth is generally not as wide as the midpoint of the eye (but its close) 6.) The ears generally fall between the upper eyelid and the bottom of the nose. Now, lets look at the head from the side/profile view and add to our existing knowledge. 1.) The first question asks. Is the head more tall?......... or is it more deep? In other words, lets compare the distance between the chin and the top of the head.......Wow, it looks close......but there is a strange reason for that...........Observe the slope of the forehead and the shape of the top of the head. When we measure from the jaw line we go up to the top front of the head.......which is lower in height than the back of the head when we are looking forwards. Notice the difference when we measure the distance from the chin to the top....back of the head....there is no comparison anymore. For our purposes, lets think of the head as an egg shape from the side. But the egg is not straight up and down, it is at an angle.......HMMMM egg shaped....maybe Stewie's head isn't that out of proportion.Now that we understand the basic shape of the head from the side, lets look for universal rules. A good place to start is Leonardo DaVinci 2.) Leonardo said, "The distance from the middle of the nose to the bottom of the chin, is half the length of the face." This rule applied to all 8 of the models.....and the middle of the nose as a half way point, compliments what we learned in Video 1 and 2. Lets add it to our formula.3.) Leonardo also measured the distance between the chin and the throat and the mouth and the bottom of the chin as equal distances. This rule applied to all 8 of the models.4.) he also said, "From the chin to the back of the neck, is the same distance as between the mouth and the roots of the hair." Once again, this rule applied to all 8 models.The three previous rules were helpful, but some of Davinci's formula didnt apply to our models......For instance, The space from the chin to the base of the nose e f is the third part of the face and equal to the length of the nose and to the forehead. This breaks the face up in to three equal parts....but it only applied to five of our models.
Finally, DaVinci stated, "From the eyebrow to the junction of the lip with the chin, and the angle of the jaw and the upper angle where the ear joins the temple will be a perfect square.......... Zero out of eight people formed a perfect square from the four points that DaVinci named. I am mentioning this because we should keep the relationship between these four points in the back of our mind when we draw from observation, but lets leave them out of our proportion formula. One of the biggest mistakes that students make when drawing the head from profile is the depth of the ear, or on other words, how far back it is from the face. I recently came across a website that stated that the ear is exactly half the distance between the face and the back of the head.......WRONG!!!! It is definitely further back than that. The green line measures the distance from the face to the midpoint of the ear and the red line measures the distance between the midpoint of the ear and the back of the head. I estimate that the midpoint of the ear is 55 to 70 percent of the distance from the face to the back of the head. Be sure to notice that there is a range of values rather than a universal rule, so we will have to average our answer. Now I am going to test a measurement from one of my former teachers at the Art Students League of New York who taught me that there is an imaginary equilateral triangle that connects the pupil, the back arch of the ear and the chin. When I tested this measurement, it existed in 7 of the 8 people I measured. However, there is a flaw to this system. Notice that the bottom point exists at different points on the jaw line. But overall, this measurement helps us see that it is usually an equal distance between the eyes and the chin, the eyes and the ear and the chin and the ear.
Learn to draw Rihanna step by step (easy). Instruction by Merrill Kazanjian (kazanjianm).
Supplies I Use- http://www.jdoqocy.com/click-4....247664-805536?url=ht
You found art. But you are not in a hopeless place ........I heard your "S.O.S" through a lot of requests and today, I am going to be your artistic "Umbrella"........I am going to give you simple, easy to follow Step by Step instructions on how to draw Rihanna. My steps will be so descriptive, someone with limited artistic experience can create a successful drawing. In other words, its not going to be "Hard".
You will also learn about S&M in this video. S stands for SHADING and M stands for MODELING and the proper use of both will allow you to create areas of light and shade, and achieve a likeness of Rihanna.
All you have to do is grab a pencil, some paper.....and ....."Watch n Learn". We are not going to let this "Good Girl go Bad", your drawing is going to be "the hotness". What's that Rude boy? You "love the way I lie"? HUH!.... If you need proof, hit the button that says playlist to look at some amazing video responses from my viewers. But I promise that I don't just "talk that talk" I walk that walk! So don't play Russian Roulette with hit or miss drawing instruction on YouTube, subscribe to kazanjianm for quality art instruction.......And silly introductions like this one.
WE NEED A VISUAL ARTS CATEGORY ON YOUTUBE THREAD-http://www.google.com/support/forum/p/youtube/thread?tid=2a9806f929074cbd&hl=en&fid=2a9806f929074cbd0004b630ad37cc3e
Facebook- http://facebook.com/kazanjianm
Twitter- http://twitter.com/kazanjianm
Website- http://merrillk.com
Step 1: Notice the perfect square that is formed between the center points of Rihanna's eyes and the two corners of her mouth. Start your drawing by making four dots on your paper that form a perfect square.
Step 2: Make the circles exactly as you see them. No, Rihanna doesn't have a floating eye, just trust me.
Step 3: Put in the shapes for Rihanna's eyes. Notice how the new shapes overlap the circle shapes from step 2.
Step 4: Add the eyelids.
Step 5: Rihanna has a contract with Cover Girl so add a lot of mascara to the eyelashes.
Step 6: You need to do two simple things for step six. Center the pupil for the eye on the left and connect the two lines for the mouth.
Step 7: Add the M shape for the upper lip. Notice that it's height is similar to the height of the white part of the eye.
Step 8: Add the banana shape for the bottom lip. Notice that it is about twice the thickness of the upper lip. Also, be sure to notice the shape in between the two lips.
Step 9: Now add Rihanna's nose. Oh relax, this is the hardest thing that I am going to ask you to do. Notice how the septum fits perfectly in to the indentation at the top of the upper lip Also notice that the nostril line is about two thirds down the square shape that we began with.
Step 10: Add the eyebrows.
Step 11: Now its time to add the chin. Here is a tip to make it easy. Measure the distance from the eyebrows to the bottom of the nose. It will be the same distance from the bottom of the nose to the chin and from the hairline to the eyebrows.
Step 12: Give Rihanna her Marge Simpson hair. Hair moves all the time. Do not feel the pressure to copy the hair in my drawing perfectly.
Step 13: Rihanna has an album called "Loud" so I guess that we should give her ears. Notice that the ears line up between the eyebrows and the bottom of the nose.
Step 14: I promised you S&M so now its time to shade and model. Lightly put in these shadow lines around the eyes and the nose.
Facebook: http://facebook.com/kazanjianm
Twitter: http://twitter.com/kazanjianm
I used this image - http://www.flickr.com/photos/5....1051231@N06/47365468 It has a creative commons license

Part 1- I will start this drawing by taking a second to look at my reference photograph on the left. I try to see the mouth as one big shape first and I try to match that shape as best as I can to start. Next, I break the mouth in to three smaller shapes. I notice that the top lip looks like a flattened McDonalds Arch and the bottom lip looks similar to a crescent moon shape. The area in between is more complex but that is ok since I can create that shape by noticing the nuances of upper and lower lip.
Part 2- Take a second to notice that the lower lip is slightly fuller than the top lip. This is true for every person. Once I am somewhat satisfied with the upper and lower lip, I start to notice the space between the lips. That space is divided between the upper teeth and the negative space below the teeth. Please notice that when a person smiles, the bottom lip comes up and blocks the lower set of teeth. Many people make the mistake of drawing the upper and lower teeth in a smile. While drawing the teeth, I am very careful about not pressing too hard. Notice that there are NO dark tones, separating the teeth, only light to medium ones. The front of our face is rounded and the formations of the upper and lower sets of teeth are in a horseshoe shape. When drawing a person from the front, notice that as the teeth go further back towards the throat, they become more foreshortened. Also, as the teeth go back towards the throat, they are blocked more in a smile by the lips and are more shadowed. Be careful because this can easily be overdone. The color of the teeth are not white, they are bone colored, which is a cool off white.
It is a conscious choice for me to start this drawing with color pencil. I use color pencil because the fine tip of the color pencil gives me a lot of accuracy, and also because, color pencils can be mixed with oil paint. You will see me mix color pencil with oil paint in step four.
Part 3- At this point I am satisfied with the placement of all of my shapes. Once that task is accomplished, I focus on building tones and colors. In other words, my focus to this point has been to get all of the pieces of the puzzle in to the right place and now, I can have fun by mixing colors and matching tones. I try to also notice the qualities of the edges of shapes. For instance, there is a fuzzy, unclear edge between the upper lip and the gums above the teeth. It is there but it is hard to see. In contrast, there is a solid, distinct edge between the upper teeth and the darker area of negative space, below the teeth.
Color pencil is a great medium for a contemporary artist to learn. I greatly value the accuracy and detail work that can be achieved with color pencils. The flaws to this medium is that color pencil cannot be layered as well as paint, since it doesn't fully dry. Its biggest strength is also a big weakness. The fine tip of the color pencil, covers surfaces at an extremely slow rate. Both weaknesses can be fixed however. I found that if you dip a paintbrush in a painting medium called Liquin and start to paint, the color pencils essentially pick up the properties of oil paint. In the next step, I will use liquin and mix it with both the oil paint atop of the color pencil.
Part 4- Now I am painting with Liquin and oil paint over the color pencil. They are very compatible with each other and are essentially made with the same materials. The pigment of the color pencil is bound with wax; and wax has been used in parts of many painting mediums throughout the history of oil painting.
Oil paint is considered a traditional medium but many of its artistic capabilities have not yet been matched by other, newer mediums. Oil paint gives to the ability to work opaque, transparently and translucently. Today, I am using the combination of the oil paint and the liquin to soften my color pencil drawing below. I am using small soft paintbrushes and they pick up some of the color that was left below. The paintbrush is a great tool to create soft blends. That makes perfect sense if you compare it to the tip of a color pencil
I hope that you have enjoyed this video and I hope that you learned something. Feel free to ask me questions and please subscribe to my channel if you like concise, information rich videos on art.
Created by Merrill Kazanjian http://merrillk.com

Even if you are new to art, YOU will be able to draw Wiz Khalifa with a pencil. I break the drawing process down in to simple steps that anybody can understand. This video is also translated in to 15 different languages.
Subscribe to kazanjianm (Don't miss any new videos that I make)- http://www.youtube.com/subscri....ption_center?add_use
Facebook: Like me on Facebook to find out about live hangouts or to post your work!- http://facebook.com/kazanjianm
Twitter: I tweet! Do you? http://twitter.com/kazanjianm
My Website: http://merrillk.com
Art Supplies I Use in my Art Work- http://merrillk.com/?sid=135&idpage=supplies_i_use
YouTube Visual Arts Category Petition: http://www.change.org/petition....s/create-a-visual-ar
Step by Step Drawing Playlist: http://www.youtube.com/playlis....t?list=PLD6E34C7CD58
As we go through the steps, I will teach you how to shade your drawing to make yours look like a realistic portrait of Wiz Khalifa.
