تازہ ترین ویڈیوز

Yeah, I guess I missed #YouTube during my hiatus because I am making videos at a record pace and all I want to do is make more. This video will teach you about the medium of watercolor pencil. I made the drawing of the plum with a layer of watercolor pencils. This medium is SO COOL because artists can blend on the surface of the paper and then activate the blending properties of the color by using water and a paint brush. After the first layer dried, I did a second with #Prismacolor colored pencils.
watercolor pencils tutorial, watercolor pencils techniques, watercolor pencils portrait, watercolor pencils drawing, watercolor pencils landscape, watercolor pencils speed painting, watercolor pencils flowers watercolor pencils painting, watercolor pencils anime, watercolor pencils for beginners, watercolor pencils flowers, watercolor pencils faber castell, how to use watercolor pencils for beginners, how to draw with watercolor pencils for beginners, watercolor pencils realistic
Subscribe to kazanjianm (Don't miss any new videos that I make)- http://www.youtube.com/subscri....ption_center?add_use
Facebook: Like me on Facebook to find out about live hangouts or to post your work!- http://facebook.com/kazanjianm
Twitter: I tweet! Do you? http://twitter.com/kazanjianm
My Website: http://merrillk.com
Art Supplies I Use in my Art Work- http://merrillk.com/?sid=135&idpage=supplies_i_use
Petition: YouTube NEEDS a Visual Arts Category: http://www.change.org/petition....s/create-a-visual-ar
Step by Step Drawing Playlist: http://www.youtube.com/playlis....t?list=PLD6E34C7CD58

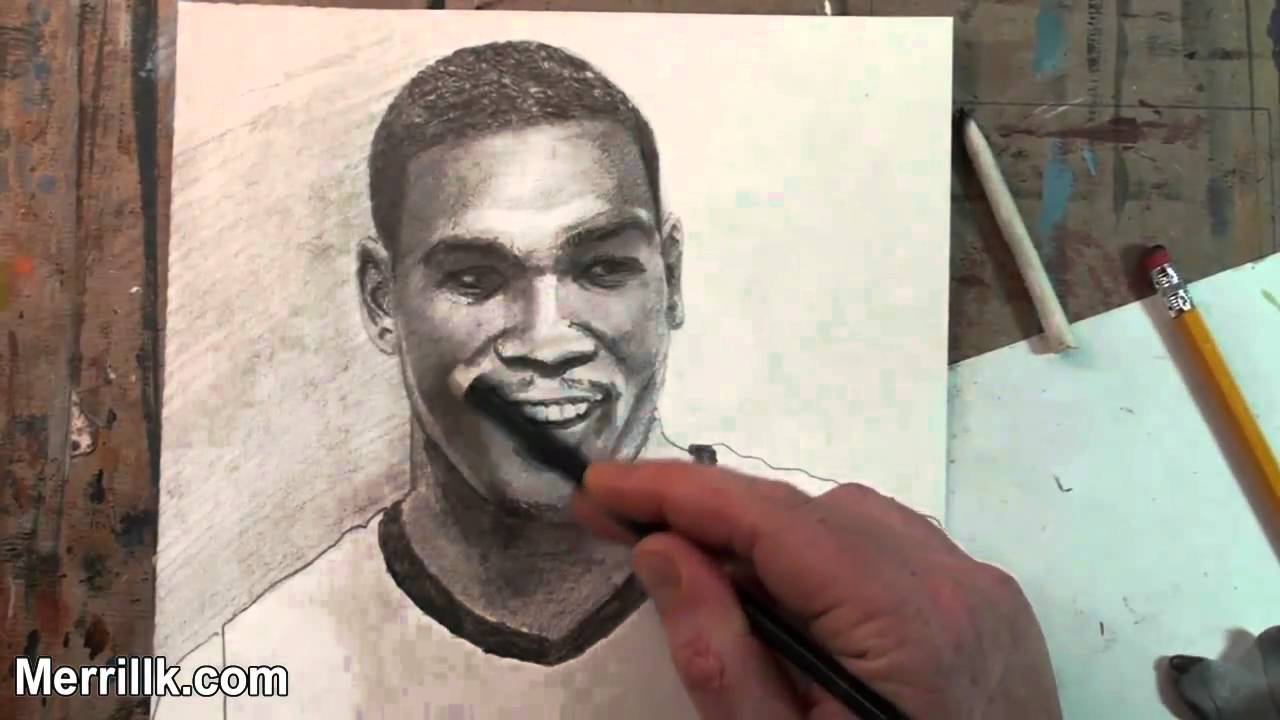
This video will teach you how to draw NBA superstar, Kevin Durant of the Oklahoma City Thunder (formerly Seattle Supersonics).
Narration: That was me before I became a serious artist ..... While my jumping skills have regressed, my video making skills have improved. You dont need to tilt your head to the left anymore. Now that you have seen my very mediocre Sportscenter highlight, I am going to teach you about highlighting and shading in a drawing video. This video will teach you how to draw the top player on team USA, Mr. Kevin Durant. All you have to do is follow the step by step instructions and pause the video at the end of each step while you draw. Im going to make it easy, so I hope that you give it a try. Lets get started.
Step one- Observe, then draw the two shapes that you see. The top shape is similar to a crescent moon. The bottom shape is trapezoidal and the base of the bottom shape is similar to a childs drawing of a bird in flight.
Step two- Add the four oval shapes for the eyes and ears. Be sure to notice that the left ear is much thinner because the head is turned.
Step three- The double shape that I just added is the edge of the bottom of the nose and a parallel line for a shadow. Be sure to notice the symmetrical smile lines on both sides of the nose as well. Here is a close up.
Step four is a tricky step. Start with completing the oval for the chin. Next, create the symmetrical lines for the moustache. Durant also has sparse facial hair below his bottom lip and at his chin.
Step five is the most difficult step. I added the mouth and I will give you a close up in a second. Notice the shape of the teeth and the shadow below the teeth. Take some extra time to observe the teeth are slightly taller than the shadow below. Also, notice that the top lip gets darker as it turns towards the teeth.
Step six- add the eyebrows to the top of the oval shapes from step one and the eyes towards the bottom. Also, observe and add the details to the ears.
Step seven. add the jersey.

What happens when the faces of art icons Bob Ross, Pablo Picasso and Chuck Close are morphed together. Watch the video to find out. Tradigital artwork by Merrill Kazanjian http://merrillk.com . I used Paint Shop Pro 8, Photoshop CS3, a printer, color pencils and oil paint to make this artwork.

FINALLY....a landscape painting
realistic oil painting oil paintings dogs figure oil painting oil paintings of seascapes oil paintings children oil painting collections oil painting how to oil painting oil painting websites oil painting for children hawaiian art paintings oil painting reproductions
artists oil paints oil & watercolor paintings portrait painting artist dog oil paintings latest oil paintings oil paintings for sale seascapes oil paintings art oil paints nature oil paintings
large oil paintings oil painting images oil paintings figures oil painting of animals paint oil paints oil paintings of animals fall oil paintings oil painting catalog oil paints for beginners nature oil painting portrait painting artists describe oil painting sketching oil painting seascape oil paintings discount oil painting oil painting pics oil painting gallery
paintings hawaii oil painting supplies beach paintings hawaiian art prints hawaii paintings hawaii fine art hawaiian paintings hawaii art galleries hawaii oil paintings tropical paintings tropical flower paintings hibiscus painting hawaiian art galleries hawaii painters hawaii artist portrait oil paintings hawaiian art watercolor landscape paintings oil painting portraits oil paintings portraits oil painting portraits how to maui art antique oil portrait painting fine art oil paintings fine art oil painting landscape oil paintings gallery
still life oil paintings oil paint portraits realism oil painting oil paintings of still life cafieri oil paintings oil paint portrait oil paintings of landscapes oil paintings by famous artists artwork oil paintings portrait paintings by famous artists oil pastel paintings impressionist oil paintings portrait paintings children painting contractors oil paints for artists classical oil paintings landscape paintings famous artists oil paint landscapes oil paintings by landscape oil paintings for sale classical oil painting how to oil paintings nude oil paintings oil painting societies american oil painting oil painting website realistic oil paintings oil paintings of children big island hawaii maui hawaii vacations oahu hawaii vacation packages hawaii cruise vacation honolulu hawaii map of maui hawaii things to do in maui hawaii best island in hawaii hawaii vacation maui island hawaii kona hawaii
cheap flights to honolulu hawaii beach luau
WE NEED A VISUAL ARTS CATEGORY ON YOUTUBE THREAD-http://www.google.com/support/forum/p/youtube/thread?tid=2a9806f929074cbd&hl=en&fid=2a9806f929074cbd0004b630ad37cc3e
Facebook- http://facebook.com/kazanjianm
Twitter- http://twitter.com/kazanjianm
Website- http://merrillk.com
(Merrill) Supplies I Use- http://www.jdoqocy.com/click-4....247664-805536?url=ht
This is Part 2 of How to draw Kevin Durant Step by Step
The darkest parts will be the eye region, and the shadow under the nose......followed by the hair. This is usually not the case (The hair almost always has the darkest tones in a drawing, but there was a strong light from above in my reference images. I smudged the brow with the tortillion because I didnt want it to be one solid shape. I will cross hatch over the smudge. The brow is darker (thicker) towards the center of each eyebrow. His hair is both curly and cropped. I started with dark squiggles (Is that a word?)....Then I will cross hatch over the "squiggles". Cross hatch light over the forehead.....then I pressed it down (smoothed it out) with a bristle brush. I found that stiff bristles work better than soft ones. The folds under the eye are important in order for you to capture his likeness.....Also, his eye region is in EXTREME shadow. Do not be scared to go DARK!!!!! I didnt "waste any time" with the shadow under the nose. I usually build things up slowly, but in this case, I just went for it, because it is a simple shape with hard edges....If it was a complex shadow (with several dark tones) I would have done it more slowly. .....NO LINES betwe
All Music is by Kevin Macleod of Incompetech.com. Thank you Kevin for letting me use your wonderful music!

WE NEED A VISUAL ARTS CATEGORY ON YOUTUBE THREAD-http://www.google.com/support/forum/p/youtube/thread?tid=2a9806f929074cbd&hl=en&fid=2a9806f929074cbd0004b630ad37cc3e
Facebook- http://facebook.com/kazanjianm
Twitter- http://twitter.com/kazanjianm
Website- http://merrillk.com
(Merrill) Supplies I Use- http://www.jdoqocy.com/click-4....247664-805536?url=ht
Today, you are going to learn how to draw a 250,000 dollar sports car that goes 0-60 faster than Fred Flintstone on Red Bull.......Wait a second....it has power windows....make that 260,000 dollars. All you have to do is follow my step my step instructions and watch the shading tutorial and youll be able to draw the Lamborghini Gallardo. Lets get started/
Step 1: Draw the three trapezoids that you see. Take extra time to observe their placement. Due to the rules of perspective the large trapezoid at the top is rounded at its top.
Step 2: Dont Freak out! Look closely, all I added was a half circle with other shapes inside. Notice that the half circle is slightly smaller than the large trapezoid shape from step 1.
Step 3: Now here is the hard one! First, notice that I closed the shape on the right side. Second, notice that I added a rectangular shape directly below the smaller trapezoids from step one. Take time to notice the placement of the shapes within the rectangle. Finally, notice the horseshoe shape in between and below the shapes added from steps 1 and 2.
Step 4: Add the front tires and the fancy thingey on the door. If you made it through step 3, step 4 will be a breeze.
Step 5: Complete the back end of the car from observation. Take some extra time to notice the details of the rims and wheels.

Want to draw the beautiful Jennifer Lawrence (Katniss Everdeen from the Hunger Games)? This video will show you step by step how to draw her with just a pencil and paper. I made this drawing tutorial in time for the upcoming Hunger Games Mockingjay Movie. I model he process of drawing by teaching you how to draw step by step.
Subscribe to kazanjianm (Don't miss any new videos that I make)- http://www.youtube.com/subscri....ption_center?add_use
Facebook: Like me on Facebook to find out about live hangouts or to post your work!- http://facebook.com/kazanjianm
Twitter: I tweet! Do you? http://twitter.com/kazanjianm
My Website: http://merrillk.com
Art Supplies I Use in my Art Work- http://merrillk.com/?sid=135&idpage=supplies_i_use
YouTube Visual Arts Category Petition: http://www.change.org/petition....s/create-a-visual-ar
Step by Step Drawing Playlist: http://www.youtube.com/playlis....t?list=PLD6E34C7CD58
Link- http://merrillk.com/?part=fineart&articles_id=6935&act=artist1&artist=69&collection=114
Illustration markers are incredible tools for artists! They add color quickly and accurately without a time consuming set up or a messy clean up. They can be used alone or in combination with other artistic media. This tutorial will teach you what you need to know about illustration markers. You will learn how to use them as I demonstrate by drawing a basketball player. Lets Get Started with thos tutorial!
Lets start by giving you some background knowledge.
1a.) Brands- The most popular brands are Prismacolor, Copic , Ad Chartpak and Pantone. I will do a drawing demonstration of Ad Chartpak in this video.
1.) Markers- When you use illustration markers, think of yourself as a watercolor artist. Watercolor artists create their work with beautiful transparent colors. If you choose to try illustration markers, you will definitely be able to apply and make multiple layers of transparent color. But there is a difference......the ability to mix. The colors are pre mixed and they do not blend together like wet paint as you can see in this demonstration.
2.) Special Markers- There are two different types of special illustration markers; Blender markers and gray markers for tones. The blender marker is a little deceptive. It is simply a marker without color in it. It is comprised of the fluid that the marker is mixed in. When it is applied on paper, the colors will bleed together. Notice how the line in between the two colors has disappeared. You will see more examples of how to use the blender in my demonstration. The gray markers are used to build tones. They come is Warm and Cool chromas. The warm gray markers lean towards the warm orange half of the color wheel and the cool ones lean towards the cool blue half. As you saw in the previous section, we cant mix marker colors on a palette like paint, so these gray markers become extremely important. These markers give an illustrator the ability to add tones......and tones make an artwork interesting by giving it depth. As you can see, these markers have a range of tones from one to ten. Ten is the darkest tone and one is the lightest.
3.) Paper- In order to use Illustration Markers to their full capacity, you will need Bleedproof paper. It is specifically made for markers, and it prevents markers from running. Notice the difference in the amount of bleeding of the printer paper on the left, compared to the Bleedproof paper on the right.
4.) As a final point before you see the demonstration, I wanted to make you aware of an article that I wrote that goes in to depth about the nuances of illustration markers. I will recommend color palettes, compare brands and describe techniques for illustrators. It is a good resource for people who wish to learn about illustration or for any person who is in the market for illustration markers. I will leave a link in the video description.

What happens when you merge the faces of Eliot Spitzer, Mark Sanford, Bill Clinton John Edwards? You get a celibate monk!!!!!
All photos are from Wikipedia.com (under a creative commons license). For example Bill Clinton-http://en.wikipedia.org/wiki/File:Bill_Clinton.jpg (Work of a govt Employee) John Edwards- http://en.wikipedia.org/wiki/F....ile:John_Edwards,_of (Work of a govt Employee) Mark Sanford- http://en.wikipedia.org/wiki/File:MarkSanford.jpg (govt employee) Eliot Spitzer- http://www.flickr.com/photos/d....avidsilver/232947805 (Was posted by David Silver under a Creative Commons license) http://www.flickr.com/photos/kapkap/1335721782/ (Posted by Paul S under a creative commons license).
Music was taken from Incompetech.com - a site recommended by youtube in the partner program tutorial.

Hint number 1 is to see things as shapes. I like to analogize drawing with assembling a jigsaw puzzle because in both you look for shapes to fit together Hint number 2 is to pay close attention to the edges of what you are drawing. Light and shadows can do funny things and in almost anything that you draw you will see a disparity between the qualities of each edge. Hint number three is to develop your drawing like a Polaroid photograph. Polaroid was the company that innovated instant photography. After pushing the shutter button the photograph would come out of the camera and develop before your eyes. What I want you to know about this is that every part of the photo would develop at the same rate and that is how I want you to try to draw next time. In other words, move the drawing tool around, dont get stuck in a favorite spot. Alright, lets slow it down. What you are seeing me do here is pay close attention to the form and the proportions. In other words, I am comparing the sizes of the different shapes and making sure that the placement of each line is correct. I am using vine charcoal a HB pencil and an eraser. I started out with the vine charcoal because it is easy to erase and move around. You will see later in this video that after I am satisfied with the placement of the charcoal, I will hatch over it with a pencil to keep it undisturbed. I am also trying to be aware of the edges of my shapes and I am especially cognizant of the highlight on the top because that will require me shading the areas around it and using the white of the page as a representation of the strong light. Now when I look back at my reference, I notice that the tone of the background is much darker than the white of the page. I use the side of the charcoal to darken the mid tone of my drawing. This step will make it easy to draw in the highlights with an eraser a little bit later. Now I am folding a piece of paper towel to smudge in the charcoal. You will get a very similar result with a blending stump (also known as a tortillion) but the towel will smudge the charcoal more quickly. To be perfectly honest, many teachers that I have had have told me not to use a blending stump, fingers or anything that comes in to contact with the surface of the paper. I partially agree. Oil from fingers when combined with pencil or charcoal leaves a stain that is tough to work around. Notice that my hand is resting on a sheet of paper. Artists call these slip sheets, but it is just a sheet of computer paper. I like working with the blending stump and the paper and this process works for my needs. It would be dishonest if I changed my process for the sake of making a video. Before, I mentioned the term hatching. Hatching is the short name for the drawing technique of cross hatching. It is simply putting a series of lines next to one another with a drawing tool. These lines usually follow the shape of the object that is being drawn. Once I am done adding pencil marks, I take the blending stub to burnish over my hatch marks. This gives my drawing a more smudged look and possibly my former art teachers a heart attack. I like to smudge the pencil and charcoal because it also gives me a surface that is smooth in tone. Hatching can be layered and I usually stop using the blending stump after the second layer. I once did ten layers of hatching in a pencil drawing. Lets recap and take this to the end of part 1. My focus, over the course of any drawing that I do from observation, is to see a simple pattern of shapes on my reference and to accurately render these shapes, on to the piece of paper that I am drawing. After I get the shapes aligned correctly, I attempt to build up tones with charcoal and pencil. When I am building the tones, I am very aware of the nuances of the edges of each shape, because they are usually different. My focus is also on building the tones of my drawing in a similar manner to how a Polaroid photograph develops.
In part 2, I will teach you a way to add color to any pencil drawing. Thanks for watching the video and please let me know if this helped.

Want to learn to draw Bruce Lee? Look no further. This video will teach you how to draw his body step by step. The first minute and a half is a Bob Ross stop motion karate movie parody where Bob Ross enters my studio and unleashes his master painter ninja style....aka- beats me up.
Art, Step by Step Drawing tutorial:
Step 1.) Observe then add the shape for the upper chest. This shape is comparable to the height of the face. Please note that Bruce's body is turned so the area is foreshortened.
Step 2.) fits to step one like a puzzle piece. Be sure to notice that the bottom is rainbow like and the sides point slightly away from each other.
Step 3.) is a very tricky step. Try to notice that the shape of the arm in this step looks like a women's dress shoe. Put that large shape in first, then go on to she smaller shapes.
Step 4.) Add the V Shape for Bruce Lee's left arm. Notice that it is wider at the top of the arm than the bottom. The palm of the hand is circular and the thumb and pinky protrude at a similar angle.
Step 5.) Observe, then add the line to fill in the shoulder.
Step 6.) Observe then add the legs. Notice that his pants are worn very high, so his legs are slightly longer than his upper body.
Step 7.) Add Bruce Lee's ankles and feet.
The song is called Cartoon Battle and it is by Kevin Macleod of Incompetech.com, a site recommended to partners to get copyright free music.
All music by Kevin MacLeod http://incompetech.com Thank you Kevin!
The image of Bob Ross is from creative commons search- http://www.flickr.com/photos/z....anthraxnl/3613024633

WE NEED A VISUAL ARTS CATEGORY ON YOUTUBE THREAD-http://www.google.com/support/forum/p/youtube/thread?tid=2a9806f929074cbd&hl=en&fid=2a9806f929074cbd0004b630ad37cc3e
Facebook- http://facebook.com/kazanjianm
Twitter- http://twitter.com/kazanjianm
Website- http://merrillk.com
(Merrill) Supplies I Use- http://www.jdoqocy.com/click-4....247664-805536?url=ht
Today, I am going to give you step by step instruction to help you draw the male upper body. All you will need are drawing tools and some tenacity. Be sure to pause the video at the end of each step and observe each reference image that I give you. After we get through the steps, I will guide you through the shading process. Many people who have never drawn before have had a lot of success with my step by step videos.....and you will too. Lets begin.
Step 1.) Draw the shape that you see. Notice that it is curved at the bottom. Also be sure to notice the W shape at the top. Make sure that you notice that the left part of the W is smaller than the part on the right.
Step 2.) Lengthen the W to form the chest muscles. Also add the shadow lines below each chest muscle.
Step 3.) Step three is a tricky step. Add the line to complete the shape for the arm and shoulders. Take extra time to observe during this step.
Step 4.) Complete the arms. Notice that each upper arm is wider than the lower arm but both parts are rounded in shape.
Steps 5,6,7,8 are all smaller details that I added for shadows. Do not stress out over these steps. Expect your placement to be close rather than perfect. In other words, try to place them as accurately as possible but know that they do not have to be placed perfectly for you to have a successful drawing.

This video is going to teach you how to draw a portrait of NBA All Star, Chris Paul Step by Step.
WE NEED A VISUAL ARTS CATEGORY ON YOUTUBE THREAD-http://www.google.com/support/forum/p/youtube/thread?tid=2a9806f929074cbd&hl=en&fid=2a9806f929074cbd0004b630ad37cc3e
Facebook- http://facebook.com/kazanjianm
Twitter- http://twitter.com/kazanjianm
Website- http://merrillk.com
(Merrill) Supplies I Use- http://www.jdoqocy.com/click-4....247664-805536?url=ht
And I promise that I am going to make this VERY EASY for you. What? You dont believe me? Well fine! I guess that you are one of those people that need proof. Click the Little Old Man on the screen to go to a playlist of peoples drawings made from my videos. Oh, so you're back.....And you believe me now. Good! Now you can grab a pencil and some drawing paper. You are about to draw Chris Paul. But first, a quick word from our channel mascot......
Step 1: Draw the shape that you see. Take some extra time to compare the height versus the width.
Step 2: Add the two ovals. Notice their overall size compared to the shape from step 1.
Step 3: Add the nose shape. Notice that it is triangular and the line on the bottom resembles a bird in flight.
Step 4: This step is small, but tricky. It is the upper lip and the moustache. Notice how close the moustache is to the nose and draw both shapes.
Step 5: I just added two shapes, but for now ignore the line in the middle and see the two shapes as one larger shape. The larger shape resembles an ear of corn. After you add the large shape, add the squiggly line in the middle. This line has 8 points pointing downwards.
Step 6: Now add the bottom lip and the soul patch below it. Notice the size difference compared to the top lip.
Step 7: Add the U shape for the bottom of the face.
Step 8: Add the ears and the hair. A tip for the ears is to notice their placement compared to other features of the face.
Step 9: Add the eyebrows. CP3 isnt quite Drake, but his eyebrows are thick.
Step 10: Add the two rainbow shapes under the eyebrows.
Step 11: This is the hardest step. A trick to make it easier is to observe that there is one eye length between each eye. Overall the shape of the eye is almond like and the top of the iris is blocked by the upper eye lid.
Step 12: Add the lines that you see in the ears.

Music has a special relationship with each person's memory. It ages with us. The music that we listen to as our lives elapse, stays with us and leaves an imprint that is unique for each person. Listening to an old song is quite possibly the most powerful way to recall the past. The death of Whitney Houston rocked my generation this week. She contributed to the soundtrack to many of our lives. In this video, I am going to do what I do best. I am going to give you a step by step formula so that you can draw Whitney Houston. While this might sound challenging, I want to reiterate that this is what I do best. So grab a pencil and paper and get ready to surprise yourself. Thousands of people have successfully completed my drawing tutorials and you are the next person to do so.
Step 1: Make the five dots that you see. While this step appears to be easy, the relationship between the dots is crucial so pause the video and take your time. Notice that if you connect the dots, we will have two triangles. Notice that the top triangle is larger than the bottom one.
Step 2: Add the nostrils and the line that connects them.
Step 3: Add circles around the top row of dots. This will eventually be the irises of each eye.
Step 4: Complete the eye shapes.
Step 5: Add the rainbow shapes for the eyelids.
Step 6: Add eyebrows
Step 7: Add the very soft line on your left and the backwards C shape on your right.
Step 8: Add the flattened M shape for the upper lip.
Step 9: Add teeth.
Step 10: Add the bottom lip.
Step 11: Add the oval shape for the face
Step 12: Add the shapes for the neck.
Step 13: Add the lines for the blouse.
Step 14: Add the shape for the hair. Just generalize it. It doesnt have to be perfect.
Step 15: Add the stray ends to the hair and the bangs. It was the 80's.
Step 16: Now its time to shade. If you feel that you made an unfixable mistake after you start shading, hit the first link in the upper right corner. This will give you an easy way to start over from this point rather than from the beginning. The method of shading that I am using is called cross hatching. To see my tutorial on cross hatching hit the second link in the upper right corner.
Start off by darkening the eye area. Whitney is wearing mascara in this picture so you can darken the lashes above and below the eye. The upper set of lashes will be thicker than the bottom set. The area between the eyebrows and the upper eyelid will be hatched to a tone that is almost as dark as the eyebrows. Notice that there are highlight areas though. Do not make a solid line for the bridge of the nose. That will remain as a smudge. You can use a paintbrush, a blending stump or a q-tip to soften it. Notice the difference in tone between the left side and the right. The white stick that you see me using is called a tortillion or a blending stump. Do some light hatching over the cheeks and the nose and some extra hatching to round the face by where the hair is on each side of the face.
Step 17: Its time to shade the forehead. be sure to continue the tones that exist from the previous step. The center of the forehead will be in highlight and the hair will be darkened relatively dark. Make the temple area almost as dark as the hair. Use a paintbrush, blending stump or Q-Tip if you wish to smooth the transition from dark to light.
Step 18: The top lip will be darker than the bottom lip and the top lip will be at its darkest point as it moves towards the opening for the mouth. Shade around the bright highlight on the bottom lip. It should be similar in tone to the teeth. The tones on the bottom of the face are tricky. You will have to round the face at the jaw line without making her look like she has a beard. There is a solid line at the jaw line and the area below the chin will be in heavy shadow, as you will see in our next step.

Subscribe to kazanjianm (Don't miss any new videos that I make)- http://www.youtube.com/subscri....ption_center?add_use
Facebook: Like me on Facebook to find out about live hangouts or to post your work!- http://facebook.com/kazanjianm
Twitter: I tweet! Do you? http://twitter.com/kazanjianm
My Website: http://merrillk.com
Art Supplies I Use in my Art Work- http://merrillk.com/?sid=135&idpage=supplies_i_use
YouTube Visual Arts Category Petition: http://www.change.org/petition....s/create-a-visual-ar
Step by Step Drawing Playlist: http://www.youtube.com/playlis....t?list=PLD6E34C7CD58
Learn to draw rapper Mac Miller. This video will teach you how to draw rapper Mac Miller. Follow my steps and then watch my shading tutorial at the end. Post your drawing to my facebook page or as a video response/

This is my video response to Phil Hansen's (Philinthecircle) interactive toilet paper printing tutorial.
Here is his video- http://www.youtube.com/watch?v=4EudkS-U6QQ
YouTube Visual Arts Category Forum- http://www.google.com/support/forum/p/youtube/thread?tid=2a9806f929074cbd&...
Supplies I Use- http://www.jdoqocy.com/click-4....247664-805536?url=ht
Facebook Page- http://facebook.com/kazanjianm
Twitter- http://twitter.com/kazanjianm

Link- http://merrillk.com/?part=fineart&articles_id=11538&act=artist1&artist=69&collection=461
WE NEED A VISUAL ARTS CATEGORY ON YOUTUBE THREAD-http://www.google.com/support/forum/p/youtube/thread?tid=2a9806f929074cbd&hl=en&fid=2a9806f929074cbd0004b630ad37cc3e
Facebook- http://facebook.com/kazanjianm
Twitter- http://twitter.com/kazanjianm
Website- http://merrillk.com
(Merrill) Supplies I Use- http://www.jdoqocy.com/click-4....247664-805536?url=ht
This video will show you how to draw Amare Stoudemire's body. It is part 2 of 3.
How to draw Amare Stoudemire step by step knicks suns all star. How to draw basketball player amazing art drawing

We NEED a Visual Arts Category on YouTube! SIGN OUR PETITION HERE- http://www.change.org/petition....s/create-a-visual-ar
Please contribute a video to our playlist HERE- http://www.youtube.com/playlis....t?list=PLEA626A08B26
As for this video.....GOSH! This video will teach you how to draw Napoleon Dynamite step by step.

How to Draw/Paint Jack Sparrow (Johnny Depp) and Will Turner (Orlando Bloom) in Dry Brush Technique.
Link- http://merrillk.com/?part=fineart&articles_id=13277&act=artist1&artist=69&collection=462 This video is going to teach you how to draw or paint two famous pirates, Captain Jack Sparrow and Mr. William Turner from Pirates of the Caribbean. I dont care if you if you have limited art experience, grab your art supplies because you are going to surprise yourself today. In this video, I am going to demonstrate the process of dry brush, but you also have the option to follow along with a pencil. I strongly recommend that you hit the link in the video description and use my step by step guide while you watch this video. Its printable and it has photos and text and it will simplify the process a lot.
If you are planning on doing dry brush, do the steps on watercolor paper.
If you are planning on doing a pencil drawing, do the steps on drawing paper.
Lets begin. Captain Jack Sparrow is a fictional character and the main protagonist in the Pirates of the Caribbean film series created by screenwriters Ted Elliott and Terry Rossio, portrayed by Johnny Depp. He is first introduced in the film Pirates of the Caribbean: The Curse of the Black Pearl (2003). He appears in the sequels Dead Man's Chest (2006), At World's End (2007), and On Stranger Tides (2011). Jack Sparrow was conceived by Elliott and Rossio initially as a supporting character, but Jack serves as a central protagonist in the films. He was brought to life by the actor Johnny Depp, who based his characterization on The Rolling Stones guitarist Keith Richards and cartoon character Pepé Le Pew.
The series Pirates of the Caribbean was inspired by a Disney theme park ride, and in 2006, when the ride was revamped, the character of Jack Sparrow was introduced to it. Jack Sparrow is also the subject of a children's book series, Pirates of the Caribbean: Jack Sparrow, which chronicles his teenage years and the character has also appeared in numerous video games.
In the context of the films, Sparrow is one of the Brethren Court, the Pirate Lords of the Seven Seas. He can be treacherous, but survives mostly by using wit and negotiation rather than weapons or force, preferring to flee most dangerous situations and fight only when necessary. Sparrow is introduced seeking to regain his ship, the Black Pearl, from his mutinous first mate, Hector Barbossa, and attempts to escape his blood debt to the legendary Davy Jones while battling the East India Trading Company.
Music by Kevin MacLeod Song- Montego. Website http://incompetech.com

Worksheet- http://merrillk.com/?part=fineart&articles_id=8107&act=artist1&artist=69&collection=114 .This video will teach you how to draw a baseball player. I will provide you with a link to a worksheet to accompany the video. I demonstrate how to break images down in to smaller shapes and how to draw from observation. I demonstrate how to make construction lines to draw realistically and place the "shapes" together correctly. The baseball player is in a batting stance (swinging a bat and hitting a baseball). I use a set of pencils (HB, 2B, 4B, 6B Graphite Stick)to do the drawing and shading and a tortillion (blending stump) and a paintbrush to help build tones and blend realistic textures. This video will show you: how to blend with a paintbrush, how to sketch a baseball player, how to draw a baseball player, how to draw a baseball bat, how to sketch a baseball player, how to draw a baseball glove, bas ball Keyword
pitching baseball home run baseball fantasy baseball league baseball home runs fantasy baseball sleepers fantasy baseball guide fantasy baseball tips fantasy baseball help fantasy baseball analysis drawing college drawing baseball draw baseball drawing sports baseball drawings drawing career drawing of baseball baseball bat drawing baseball player drawing drawings of baseball players how to draw baseball players baseball player drawings baseball bat drawings drawings of baseballs drawings of baseball bats drawing of a baseball bat how to draw a baseball pitcher tournament hall of fame famer master drawings drawing convert drawings of eyes twilight drawings dwg drawing anatomical drawings anatomical drawing drawing artwork drawing papers drawing training male figure drawing learn figure drawing learn to draw anatomy
drawing drawings portrait sketching drawing drawing software drawing games cad drawing cad drawings sketch drawing drawing school landscape drawing
famous drawings eagle drawing landscape drawings pastel drawing drawing file pen and ink drawing working drawings
