تازہ ترین ویڈیوز

THE QUESTION: Is an EMO still an EMO if he loses his hair?...........Script from video: For those of you who dont know.....EMO's are the dudes known for their melancholy dress code, morbid body language, sad facial expressions and their taste in music.....but most of all, EMO's are famous for their super floppy, vision impairing hair! Oh look! Heres a fine specimen!....This leads us to a question that perplexes the universe.....Is an EMO still an EMO if he loses his hair? I want to hear your opinion......Post your answers to this question as a text comment or a video response, to enter yourself in this contest. All responses will be judged on humor and originality. Please don't post anything offensive because we want to make EMO's smile, not cry! The prize is an illustration of the winner be me, Merrill Kazanjian. As always I will document the process on video and give you a copy for your channel. The deadline for this contest is March 1st, 2010 and the winner will be chosen on March 2nd.......Anyway, heres how I drew the Balding Emo.
Here are the steps that I took to create the "Balding Emo" artwork:
Step 1.) Pencil
Step 2.) Illustration Marker- Prismacolor and Chartpak Ad markers
Step 3.) Color Pencil
Step 4.) Scan with Epson Scanner
Step 5.) Digital Collage using Paint Shop Pro 9
Step 6.) Print with Hewlett Packard Printer
Step 7.) Color Pencil
Step 8.) Scan with Epson Scanner
Step 9.) Finishing Touches with Paint Shop Pro 9
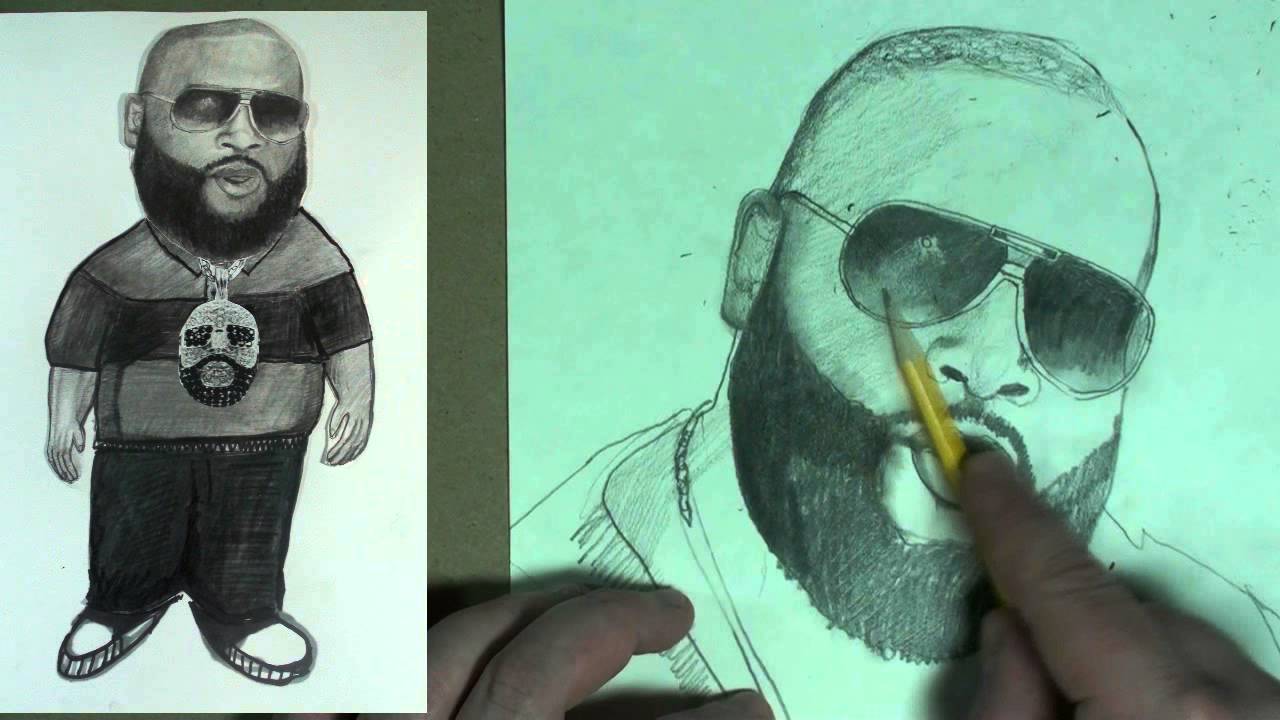
This is my first portrait tutorial in over a year! Rick Ross is a frequent request and he has a new album coming out called Mastermind.
Subscribe to kazanjianm (Don't miss any new videos that I make)- http://www.youtube.com/subscri....ption_center?add_use
Facebook: Like me on Facebook to find out about live hangouts or to post your work!- http://facebook.com/kazanjianm
Twitter: I tweet! Do you? http://twitter.com/kazanjianm
My Website: http://merrillk.com
Art Supplies I Use in my Art Work- http://merrillk.com/?sid=135&idpage=supplies_i_use
YouTube Visual Arts Category Petition: http://www.change.org/petition....s/create-a-visual-ar
Step by Step Drawing Playlist: http://www.youtube.com/playlis....t?list=PLD6E34C7CD58
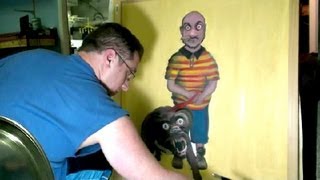
Hey everyone it's Merrill. I made this video to show you a unique and hopefully amazing mixed media art technique that I use to create my "characters". Over the years, I have made more than 2000 characters which I save as PNG files, to reuse in my painting compositions. I use a mixed media approach to art making. I start with a pencil sketch. Then I add my first layer of color with AD Chartpak illustration markers. Next, I use Prismacolor colored pencils. Next, I use a scanner so that I can digitally edit my drawing. I use the archaic Photoshop competitor program Paint Shop Pro 10 to digitally refine my artwork. This program enables me to collage photos from Google Image Search in to my Artwork. Then I use a large format printer (HP DesignJet 510) to print my work on to a canvas. I then use a paint brush and my knowledge of oil and acrylic painting techniques to finish off my painting. I call this work Man With Dog and it is based upon a meeting I had with a parent at parent/teacher conferences (I am a teacher). I hope that you find my process interesting and fun. If nothing else, it is a unique way to transform my ideas in to something tangible. I like to create art and I am more known on YouTube for my step by step drawing videos. This is something different and hopefully something cool. It aint beautiful, but art is a bi product of an artists reactions to the world around him.

This is an oil paint portrait that I made for a friend. I haven't made one (a pure oil painting) in years. I am now a mixed media artist but it feels good to try this again. I used Old Holland, Vasari, Bloxx and Gamblin Oil paint on paper. It has some details added with color pencil and paint marker. The medium that I used was Liquin.
oil paints, oil painting, oil paint, oil paintings, artist oil paint, oil paint color, oil paint sets, how to oil paint, oils paint, oil painting supplies, oil paint water, oil paint brushes, oil paint set, oil paint brush, acrylic oil paint, oil paint techniques, oil paint art, oil paint canvas, oil paint varnish, oil paint palette, oil paint technique, oil paint medium, mixing oil paint, oil paint colors, oil paint artists, oil paint supplies, oil painting techniques, clean oil paint, cleaning oil pain, oil paint stain, oil paint dry, oil based paint, oil paint materials, oil paint flowers, oil paint wash, oil paint portrait, oil paint mediums, oil paint lessons, oil paint landscape, airbrush oil paint, gesso oil paint, learn to oil paint, artist oil paints, oil paint colours, oil paint glass, learn oil painting, oil painting lessons, oil painting technique, how to paint with oils, oil painting tips, oil paint pigments, oil paint tips, oil paint wood, spray oil paint, oil paint primer, oil paint finish, exterior oil paint,
removing oil paint, oil paint pigment, oil vs latex paint, oils paints, make oil paint, oil paint history, oil paint pictures, oil paint sale, oil paint use, old oil paint, oil paint reviews,
oil paint brand, gold oil paint, oil paint instructions, making oil paint, thick oil paint, oil paint products, best oil paint, oil paint brands, oil paint review, how oil paint, oil paint tube, oils painting, oil paint container, oil paint tubes, buy oil paint, using oil paint, thin oil paint, oil paint effect, graham oil paint, charvin oil paint, old holland oil paint, learning to oil paint,
Extended shading tutorial

LINK- http://merrillk.com/?part=fineart&articles_id=8462&act=artist1&artist=69&collection=114
Facebook- http://facebook.com/kazanjianm
So. you wish to draw Bruce Lee do you?
Hahahahahaha
Oh you are serious?
Well then?
You must Enter the Dragon with me
I will train you to be deadly with a pencil. This video will teach you how to draw Bruce Lee's Head. Video two will teach you how to draw Bruce Lee's body.
Simply follow my step by step instructions and eat fish heads twice per day and you will have no problems with your drawing.
If you do not like fish heads, I recommend that you hit the link in the video description. You will be taken to a resource with words and pictures. Simply download and print and you will not need the protein content of the fish heads.
One more thing before your training begins. It would be prudent for you to click on Little Old Pai Mei and his Pikachu friend so that you can subscribe to this channel. Because, you will never be able to spell it again!
I will act normal again in three seconds.......
Step 1: Observe then draw the shape that you see. The bottom is a semi circle
and the top is trapezoidal.
Step 2.) Add the two shapes that you see. They will be the area around Bruce
Lee's eyes.
Step 3: Add the shapes which will make up Bruce Lee's nose. Be sure to notice that
the size of these shapes when together is slightly smaller than the eye shapes
from the previous step.
Step 4: Step four is the most complicated step. Be sure to observe it for a few
seconds before you draw it. Notice that the trapezoidal mouth shape is as wide as
the nose shape above. The shadow shape encircles the mouth and then forms a
shape that slightly resembles the State of California to the right of the mouth.
Step 5: Put in the lines which will separate the eyebrows and the area above Bruce
Lee's eyes.
Step 6: Is tricky. Be sure to give it extra time. Add the eyes and be sure to notice
that they lie directly in the middle of the shapes added in step two. Bruce will have
an angry expression in this picture so his eyes will be wide open and his eyebrows
will be pushing downwards.
Step 7: Add Bruce Lee's vintage 70's Emo haircut.
Step 8: Add the two shapes for his neck.
"how to draw famous people step by step"

Fun figure drawing tutorial. Learn to draw Nicki Minaj.
WE NEED A VISUAL ARTS CATEGORY ON YOUTUBE THREAD-http://www.google.com/support/forum/p/youtube/thread?tid=2a9806f929074cbd&hl=en&fid=2a9806f929074cbd0004b630ad37cc3e
Facebook- http://facebook.com/kazanjianm
Twitter- http://twitter.com/kazanjianm
Website- http://merrillk.com
(Merrill) Supplies I Use- http://www.jdoqocy.com/click-4....247664-805536?url=ht
My Twitter- http://twitter.com/kazanjianm
Reference Image- http://merrillk.com/?part=fineart&articles_id=13970&act=artist1&artist=69&collection=464
TIP: Press lightly on the pencil when you fill in the mass.
I used this image from wikipedia commons - http://commons.wikimedia.org/w....iki/File:Nicki_Minaj . This file is licensed under the Creative Commons Attribution-Share Alike 2.0 Generic license. I will credit Philip Nelson in the video description.

I saw a realism challenge that Mark Crilley did where he crumples up a piece of paper and draws it. It is called, Drawing Time Lapse: Realism Challenge-- Crumpled Paper. I wanted to see how well I was able to respond to the great Crilley!
Here is Mark's original video: http://www.youtube.com/watch?v=zZdkjjj3Rg0
The song Cartoon Battle used in this video is by Kevin Macleod of Incompetech.com. Website- http://incompetech.com/m/c/royalty-free/faq.html

I have been reading your requests and a frequent one was Rick Grimes from The Walking Dead. The best place to put your requests is on my most recent video (I have over 300 now and i cant go through them all). Thanks! MK
My new channel: http://youtube.com/metaldetectingnyc
Subscribe to kazanjianm (Don't miss any new videos that I make)- http://www.youtube.com/subscri....ption_center?add_use
Facebook: Like me on Facebook to find out about live hangouts or to post your work!- http://facebook.com/kazanjianm
Twitter: I tweet! Do you? http://twitter.com/kazanjianm
My Website: http://merrillk.com
Art Supplies I Use in my Art Work- http://merrillk.com/?sid=135&idpage=supplies_i_use
Petition: YouTube NEEDS a Visual Arts Category: http://www.change.org/petition....s/create-a-visual-ar
Step by Step Drawing Playlist: http://www.youtube.com/playlis....t?list=PLD6E34C7CD58

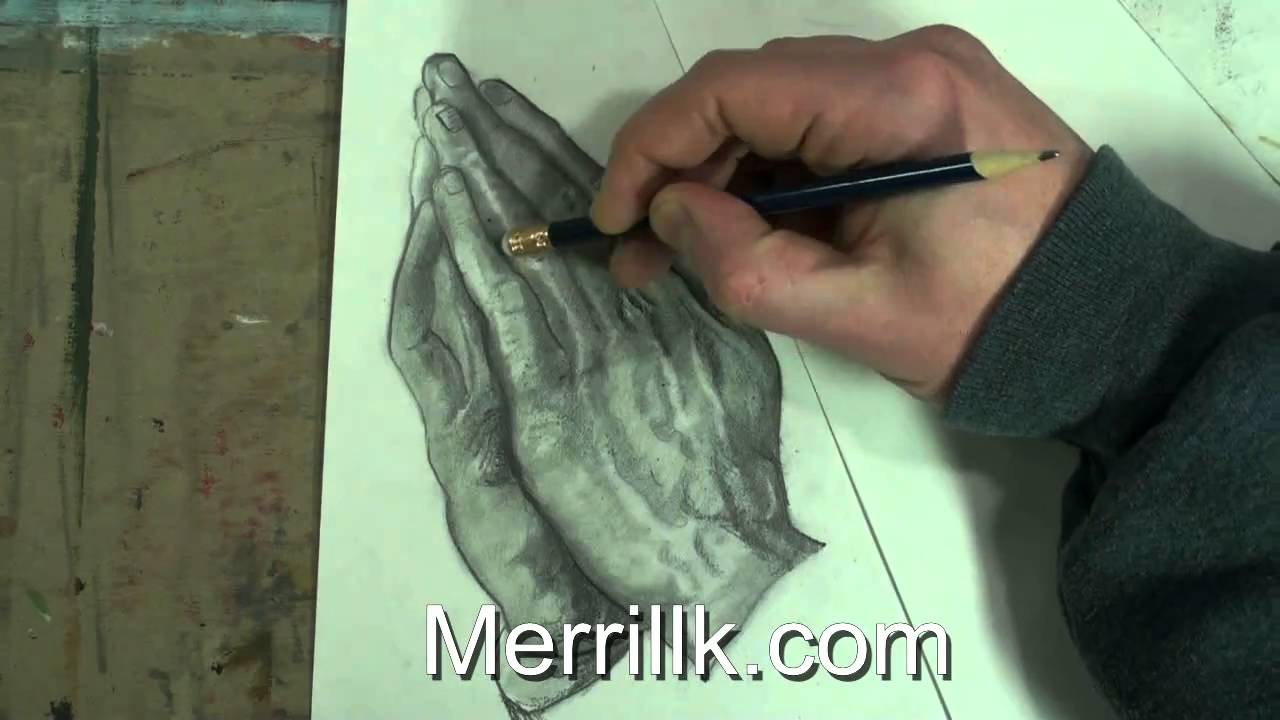
Step by Step drawing instruction. Learn how to draw a hand holding a sword.

This is a slower version of the shading that I did in, "How to Draw Kobe Bryant Step by Step (YOUDRAW) Special thanks to Rico Shen for use of his photograph via Creative Commons.

I was reflecting upon a recurring question from the hangout (How can an artist transition from drawing from reference images to drawing from memory?) This video should help.
Subscribe to kazanjianm (Don't miss any new videos that I make)- http://www.youtube.com/subscri....ption_center?add_use
Facebook: Like me on Facebook to find out about live hangouts or to post your work!- http://facebook.com/kazanjian
Twitter: I tweet! Do you? http://twitter.com/kazanjianm
My Website: http://merrillk.com
YouTube Visual Arts Category Petition: http://www.change.org/petition....s/create-a-visual-ar
Step by Step Drawing Playlist: http://www.youtube.com/playlis....t?list=PLD6E34C7CD58
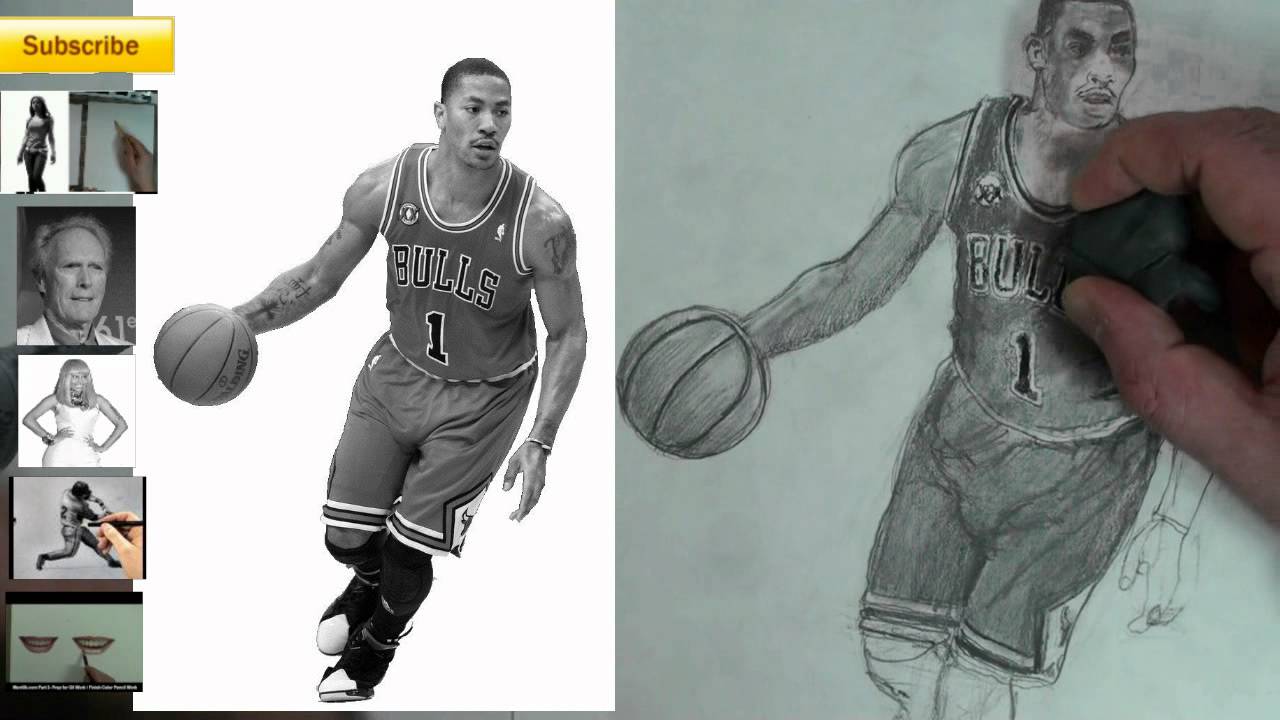
Learn to draw Chicago Bulls star Derrick Rose with pencil. Instruction by Merrill Kazanjian (kazanjianm)
Link- http://merrillk.com/?part=fineart&articles_id=14077&act=artist1&artist=69&collection=464
(Merrill) Supplies I Use- http://www.jdoqocy.com/click-4....247664-805536?url=ht
WE NEED A VISUAL ARTS CATEGORY ON YOUTUBE THREAD-http://www.google.com/support/forum/p/youtube/thread?tid=2a9806f929074cbd&hl=en&fid=2a9806f929074cbd0004b630ad37cc3e
Facebook- http://facebook.com/kazanjianm
Twitter- http://twitter.com/kazanjianm
Website- http://merrillk.com
Hello everybody it's Merrill. Welcome to the
fourth installment of you draw. Last time
Last time, we drew pink haired Nicki Minaj. This time we are going to be drawing the NBA's Most Valuble Player Derrick Rose. He has been one of my top requests. You might be asking, what is YOUDRAW?
You draw is an interactive figure
drawing series that you get a chance
to draw along with me.This series is made for graduates of my step-by-step videos. I am probably known best on YouTube for that series.
Many of my viewers have gotten too good for that approach. And
They need a new challenge. So this is the next step. If you wish, you can hit the link in the video description and you could print out the reference image.
You don't have to do that though. The image is on the screen.
let's get started. One order of business before I start talking about mister Derrick Rose. A lot of people that make the extra
effort to post video responses to my videos and i greatly appreciate that.
I really enjoy seeing your work.
It helps me see that I am helping people.
The column on the left of the screen are some of my favorite video responses. I encourage you to post yours. I will put your responses in a playlist that others can see and you will get hits.
Please keep posting those video responses.
I am starting out my drawing by scribbling in the shape.
Scribble lightly and dont worry about making mistakes.
Keep your lines light enough to erase with the pencil. Look for the overall shape. Don't worry about the outlines yet. Focus on drawing in the overall shape of Derrick Rose. You will definitely make changes to this as we progress with the drawing.
In a moment, pause the video and look!
Quickly scribble in what you see and then pause the video. Pause the video right now. There will be four of these breaks in this video.
There is no substitute for the real thing. Life Drawing. This is the internet version of life drawing. We will do our best. It will teach you what to look for when you draw from life in the future. This video series is the only interactive life drawing series on the internet.
I am teaching you from across the country or across the world.
2:04 Pause the video for a few minutes during each break and scribble out the "gesture". Dont look at my work, look at the reference image.
2:04 Try not to notice anything but his silhouette for now. Look for shapes in the negative space (under his arms).
2:22 Now you can "sculpt out" your contour lines.
2:32 Notice the DIFFERENCES! I was WAY OFF with my first guess (Most people are)! We correct our drawing with the contour lines.
4:37 By now, you should have completed the contour of the body. Its a video. Take your time. Go at your own pace.
6:25 Notice that most photo realistic portraits are LARGE in scale. The face will be a struggle.
6:42 Tip: I am using a mechanical pencil because the graphite is thinner. I will teach you how to shade with a pencil.
6:43 TIP: Squint your eyes and exaggurate the shadows on the face
7:53 Ink is absorbed in to the surface of a paper. Graphite slides on the top. The effect will be different.
I used the colored pencil because there is no tonal variation in the lettering of the jersey.
9:39 By now, if you haven't done so already, start your shading.
11:41 To finish a drawing, we must consider the qualities of edges

This video is made for any person who wants to learn oil painting. This video will give you a solid base of knowledge. http://merrillk.com
Today, I am going to show you how to paint a puppy dog. I made this video for beginner to intermediate level artists, who wish to learn about traditional painting...I will try to show you how to paint. step by step. While I can imagine that painting a realistic looking puppy is intimidating for someone new to art, I will try to make my instruction as clear as possible, so that you can get in to great habits for the future. Once you are in good habits, you will progress very quickly.
I split this lesson in to four parts.
1.) Part one will cover what you need to know before you paint.
2.) Part two will give you an effective strategy for painting realistically The mentality of rendering (aka drawing what you see)
3.) Part three will walk you through the process of painting and I will give you tips while I paint. The process of "sculpting" a painting
4.) Part four will actually be a separate video and it will discuss glazing...a great finishing strategy. Glazing: Finishing a painting (Covered in another video)
Part 1.) I have two points to go over in Part 1-
1-1- First, pick a surface to work on. When I was learning painting, I would use cardboard in place of canvas to save money. Ten years later my original oil paintings are still in good shape. However, this would not be the case if I didn't prime the cardboard with layers of Gesso. Without getting over technical, gesso gives your surface a protective layer that will prevent the oil from being over absorbed. Try to remember this silly saying, "Paint with cream, not with butter or milk!" No, im not saying that you should break out the dairy prodicts.....I am referring to the consistency of the paint. Cream is not a solid like butter .....and is not watery like milk. When you apply paint to a surface it should be creamy in texture. You can make the paint creamy by adding about three to four drops of painting medium to the paint that is sitting on your palette. The object in my hand right now is called a palette knife. I used it to mix the paint with the painting medium. For a long time, I considered this step trivial, but it makes a difference!
1-2 Oil Painters use mineral spirits to clean off their brushes and to thin out a paint mixture. Mineral Spirits is also known commercially as paint thinner and sold as an art supply called turpenoid for quadruple the price. You will only need a SMALL amount of Mineral Spirits because its very powerful. Use it sparingly when you wish to thin out your paint; because too much will make the paint runny and "milk-like" in consistency. Here is a great tip to remember when cleaning your brushes.....WIPE-DIP-WIPE. As silly as that sounds, commit it to memory....In other words..... wipe your brush with a paper towel.....Then dip it in to the mineral spirits and swish it around....followed by another wipe with the paper towel to take the extra spirits off your brush. The last wipe is especially important to prevent the excess mineral spirits from thinning out your paint too much
Part 2
Now you will learn a great strategy to help you paint what you see. I call this strategy, "jigsaw puzzle observation" because it is similar to putting a jigsaw puzzle together. Jigsaw puzzles are fun because you fit shapes together to create an image.........I want you to think the same way when you paint. Try to see and identify shapes and then put them together like a puzzle. Painters sculpt and manipulate the paint on the surface of a painting until the shapes fit together as a recognizable image. Here....let me show you what I mean.....When you try this, I recommend that you get in the habit of looking at your reference image at least once for every five seconds; and then paint what you observed. After you get the bigger shapes in.....work your way down to the smaller shapes........ If you feel that you cant work the paint any more. Let it dry and repeat this step on top of the dried paint. You have an advantage by using paint because it is opaque and it can cover over any mistake...... Take your time with this step. Skyscrapers cant be erected without solid supports and good paintings cannot be made without careful placement.
How to begin oil painting vido
Supply List
- Titanium White (paint)
- Raw Sienna (paint)
- Ultramarine Blue (paint)
- Ultramarine Purple (paint)
- Lamp Black (paint)
- Painting Medium (my favorite is called Liquin)
- Palette, Wax Paper or Aluminum foil (to mix the paint on)
- Mineral Spirits
- Canvas or Cardboard
- Gesso (white or clear)
- Paint Brushes (several sizes, tips, and softnesses......based on your preference)
- Cups for Mineral Spirits and Paint Medium

I am going to be using illustration markers, color pencils and oil paint. Just drop me a line if you have any questions
In step 1 I scanned and reprinted my original drawing- I do this for 2 reasons- 1.) If I mess up, I could just reprint it and 2.) marker and color pencil coexist better with printer ink than with graphite from a pencil.
Next I add a layer of the illustration markers. These markers are totally transparent and they enable me to add a layer of color and still be able to see the lines from my pencil drawing. These markers give the artist a similar effect to watercolor paint, but without the messy setup and clean up.. I am still following the Polaroid picture development analogy from the first video- in that I am adding color to all areas at an even pace and slowly building up the darker tones on the sides and bottom of the glass.
The color pencil is great at this point of the drawing, because it adds a translucent layer of color above the marker. In addition to that, color pencils are mixed with wax. The wax will be very handy in the next step when I add oil paint on top of the marker and color pencil. Working with color pencil also allows me to be very precise with my marks on the page. It can be very challenging to be as accurate with a paint brush. This step allows me to make my drawing more accurate and these clarifications will eventually be absorbed by the oil paint.
Now you are going to see me add three layers of oil paint to finish my drawing. I am using oil paint because I want to edit the colors of this composition and it is much easier to mix and match color with oil paint than it is with color pencil. It is also easier to apply large areas of color with a paintbrush rather than the tiny tip of a pencil. I did all of my editing in the last step and now I am just applying color, trying to notice the nuances of the edges of each shape on my reference. If I need to soften an edge I use a dry, soft brush and I pull the paint with that. The color pencil from the layer below is blending nicely with the paint.

Team.........You played a good game today and you should be proud. But, next week, we play the Fashion Institute of Technology. In order to beat them, we need to think like them. We usually work out like trained testosterone induced Hamsters. But this week, were going to prepare by learning to draw. Youre not going to have a problem with that are you? ............................No Coach............................Good.
When I got a full scholarship to play football at Notre Dame, I needed to study something......so I studied art. This video is going to teach you how to draw a football player step by step. All you need to do is follow the instructions. Even Field Goal Kickers like Andreas over there will be able to successfully complete this.....PAUSE.....SHUT UP. If you get stuck, never surrender.....just hit the link in the video description to go to a printable step by step resource, which will make this process, even easier. One last thing, before we begin....click on the picture on Little Old Knute Rockney to subscribe to this channel so that you can see more fun and informative videos like this........Yes Coach.....Alright, hands in.....
Were not playing Germantown you tools, were playing FIT! Garl Dang it!
All music is by Kevin MacLeod of Incompetech.com. (Creative Commons License) The songs I used are Bumbly March, Evil March, Hamster March, Waunobe March, Cartoon Battle and The Machine Thinks. I also used a creative commons liscenced clip from this video- http://blip.tv/file/get/Theoh-hamster979.wmv how to draw a football how to draw football players sports artist step by step drawing for beginners step by step drawing lesson draw for kids sports pictures how to draw for free characters to draw

WE NEED A VISUAL ARTS CATEGORY ON YOUTUBE Petition- http://www.change.org/petition....s/create-a-visual-ar
Facebook- http://facebook.com/kazanjianm
Twitter- http://twitter.com/kazanjianm
Website- http://merrillk.com
(Merrill) Supplies I Use- http://www.jdoqocy.com/click-4....247664-805536?url=ht
Hey Youtube arts community. Its Merrill from kazanjianm. Since Youtube does not have a specific channel type for visual arts, I decided to list the top 25 visual art channels on youtube. I spent the last few days putting in every visual arts related search term and my ranking system is based on the number of subscribers that a channel has. So here is the list. We are going to count down from 25. Click on the channel name to visit the channel.
At number 25 is the youtube channel for Banksy, possibly the most famous visual artist in the world. 18619At number 24 is AirbrushTricks a channel that you could learn airbrush tricks. 20,024At number 23 is Bashirsultani . This dude is a salt artist.And I thought pencil drawing raised your blood pressure! 20,807The number 22 channel is Igor Kazarin's PortraitDrawing. Igor does not instruct but his dry brush portraits are unbelievable. 23,894The number 21 channel is me! Kazanjianm. Im a visual artist and a teacher and I have taught thousands of people how to draw with my step by step videos. Note to the top 20, im coming to get you sucka! 24,701
The number 20 channel is Matthew39Arch. This guy is a professor at a major art school and does some great instruction on his channel.The number 19 channel is PhilintheCircle. This guy makes art with everything. He has ridiculous talent and he makes very engaging videos. He is best known for his Goodbye art series.The number 18 channel is Sycra. He has been posting videos since youtube was a baby channel and he probably doesn't know that he made the prototype for art instruction on Youtube. Before I started posting videos, I used Sycra's channel as a supplement in my own classroom. And after I saw the effect of my students drawing from his videos, I decided to post my own instructional videos. He is also an amazing caricature artist.
At number 17 is Cholowiz13. He has the title as youtubes most famous graffiti artist. This is especially impressive whe n you consider that Banksy comes in at #25. The number 16 art channel is Sophiechan90. She is a manga artist who is a virtuoso with Copic illustration markers.
The number15 channel is called notblu. This channel documents the work of the artist Blu who merges graffiti with stop motion animation. Almost all of the videos on this channel approach over one million views.
The number 14 channel is a channel that I found recently called SoCraftastic. Sarah Takacs instructs on a wide range of art and craft related topics and its always a guess, what is going to be covered next. It's a really fun channel.
The number 13 channel is Idrawgirls. Xia is a retired illustrator who is famous for his digital artwork. He is really generous as a teacher and covers a wide range of topics. The name of the channel is I draw girls but he draws dudes too. Its really great for people who want to learn digital art, portraiture and figure drawing.Coming in at number 12 is Chris Scalf's channel CGSBGS. This guy is a top notch illustrator who is responsible for several viral art videos.Coming in at number 11 is Youtube's fastest growing art channel, CartoonBlock. Evan Burse is a professional cartoonist who has worked on Scooby Doo and Batman. He brings his talents and professional connections to CartoonBlock. On his channel you learn how to draw, as well as gain insights to working in the cartoon industry. Evan is a natural teacher who makes his videos fun.The number 10 channel is spray paint virtuoso Brandon McConnell at spacepainter. He not only documents his amazing spray paint artwork, he can also teach you how to rip a phone book in half.
Val's Art Diary comes in at number 9. It is one of the oldest art channels on youtube and it has vlogs and time lapse artwork from Val. Shes got a really cool accent. Just like me.Macpulenta is the number 8 art channel on Youtube and is number one in the country of Argentina. NICO Di MATTIA is an artist who has captivated the world with his photo realistic digital paintings of celebrities and although he hasn't posted recently, remains one of youtubes top art stars.
"Dvorak Polka Kevin MacLeod (incompetech.com) Licensed under Creative Commons "Attribution 3.0" http://creativecommons.org/licenses/by/3.0/"

Click on the images to go to the other four parts of this series.
Welcome to the fifth and final installment of my series about drawing the human head from memory. This video will give you a dizzying amount of information on how to draw the head at 3/4 view. Lets start out by observing what happens when the head turns. Notice what little space the face takes up when the head is turned in profile view. Notice that the back of the head becomes more rounded as the face seems to shrink. Lets take a closer look at the face. The green shape connects the two outer corners of the eye and the outer corners of the mouth. Observe what happens to this trapezoid shape as the head turns from side to side. Notice that as the green shape gets smaller, the back of the head becomes more rounded. Now lets look at a silhouette of the face. Be sure to observe what happens to the silhouette of the face at 3/4 view- It is no longer an oval shape. There are indentations and protrusions
In the 3/4 view of the head, there is an indentation by the eye and a protrusion at the cheekbone and mouth. This is due to underlying bone and muscle structures.
Now, lets look at the individual features of the face starting with the eyes. Notice that the eye shifts in shape as the head turns. When the head is in profile... the shape of the eye looks like a Hershey's kiss turned to the side.....as the head turns, it morphs to an almond shape. Since I am teaching you how to draw the eye 3/4 view for this video, we will remember that the 3/4 view eye resembles Pac Mans mouth. Notice that the pupil and iris are more oval like and that there is no white on the inner corner of the eye.
Now lets observe the nose. Notice the relationship between the nose and the cheek. In the 3/4 view, the nose is partially covering the cheek and almost to the edge of the face. Notice how the nostrils shift as the head turns. When you draw a head in 3/4 view, you essentially draw 1 1/2 nostrils.
As for the mouth, take a few seconds to notice the changes. The top lip morphs from a flattened M shape from the front....to a lightning bolt shape in 3/4 view. The bottom lip has a squared section and triangles on each side.
The ears move from being close to the center of the head from profile view, to the edge of the head in front view. In 3/4 view, the ears seem to be at the verge of protruding through the back of the head....but they are not there yet.
Now its time for the demonstration. Since we studied a male head in the first part of the video, lets switch it up and draw a female head. Just follow the directions for each step and also on the shading tutorial.
Step 1: Draw the shape that you see. Notice that it is an egg shape with various protrusions and indentations. This is the most difficult step so take some extra time.
Step 2: Notice the rectangular shape. The four dots are the centers of each eye and the corners of each mouth. Place each dot in the appropriate place. Then, about 2/3 of the way down add a line for the bottom of the nose.
Step 3: Add the eyebrows and ears.
Step 4: Fill in the eye shape. Remember the Pac Man rule. Here is a close up.
Step 5: Complete the nose. Notice the solid line leading from the bottom of the nose to the brow. Also, remember the rule about 1 1/2 nostrils. Here is a close up.
Step 6: Complete the mouth. Overall the mouth looks like a flattened heart shape. For now, put in one solid shape and ignore the rules that you learned before. We will make the rectangular shape on the bottom lip and the lightning bolt shape on the top when we shade.
Shape 7 Add the hair. Be creative, you dont have to re create this hairstyle.
The pictures used were from Thirteen of Clubs Photostream on flickr. They are under a Creative Commons License (Attribution). I will credit him in the video description- http://www.flickr.com/photos/t....hirteenofclubs/sets/ All other imagery and audio were made by me (Merrill Kazanjian)

WE NEED A VISUAL ARTS CATEGORY ON YOUTUBE THREAD-http://www.google.com/support/forum/p/youtube/thread?tid=2a9806f929074cbd&hl=en&fid=2a9806f929074cbd0004b630ad37cc3e
Facebook- http://facebook.com/kazanjianm
Twitter- http://twitter.com/kazanjianm
Website- http://merrillk.com
(Merrill) Supplies I Use- http://www.jdoqocy.com/click-4....247664-805536?url=ht
Hey Hey..... Wanna see a really annoying tutorial? Hey ....Yeah me too.....This video is going to give you step by step instruction on how to draw The Annoying Orange. As soon as the helium wears off, lets begin.
Ah much better.... Step 1: Make a circular shape because oranges are circular.....even annoying ones.
Step 2: When you make the eyes, remember that there is one eye length between each eye. The top of the eye shape is rainbow like. The bottom of the eye shape is almost flat, and slightly curves up at each end. Notice that the top of the pupil and iris is hidden behind the upper lid. Unlike human proportions, oranges eyes are closer to the top of his head....I mean .......skin.....ahh whatever.
Step 3: Add the mouth. This is the toughest step but it will be easier if you put it in as a big half circle, then break it up in to six smaller shapes. Here are the smaller shapes from top to bottom- the upper lip, the upper teeth, the mouth, the tongue, the lower teeth and the bottom lip. Pause the video at the end of this step and observe before you go on to the coloring part.

Link- http://merrillk.com/?part=fineart&articles_id=13449&act=artist1&artist=69&collection=455
My new channel: http://youtube.com/metaldetectingnyc
Facebook- http://facebook.com/kazanjianm
Twitter- http://twitter.com/kazanjianm
Website- http://merrillk.com
(Merrill) Supplies I Use- http://www.jdoqocy.com/click-4....247664-805536?url=ht
This is my first step by step colored pencil tutorial. After you watch this video, you will have a solid understanding of how to draw a rose with colored pencil. I have simplified the instructions so that even a beginner could create a successful drawing. I will tell you about the colored pencils later in this video. But, for now, grab a regular pencil and some drawing paper. I have a quick recommendation before we begin. Hit the link in the video description and go to my website to download a printable page with our reference image. Lets begin.
Step 1: Draw a long rectangular shape for the stem.
Step 2: Take a moment to observe the proportions of the new shapes that I added. Notice that the leaf to the right overlaps the stem. The two shapes on top are positioned more to the left hand side.
Step 3: Now add the shapes for the bottom of the petals on the right hand side. Notice the U shape that is formed at the bottom of the rose. Notice that the upper shape on the right is slightly thicker than the upper shape on the left.
Step 4: Use your imagination a bit and notice the slightly skewed egg shape above the shapes from the first three steps. Once you notice how it fits, draw it on your paper.
Step 5: Add the four shapes which I just added around the egg shape.
Step 6: Use your observation skills and add even more shapes to the center of your rose. Do not stress if your drawing does not look exactly like mine. In portraiture, you need a likeness, but you don't need to be as exact when drawing a flower.
Step 7: The same rule applies with step seven. Use your observation skills, but don't stress extreme accuracy.
