Лучшие
ПАНСИОНАТ "ЛИГА КЛУБ" https://liga-club.com/
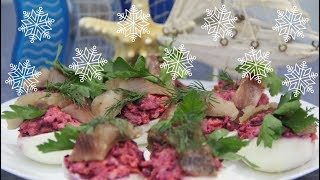
Новый Год! Вот и приближается этот замечательный праздник! Вот и начинаем мы подбирать блюда на Новый Год, ищем необычные новогодние рецепты.
Классический Рецепт Селедки под Шубой в новом исполнении может стать как раз таким блюдом. Это "ленивая" селедка под шубой. Необычное исполнение классического салата. Этот салат будет украшением любого праздничного стола.
Приятного аппетита!
Ингредиенты:
яйца 5 шт.
картофель 1 шт. морковь 2 шт.
свекла 1 шт.
сельдь 1 шт.
майонез 2 ст.ложки
зелень
Вкусный Домашний Майонез за 2 минуты.
https://www.youtube.com/watch?v=sJS7nn5hHJA&list=PLqCZWqsWs4QJbA3Yqsegd8sVD0C1ogbq5&index=18&t=0s
#салаты #новогоднийстол #рецептынановыйгод #восадуливогороде #рецепты
Как мы знаем, самый Новогодний Салат это , конечно же, Салат Оливье.
Как приготовить Салат Оливье быстро. https://www.youtube.com/watch?v=8qEqWAao4dc
Другие рецепты для праздничного стола:
https://www.youtube.com/playli....st?list=PLqCZWqsWs4Q
Новенький салат на Новый год!
http://www.youtube.com/watch?v=rcLGbN_ObgQ&list=PLqCZWqsWs4QLWCcVHuzWEAeisxYFcWTnu&index=6
Селедка Под Шубой. Новый рецепт классической "шубы".
https://www.youtube.com/watch?v=TpNBul1yby8
Селедка Под Шубой по-Новому!
https://www.youtube.com/watch?v=YggOHkFOPwQ&t=14s
Юлия Миняева, на канале Во саду ли в огороде.
(Yulia Minyaeva, Vo sadu li v ogorode).
**********
● ПОДПИСАТЬСЯ, чтобы не пропустить новые видео → http://www.youtube.com/channel..../UCiWA1Ct_IdiUA8a-DT
Наша жизнь за кадром → https://www.youtube.com/channe....l/UCosY8oXpLMnN-dBa3
************
● Отвечаю на вопросы тут → http://ok.ru/profile/550906857588
● Общаемся, делимся опытом тут → http://ok.ru/covetyotyu
● Помогу советом тут → http://vk.com/id257485924
● Почта → olga_minyaeva@mail.ru
******
●Плейлисты с интересными видео:
Открываю секреты урожая
http://www.youtube.com/playlis....t?list=PLqCZWqsWs4QK
Очень вкусно! Рецепты.
http://www.youtube.com/playlis....t?list=PLqCZWqsWs4QJ

Всем известен муссовый торт Три шоколада. Предлагаю свой вариант приготовления этого десерта.
Друзья, подписывайтесь на наш канал https://goo.gl/kcMqcX здесь вы найдете рецепты, которые всегда получаются!
Рецепт торта Три шоколада ниже в описании.
Список ингредиентов 1:30
Бисквит с черным шоколадом 1:47
Кремю с молочным шоколадом 3:15
Шантии с белым шоколадом 4:37
Зеркальная шоколадная глазурь https://youtu.be/mSgFgiELo3g
Отвешенная сметана https://youtu.be/KxGYUlch99I
Рецепт торта Три шоколада на сайте http://vkusnajaeda.ru/tort-tri-shokolada/
МЫ В СОЦИАЛЬНЫХ СЕТЯХ:
Instagram @irinacooking
Наш канал https://goo.gl/kcMqcX
Google+ https://plus.google.com/+LenivayaKuxnya/posts
Вконтакте https://vk.com/club82321448
Одноклассники http://ok.ru/group/52701074554968
Facebook https://www.facebook.com/Irina....Cooking-336228133215
Сообщество https://goo.gl/zFsbSK
Вы обязательно найдете нужный рецепт в плейлистах нашего канала:
1. Рецепты для ПРАЗДНИЧНОГО СТОЛА
https://www.youtube.com/watch?v=TDOui0Ra0rQ&list=PL_Epb1h35ZsKOqQ0jkr4kMMaROrtekIL3
2. ОСНОВЫ ОСНОВ ○ Обучающие видео
https://www.youtube.com/watch?v=_8x08P4gxFY&list=PL_Epb1h35ZsJKm--emtxw7T5KHrUFyJ5g
3. Латышская кухня https://www.youtube.com/playli....st?list=PL_Epb1h35Zs
4. Хлеб в домашних условиях
https://www.youtube.com/watch?v=-L27KqxAYrU&list=PL_Epb1h35ZsKD8qvM_KaZiMZIcgMMfJQb
5. Грузинская кухня https://www.youtube.com/playli....st?list=PL_Epb1h35Zs
6. Блюда из тыквы
https://www.youtube.com/watch?v=pov6prTsaq0&list=PL_Epb1h35ZsIh0bGtH_Urw_C28gqGFhJM
7. Быстрые рецепты
https://www.youtube.com/watch?v=qLKFplUaVAw&list=PL_Epb1h35ZsL5Tb5ZwYAAWBcPCag5jd4Y
8. Mr.Бутер ○ БУТЕРБРОДЫ
https://www.youtube.com/watch?v=erkXi2ME7DQ&list=PL_Epb1h35ZsIxamEMclmdl0mL-mEeRIYj
9. ЗАГОТОВКИ И КОНСЕРВИРОВАНИЕ
https://www.youtube.com/watch?v=u1kM62NYOQY&list=PL_Epb1h35ZsK7TVTaZpjFoLtoeupHn8EF
10. Блюда с грибами
https://www.youtube.com/watch?v=ukaw-QSAI5U&list=PL_Epb1h35ZsLd76ISdd9Kx1cXhTzBpFS7
11. Восточные сладости
https://www.youtube.com/playli....st?list=PL_Epb1h35Zs
12. Пицца, паста
https://www.youtube.com/watch?v=wW23lM9iGX0&list=PL_Epb1h35ZsJdKiV5snIzayEjBUeN2N-1
13. Блюда из мяса
https://www.youtube.com/watch?v=9QBFtWtpN8M&list=PL_Epb1h35ZsIZTck9OKGavQH9gxHe3xHf
14. Блины, оладьи, лепешки
https://www.youtube.com/watch?v=f0_PfjP-Yr4&list=PL_Epb1h35ZsICOlmxOrZZF2Esq4ONDE4R
15. ТОРТЫ и ПИРОЖНЫЕ
https://www.youtube.com/watch?v=-Qn4VNrhTaM&list=PL_Epb1h35ZsJDln-BijJBpvvlGP4hxRC5
16. Мороженое
https://www.youtube.com/playli....st?list=PL_Epb1h35Zs
17. Постные блюда
https://www.youtube.com/watch?v=P8gO9u2FadM&list=PL_Epb1h35ZsI5jnpLNLQNSUQ2RsZxCTgi
18. Салаты, закуски, паштеты
https://www.youtube.com/watch?v=UGpfIj87vAs&list=PL_Epb1h35ZsKDVOQKcKCCNySUr2taZaV3
19. Блюда из птицы
https://www.youtube.com/watch?v=6uHYjIBSNUs&list=PL_Epb1h35ZsKifYmH4KIhqVmLz7_21QGQ
20. Блюда из творога
https://www.youtube.com/watch?v=nwF-bUrefsY&list=PL_Epb1h35ZsL4PuBQmMvisFAFfjqOJMY1
21. Блюда из рыбы и морепродуктов
https://www.youtube.com/watch?v=2hcDQ4JyeWs&list=PL_Epb1h35ZsKsA0yycqKsc4tq8FPEtkgT
22. Блюда из овощей
https://www.youtube.com/watch?v=qLKFplUaVAw&list=PL_Epb1h35ZsLsnrxZvV_2pFt8008C9dPZ
Рецепт торта Три шоколада:
Бисквит
1 яйцо
1 белок
25 г сахар
40 г черный шоколад
10 г сливочное масло
Кремю
70 г молоко
70 г жирные сливки
70 г молочный шоколад
2 желтка
3 г желатин
5 г сахар
Шантии
200 г жирные сливки для взбивания
100 г молоко
100 г белый шоколад
7 г желатина
½ ч.л. ванильная пудра
#irinacooking #иринакукинг #лениваякухня #ТриШоколада #TripleChocolate #Рецепт #КакПриготовить #ТортТриШоколада #ТортТриШоколадаРецепт #ТриШоколадаРецепт #ТортТриШоколадаПошаговыйРецепт #МуссовыйТорт #МуссовыйТортТриШоколада #МуссовыйТортТриШоколадаРецепт #КакПриготовитьТриШоколада #КакПриготовитьТортТриШоколада #КакПриготовитьМуссовыйТорт #ТортТриШоколадаПошаговый #РецептТортаТриШоколадаПошагово #ПраздничныйТорт #ТортНаПраздник
Нравится наш канал? Можете поддержать его покупкой одного из видео-курсов:
"Шкаф своими руками" https://jurprime.ru/pages/shkaf_handm...
"Комод своими руками" https://jurprime.ru/pages/s_komod/
"Стол своими руками" https://jurprime.ru/pages/handmade_ta...
"Окна своими руками"https://jurprime.ru/pages/sale_window...
"Кровати своими руками" https://jurprime.ru/pages/inv_bed-yt/
Видео-курс "Столешница из массива" вы получите в подарок при покупке любого из выше перечисленных курсов.
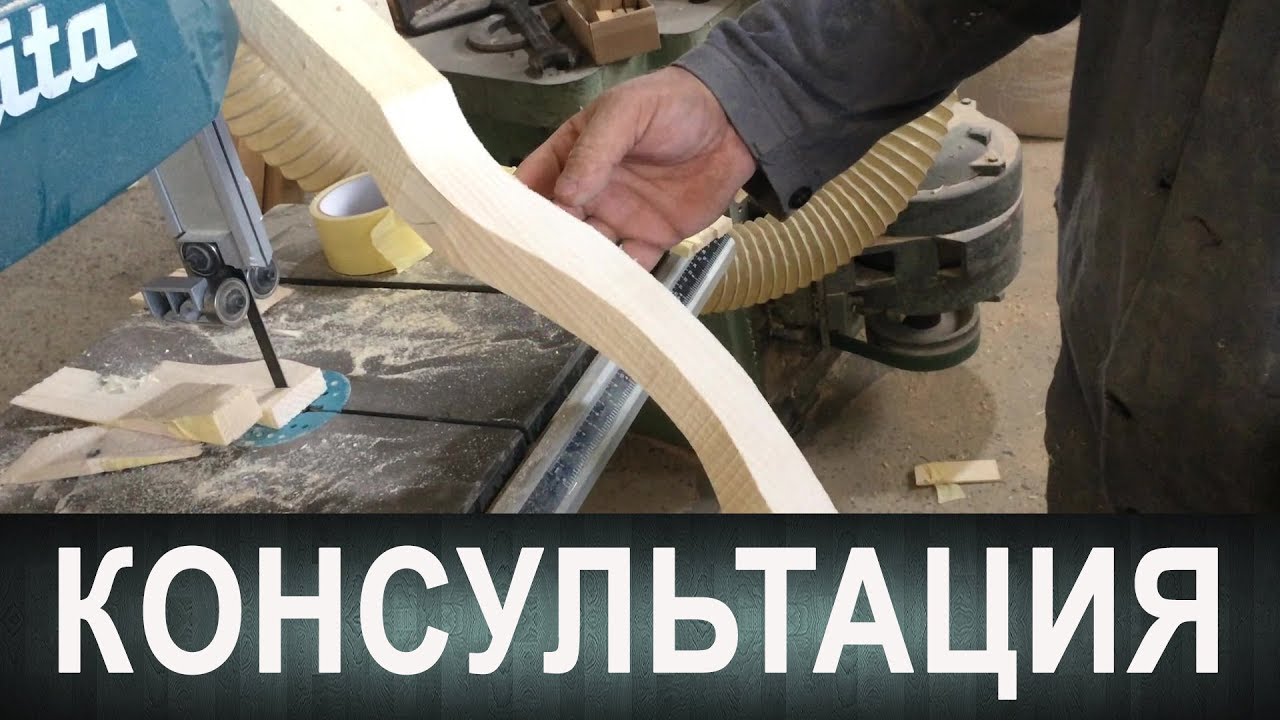
Одна из моих консультаций...
► Чтобы попасть в рубрику "РАБОТА ДНЯ" присылайте свои фото сюда: https://vk.com/woodprime
===
Одна из моих консультаций...
Консультирую друга из Словакии по поводу изготовления ножек кабриоль...
Приятного промотра!
===
Вступайте в группу Вконтакте: http://vk.com/woodprime
===
Добавляйтесь в друзья:
Вконтакте: http://vk.com/jurprime
Facebook: https://www.facebook.com/jurprime
Twitter: https://twitter.com/jurprime
===
Посетите наш сайт!
http://jurprime.ru/
===
Поделитесь этим видео с друзьями:https://www.youtube.com/watch?v=dIwi7aWGMZo

Плагин называется NextGen Gallery
Мой блог: http://www.kalsin.ru/
В видеоуроке я показываю как быстро и легко установить плагин для создания классных фотогалерей на сайт/блог на движке wordpress
Тэги: бизнес в интернете разработка сайтов сделать сайт бесплатно создание сайта

http://www.HungarianPod101.com/video
Can learning Hungarian help you lose weight? In Hungary your Hungarian is improving rapidly every day, but your body has gotten really out of shape. You need to head to the gym for some daily exercises, but what exercises are most popular in Hungary? If you use your Hungarian to make new friends at the gym, you won't have any trouble finding out. You've always known that exercise does the body and the brain good. Who knew that studying Hungarian could also make you stronger? In this lesson you'll learn Hungarian exercise expressions and words that will help your brain stay fit.
This Hungarian video series is a brand new way to learn Hungarian. Learn everyday vocabulary and key verbs in this Hungarian video lesson. Read the Hungarian lesson notes to learn about the Hungarian present tense and simple past tense. Join us, and see what you've been missing! Visit us at HungarianPod101.com where you will find many more fantastic Hungarian lessons and learning resources! Leave us a message while you are there!
To find out more, go to: http://www.hungarianpod101.com..../2011/10/14/learn-wi
http://www.HungarianPod101.com/video

👍 Смотрите как получить доступ к ВКонтакте, Одноклассникам, Поиску Яндекс, Яндекс Почте, Почте Mail.ru, Яндекс Картам, Яндекс Диску, Яндекс Деньгам, Ответам Mail.ru, а также мессенджерам WeChat, IMO, LINE и прочим приложениям, заблокированным мобильными операторами Киевстар, МТС, Лайф Украины или Роскомнадзором России.
Случайное удаление файлов, форматирование диска, вирусная атака, системный сбой или ошибка файловой системы — это не полный список проблем, которые решают программы компании Hetman Software: https://hetmanrecovery.com/ru/.
Это видео поможет разблокировать сайты и приложения на смартфонах или планшетах под управлением Android или iOS. В предыдущем видеоролике мы рассмотрели то, как обойти блокировку сайтов на компьютере, ссылка на него есть в описании - https://www.youtube.com/watch?v=Ok4nMNdLlx4.
Чтобы получить доступ к заблокированному контенту, которым вы пользуетесь через приложения, установленные из Play Market или App Store, можно использовать VPN приложения. Их много. Рассмотрим несколько самых популярных:
Установка и настройка Turbo VPN - 01:20;
Установка и настройка VPN Master -02:20.
Tor Browser - https://www.torproject.org/.
Opera Mini - http://www.opera.com/ru/mobile/mini.
На этом всё. Если Вам понравилось данное видео, ставьте лайк и подписывайтесь на канал. Будем рады ответить на любые вопросы в комментариях. Всем спасибо за просмотр, удачи.
Смотрите видео об очистке места на диске, оптимизации Windows и ускорения работы системы - https://www.youtube.com/playli....st?list=PLOlQebdCQYq
Смотрите другие ролики на тему: #НеРаботаютПриложения, #Вконтакте, #Яндекс, #Карты, #смартфон, #Андроид.
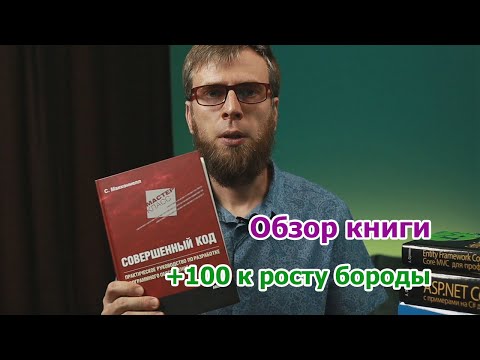
Легендарная книга. Мудрость поколений программистов в одном месте. Философия кода. Мое мнение о книге.
-------------------
Ваше участие очень важно для развития моего канала. Самое мало, что вы можете сделать это поддержать канал любым доступным вам способом: лайк, комментарий, подписка. Меня это мотивирует на продолжение работы, а вам ничего не стоит.
Если вы хотите меня отблагодарить донатом и поддержать развитие канала:
https://money.yandex.ru/to/4100184436534
В комментариях можно указать тему или идею для нового видео, которую вы бы хотели увидеть на канале. Естественно, мнение тех, кто меня поддерживает финансово я буду учитывать в первую очередь.
Личные вопросы о помощи в программирование и построении карьеры в IT можно задавать тут http://sberegovoy.ru/mentor/
--------------------
Оставайтесь на связи:
Мой сайт - http://sberegovoy.ru
Вступайте в телеграмм канал - https://t.me/sberegovoy
Группа в телеграмме - https://t.me/group_sberegovoyru
Вступайте в группу ВК - https://vk.com/sberegovoyru
#ityoutubersru

страница Facebook https://www.facebook.com/vladimir.tsibin
_
instagram https://www.instagram.com/detailing_paint/
_
группа https://www.facebook.com/Detai....ling-Paint-457511931
страница вк https://vk.com/id31166872?87987
второй канал https://www.youtube.com/channe....l/UCF9ERd5Nfv7D0kzsy

Настоящий советский пломбир и шедевральный коктейль из него. Попробуйте обязательно. Поделитесь видео
★ Блендер http://goo.gl/CNQ6Np
★ Обзор блендера https://youtu.be/W8PFF0wyoJA
★ Samura http://goo.gl/F5oKQP (скидка 70% на чсю керамику!)
★ ИНГРЕДИЕНТЫ ДЛЯ ПЛОМБИРА
• Желтки - 3 штуки
• Сливки (35%) – 300-400 грамм
• Молоко – 150 мл
• Сахар – 150 грамм
• Ванильный сахар - 1 пакетик
★ ИНГРЕДИЕНТЫ ДЛЯ КОКТЕЙЛЯ
• Сироп – 30 гр, (у меня сироп агавы, но можно использовать абсолютно любой)
• Молоко – 250 мл
• Мороженое – 70 грамм
----------------
ПОКАШЕВАРИМ В СОЦИАЛЬНЫХ СЕТЯХ
① Официальный сайт http://www.pokashevarim.ru
② Лайф-канал Покашеварим https://goo.gl/DlU4fp
③ Periscope https://www.periscope.tv/pokashevarim
④ Zello http://zello.com/channels/k/eb8xF
⑤ Группа ВК http://vk.com/pokashevarim
⑥ Страница ВК http://vk.com/id167258250
⑦ Facebook https://www.facebook.com/100007514292567
⑧ Instagram http://instagram.com/pokashevarim
➈ Одноклассники http://ok.ru/pokashevarim
Для коммерческих предложений Pokashevarim@bk.ru
--------------------
Для Вашего удобства я разделил все свои видео по тематике:
ДЕСЕРТЫ И СЛАДКАЯ ВЫПЕЧКА
http://www.youtube.com/playlis....t?list=PLtgZAIFmyCda
ПРИГОТОВЛЕНИЕ МЯСА
http://www.youtube.com/playlis....t?list=PLtgZAIFmyCdY
БЛЮДА ИЗ ПТИЦЫ
http://www.youtube.com/playlis....t?list=PLtgZAIFmyCda
БЛЮДА ИЗ РЫБЫ
http://www.youtube.com/playlis....t?list=PLtgZAIFmyCdb
БЛЮДА ИЗ ГРИБОВ
http://www.youtube.com/playlis....t?list=PLtgZAIFmyCda
САЛАТЫ
http://www.youtube.com/playlis....t?list=PLtgZAIFmyCdZ
ОВОЩИ, ГАРНИРЫ, ЗАКУСКИ
http://www.youtube.com/playlis....t?list=PLtgZAIFmyCdb
НАПИТИКИ
http://www.youtube.com/playlis....t?list=PLtgZAIFmyCdY
ВЫПЕЧКА (не сладкая)
http://www.youtube.com/playlis....t?list=PLtgZAIFmyCdZ
-----------------------
На развитие канала:
Кошелек webmoney: R265065116488
Яндекс деньги: 41001844306837

Застрял с кодом? Не знаешь, что делать? Попроси помощи у коллег, но сделай это правильно! А может тебе нужно продемонстрировать друзьям крутую фичу, но не знаешь как это лучше сделать?
Рассказываю о полезном и удобном инструменте совместной работы - Live Share. Этот инструмент представлен сразу в двух редакторах кода: Visual Studio и Visual Studio Code.
-------------------
Ваше участие очень важно для развития моего канала. Самое мало, что вы можете сделать это поддержать канал любым доступным вам способом: лайк, комментарий, подписка. Меня это мотивирует на продолжение работы, а вам ничего не стоит.
Если вы хотите меня отблагодарить донатом и поддержать развитие канала:
https://money.yandex.ru/to/4100184436534
В комментариях можно указать тему или идею для нового видео, которую вы бы хотели увидеть на канале. Естественно, мнение тех, кто меня поддерживает финансово я буду учитывать в первую очередь.
Личные вопросы о помощи в программирование и построении карьеры в IT можно задавать тут http://sberegovoy.ru/mentor/
--------------------
Оставайтесь на связи:
Мой сайт - http://sberegovoy.ru
Вступайте в телеграмм канал - https://t.me/sberegovoy
Группа в телеграмме - https://t.me/group_sberegovoyru
Вступайте в группу ВК - https://vk.com/sberegovoyru
#ityoutubersru

Резьба по дереву. Ветка березы - часть 5 / The birch branch - part 5.
КАНАЛ VIDEO - резьба по дереву.
VK - http://vk.com/id277561541
Facebook - https://www.facebook.com/profi....le.php?id=1000060881
мой блог - http://reznoedelo.blogspot.ru
Обо мне - http://leto-aleksandr2008.wixsite.com/mysite/about
1. Композиция "As I Figure - Latinesque" принадлежит исполнителю Kevin MacLeod. Лицензия: Creative Commons Attribution (https://creativecommons.org/licenses/by/4.0/).
Оригинальная версия: http://incompetech.com/music/r....oyalty-free/index.ht
Исполнитель: http://incompetech.com/
2. Композиция "Cumbia No Frills Faster" принадлежит исполнителю Kevin MacLeod. Лицензия: Creative Commons Attribution (https://creativecommons.org/licenses/by/4.0/).
Оригинальная версия: http://incompetech.com/music/royalty-free/index.html?isrc=USUAN1100275.
Исполнитель: http://incompetech.com/
3. Композиция "EDM Detection Mode" принадлежит исполнителю Kevin MacLeod. Лицензия: Creative Commons Attribution (https://creativecommons.org/licenses/by/4.0/).
Оригинальная версия: http://incompetech.com/music/royalty-free/index.html?isrc=USUAN1500026.
Исполнитель: http://incompetech.com/
4. Композиция "Ether Disco" принадлежит исполнителю Kevin MacLeod. Лицензия: Creative Commons Attribution (https://creativecommons.org/licenses/by/4.0/).
Оригинальная версия: http://incompetech.com/music/royalty-free/index.html?isrc=USUAN1100237.
Исполнитель: http://incompetech.com/
5. Композиция "Hot Mess" принадлежит исполнителю Audionautix. Лицензия: Creative Commons Attribution (https://creativecommons.org/licenses/by/4.0/).
Исполнитель: http://audionautix.com/
6. Композиция "Matt's Blues" принадлежит исполнителю Kevin MacLeod. Лицензия: Creative Commons Attribution (https://creativecommons.org/licenses/by/4.0/).
Оригинальная версия: http://incompetech.com/music/royalty-free/index.html?isrc=USUAN1100165.
Исполнитель: http://incompetech.com/
7. Композиция "Yeah" принадлежит исполнителю Audionautix. Лицензия: Creative Commons Attribution (https://creativecommons.org/licenses/by/4.0/).
Исполнитель: http://audionautix.com/
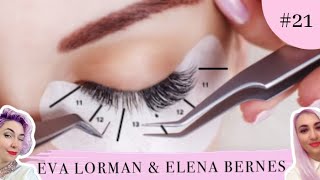
НАРАЩИВАНИЕ РЕСНИЦ! Уроки! 3D Объёмное Наращивание Ресниц! МАСТЕР - КЛАСС!Пошагово!
В объёмном наращивании ресниц мы показываем всю технологию наращивания.
Кому подойдет наращивание ресниц 3 Д? Конечно же девушкам, которые хотят выглядеть эффектно и создать акцент именно на глазах.
Еще не маловажно - наращивание ресниц 3 Д делают на очень редкие ресницы. Если такое наращивание делать на густые натуральные ресницы, то получится эффект перегрузки. Поэтому, важно правильно подбирать объём ресниц с учетом своей натуральной базы.
В объёмном наращивании ресниц есть свои особенности и правила.
1. Пучок из ресниц надо формировать на ленте. В руках лучше этого не делать, так как будет плохая носибельность. Жир на пальцах может смешаться с клеем, что приведет к плохой склейке натуральных ресниц с искусственными.
2. Отступ от века при наращивании ресниц должен быть не более 0,2 мм. Если этот отступ будет больше, пучки будут слишком заметны, такое наращивание не считается качественным.
3. Галочка в 3 Д объёме должна быть раскрыта больше, чем в 2Д.
4. Расстояние между ресницами в пучке должно быть одинаковым, иначе иначе при перекрещивании между собой они будут давать неправильный угол, это будет заметно и выглядеть будет коряво.
5. Клей для формирования пучков должен быть полупрозрачный, чтобы капли клея не утолщали дополнительно толщину ножки. Иначе ножка будет похожа больше на столб.
6. Клей для наращивания ресниц 3Д надо выбирать хорошего качества, чтоб носибельность была хорошей.
7. Если клиент сомневается в выборе объёма, надо уточнить, какую задачу ставит перед собой клиент. Если он хочет для повседневной носки нарастить ресницы, то лучше воздержаться от наращивания ресниц 3 Д, так как нагрузка на глаза будет выше, чем в 2 Д.
8. Если клиент делает впервые наращивание ресниц 3 Д, надо предупредить его, что возможна головная боль первый день. Это неприятное ощущение может пройти, а может и нет. Если не проходит, значит надо снимать ресницы и наращивать более легкий объём.
Если Вам понравилось видео ставьте лаки 👍, задавайте вопросы, пишите комментарии.
Подписывайтесь на мои каналы
Ресницы, брови, ногти, депиляция https://www.youtube.com/c/EvaLorman
Уроки парикмахеров https://www.youtube.com/c/EVALORMANTUTORIALS
ПОЛЕЗНЫЕ ВИДЕО
Прически. Идеи причесок. - https://www.youtube.com/playli....st?list=PLOFI1Q2RpVU
Волосы. Парикмахер - https://www.youtube.com/playli....st?list=PLOFI1Q2RpVU
Женские стрижки https://www.youtube.com/playli....st?list=PLOFI1Q2RpVU
Мужские стрижки. https://www.youtube.com/playli....st?list=PLOFI1Q2RpVU
Как покрасить волосы. Окрашивание волос. https://www.youtube.com/playli....st?list=PLOFI1Q2RpVU
Плетение кос https://www.youtube.com/playli....st?list=PLOFI1Q2RpVU
Наращивание ногтей - https://www.youtube.com/playli....st?list=PLdg2yJWxy1x
Ктийская роспись ногтей - https://www.youtube.com/playli....st?list=PLdg2yJWxy1x
Декоративная роспись ногтей - https://www.youtube.com/playli....st?list=PLOFI1Q2RpVU
Дизайн ногтей
Как сделать ногти. https://www.youtube.com/playli....st?list=PLOFI1Q2RpVU
Наращивание ресниц. Ламинирование ресниц - https://www.youtube.com/playli....st?list=PLdg2yJWxy1x
Брови. Архитектура бровей. Окрашивание бровей. https://www.youtube.com/playli....st?list=PLOFI1Q2RpVU
Депиляция воском. Шугаринг. https://www.youtube.com/playli....st?list=PLdg2yJWxy1x
#elashextension #eva lorman #elena bernes

Мой рассказ о посадке гиацинтов в открытый грунт осенью. Читайте больше о посадке гиацинтов в моем блоге: http://www.aleninsad.com/2015/....10/posadka-giacintov
Как посадить гиацинты на выгонку? Смотрите здесь: https://www.youtube.com/watch?v=R9DlNz_GKvY
✿ ✿ ✿ ✿ ✿ ✿ ✿ ✿
Этот канал - дополнение к моему блогу http://www.aleninsad.com.
Также вы можете найти меня:
на ОK: http://ok.ru/aleninsad
на VK: http://vk.com/public77029766
на Facebook: Алена Волкова
в Twitter: @AleninSad
на Instagramm: @alenin_sad
Буду рада новым друзьям!!!

Так лепешки я еще не готовила! Самые ароматные - чесночные лепешки!
Решила вам показать рецепт ароматных чесночных лепешек. Нашла его на боснийском форуме. Продукты обычные, форма интересная, а вкус любимый))) Рецепт очень простой, но так я лепешки еще не готовила!
Каталог с семенами томатов и острых перцев 2018 https://vk.com/doc270601604_474486687?hash=a1c24c1905ae27b777&dl=d08c0d214dd7a804ae
Рецепт Ниже под Видео!!!
НА НАШЕМ КАНАЛЕ ЕСТЬ ЕЩЕ 640+ ВКУСНЫХ РЕЦЕПТОВ. ПОДПИСЫВАЙТЕСЬ НА НАШ КАНАЛ!
https://www.youtube.com/channe....l/UC_lFSf37jhFtGYAeo
Друзья, напоминаем!!!! Когда Вы нажали кнопку ПОДПИСАТЬСЯ появляется
ПОДПИСКА ОФОРМЛЕНА и рядом колокольчик будет, нажимаете на колокольчик и ставите галочку !!!
ТАК ВЫ будете ОПОВЕЩЕНЫ о выходе НОВОГО ВИДЕО
Всегда ваша, Другая Кухня!
****************************************
Наша группа ВКонтакте: https://vk.com/other_kitchen
Наша группа в Одноклассниках : https://ok.ru/drugaya.kuhnya
Instagram: https://www.instagram.com/another.kitchen/
Очень Рады Новым Зрителям! Подписывайтесь!!!
https://www.youtube.com/channe....l/UC_lFSf37jhFtGYAeo
*************************************************
САЛАТЫ и ЗАКУСКИ
https://www.youtube.com/watch?v=Wj8B6amsZZs&list=PL75EMnrcHAI5pBBjy6JJB3uqMquk2cR3J
ОБЕДЫ и УЖИНЫ
https://www.youtube.com/watch?v=laFtAGK_yQ8&list=PL75EMnrcHAI4Wg-I7EX7Tz50Vz8Wc6715
НЕСЛАДКАЯ ВЫПЕЧКА
https://www.youtube.com/watch?v=3y_HX9TTQTY&list=PL75EMnrcHAI52jM60db6vukq-Kf9yd6hS
ИДЕИ для ЗАВТРАКА
https://www.youtube.com/watch?v=UttY15vRki8&list=PL75EMnrcHAI6MDyBxlSp8WAsU9W2rmI8g
СЛАДКАЯ ВЫПЕЧКА
https://www.youtube.com/watch?v=GROH_zTo2tM&list=PL75EMnrcHAI6HZf4EWa0wyjPLqg4q3WA-
ФАНТАСТИЧЕСКИ ВКУСНЫЕ РЕЦЕПТЫ! ЛУЧШЕЕ от ДРУГОЙ КУХНИ
https://www.youtube.com/watch?v=exwR512LgSU&list=PL75EMnrcHAI6SRe17IGlxRhSFXenHeyiS
Рецепт:
сметана 300 мл
яйца 1 шт
сахар 1,5 ч.лож
соль 1\2 ч.лож
дрожжи 1 ч.лож
мука 500 гр
сливочное масло 50 гр
чеснок 1 зубчик
зелень перушки
************************************
Recipe:
sour cream 300 ml
eggs 1 pc
sugar 1.5 tsp
salt 1 \ 2 tsp
yeast 1 tsp
flour 500 gr
butter 50 gr
garlic 1 clove
green parsley
**********************************************
По поводу Рекламы и Сотрудничества пишите на почту:
isaev.kitchen@gmail.com
Спасибо всем большое! Приятного аппетита! Следите за каналом!
Thank you all very much! Bon Appetit! Watch the channel!
#другаякухня #лепешки #вкусныйхлеб #ароматныйхлеб #вкусныйрецепт #рецептеста #вкусноетесто #чесночноемасло #тестодляпирожков #хачапури #дрожжевоетесто #рецептдуховка #какприготовить #перекус #готовимвкусно #домашняявыпечка #тестонакефире #чесночныелепешки #осетинскиепироги #пирожки #узбекскиелепешки #рецептприготовления #лучшиерецепты #чесночныепампушки #чесночныебулочки #готовимдома #тестонасметане
#ДругаяКухня #Лепешки #ЧесночныеЛепешки #АроматныйХлеб #ВкусныйРецепт #ВкусноеТесто #ЧесночноеМасло #ТестоДляПирожков #Хачапури #ОсетинскиеПироги #РецептТеста #ДрожжевоеТесто #Пироги #Пирожки #РецептДуховка #ЛепешкиВДуховки #УзбекскиеЛепешки #РецептПриготовления #ЛучшиеРецепты #КакПриготовить #Перекус #ЧесночныеПампушки #ЧесночныеБулочки #ГотовимВкусно #ДомашниеРецепты #ДомашняяВыпечка #ГотовимДома #ЛепешкиНаСметане #ТестоНаСметане #ТестоНаКефире

Знакомство с углами оттяжки
#углыоттяжки #курсыпарикмахеров #евалорман
Курсы Евы Лорман - http://lorman-academy.online/bigstep
Стрижка на самом деле это
геометрия, любая стрижка, какая бы она там
ни была. Голова наша это
что? Это шар. Есть две техники углов
оттяжки. Имеется ввиду - мы здесь
технику самую основную взяли - это по
отношению к плоскости головы.
Понимаете? По отношению к плоскости головы,
то есть мы работаем с плоскостью головы.
А есть техники по отношению, вот к чему
как вы думаете? К полу, к горизонту,
правильно. И Вы сами поймете какая из
этих техник более понятная для Вас. Ну
покажу на себе. Просто самое элементарное
сейчас. То есть если я хочу по отношению
к полу, это горизонт, вот я по отношению к
полу поднимаю прядь. Под каким углом я ее подняла? 90.
Это по отношению и к полу,
и к голове, плоскости головы. Теперь я эту
прядь увожу вот сюда, это будет 60, вот
сюда я ее отвела. Как я могу сейчас ее
оценить по отношению к полу ? Нет это не нулевая
оттяжка. -15. Нет! Но вот представьте себе,
как я сейчас Вам объясню по
отношению к полу? А теперь смотрите, что
значит с плоскостью головы.
Это гораздо проще. Причем мы работаем, кстати,
на участке, сколько сантиметров? Четыре
сантиметра.
Почему? Потому, что, нет, 4 сантиметра,
это я имею ввиду по поводу
углов. Удобно захватывается, все такое. Теперь
смотрите вот я беру свои вот эти четыре сантиметра вот здесь,
да. Это самая
минимальная погрешность здесь будет. Если
я сейчас возьму здесь, то у меня отсюда
прядь идет под одним углом, если я сейчас
вот этот кусок весь заберу, вот она прядь -
широкая. Правильно? Она прям
ну гораздо больше, чем четыре
сантиметра. Теперь посмотрите, я сейчас
оттягиваю , я ее подстригаю, грубо говоря, вот
так вот, но она же помещается как раз между
пальцами ровно четыре сантиметра. Вот. Вот
это расстояние,
где я подстригу, то есть у меня не такие
длинные пальцы, чтобы я могла равномерно
распределить. Если я вот сейчас вот так отстригу,
скажите мне где самая короткая часть пряди?
По середине самая короткая. Самые длинные
части где будут? Верх Низ. Вот об этом
речь и идет. Это такая будет громадная
погрешность, очень большая, это будет очень
хорошо видно. И между прочим знаете
какая погрешность будет?
Вот ровно столько во сколько у меня идёт
увеличение головы или уменьшение сюда,
самая длинная прядь будет вот эта. Она будет
перепадали вот с этой центральной прядью
на два почти сантиметра. Два сантиметра
это огромная погрешность, это просто, ну
это большая ошибка, особенно если Вы
потом будете на вот эту прядь и
ориентироваться. Мы же ориентируемся
прядь на прядь, ну то есть вот она идет,
мы потом и каждую последующую и так
далее. То есть если мы вот таким образом
будем делать, то это все, это крах, то есть
не подстричь точную стрижку никаким
образом.
Поэтому разбивается вся голова на
участки с минимальной погрешностью,
это четыре сантиметра. Вот Ваши пальцы то,
что Вы можете равномерно поместить в свои
пальцы и чтобы не было заломов пряди. Чтобы не вот так это как-то
было, таким крючком, а
чтобы она, эта прядь, распределилась
равномерно. И ладно, тут равномерно, ну вот
это вот, вот этот изгиб надо обязательно
учитывать. Поэтому все стрижки,
не то, что все стрижки, я их разделила
стрижки вот эти вот, которые мы будем
изучать с Вами, от самой простой до самой
сложной, кстати какая самая сложная стрижка? - женская
классическая.
Вот теперь смотрите, а почему она сама
сложная? Потому, что в ней есть все, что
есть в
стрижках вообще, вот она из-за этого
самая сложная. У нее есть все углы
оттяжки, которые вообще существуют, у нее
есть все зоны, которые существуют, то есть
все абсолютно, у нее эта сумасшедшая
окантовка потому ,что она все время может
быть разная. И такая челочка, и вот такая, и
вот такая и вот здесь вот может быть
висок вдлинь. Вопрос возникает особенно у
тех людей, которые с математикой не особо дружат, то есть
геометрию мы все проходили в школе, кто
как учил, это естественно. У вас
должно быть пространственное мышление
такое. То есть Вы вот голову эту свою
представляете, этот кружок, шар этот.
И вот эти все волосы, которые Вы
стрижете, Вы должны именно по отношению
голове их представлять, а
не к горизонту. Потому, что потом мы должны
себе эту стрижку представить, когда у Вас
волосы опустятся, они же не находятся у
нас под 90 градусов, они лягут и Вы уже
должны себе представить, вот, как они
легли по отношению в голове таки, а не к
плоскости горизонта. Вот здесь 90, а к полу это
сколько? Вот.
Это 60 . Однозначно! То есть,
вот видите в чем дело? Если мы берем пол
это будет вот так, по отношению к полу это будет
60, по отношению к полу это будет 90. Мы
понимаем вот этот кусочек это и есть
наш горизонт, это прямая линия, вот она, мы по отношению
к этому участку находим угол. Поэтому
стрижки пишутся вот такими формулами
девяносто-шестьдесят-девяносто например.
То есть все стрижки должны иметь четкую
формулу градусов по отношению к голове.
Эту технику мы назвали БИГСТЕП (BIG STEP) - Большой шаг.

Брови. Коррекция бровей. Архитектура бровей. Техника Граней.
Если вас интересуют видеоуроки по коррекции и окрашиванию бровей, я надеюсь что я смогу вам помочь!
Здравствуйте дорогие друзья! Меня зовут Ева Лорман! Я представляю вам свой авторский курс мастер бровист - моделирование идеальной формы бровей в "Технике Граней". Я давно хотела поделиться с вами своими знаниями и вот - Техника граней «Бриллиант»! Основана она на законах геометрии и гармонии. О чем этот курс? В курсе я знакомлю вас со своим изобретением и покажу, как можно быстро и точно строить идеальную форму бровей!
Что такое "Техника Граней" и какое отношение гармония и геометрия имеет к бриллианту, скорее всего вы зададите этот вопрос! А все очень просто - схема бриллианта идеальна априори, создается она методом построения граней, основанных на законах геометрии! Но построить грани мало, грани необходимо делать симметричными! Это основа гармонии и я попыталась эту формулу применить на создание идеальной формы бровей и представляйте, я ее получила! Это формула универсальна! Базируется она на двух постулатах - первое - построение граней и второе - создание симметрии граней! В итоге, мы получаем идеальную форму бровей! Как я уже сказала техника граней основана на двух законах и выглядит это примерно так - первое - находим старт точки и строим грани body up & body down! В курсе я вам объясню, что это такое! Второе - создаем симметрию граней и в итоге, мы видим насколько чертеж, который я построила на лице клиента и чертеж граней бриллианта похожи между собой!
Понятно теперь почему я эту технику назвала - Техника Граней "Бриллиант"! Я эту технику отрабатывала на всех абсолютно людях которые мне встречались, на клиентах, на студентах, на моделях.
Мой, скажем так эксперимент, длился 8 лет и я увидела насколько Техника Граней универсальна. Она подходит абсолютно под все формы бровей, существующих в мире! Когда я начала применять именно эту формулу при коррекции бровей, что я получила в итоге? Я всегда получала идеальную форму бровей, симметричную форму бровей! Естественно у меня был быстрый и отличный результат и я себя зарекомендовала хорошим мастером! В итоге Техника Граней стала моей фишкой!
Как работает эта Техника Граней? 1) Она совершенствуют свою форму бровей в первую очередь! 2) Она исправляет недостатки своей формы бровей! 3) Мега важно - при коррекции мы сразу создаем симметрию бровей автоматически! Бровисты наверняка знают, насколько это сложно, но именно в Технике Граней этот пунктик делается автоматически, что конечно очень сильно упрощают работу мастера бровиста!
Что вообще могут брови? Конечно нельзя недооценивать тот факт, что брови для лица как рамка для картины! При наличии рамки любая картина уже выглядит очень даже ничего, а брови естественно делают более выразительным лицо! Они могут сделать даже коррекцию овала лица сбалансировать черты лица, а в некоторых случаях даже изменить внешность!
Какие самые распространенные ошибки мастеров бровистов вообще можно выделить? Первое - это не знание и не умение строить форму бровей с учетом других черт лица! Второе - многие мастера пользуются только одной схемой и применяют ее для всех, а некоторые мастера вообще не моделируют форму бровей! Делают все на глаз! Все равно, все мастера молодцы, стараются, но мне хочется подсказать, как коррекцию бровей можно делать быстрей!
В курсе я знакомлю вас со своей терминологией бровиста, которая именно в Технике Граней была мной выработана. Затем, мы учимся строить индивидуальные схемы бровей! Делаем окрашивание бровей хной и краской, подбираем правильный цвет клиентам, а также учимся корректировать брови пинцетом воском и шугарингом!
Если у кого-нибудь возникнет вопрос - можно ли получить по окончании этого курса какой - то документ, отвечу да! Курс бесплатный, выкладываю его на YouTube в общем доступе, но он профессиональный! В своих лицензированных учебных центрах я преподаю именно этот курс, поэтому он профессиональный, по окончании которого можно получить документ при желании! Для этого нужно обратиться ко мне по ссылке в описании! Но здесь уже выбор за вами! Вы можете учиться без получения каких либо документов, я не ограничиваю вас, а также можете получить документ от меня! Приятного обучения! Мне приятно было с вами поделиться этой информацией и до встречи уже на первом уроке!
Если Вам понравилось видео ставьте лаки 👍, задавайте вопросы, пишите комментарии.
Подписывайтесь на мои каналы
Ресницы, Брови, Ногти, Депиляция https://www.youtube.com/c/EvaLorman
Уроки парикмахеров https://www.youtube.com/c/EVALORMANTUTORIALS
#евалорман #брови #бровист #формабровей

Друзья мои, сообщаю вам, кто ещё не знает! Кто хочет стать мастером Бровистом, есть такая возможность - я создала целый курс, он супер профессиональный! По нему я обучала своих Студентов офлайн! Но недавно, я его выложила в общий доступ, для того, чтоб у всех желающих появилась такая возможность, в современных нестабильных условиях! Такой мой скромный вклад - мир сделать лучше! Именно когда ничего не понятно, лучше всего вкладывать в себя! Курс пока в общем доступе, большой, интересный! Из курса вы узнаете:
- Какие бывают Формы бровей;
- Как правильно строить форму бровей;
- Как подобрать цвет бровей;
- Косметика в Brow индустрии;
- Коррекция в Технике Граней « Бриллиант»;
- Депиляция бровей Воском, Шугаринг;
- Окрашивание бровей Краской;
- Окрашивание бровей Хной;
Переходите на канал, все уроки пронумерованы! Желаю всем приятного обучения!
Брови. Архитектура бровей. Окрашивание бровей. https://www.youtube.com/playli....st?list=PLOFI1Q2RpVU
Если Вам понравилось видео ставьте лаки 👍, задавайте вопросы, пишите комментарии.
Подписывайтесь на мои каналы
Ресницы, брови, ногти, депиляция https://www.youtube.com/c/EvaLorman
Уроки парикмахеров https://www.youtube.com/c/EVALORMANTUTORIALS
ПОЛЕЗНЫЕ ВИДЕО
Прически. Идеи причесок. - https://www.youtube.com/playli....st?list=PLOFI1Q2RpVU
Волосы. Парикмахер - https://www.youtube.com/playli....st?list=PLOFI1Q2RpVU
Женские стрижки https://www.youtube.com/playli....st?list=PLOFI1Q2RpVU
Мужские стрижки. https://www.youtube.com/playli....st?list=PLOFI1Q2RpVU
Как покрасить волосы. Окрашивание волос. https://www.youtube.com/playli....st?list=PLOFI1Q2RpVU
Плетение кос https://www.youtube.com/playli....st?list=PLOFI1Q2RpVU
Наращивание ногтей - https://www.youtube.com/playli....st?list=PLdg2yJWxy1x
Ктийская роспись ногтей - https://www.youtube.com/playli....st?list=PLdg2yJWxy1x
Декоративная роспись ногтей - https://www.youtube.com/playli....st?list=PLOFI1Q2RpVU
Дизайн ногтей https://www.youtube.com/playli....st?list=PLdg2yJWxy1x
Наращивание ногтей https://www.youtube.com/playli....st?list=PLOFI1Q2RpVU
Наращивание ресниц. Ламинирование ресниц - https://www.youtube.com/playli....st?list=PLdg2yJWxy1x
Брови. Архитектура бровей. Окрашивание бровей. https://www.youtube.com/playli....st?list=PLOFI1Q2RpVU
Депиляция воском. Шугаринг. https://www.youtube.com/playli....st?list=PLdg2yJWxy1x
#eva_lorman #евалорманброви #брови

Косы! Плетение французской косы из 4 прядей! Уроки плетения кос!
Рада приветствовать вас дорогие мои любители плетения кос! И в этом уроке я вам покажу плетение французской косы из четырех прядей! Сразу хочу сказать, что она будет немного асимметричная, но потренироваться надо. Плетется она по принципу предыдущий косы. На макушке мы отделим прядь и разделяем ее на 4 равные части начинаем плетение четырех прядей. 1 на вторую под третью и на четвертую. Следующий шаг с правой стороны 1 на
вторую и к ней мы делаем подхват с правой стороны, хорошо
расчесываем прядь и подхват, они у нас вместе проходят наш путь алгоритма плетения штопкой с левой стороны и к левой пряди мы делаем такой же подхват, совмещаем их с левой прядью, зажали все между пальцами и начинаем плетение с правой стороны. Делаем подхват к главной пряди - правой, хорошо вычесали эту прядь и плетем штопкой на вторую, под третью и на четвертую и следующий подход у нас идет к левой пряди. По счету она у нас четвертая мы их совмещаем вместе и перебираем в пальцах, зажимаем и перемещаемся на начало плетения с правой стороны. 1 на вторую потом подхват на первую, следующий шаг это уже плетение нашим методом штопки этого ряда! Когда у нас заканчиваются подхваты мы плетём уже обычную косу из четырех прядей. Как видите она немного асимметрична, изменить эту картину невозможно. Мы сейчас сделаем стретчинг и немножко этот не большой недостаток скроется. Как правило косу из четырех прядей именно французскую не плетут, потому что у неё с одной стороны подхваты вниз, а с правой стороны подхваты сверху, из-за этого появляется небольшая асимметрия самой косы. Плетут в определенных случаях, но не в этом случае. Коса объемная, фактурная!
На этом урок окончен!
С вами была Ева Лорман!
Подписывайтесь на канал! Жмите на колокольчик! Делитесь с друзьями!
А мы встречаемся на следующем уроке!
.
Подписывайтесь на мой каналы
Ресницы, брови, ногти, депиляция http://bit.ly/2qZx8iy
Парикмахерское искусство http://bit.ly/2QNsBea
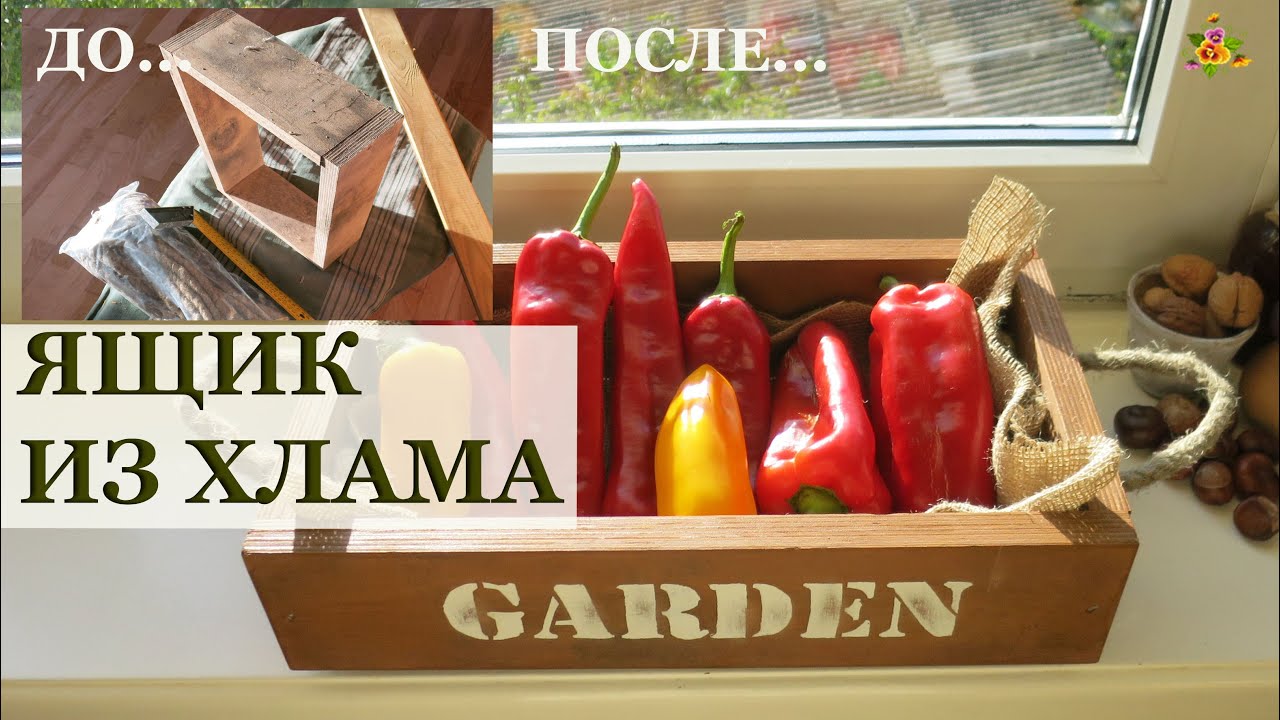
Продолжаю столярничать:) Рассказываю, как делала ящик из старого хлама.
А тут поднос из старых досок https://youtu.be/Z2UXX61zYs8
#Аленин_сад #DIY #recycling

Традиционные для умеренного климата возвратные заморозки в конце мая-начале июня снова пугают нас своими последствиями для огорода (мы от заморозков в начале мая-то еще не отошли...)! Что делать? Как спасаться? Об это в видео:)
Как сделать чехлы из спанбонда https://youtu.be/yCq1x9q6E1E
#Алёнин_сад #Latvia #огород
