Лучшие

Facebook- http://facebook.com/kazanjianm
Twitter- http://twitter.com/kazanjianm
Website- http://merrillk.com
(Merrill) Supplies I Use- http://www.jdoqocy.com/click-4....247664-805536?url=ht
Music by Kevin MacLeod- http://incompetech.com Thank you Kevin!
The winner is orangemonkey92! Congratulations to Mr. Serafin Ureno!
About the Contest: (Narration from Video) "You've asked for it, so lets start the new year in a fun way by having an Art Contest! Here is your challenge question: "What did my channel mascot, Little Old Man look like when he was a young man?" To answer this challenge, you can use any media that you want - be creative and have some fun.....etc..... Remember you have over 140 videos to help you with this task on my channel. When I judge the artwork, I will be looking for humor and creativity but your artwork will have to resemble a younger version of Little Old Man. But Merrill, whats the prize? I will make a pencil portrait and a step by step video of the winner so that the world can draw YOU! I will also feature the winning artwork and the winners youtube channel in an upcoming video. Now for the rules so listen carefully. You will need to follow all three of these rules to win. 1.) Post the words "Im in" in the comments section of this video. 2.) You have to be a subscriber to kazanjianm to be entered, so hit the subscribe button in the video if you haven't subscribed yet. 3.) You can post your entries in one of two places. Your first option is to take a video of your entry and post it as a video response to this video. Your second option is to post your entry to my facebook like page- If you do that, make sure to submit your entry with your channel name. Just hit the link in the video description or visit my channel page to get to my facebook like page. The deadline for entries is January 15, 2011! I cant wait to see the artwork and I will respond to every single entry. Happy new year everybody!"
![Опил ногтей! Как правильно придать форму ногтям! [Наращивание ногтей]](https://i.ytimg.com/vi/uyqH0MApG-Q/mqdefault.jpg)
Опил ногтей! Как правильно придать форму ногтям! Наращивание ногтей!
В этом видео мы учиться создавать правильную форму ногтей при наращивании ногтей.
#nail #eva lorman #nailextension
Мы рассмотрим опил формы квадрат салонный
вариант.
Измеряем длину и придаем форму
свободному краю.
Зажимаем боковые валики пальца клиента
так, чтобы нам был виден только его
ноготь. Таким образом мы не повредим кожу
клиента.
В некоторых методиках опила
эта линия называется линия номер 2 - линия
свободного края.
Правильность этой линии проверяем с
внутренней стороны свободного края.
Первая линия не пилится, это визуальная
ось пальца, которая проходит вдоль пальца
и не повторяет естественных изгибов
пальца. 3 и 4 линии - они едва ли не самые
важные, именно ими
создается четкая форма. Для этого ставим
пилку на ребро и движениями на себя, без
смены направления, пилим с одной и с
другой стороны ногтя, при этом следим за
толщиной по бокам - она должна быть не
менее 0,5 миллиметров с обеих сторон.
Иначе может открыться натуральный ноготь
и в этом случае придется докладывать
материал. Эти линии должны быть
перпендикулярны второй линии и
параллельны между собой.
5 линия - это линия по контуру кутикулы.
Ее необходимо опилить так, чтобы материал
отступал от кутикулы не менее, чем на
один миллиметр, иначе будет отслойка.
В этой зоне должен быть самый тонкий
слой геля. Опиливать эту зону нужно очень
аккуратно, иначе можно повредить кожу
клиента. Использовать лучше всего пилку
не менее 180 грит. 6 и 7 линии - они
убирают образовавшиеся грани после опила
третьей и четвёртой линии. Шестой и
седьмой линией мы убираем эти грани
убирая угловатую поверхность.
Правильность их опила можно проверить
нажав на свободный край ногтя - он от
нажатия не должен сгибаться, как делает
при этом натуральный ноготь.
Толщина геля по бокам должна быть не
менее от 0,5 миллиметров. Опиливая
эти линии мы как бы округляем боковые
стороны ногтя. 6 и 7 линия должны быть
между собой симметричны.
Восьмая - это не линия,
а высшая точка на ногте.
Она находится на своем месте
в зависимости от длины свободного края.
Если свободный край меньше длины ногтевой
пластины, то эта точка находится
центре всей длины от кутикулы до
конца свободного края. Если длина
свободного кроя такая же как и ногтевая
пластина, то 8 точка находится на
стрессовой зоне, зоне улыбки ногтевой
пластины. Девятая - это не линия, а зона.
Мысленно находим 8 точку и от нее в
сторону свободного края опиливаем зону,
которая в итоге должна создать ровную
красивую арку со стороны свободного края.
Проверяем прикладывая пилку на 8 точку и
смотрим в торец ногтя.
Все впадины и неровности очень хорошо
видны, их следует опилить.
10 линия - эта линия выравнивает боковые
части ногтя
под один уровень. При правильном опиле
толщина свободного края
поперечной арки должна быть около 1
миллиметра. Если получилось больше, то
можно выпилить с внутренней стороны фрезой с
насадкой цилиндр.
В итоге после правильного опила должна
получиться форма повторяющая форму
натурального ногтя,
но при этом иметь толщину ,чтобы ноготь
не сломался в процессе носки.
Но он должен быть и не слишком толстым и
тем более обязательно ровным. Мы с вами
рассмотрели основные линии опила
квадрата в салонном варианте наращивания
ногтей.
С Вами была Ева Лорман!
Подписывайтесь на мои каналы!
Ресницы, брови, ногти, депиляция https://www.youtube.com/c/EvaLorman
Уроки парикмахеров https://www.youtube.com/c/EVALORMANTUTORIALS
Оставляйте отзывы!
Ставьте лайки! Всего Вам доброго и удачи!
#опил_ногтей #форма_ногтей #ева_лорман

Электрическое поле. Линии напряженности электрического поля. Физика 10 класс
Visit http://youtube.com/September11 to watch more perspectives on the 10th Anniversary of September 11 and to submit your own.
WE NEED A VISUAL ARTS CATEGORY ON YOUTUBE THREAD-http://www.google.com/support/forum/p/youtube/thread?tid=2a9806f929074cbd&hl=en&fid=2a9806f929074cbd0004b630ad37cc3e
Facebook- http://facebook.com/kazanjianm
Twitter- http://twitter.com/kazanjianm
Website- http://merrillk.com
(Merrill) Supplies I Use- http://www.jdoqocy.com/click-4....247664-805536?url=ht
Reflections on 9-11 .....Merrill Kazanjian's 9-11 story.

http://merrillk.com/index.php?part=fineart&articles_id=5376&collection=114 Today, you are going to draw Lebron James...Never draw before? Thats OK! I broke this process down in to simple steps for you. Miami Heat. I recommend that you pause the video at the end of each step and get in the habit of looking at the reference image on the screen at least once every five seconds. To make this as easy as possible, I uploaded a print version of this lesson to my website. Go to http://merrillk.com and type in LeBron in the search box. Or, if you are watching on youtube, click the link to the right. All that you will need is a pencil and some paper to draw and a q tip or a blending tool to do the shading in the second part of this video. Good luck! Here we go!
This part has 24 steps and it will be followed by a Lebron shading tutorial.
Step 1- Make a rainbow shape
Step 2- Make another rainbow shape above the first, with a slightly higher arc. This will be LeBron's headband. At the end of this step, it should resemble a banana shape.
Step 3- Make one more rainbow shape slightly above the top of the headband this will be Lebrons hair.
Step 4- Is a little tricky. Add the 2 shapes that you see. Notice that the one on (your) left is slightly larger than the one on (your) right.
Step 5- Add the backward L shape that you see.
Step 6- Add the shape that looks like the "little dipper" (pot shape).
Step 7- Add the next 2 lines. Notice that these two lines connect with the bottom of the shape from step 4.
Step 8- Add the 2 small rainbow shapes for the tops of Lebrons Eyes, and take an extra second to notice how each end connects to form a new shape above the eye.
Step 9- Add 2 U shapes under each eye lid. Dont make circles though, leave the top blocked by the upper eyelid.
Step 10- Take a second to observe the gross outline of the nose. Notice that the shape is about the same height as the forehead.
Step 11- The next lines that you see are the outline of Lebrons moustache. Notice that the 2 vertical lines go DIRECTLY below the mid part of Lebrons eyes.
Step 12- Next, put in Lebrons upper lip. Notice that it looks like a flattened letter M.
Step 13- Now put in his bottom lip. It is shaped like a boat. The shape in between the 2 lips looks like the roof of a Pizza Hut.
Step 14- Now, do your best to put in the ear shapes. Notice that his head is turned slightly, so the ear on your right will be a little smaller.
Step 15- Try to observe the line for his chin and jaw and then draw it.
Step 16- Observe and add these lines for the neck.
Step 17- Add the shoulders
Step 18- This v shape will be an important shadow on the neck.
Step 19- Add the W shape between the chin and lower lip.
Step 20- Connect the W shape with the bottom of each ear.
Step 21- Add the nostrils
Step 22- Add the bottom line for the eye.
Step 23- Add two V shapes under the eyes
Step 24- For the final step before we shade, notice the three shapes that are being added on each ear.
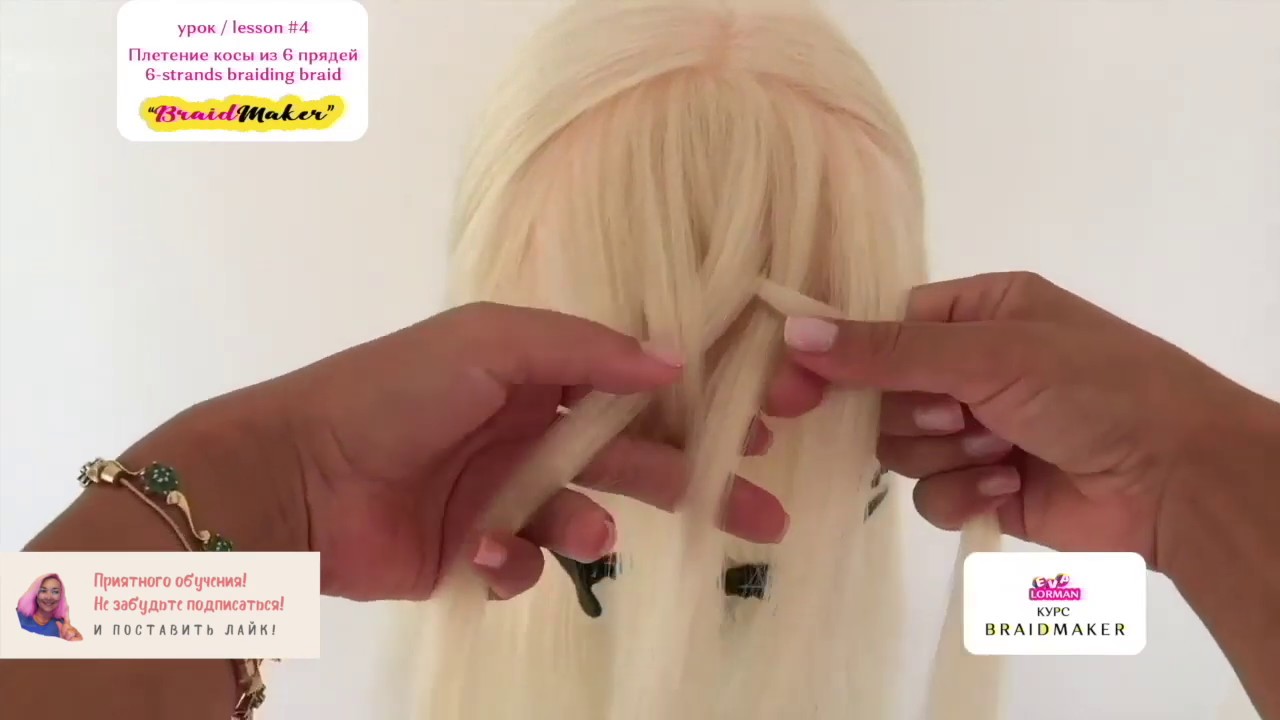
Плетение кос!!! Коса из 6 прядей!!! Уроки плетения кос!
Начинаем стандартно, отделяем прядь и делим ее на шесть равных частей. При чем при некорректном начале необязательно делить все сразу шесть. Нужно отделить первую и к ней добавлять остальные пряди. Первая прядь у нас по стандарту главная, на нее весь ориентир и мы ее вплетаем методом штопки во все остальные пять прядей. Некорректное начало здесь будет явно видно, но это не вопрос для нас, мы это уже понимаем. Вот мы уже проплели первый ряд, по диагонали мы видим главную прядь. И мы начинаем второй ряд, с первой главной пряди во втором ряду и мы ее методом штопки вплетаем в оставшиеся пряди. На вторую, под третью, на четвертую, под пятую, на шестую. Второй ряд готов. Третий аналогично. Первая главная на вторую, под третью, на четвертую, под пятую, на шестую. И так до конца плетения. Видно некорректное начало, если прическа состоит из единственной такой косы, то такое начало конечно неуместно. Поэтому здесь надо обязательно отрабатывать корректное плетение, чем мы сейчас с вами и займемся. Выделяем в топ зоне две пряди по центру, оставляя при этом пару прядей справа и пару прядей слева. Мы берем в руки две центральные пряди и с них мы начинаем плести. Первая прядь главная на вторую, под третью, на четвертую. Вот мы сделали первый ряд, он у нас закончен. Теперь вводим правую прядь, начиная при этом второй ряд. После вводим еще одну прядь и начинаем третий ряд. Вот такая запутанная картина у нас получилась. Но мы понимаем, что такое метод штопки и продолжаем второй ряд, берем главную прядь второго ряда, ее на вторую, под третью, на четвертую. Заканчиваем второй ряд. Начинаем третий ряд. Первая главная на вторую, под третью, на четвертую, под пятую, на шестую. Таким образом мы заплели середину плетения. Дальше плетем, как мы изучали - корректное плетение методом штопки. Всегда у нас первая прядь с правой стороны главная - это у правшей. У левшей главная прядь с левой стороны и плести вы будете слева направо. Хотя левши бывают разные. Некоторые могут работать и правой рукой и левой одинаково. Поэтому смотрите, что вам сподручнее. Вот мы заканчиваем плетение из шести прядей. Это обычная коса методом штопки. Мы с вами уже хорошо изучили эту технику. Я думаю, что вы ее при всем желании уже не забудете. А мы с вами переходим на плетение корректного начала на объемных прядях. В центре отделить пару прядей и сделать один переплет. И с с левой стороны начинаем вводить две оставшиеся пары прядей. Хатем справой стороны постепенно отделяем пряди друг от друга и вводим в плетение, начиная при этом новые ряды. Это у нас второй ряд, а вот это третий ряд. То есть получается у нас первый ряд закончен и два ряда начатых. Что мы должны сделать? Это закончить эти два начатых ряда, чтобы выйти на понятную нам штопку. Главную прядь во втором ряду плетем методом штопки и заканчиваем второй ряд. Далее осталось закончить третий ряд. Главная прядь лежит на второй, мы ее вводим под третью, на четвертую, под пятую и на шестую. Все. Ура! Самый сложный момент у нас пройден. Дальше мы плетем обычным методом штопки, который мы изучили с вами до автоматизма. Расчесали волосы, если они запутались и продолжаем плести. Как видите при плетении из шести прядей проблемы у нас никакой нет, несмотря на то, что прядей у нас больше. Все благодаря тому, что мы очень хорошо изучили алгоритм штопки и продолжаем наращивать свою мышечную память. Тем самым мы продвигаемся все выше и выше. Умений у нас в руках все больше и больше. Руки нас уже слушаются, а порой даже мы не обращаем внимание на их действия. Тоесть руки плетут сами, а вы просто наблюдаете за этим со стороны. Это и называется мышечная память, которая развивается со временем от одного и того же действия. Наращивается и тем самым облегчает нам дальнейшую работу. Продолжаем плести. Коса из шести прядей выглядит уже повеселее:)))
#косы #braiding #ева_лорман #как
Если Вам понравилось видео ставьте лаки 👍, задавайте вопросы, пишите комментарии!!!:)))
Подписывайтесь на мой канал http://bit.ly/2qZx8iy

Определим направление силы Лоренца. Правило левой руки. Физика 11 класс

Самая популярная в мире стрижка - Клинт Пришел и Сказал (КПС)
Записаться на бесплатный вебинар BIG STEP
http://lorman-academy.online/bigstep
Поэтому, нет ребята, мы учим базу, которую
потом вы будете между собой смешивать и
она у вас должна легко смешиваться и
логично, то есть, потому, что я понимаю реально, как
человек, студент, который не знает, у него
вообще могут отсутствовать даже понятия
о этом, глазомере,
и это вообще это реально. Это абсолютно
реально. Почему вот у вас вопрос возник - Я
вот вижу ,что тут коротко или мне не
нравится здесь, а Вы не видите. Понимаете?
Кто-то видит желтое платье , кто-то там
синее или черное, уже не помню там эта
фишка. Понимаете в чём дело? У всех людей
разный глазомер, у всех. Вот сколько
сантиметров я сейчас показываю?
Дальше, дальше. 40. Вот здесь 40 сантиметров, линейка
30 и было там 10 еще, ну 38 .
Сколько вот здесь? Вот между моими, ну
пусть пальцами, не ногтями, пальцами. Ваша группа
говорит 6?
Пять. Дальше. Нет между пальцами.
Ровно пять сантиметров.
Понимаете, чувствуете насколько мы все
разные люди?
Чувствуете? А представьте себе вот эту
банду клиентов,
которая тоже понимает, что это либо 5,
либо 6, либо 7, либо 3 сантиметра.
Которая понимает, что вот этот отрезок -
полметра, а кто-то говорит 30 сантиметров.
Понимаете? Мы все абсолютно разные люди и
к этому надо относиться с любовью. Что мы
все люди разные. Да. Это называется надо относиться к
людям с любовью. Очень люблю такую пословицу - Чем
топтаться по камням на земле и пытаться
их выгрести с этой земли, просто оденьте
соответствующую обувь.
Понимаете? Вы не сможете просто этого
сделать, изменить людей нельзя изменить,
мир вообще невозможно. То есть, если вы
видите дорогу в камнях, чем вот это все
разгребать вот идти, просто оденьте обувь
соответствующую, чтобы вам было комфортно
идти по этим камням. Вот так в жизни все.
Согласны с этим? Это и есть клиенты!
Это и есть клиенты, которые вот такие
вот камни. Вы должны будете к ним
подстроится, вы должны соответствующую
обувь, а
это ваши знания. Обувь в данной ситуации играет
роль знания,
вернее играют роль обуви вот этой. Вы
должны быть готовы к этому и вы должны
думать, научиться просто думать и не
переживать, что что-то там. Не Боги горшки
обжигают, есть такое выражение. Я вообще
своих студентов учу -
давайте, знаете как, забудем вообще, что
существуют какие-то стрижки , как они там
называются, это мы знаем как они
называются, а клиент не знает как они
называются. Клей придет- Мне вот тут так, мне
здесь вот так, а вот тут вот вот так. Ваша
задача спросить - А вот тут как?
А вот тут вот вот так мне. А, отлично! А здесь как?
Здесь вот, на вот этой зоне какая должна
быть длина? Ну пусть вот она вот здесь у
меня лежит. Все.
Вы уже себе в голове выстроили вот
эту характеристику этой стрижки. Начинаем
с тех зон, которые человек вам говорит. Он
сказал вам там вот так, причем опять же
не верьте никогда ему, когда он говорит
оставьте мне там 40 сантиметров или 30,
или 15. Прям берете линейку и говорите -
смотрите 15 сантиметров это вот столько
и прикладываете клиенту к спине и прям вот тычите ему пальцем в
спину и говорите вот ваша длина.
Так ? Он говорит - Ну да! Все отлично! Или там скажет - нет или мне
длинее оставьте. Правильно же? Все . Точку-то
вы сделали. Вторая точка -
макушка. Клиент всегда будет знать какую ему
макушку делать. Вот запомните это! Это всегда
сто процентов.
Человек, который страдает от отсутствия
объема на голове, он будет стараться сделать ее
максимально короче. Правильно? Все.
Если у него стоит эта задача он вам
никогда не скажет - мне подстригите ровно. Но
тут, чтобы было пышно. Такого не бывает,
либо это укладка. То есть если он вам сказал - мне
повыше макушку - это значит вы должны
прикинуть, что у вас должна вот эта длина
вот короче, чем вся остальная. Вы вот эту
длину определяете опять с ним. Говорите -
вот если она вот здесь вот у вас будет,
да. И как правило они говорят -Да,да,да, вот в этом районе! Это каскад под 90
на всей голове это по сути.
Дальше! Спрашиваете у клиента -
челка какая? Челка мне, пожалуйста, на три
части, к примеру сейчас скажем, вот такую
длину, чтобы обязательно прикрывала скулы.
Да, скажем к примеру. Всё сказал , сделали здесь две
контрольные точки, отлично молодец. Здесь
какая длина уже это не его вопрос потому,
что ваша задача теперь вот эту длину
соединить во с этой. И все. Вот как вы назовете эту
стрижку?
Клиент пришел и сказал - называется так. И
такие стрижки будут у вас практически
все.
Клиент Пришел и Сказал как ему подстричь.

Время, в котором мы живем, характеризуется бурным развитием науки и быстрым внедрением научных открытий в промышленность, сельское хозяйство, в быт человека.
С развитием физики тесно связано развитие техники.
Так электрические явления люди наблюдали еще за несколько веков до нашей эры.
Однако в промышленности и быту электричество стала применяться лишь с конца 19 века, когда были открыты основные законы которым подчиняются электрические явления.
Развитие электронной техники, появление калькуляторов, компьютеров, новых моделей телевизоров, автоматических устройств, стало возможным благодаря созданию полупроводниковых материалов, обладающих специфическими электрическими свойствами.
В свою очередь использование компьютера помогает решать многие научно-исследовательские и практические задачи.
Например компьютер даёт возможность достаточно точно рассчитать траекторию движения космических тел и космических кораблей.

Дифракционная решетка одномерная. Физика 11 класс

Математический маятник. Физика 11 класс
Facebook- http://facebook.com/kazanjianm
Twitter- http://twitter.com/kazanjianm
Website- http://merrillk.com
Supplies I Use- http://merrillk.com/?sid=135&idpage=supplies_i_use
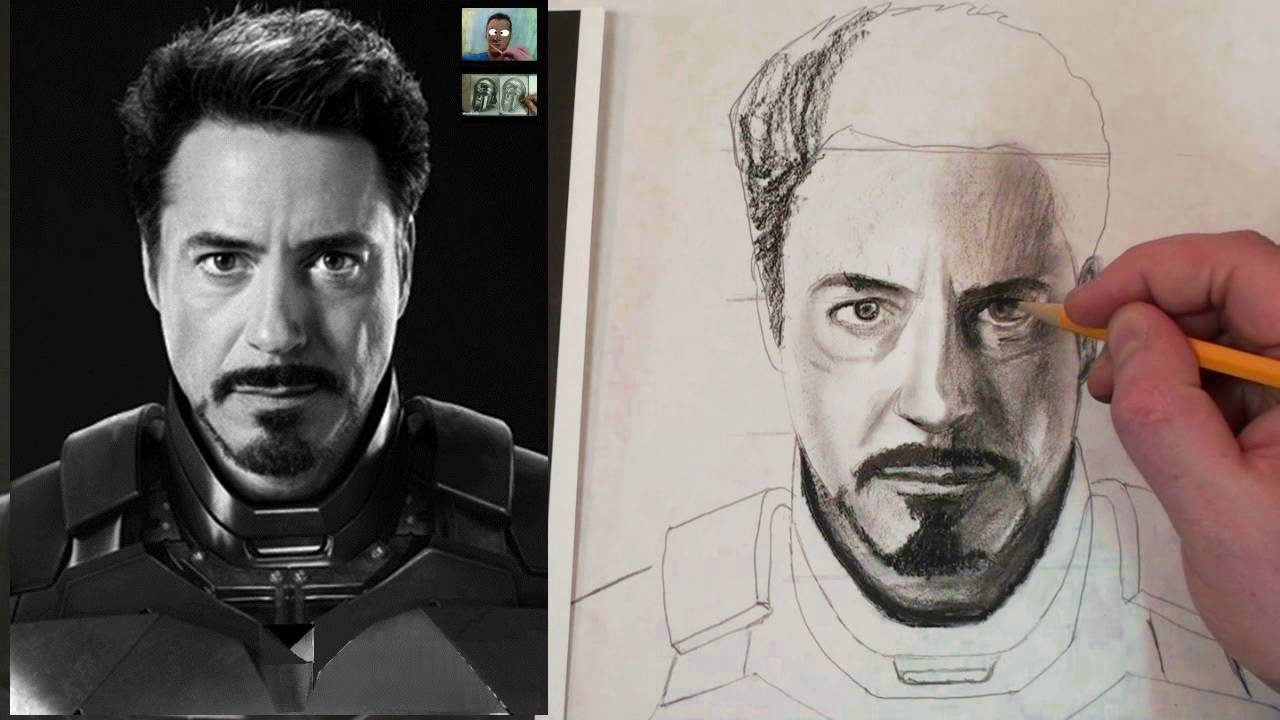
Last week, my audience voted for the tutorial that they wanted on my Facebook page. And Iron Man was the most popular choice. Since this tutorial was directly chosen by my viewers, I wanted to make it extra special. As always, I am going to give you step by step instruction on how to get a likeness of Iron Man. But after the steps, I am going to try to do something special. I am going to teach you how to incorporate charcoal and fixative in to a drawing so that you can layer it like a painting. This video will be a little longer than usual, but it will be packed with great information. Grab your pencils and some drawing paper. Lets begin.

A helpful trick with observational drawing is to see what you are drawing, as shapes. The basic shape of the human eye is similar to an almond shape. But this is only one of the several shapes that encompass the eye. Think of these shapes as puzzle pieces as you draw a persons eye in the near future. Remember that these shapes will slightly change based upon a persons facial expression. Today, I will show you step by step how to draw the human eye. Pause the video at any time if you need to. Here we go.
Step 1: Make a rainbow shape with a circle under it. The top of the circle should be partially blocked by the rainbow.
Step 2: Make the bottom lid. Notice that the lower part of the almond shape narrows as it approaches the tear duct on the inner corner of the eye.
Step 3: Make the pupil and leave an empty space in the middle for a reflection. The line above, is the eye lid folded back.
Step 4: Add the shape of the eyebrow.
Step 5: Add a light line below the eye to hint at the eye socket.
Step 6: Shade in the eyebrows. Try to notice that they are not one solid shape.
Step 7: Add the eyelashes. Try to notice that they are much thicker on the top eye lid.
Step 8: Add the final shading. The darkest areas should be directly under the eyebrow and under the eye.
I hope that this video helped you. If you still need help go to merrillk.com and download a print version of this lesson. This print version will give you step by step instruction through pictures and words. Once you are on Merrillk.com, click the gallery tag at the top of the page. Next, go to select an artwork at the top on the right, under the merrillk.com banner. Scroll down until you see Eye Worksheet 1, 2 or 3.
Un truco útil con el dibujo de observación es para ver lo que está dibujando, como las formas. La forma básica del ojo humano es similar a una forma de almendra. Pero esto es sólo una de las varias formas que abarcan los ojos. Estas formas de pensar como piezas como las personas que dibujar un ojo en el futuro próximo. Recuerde que estas formas se modifican levemente las personas sobre la base de una expresión facial. Hoy en día, yo te mostraré paso a paso cómo sacar el ojo humano. Pausa en el vídeo en cualquier momento si es necesario. Aquí vamos. Paso 1: Hacer un arco iris forma con un círculo en virtud del mismo. La parte superior del círculo debe ser parcialmente bloqueado por el arco iris. Paso 2: Hacer la tapa inferior. Observe que la parte inferior de la forma de almendra se reduce a medida que se acerca el conducto lagrimal en la esquina interior del ojo. Paso 3: Hacer que el alumno y dejar un espacio vacío en el centro de la reflexión. La línea anterior, se tapa los ojos recogidos. Paso 4: Añadir la forma de la ceja. Paso 5: Añadir una línea por debajo de la luz a los ojos en la pista de las órbitas. Paso 6: La sombra de las cejas. Trate de notar que no son una forma sólida. Paso 7: Añadir las pestañas. Trate de observar que son mucho más gruesa en el párpado superior. Paso 8: Añadir la última sombra. Las zonas más oscuras debe estar directamente bajo la ceja y en el marco del ojo. Espero que este video le ayudó. Si aún necesita ayuda para ir a merrillk.com y descargar una versión impresa de esta lección. Esta versión para imprimir le dará instrucciones paso a paso a través de imágenes y palabras. Una vez que esté en Merrillk.com, haga clic en la etiqueta de la galería en la parte superior de la página. A continuación, vaya a seleccionar una obra de arte en la parte superior de la derecha, bajo la bandera merrillk.com. Desplácese hacia abajo hasta que vea los ojos de trabajo 1, 2 o 3.

Движение двух тележек под действием силы упругости
Воспользуемся вновь двумя демонстрационными тележками, Изменяя длину нитей, к которой стягивается упругая пластина, мы тем самым изменяем усилия действующие на тележке.
Чем сильнее мы стянем эту пластину, тем речи и интенсивнее она будет распрямляться после переживания нити.
И в этом случае ускорение и скорости с которыми тележки разъедутся, будут зависеть от усилия приложенного к пластинам со стороны.
Таким образом, действие одного тела на другое, иначе говоря взаимодействие тел, может быть различным.
Урок ''Движение двух тележек под действием силы упругости"
https://wkojla.com/dvizhenie-d....vuh-telezhek-pod-dej

Движение под действием нескольких сил

Определение равнодействующей сил, действующих по одной прямой, но направленных в противоположные
Определим равнодействующую сил действующих по одной прямой, но направленных в противоположные стороны.
Для этой цели над одним из динамометров закрепляем блок.
К верхнему крючку этого динамометра прикрепляем нить, которую перекидываем через блок.
К другому концу нити подвешиваем груз, снятый со 2 динамометра.
Показания 1 динамометра уменьшаются на величину веса подвешенного груза.
Если силы направлены по одной прямой но в противоположные стороны, то равнодействующая равна разности этих сил и направлена в сторону большие силы.
За учебником Физика 7 класс Перышкин А. В.
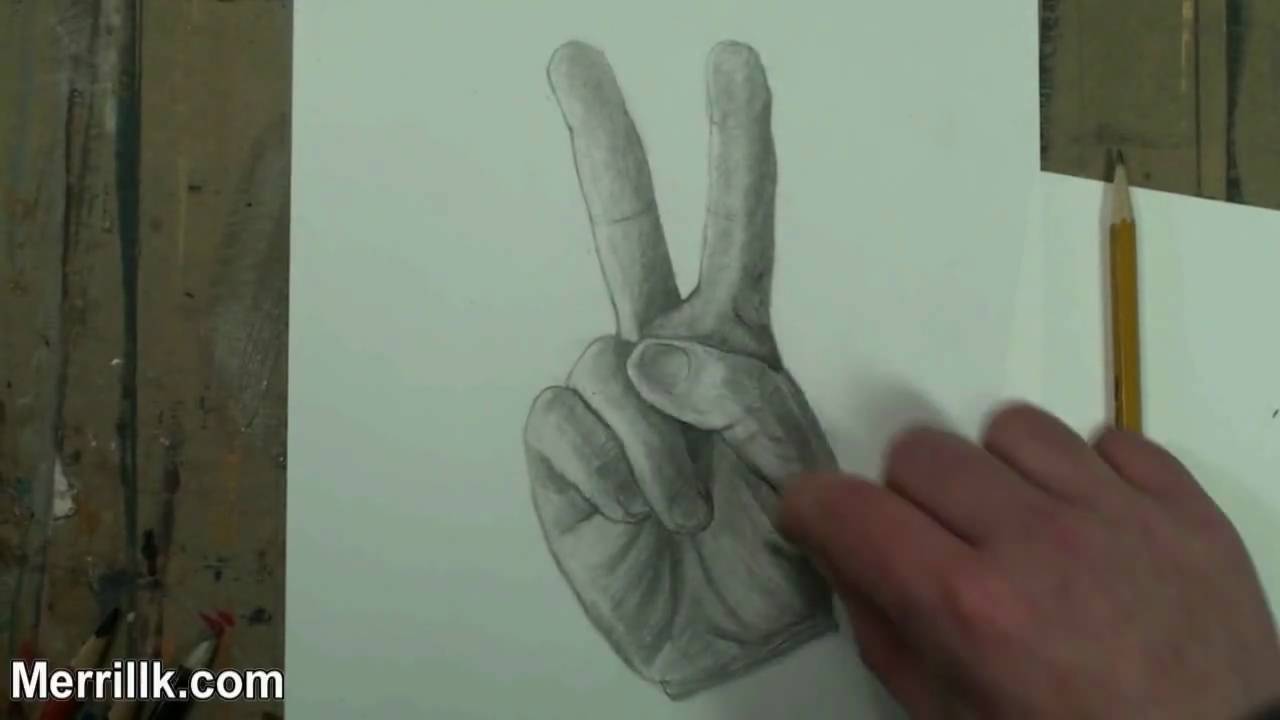
Link- http://merrillk.com/index.php?part=fineart&articles_id=6556&collection=114 This is the second in a series of twenty videos, that will show you how to draw the hand in various poses. This video will specifically focus on the peace sign hand gesture. I broke the process down in to simple steps and I went the "extra mile" to make sure that EVERYONE could do it, even if you havent had much experience with art. The link in the videos description will take you to a web page with step by step instructions and a PDF Book that you could download and print for free..... Lets get ready to draw
As a general recommendation, pause the video at the end of each step and look at the reference image often.
Step 1: Draw the two fingertip shapes. Notice that the fingertip on the left is at a different angle than the fingertip on the right.
Step 2: Add the next two shapes. Notice that they are slightly longer than the fingertip shapes.
Step 3: Draw the trapezoid shape in addition to the two shapes that complete the fingers. Notice that the bottoms of the fingers are slightly longer than the mid sections of the fingers.
Step 4: Step four is a tricky step! Be sure to spend some extra observation time. Notice that the thumb overlaps the trapezoid shape. Also notice that the thumb in this position, resembles a flying saucer tilting to the side.....YES...a flying saucer with a thumbnail in it.
Step 5: Draw the traingle shape. Notice that it is directly below the V shape from the two fingers. Also notice the tiny shape that I made tp the right side of the thumb.
Step 6: Draw the tilted U shape, to the left of the triangle. Also, draw in the fingernail.
Step 7: Observe the picture to close the U shape from step 6.
Step 8: Add in the shape that I just added. It will eventually be a part of the pinky finger.
Step 9: Add in the fingertip and fingernail to complete the shape for the pinky finger.
Step 10: Add the triangle shape next to the pinky finger. This will eventually be part of the palm.
Step 11: Add in the shape for the lower palm.
Step 12: Observe the line that was just added. It is similar to the bottom of a cup. It starts at the middle of the ring finger and ends at the thumb shape from Step 4.
Step 13: Take some extra time to observe the line that I just added. Then, complete the shape for the bottom of the palm
Step 14: Now, take a second to observe the lines that I ALMOST totally erased.
SHADING
Step 15: Build the tones up slowly. Start cross hatching with an HB (#2) pencil.
Step 16: (NOT SHOWN) I use a blending stump to smudge my hatches. And then I do more hatching atop of the smudges.
Step 17: The darkest parts will be the triangle in the center and the areas on the edges of the right side of the hand (and fingers....see this developed in the next few steps).
Step 18: At this point I am using my darker (in tone) 2B, 3B, 4B and 5B pencils. I also use the eraser (A LOT) to create highlights.
Step 19: I always try to finish a drawing by smoothing it out by using the pencil, the eraser and the blending stub (tortillion).
Step 20: Finished!
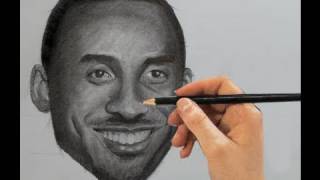
Link- http://merrillk.com/index.php?part=fineart&articles_id=5980&collection=114 Today, YOU are going to draw Kobe Bryant. It doesn't matter if you have prior art training or not. This video will break the process down in to simple steps so that anyone can do it. Grab a pencil and paper and let me show you what I mean. Remember to pause the video when you need to. Here we go.
Step 1: Draw an oval shape for Kobe's head. Notice that the bottom of the oval looks like an upside down trapezoid while the top of the oval shape is rounded.
Step 2: Make four horizontal lines. The top line MUST intersect the midway point of the oval shape. The lowest line should be placed at the bottom of the chin. After drawing the top and bottom lines, add two EVENLY SPACED lines between the top and bottom line. At the end of step two, you should have THREE evenly spaced segments between the top and bottom lines (refer to the picture).
Step 3: Observe the six dots that I added. The top four map out the corners of Kobe's eyes, while the bottom two map out the corners of his mouth. Lets look at their relationship. Notice that these dots are leaning towards the right side of the oval. This is due to the fact that Kobe's head is slightly turned. Also, take a second to notice the distance in between the two eyes is equal to one eye length. Finally, notice that the middle part of the space designated for each eye, will line up with the outer corners of the mouth. Now, draw in the six dots.
Step 4: Draw in the eyes....The upper eyelid as a rainbow shape and the bottom lid is close to a straight line. Notice that the iris is partially blocked by the upper eyelid.
Step 5: Encapsulate the eye in the oval shape that I just added.
Step 6: In this step, make the bottom of the nose by drawing three connected, upside down arches. Do not worry about the bridge of the nose yet. After you make the bottom of the nose, draw the shape for the upper lip...... The upper lip looks like a squished McDonalds logo (picture the golden arches squished).
Step 7: Add the bottom lip. It is similar to a banana shape. Notice that the bottom lip is thicker than the top lip. Now that we have the eyes and part of the mouth done, take a second to notice the perfect square that is formed when you connect the points from the middle of the eye and the corners of the mouth. Make adjustments if you do not have this perfect square.
Step 8: Draw in the two shapes between the eyes and nose. Like the bottom lip, these shapes are very similar to banana shapes. They will help us shade the nose later.
Step 9: Now add in the ears. Due to the fact that Kobe's head is turned; it appears that his left ear is smaller than his right. This, of course is not the case, but draw what you see.
Step 10: Draw in the lines, stemming from the chin, as well as Kobe's dimple lines.
Step 11: Draw in Kobe's hairline. Again, due to the turn of his head, you will see more hair on the right side.
Step 12: Erase the construction lines
Now, I will show you how to shade your drawing. Don't worry, this too, will be easy! You have three options to learn shading. Option one- click the link in the video description to go to a webpage that I made for this video..... on my website, merrillk.com. You will see a series of 17 steps with picture references and words. You will also see a free downloadable resource that you can print. Option two is to watch a shading demonstration in the second part of this video; and option three is a separate video; where I will demonstrate how I shaded Kobe at a slower pace. Please take advantage of all of these options. I am confident that they will help. Special thanks to Rico Shen for use of his photograph via Creative Commons. http://commons.wikimedia.org/w....iki/File:NikeTaipeiF

Subscribe to kazanjianm (Don't miss any new videos that I make)- http://www.youtube.com/subscri....ption_center?add_use
Facebook: Like me on Facebook to find out about live hangouts or to post your work!- http://facebook.com/kazanjianm
Twitter: I tweet! Do you? http://twitter.com/kazanjianm
My Website: http://merrillk.com
Art Supplies I Use in my Art Work- http://merrillk.com/?sid=135&idpage=supplies_i_use
YouTube Visual Arts Category Petition: http://www.change.org/petition....s/create-a-visual-ar
Step by Step Drawing Playlist: http://www.youtube.com/playlis....t?list=PLD6E34C7CD58
Intro (CC)- http://www.youtube.com/watch?v=Ov0A7dJmQ1E

Finally Get Fluent in Norwegian with PERSONALIZED Lessons. Get Your Free Lifetime Account: https://goo.gl/1xQpcc ↓ Check how below ↓
Step 1: Go to https://goo.gl/1xQpcc
Step 2: Sign up for a Free Lifetime Account - No money, No credit card required
Step 3: Start learning Norwegian the fast, fun and easy way!
Save 20% on FULL Access to NorwegianClass101 with your YOUTUBE coupon for All subscriptions https://goo.gl/mQ4sZ4
In this lesson, you'll learn all about Fall Break in Norway and how it's celebrated, from food to decorations, while building your Norwegian vocabulary.
■ Facebook: https://www.facebook.com/NorwegianClass101
■ Google Plus: https://plus.google.com/+NorwegianClass101
■ Twitter: https://twitter.com/NorwegianClass101
■ Pinterest: https://www.pinterest.com/NorwegianClass101
■ Tumblr: http://NorwegianClass101.tumblr.com
Click here to find out more about this lesson: https://goo.gl/b5aCkA
Also, please LIKE, SHARE and COMMENT on our videos! We really appreciate it. Thanks!