Лучшие

ЕГЭ математика В6. Площадь трапеции. Видео урок.. подготовка к егэ 2010. Задание B6.Трапеция найдите площадь
Знания Успех.канал pymathru. Удачи вам на экзаменах от Балакирева Никиты. Учитесь хорошо.
ЕГЭ математика В13. Досрочный 2012.Раствор
https://www.youtube.com/watch?v=Aqapna2ToqE
В10. ЕГЭ математика 2012.. досрочный вариант .Вероятность
https://www.youtube.com/watch?v=RV4HbrNGh3U
С1 ЕГЭ математика тригонометрия. Досрочный 2012.
https://www.youtube.com/watch?v=NGrSN08MywY
Подписывайтесь, чтобы ничего не пропустить:
http://www.youtube.com/user/pymathru
сайт: http://pymath.ru
группа вконтакте: http://vk.com/pymathru
С Наилучшими пожеланиями ваш Балакирев Никита.
И помните только знания приведут вас к успеху, удачи.

Велосипедист выехал с постоянной скоростью из города А в город В, расстояние между которыми равно 104 км.На следующий день он отправился обратно егэ математика 2011 В12 решение

http://lobach-school.ru/ наш сайт
lobach.info@inbox.ru наша почта
https://vk.com/lobach_dzer наша группа в контакте
https://ok.ru/group/54191503245545 наша группа в одноклассниках

Биология 10 класс
Энергетический и пластический обмен веществ
Из этого занятия Вы узнаете:
- Понятие метаболизма
- Сравнение энергетического и пластического обмена веществ
- Обмен белков, липидов, углеводов
- Нарушения обмена веществ
http://lobach-school.ru/ наш сайт
lobach.info@inbox.ru наша почта
https://vk.com/lobach_dzer наша группа в контакте
https://ok.ru/group/54191503245545 наша группа в одноклассниках

Подробное решение задний из официального (фипи) демонстрационного варианта контрольных измерительных материалов для проведения в 2015 году единого государственного экзамена по математике (базовый уровень)
Условия заданий находятся здесь: http://math-helper.ru/elementa....rnaya-matematika/res
Хотите отблагодарить? Вот реквизиты :
Яндекс кошелек: 410011015232597
QIWI кошелек(никнейм): NORMAG
WebMoney кошельки:
P456163911504
Z208758621084
E334680670097
K964500285603
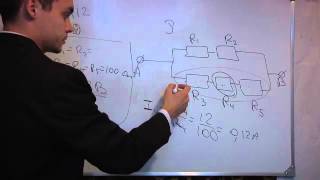
ЕГЭ(единый государственный экзамен) по физике.Видео репетитор.Подготовка Онлайн к ЕГЭ. Задание А12. ПОдготовка к егэ по физике. Репетитор по физике. Решение заданий из ЕГЭ для успешной сдачи физики.Видео репетитор подготовки к ЕГЭ. Сдать ЕГЭ по физике.Хороший бал получить за решение заданий единого государственного экзамена по физике. Эффективная подготовка к ЕГЭ по физике.Видео полезно в качестве видео репетитора для подготовки к ЕГЭ по физике.
Сопротивление каждого резистора
в цепи, показанной на рисунке, равно
100 Ом. Участок подключён
к источнику постоянного напряжения
выводами A и B. Напряжение на
резисторе R4 равно 12 В. Напряжение между выводами схемы UAB равно
1) 12 В
2) 18 В
3) 24 В
4) 36 В
группа вконтакте: http://vk.com/pymathru
веб сайт: http://pymath.ru/viewtopic.php?f=140&t=2427
только знания приведут вас к успеху!
Подписываемся на канал, у меня много видео уроков.
ЕГЭ по физике А11.Подготовка онлайн.Репетитор.Заряд
http://www.youtube.com/watch?v=z6DO-Dne6YI
ЕГЭ по физике А13.Подготовка онлайн.Репетитор.Частица
http://www.youtube.com/watch?v=MB6ClenLe0E

Егэ по физике. демонстрационный вариант.Решение подготовка к ЕГЭ 2011.
Решение задач.Радиактивный распад.Полоний., испытав один альфа распад и два распада бета

Егэ по физике. Решение подготовка к ЕГЭ 2011.
Решение задач.A14.Сила тока

Ускорение свободного падения на планете Пирр в два раза больше земного. Во сколько раз масса Пирра больше массы Земли? Плотности планет считайте одинаковыми.
1) корень третьей степени из двух 2) 2 3) 4 4) 8

Уравнения, содержащие неизвестную под знаком радикала называются иррациональными уравнениями
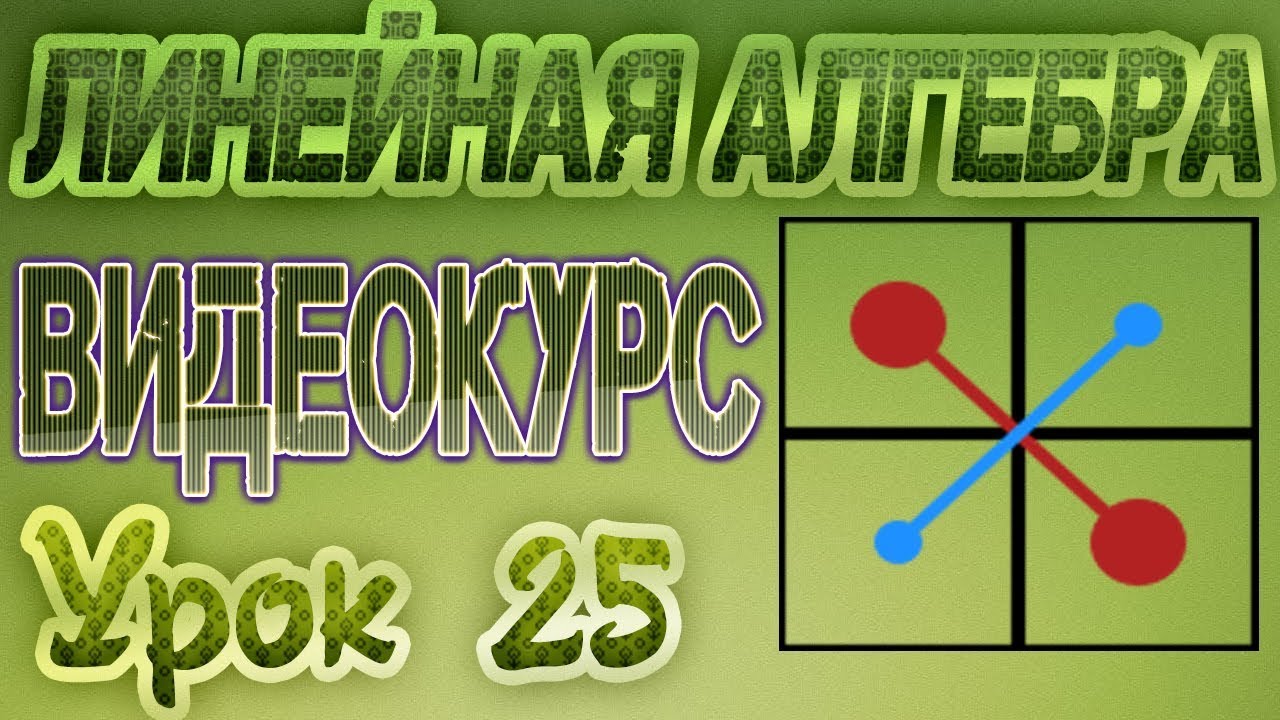
Линейная алгебра. Решение систем линейных уравнений методом Крамера
Видеокурс "Высшая математика "с нуля" рассчитан на студентов высших учебных заведений, обучающихся на нематематических специальностях.
Смотрите все уроки видеокурса: Высшая математика "с нуля". Линейная алгебра:
https://www.youtube.com/playli....st?list=PLk91qesJngS
Хотите отблагодарить? Вот реквизиты :
Яндекс кошелек: 410011015232597
QIWI кошелек(никнейм): NORMAG
WebMoney кошельки:
P456163911504
Z208758621084
E334680670097
K964500285603
Смотрите другие видеоуроки на канале MathTutor:
Высшая математика "с нуля". Аналитическая геометрия:
https://www.youtube.com/playli....st?list=PLk91qesJngS
Высшая математика "с нуля". Математический анализ:
https://www.youtube.com/playli....st?list=PLk91qesJngS
Решения различных задач по высшей математике:
https://www.youtube.com/playli....st?list=PLk91qesJngS
Математика для юристов:
https://www.youtube.com/playli....st?list=PLk91qesJngS
Алгебра 10-11 классы: https://www.youtube.com/playli....st?list=PLk91qesJngS
Геометрия 10-11 классы: https://www.youtube.com/playli....st?list=PLk91qesJngS
Наш сайт:
http://math-helper.ru/
MathTutor в соц. сетях:
VK: http://vk.com/math_tutor_zno
Twitter: https://twitter.com/MathHelperRu
Facebook: https://www.facebook.com/MathTutor777

Мифы Греции
Из этого урока вы узнаете:
• кто такой Геракл
• краткое содержание мифов
• о влиянии мифов Греции на развитие искусства в целом
------------------------------------------------------
http://lobach-school.ru/ наш сайт
lobach.info@inbox.ru наша почта
https://vk.com/lobach_dzer наша группа в контакте
https://ok.ru/group/54191503245545 наша группа в одноклассниках
https://www.facebook.com/group....s/lobach.school.onli наша группа в facebook
externlobach.ru - сайт дистанционного обучения
https://www.youtube.com/channe....l/UCEdgPGAmYfsQTEedO канал на youtube
--------------------------------
Помощь в развитии канала:
Карта сбербанка: 4276 4200 1653 0841
Яндекс деньги: 410013203811146

История 7 класс 3-4 неделя
Тема: "Смута. Окончание смутного времени."
Описание темы:
- Причины и суть Смутного времени
- Царствование Лжедмитрия I
- Боярский заговор
- Выступление Ивана Болотникова
- Лжедмитрий II
- Перелом в настроении народа
- Вторжение войск Польши и Швеции
- Распад тушинского лагеря
- Первое ополчение
- Второе ополчение
- Освобождение Москвы
- Земский собор
----------------------------------------------------------
http://lobach-school.ru/ наш сайт
lobach.info@inbox.ru наша почта
https://vk.com/lobach_dzer наша группа в контакте
https://ok.ru/group/54191503245545 наша группа в одноклассниках

История России 7 класс
Быт и обычаи в XVIII веке
Из этого занятия вы узнаете:
- жилище;
- одежда;
- досуг.
http://lobach-school.ru/ наш сайт
lobach.info@inbox.ru наша почта
https://vk.com/lobach_dzer наша группа в контакте
https://ok.ru/group/54191503245545 наша группа в одноклассниках
https://www.facebook.com/group....s/lobach.school.onli наша группа в facebook

Биолоигя 6 класс
Бесполое размножение растений и животных
- Особенности бесполого размножения
- Деление на двое
- Почкование
- Спорообразование
- Вегетативное размножение
http://lobach-school.ru/ наш сайт
lobach.info@inbox.ru наша почта
https://vk.com/lobach_dzer наша группа в контакте
https://ok.ru/group/54191503245545 наша группа в одноклассниках
https://www.facebook.com/group....s/lobach.school.onli наша группа в facebook
Алгебра 7 класс. Неделя 3. Преобразование выражений
Из этого занятия вы узнаете:
- законы сложения и умножения,
- решение задач,
- вычисление наиболее рациональным способом,
- упрощение буквенных выражений.
-------------------------------------------------------
http://lobach-school.ru/ наш сайт
lobach.info@inbox.ru наша почта
https://vk.com/lobach_dzer наша группа в контакте
https://ok.ru/group/54191503245545 наша группа в одноклассниках

САЙТ: http://matematikaprosta.ru/
Сдай ЕГЭ на 5!
Курсы http://egematkurs.ru/
Моя страница: https://vk.com/darkirill
Подготовка гр. ВК: https://vk.cc/734JvN Устал учиться❓
⬇Отдохни и поиграй лучшие онлайн игры на компе⬇
⚡ http://igraionline.ru/ ⚡

САЙТ: http://matematikaprosta.ru/
Сдай ЕГЭ на 5!
Курсы http://egematkurs.ru/
Моя страница: https://vk.com/darkirill
Подготовка гр. ВК: https://vk.cc/734JvN Устал учиться❓
⬇Отдохни и поиграй лучшие онлайн игры на компе⬇
⚡ http://igraionline.ru/ ⚡

География 7 класс 23 -24 неделя
Австралия : образ материка. Путешествие по Австралии.
1. Физико-географическое положение материка.
2. Рельеф, тектоническое строение, полезные ископаемые.
3. Климат.
4. Внутренние воды.
5. Почвы.
6. Природные зоны. Растительный и животный мир.
7. Население. Хозяйственная деятельность.
8. Государства и столицы
• Положение материка по отношению к экватору.
• Положение материка по отношению к нулевому меридиану.
• Положение материка по отношению к тропикам
• Крайние точки, их координаты.
• Протяженность материка с севера на юг и с запада на восток в градусах и километрах.
• Определить в каких климатических поясах расположен материк
• Положение материка по отношению к морям и океанам.
• Положение материка по отношению к другим материкам.
------------------------------------------------------
http://lobach-school.ru/ наш сайт
lobach.info@inbox.ru наша почта
https://vk.com/lobach_dzer наша группа в контакте
https://ok.ru/group/54191503245545 наша группа в одноклассниках
https://www.facebook.com/group....s/lobach.school.onli наша группа в facebook
externlobach.ru - сайт дистанционного обучения
https://www.youtube.com/channe....l/UCEdgPGAmYfsQTEedO канал на youtube
--------------------------------
Помощь в развитии канала:
Карта сбербанка: 4276 4200 1653 0841
Яндекс деньги: 410013203811146

Французский язык 6 класс 12-13 недели
ТЕМА: La ville
1. Лексика по теме.
2. Счет этажей.
3. Порядковые числительные.
4. Рассказ о месте, в котором живешь.
------------------------------------------------------
http://lobach-school.ru/ наш сайт
lobach.info@inbox.ru наша почта
https://vk.com/lobach_dzer наша группа в контакте
https://ok.ru/group/54191503245545 наша группа в одноклассниках
https://www.facebook.com/group....s/lobach.school.onli наша группа в facebook
externlobach.ru - сайт дистанционного обучения
https://www.youtube.com/channe....l/UCEdgPGAmYfsQTEedO канал на youtube
--------------------------------
Помощь в развитии канала:
Карта сбербанка: 4276 4200 1653 0841
Яндекс деньги: 410013203811146
