Лучшие

WE NEED A VISUAL ARTS CATEGORY ON YOUTUBE THREAD-http://www.google.com/support/forum/p/youtube/thread?tid=2a9806f929074cbd&hl=en&fid=2a9806f929074cbd0004b630ad37cc3e
Facebook- http://facebook.com/kazanjianm
Twitter- http://twitter.com/kazanjianm
Website- http://merrillk.com
(Merrill) Supplies I Use- http://www.jdoqocy.com/click-4....247664-805536?url=ht
How to draw the WTF expression step by step. How to draw a shocked face. how to draw a surprised person. How to draw a surprised man. How to draw somebody shocked. How to draw a person with gaping mouth. Draw a surprised expression. Pencil Drawing tutorial. Shading with drawing pencils. How to shade with pencil. How to draw a face. How to draw step by step. How to draw huh wtf. Misery. Pencil drawing tips. How to use a Tortillion. How to use a blending stump. How to shade with a paint brush. How to cross hatch. How to smudge. How to build tones in a drawing. How to draw a mourning person. How to draw a person in rapture. Click on any of the pictures to go to my other facial expression videos, or hit the subscribe button. There will be lots more coming soon.
This video will give you step by step instruction on how to draw the huh facial expression........Just pause the video at the end of each step and follow the instruction and you will master the huh facial expression. Lets begin.
Step 1: Draw the two circular shapes and the rainbow shape for the forehead. Be sure to notice the size of the rainbow shape compared to the circular shapes.
Step 2: Draw in the nose shape. Notice that it is perfectly symmetrical. Also notice that it resembles a long winged bird in flight.
Step 3: Draw in the mouth. Notice that it is comprised of four distinct shapes- the upper lip, the upper teeth, the inner mouth and the bottom lip. Notice that the bottom teeth are not shown.
Step 4: Complete the outline of the face. Be sure to add the double chin.
Step 5: Add the eyebrows and the ears. Be sure to notice that the eyebrow shapes are at the top of the circle shapes from step one. If you need more help with the ears, check out this ear tutorial.
Step 6: Add the eyes. Notice that the eyes are almond shaped. For this facial expression, notice that the pupil and iris is separated from the eyelids. If you need more help with the eye, check out this eye tutorial.
Step 7: Draw in the hair. You are probably saying WTF. Just trust me and draw what you see.

This is my video response to Phil Hansen's (Philinthecircle) interactive toilet paper printing tutorial.
Here is his video- http://www.youtube.com/watch?v=4EudkS-U6QQ
YouTube Visual Arts Category Forum- http://www.google.com/support/forum/p/youtube/thread?tid=2a9806f929074cbd&...
Supplies I Use- http://www.jdoqocy.com/click-4....247664-805536?url=ht
Facebook Page- http://facebook.com/kazanjianm
Twitter- http://twitter.com/kazanjianm

Music has a special relationship with each person's memory. It ages with us. The music that we listen to as our lives elapse, stays with us and leaves an imprint that is unique for each person. Listening to an old song is quite possibly the most powerful way to recall the past. The death of Whitney Houston rocked my generation this week. She contributed to the soundtrack to many of our lives. In this video, I am going to do what I do best. I am going to give you a step by step formula so that you can draw Whitney Houston. While this might sound challenging, I want to reiterate that this is what I do best. So grab a pencil and paper and get ready to surprise yourself. Thousands of people have successfully completed my drawing tutorials and you are the next person to do so.
Step 1: Make the five dots that you see. While this step appears to be easy, the relationship between the dots is crucial so pause the video and take your time. Notice that if you connect the dots, we will have two triangles. Notice that the top triangle is larger than the bottom one.
Step 2: Add the nostrils and the line that connects them.
Step 3: Add circles around the top row of dots. This will eventually be the irises of each eye.
Step 4: Complete the eye shapes.
Step 5: Add the rainbow shapes for the eyelids.
Step 6: Add eyebrows
Step 7: Add the very soft line on your left and the backwards C shape on your right.
Step 8: Add the flattened M shape for the upper lip.
Step 9: Add teeth.
Step 10: Add the bottom lip.
Step 11: Add the oval shape for the face
Step 12: Add the shapes for the neck.
Step 13: Add the lines for the blouse.
Step 14: Add the shape for the hair. Just generalize it. It doesnt have to be perfect.
Step 15: Add the stray ends to the hair and the bangs. It was the 80's.
Step 16: Now its time to shade. If you feel that you made an unfixable mistake after you start shading, hit the first link in the upper right corner. This will give you an easy way to start over from this point rather than from the beginning. The method of shading that I am using is called cross hatching. To see my tutorial on cross hatching hit the second link in the upper right corner.
Start off by darkening the eye area. Whitney is wearing mascara in this picture so you can darken the lashes above and below the eye. The upper set of lashes will be thicker than the bottom set. The area between the eyebrows and the upper eyelid will be hatched to a tone that is almost as dark as the eyebrows. Notice that there are highlight areas though. Do not make a solid line for the bridge of the nose. That will remain as a smudge. You can use a paintbrush, a blending stump or a q-tip to soften it. Notice the difference in tone between the left side and the right. The white stick that you see me using is called a tortillion or a blending stump. Do some light hatching over the cheeks and the nose and some extra hatching to round the face by where the hair is on each side of the face.
Step 17: Its time to shade the forehead. be sure to continue the tones that exist from the previous step. The center of the forehead will be in highlight and the hair will be darkened relatively dark. Make the temple area almost as dark as the hair. Use a paintbrush, blending stump or Q-Tip if you wish to smooth the transition from dark to light.
Step 18: The top lip will be darker than the bottom lip and the top lip will be at its darkest point as it moves towards the opening for the mouth. Shade around the bright highlight on the bottom lip. It should be similar in tone to the teeth. The tones on the bottom of the face are tricky. You will have to round the face at the jaw line without making her look like she has a beard. There is a solid line at the jaw line and the area below the chin will be in heavy shadow, as you will see in our next step.

Want to draw the beautiful Jennifer Lawrence (Katniss Everdeen from the Hunger Games)? This video will show you step by step how to draw her with just a pencil and paper. I made this drawing tutorial in time for the upcoming Hunger Games Mockingjay Movie. I model he process of drawing by teaching you how to draw step by step.
Subscribe to kazanjianm (Don't miss any new videos that I make)- http://www.youtube.com/subscri....ption_center?add_use
Facebook: Like me on Facebook to find out about live hangouts or to post your work!- http://facebook.com/kazanjianm
Twitter: I tweet! Do you? http://twitter.com/kazanjianm
My Website: http://merrillk.com
Art Supplies I Use in my Art Work- http://merrillk.com/?sid=135&idpage=supplies_i_use
YouTube Visual Arts Category Petition: http://www.change.org/petition....s/create-a-visual-ar
Step by Step Drawing Playlist: http://www.youtube.com/playlis....t?list=PLD6E34C7CD58

FINALLY....a landscape painting
realistic oil painting oil paintings dogs figure oil painting oil paintings of seascapes oil paintings children oil painting collections oil painting how to oil painting oil painting websites oil painting for children hawaiian art paintings oil painting reproductions
artists oil paints oil & watercolor paintings portrait painting artist dog oil paintings latest oil paintings oil paintings for sale seascapes oil paintings art oil paints nature oil paintings
large oil paintings oil painting images oil paintings figures oil painting of animals paint oil paints oil paintings of animals fall oil paintings oil painting catalog oil paints for beginners nature oil painting portrait painting artists describe oil painting sketching oil painting seascape oil paintings discount oil painting oil painting pics oil painting gallery
paintings hawaii oil painting supplies beach paintings hawaiian art prints hawaii paintings hawaii fine art hawaiian paintings hawaii art galleries hawaii oil paintings tropical paintings tropical flower paintings hibiscus painting hawaiian art galleries hawaii painters hawaii artist portrait oil paintings hawaiian art watercolor landscape paintings oil painting portraits oil paintings portraits oil painting portraits how to maui art antique oil portrait painting fine art oil paintings fine art oil painting landscape oil paintings gallery
still life oil paintings oil paint portraits realism oil painting oil paintings of still life cafieri oil paintings oil paint portrait oil paintings of landscapes oil paintings by famous artists artwork oil paintings portrait paintings by famous artists oil pastel paintings impressionist oil paintings portrait paintings children painting contractors oil paints for artists classical oil paintings landscape paintings famous artists oil paint landscapes oil paintings by landscape oil paintings for sale classical oil painting how to oil paintings nude oil paintings oil painting societies american oil painting oil painting website realistic oil paintings oil paintings of children big island hawaii maui hawaii vacations oahu hawaii vacation packages hawaii cruise vacation honolulu hawaii map of maui hawaii things to do in maui hawaii best island in hawaii hawaii vacation maui island hawaii kona hawaii
cheap flights to honolulu hawaii beach luau

Yeah, I guess I missed #YouTube during my hiatus because I am making videos at a record pace and all I want to do is make more. This video will teach you about the medium of watercolor pencil. I made the drawing of the plum with a layer of watercolor pencils. This medium is SO COOL because artists can blend on the surface of the paper and then activate the blending properties of the color by using water and a paint brush. After the first layer dried, I did a second with #Prismacolor colored pencils.
watercolor pencils tutorial, watercolor pencils techniques, watercolor pencils portrait, watercolor pencils drawing, watercolor pencils landscape, watercolor pencils speed painting, watercolor pencils flowers watercolor pencils painting, watercolor pencils anime, watercolor pencils for beginners, watercolor pencils flowers, watercolor pencils faber castell, how to use watercolor pencils for beginners, how to draw with watercolor pencils for beginners, watercolor pencils realistic
Subscribe to kazanjianm (Don't miss any new videos that I make)- http://www.youtube.com/subscri....ption_center?add_use
Facebook: Like me on Facebook to find out about live hangouts or to post your work!- http://facebook.com/kazanjianm
Twitter: I tweet! Do you? http://twitter.com/kazanjianm
My Website: http://merrillk.com
Art Supplies I Use in my Art Work- http://merrillk.com/?sid=135&idpage=supplies_i_use
Petition: YouTube NEEDS a Visual Arts Category: http://www.change.org/petition....s/create-a-visual-ar
Step by Step Drawing Playlist: http://www.youtube.com/playlis....t?list=PLD6E34C7CD58

WE NEED A VISUAL ARTS CATEGORY ON YOUTUBE THREAD-http://www.google.com/support/forum/p/youtube/thread?tid=2a9806f929074cbd&hl=en&fid=2a9806f929074cbd0004b630ad37cc3e
Facebook- http://facebook.com/kazanjianm
Twitter- http://twitter.com/kazanjianm
Website- http://merrillk.com
(Merrill) Supplies I Use- http://www.jdoqocy.com/click-4....247664-805536?url=ht
Hey Hey..... Wanna see a really annoying tutorial? Hey ....Yeah me too.....This video is going to give you step by step instruction on how to draw The Annoying Orange. As soon as the helium wears off, lets begin.
Ah much better.... Step 1: Make a circular shape because oranges are circular.....even annoying ones.
Step 2: When you make the eyes, remember that there is one eye length between each eye. The top of the eye shape is rainbow like. The bottom of the eye shape is almost flat, and slightly curves up at each end. Notice that the top of the pupil and iris is hidden behind the upper lid. Unlike human proportions, oranges eyes are closer to the top of his head....I mean .......skin.....ahh whatever.
Step 3: Add the mouth. This is the toughest step but it will be easier if you put it in as a big half circle, then break it up in to six smaller shapes. Here are the smaller shapes from top to bottom- the upper lip, the upper teeth, the mouth, the tongue, the lower teeth and the bottom lip. Pause the video at the end of this step and observe before you go on to the coloring part.

Click on the images to go to the other four parts of this series.
Welcome to the fifth and final installment of my series about drawing the human head from memory. This video will give you a dizzying amount of information on how to draw the head at 3/4 view. Lets start out by observing what happens when the head turns. Notice what little space the face takes up when the head is turned in profile view. Notice that the back of the head becomes more rounded as the face seems to shrink. Lets take a closer look at the face. The green shape connects the two outer corners of the eye and the outer corners of the mouth. Observe what happens to this trapezoid shape as the head turns from side to side. Notice that as the green shape gets smaller, the back of the head becomes more rounded. Now lets look at a silhouette of the face. Be sure to observe what happens to the silhouette of the face at 3/4 view- It is no longer an oval shape. There are indentations and protrusions
In the 3/4 view of the head, there is an indentation by the eye and a protrusion at the cheekbone and mouth. This is due to underlying bone and muscle structures.
Now, lets look at the individual features of the face starting with the eyes. Notice that the eye shifts in shape as the head turns. When the head is in profile... the shape of the eye looks like a Hershey's kiss turned to the side.....as the head turns, it morphs to an almond shape. Since I am teaching you how to draw the eye 3/4 view for this video, we will remember that the 3/4 view eye resembles Pac Mans mouth. Notice that the pupil and iris are more oval like and that there is no white on the inner corner of the eye.
Now lets observe the nose. Notice the relationship between the nose and the cheek. In the 3/4 view, the nose is partially covering the cheek and almost to the edge of the face. Notice how the nostrils shift as the head turns. When you draw a head in 3/4 view, you essentially draw 1 1/2 nostrils.
As for the mouth, take a few seconds to notice the changes. The top lip morphs from a flattened M shape from the front....to a lightning bolt shape in 3/4 view. The bottom lip has a squared section and triangles on each side.
The ears move from being close to the center of the head from profile view, to the edge of the head in front view. In 3/4 view, the ears seem to be at the verge of protruding through the back of the head....but they are not there yet.
Now its time for the demonstration. Since we studied a male head in the first part of the video, lets switch it up and draw a female head. Just follow the directions for each step and also on the shading tutorial.
Step 1: Draw the shape that you see. Notice that it is an egg shape with various protrusions and indentations. This is the most difficult step so take some extra time.
Step 2: Notice the rectangular shape. The four dots are the centers of each eye and the corners of each mouth. Place each dot in the appropriate place. Then, about 2/3 of the way down add a line for the bottom of the nose.
Step 3: Add the eyebrows and ears.
Step 4: Fill in the eye shape. Remember the Pac Man rule. Here is a close up.
Step 5: Complete the nose. Notice the solid line leading from the bottom of the nose to the brow. Also, remember the rule about 1 1/2 nostrils. Here is a close up.
Step 6: Complete the mouth. Overall the mouth looks like a flattened heart shape. For now, put in one solid shape and ignore the rules that you learned before. We will make the rectangular shape on the bottom lip and the lightning bolt shape on the top when we shade.
Shape 7 Add the hair. Be creative, you dont have to re create this hairstyle.
The pictures used were from Thirteen of Clubs Photostream on flickr. They are under a Creative Commons License (Attribution). I will credit him in the video description- http://www.flickr.com/photos/t....hirteenofclubs/sets/ All other imagery and audio were made by me (Merrill Kazanjian)

Step by Step drawing instruction. Learn how to draw a hand holding a sword.

I have been reading your requests and a frequent one was Rick Grimes from The Walking Dead. The best place to put your requests is on my most recent video (I have over 300 now and i cant go through them all). Thanks! MK
My new channel: http://youtube.com/metaldetectingnyc
Subscribe to kazanjianm (Don't miss any new videos that I make)- http://www.youtube.com/subscri....ption_center?add_use
Facebook: Like me on Facebook to find out about live hangouts or to post your work!- http://facebook.com/kazanjianm
Twitter: I tweet! Do you? http://twitter.com/kazanjianm
My Website: http://merrillk.com
Art Supplies I Use in my Art Work- http://merrillk.com/?sid=135&idpage=supplies_i_use
Petition: YouTube NEEDS a Visual Arts Category: http://www.change.org/petition....s/create-a-visual-ar
Step by Step Drawing Playlist: http://www.youtube.com/playlis....t?list=PLD6E34C7CD58

Fun figure drawing tutorial. Learn to draw Nicki Minaj.
WE NEED A VISUAL ARTS CATEGORY ON YOUTUBE THREAD-http://www.google.com/support/forum/p/youtube/thread?tid=2a9806f929074cbd&hl=en&fid=2a9806f929074cbd0004b630ad37cc3e
Facebook- http://facebook.com/kazanjianm
Twitter- http://twitter.com/kazanjianm
Website- http://merrillk.com
(Merrill) Supplies I Use- http://www.jdoqocy.com/click-4....247664-805536?url=ht
My Twitter- http://twitter.com/kazanjianm
Reference Image- http://merrillk.com/?part=fineart&articles_id=13970&act=artist1&artist=69&collection=464
TIP: Press lightly on the pencil when you fill in the mass.
I used this image from wikipedia commons - http://commons.wikimedia.org/w....iki/File:Nicki_Minaj . This file is licensed under the Creative Commons Attribution-Share Alike 2.0 Generic license. I will credit Philip Nelson in the video description.
Subscribe to kazanjianm (Don't miss any new videos that I make)- http://www.youtube.com/subscri....ption_center?add_use
Facebook: Like me on Facebook to find out about live hangouts or to post your work!- http://facebook.com/kazanjianm
Twitter: I tweet! Do you? http://twitter.com/kazanjianm
My Website: http://merrillk.com
Art Supplies I Use in my Art Work- http://merrillk.com/?sid=135&idpage=supplies_i_use
YouTube Visual Arts Category Petition: http://www.change.org/petition....s/create-a-visual-ar
Step by Step Drawing Playlist: http://www.youtube.com/playlis....t?list=PLD6E34C7CD58
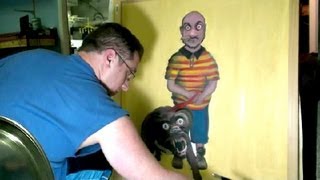
Hey everyone it's Merrill. I made this video to show you a unique and hopefully amazing mixed media art technique that I use to create my "characters". Over the years, I have made more than 2000 characters which I save as PNG files, to reuse in my painting compositions. I use a mixed media approach to art making. I start with a pencil sketch. Then I add my first layer of color with AD Chartpak illustration markers. Next, I use Prismacolor colored pencils. Next, I use a scanner so that I can digitally edit my drawing. I use the archaic Photoshop competitor program Paint Shop Pro 10 to digitally refine my artwork. This program enables me to collage photos from Google Image Search in to my Artwork. Then I use a large format printer (HP DesignJet 510) to print my work on to a canvas. I then use a paint brush and my knowledge of oil and acrylic painting techniques to finish off my painting. I call this work Man With Dog and it is based upon a meeting I had with a parent at parent/teacher conferences (I am a teacher). I hope that you find my process interesting and fun. If nothing else, it is a unique way to transform my ideas in to something tangible. I like to create art and I am more known on YouTube for my step by step drawing videos. This is something different and hopefully something cool. It aint beautiful, but art is a bi product of an artists reactions to the world around him.
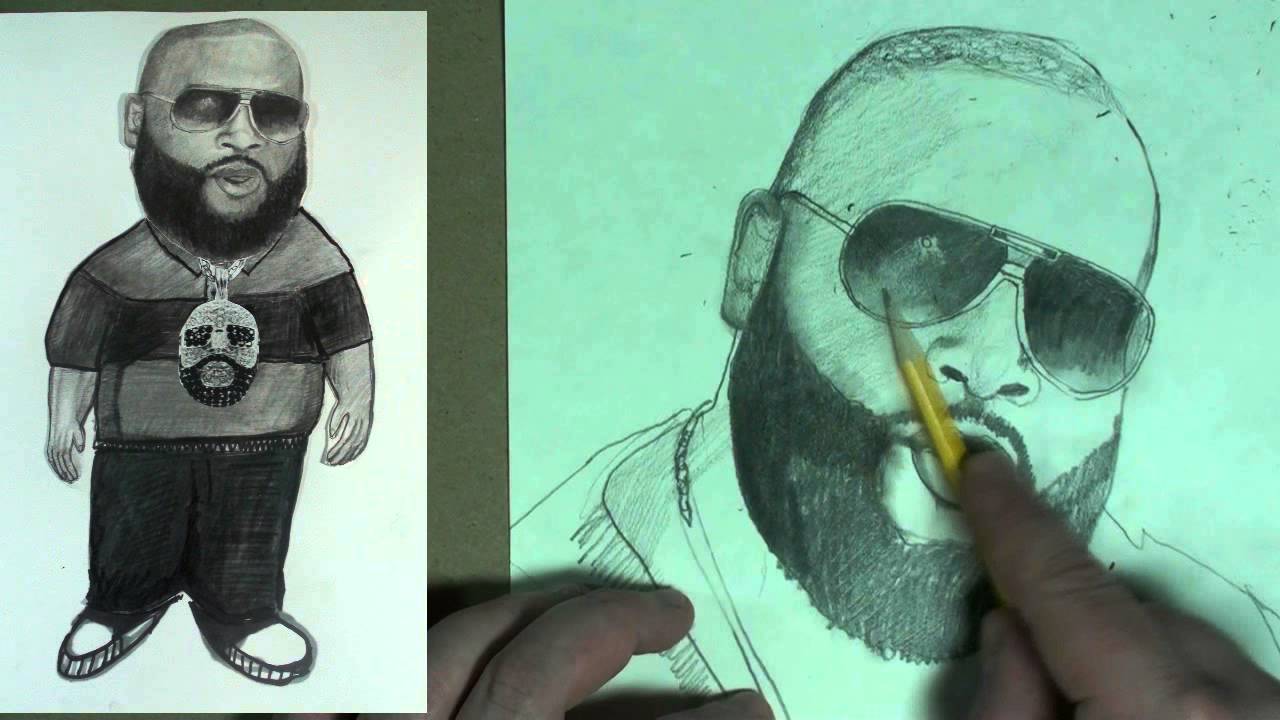
This is my first portrait tutorial in over a year! Rick Ross is a frequent request and he has a new album coming out called Mastermind.
Subscribe to kazanjianm (Don't miss any new videos that I make)- http://www.youtube.com/subscri....ption_center?add_use
Facebook: Like me on Facebook to find out about live hangouts or to post your work!- http://facebook.com/kazanjianm
Twitter: I tweet! Do you? http://twitter.com/kazanjianm
My Website: http://merrillk.com
Art Supplies I Use in my Art Work- http://merrillk.com/?sid=135&idpage=supplies_i_use
YouTube Visual Arts Category Petition: http://www.change.org/petition....s/create-a-visual-ar
Step by Step Drawing Playlist: http://www.youtube.com/playlis....t?list=PLD6E34C7CD58
To celebrate the start of the 2009-2010 NBA season, I merged the faces of four of the NBA's biggest stars ( LeBron James of the Cleveland Cavaliers, Kobe Bryant of the Lakers, Dwayne Wade of the Miami Heat and Chris Paul of the New Orleans Hornets). I used both Photoshop CS3 and Paint Shop Pro 9 to make this "artmorph". I basically made digital cut outs from Creative Commons (CC) Photos.(see end of video) All images taken are from Creative Commons or are designated public domain. I respect copyright! used the blending tool a bit, the digital scissor (scalpel), I also used a very helpful light/dark tool to make highlights and shadows.
I used to enjoy making collages with torn paper, but digital art technology helps take collage to the next level. the next lebron james art that will mess with your head art that shook the world art that moves kinetic art merging pictures photos images in photoshop or psp paint shop pro 9. Para celebrar el inicio de la temporada 2009-2010 de la NBA, que fusionó los rostros de cuatro de las mayores estrellas de la NBA (LeBron James de los Cleveland Cavaliers, Kobe Bryant de los Lakers, Dwyane Wade de los Miami Heat y Chris Paul de Nueva Orleáns Hornets). Que utilice tanto Photoshop CS3 y Paint Shop Pro 9 para hacer este "artmorph". Yo básicamente recortes digitales de Creative Commons (CC) Fotos. Usé la herramienta de la mezcla un poco, la tijera digital (bisturí), que también se utiliza una luz muy útil / herramienta oscuro para luces y sombras. Me gustaba hacer collages con papel rasgado, pero la tecnología ayuda a tener el arte digital collage para el siguiente nivel. el próximo LeBron James arte que ensuciar con su arte la cabeza que sacudió el mundo del arte que se mueve el arte cinético, fusión de imágenes Fotos de imágenes en Photoshop o taller de pintura PSP Pro 9. Pour fêter le début de la saison NBA 2009-2010, j'ai fusionné les visages de quatre des plus grandes stars de la NBA (LeBron James des Cavaliers de Cleveland, Kobe Bryant des Lakers, Dwayne Wade du Miami Heat et Chris Paul de la Nouvelle Orléans frelons). J'ai utilisé les deux Photoshop CS3 et Paint Shop Pro 9 pour faire de ce artmorph ". J'ai pratiquement fait découpes numériques de Creative Commons (CC) Photos. J'ai utilisé l'outil de mélange un peu, les ciseaux numérique (scalpel), j'ai aussi utilisé un éclairage très utile / outil sombres de faire tons clairs et foncés. J'avais l'habitude de plaisir à faire des collages avec du papier déchiré, mais la technologie de l'art numérique permet de prendre collage pour le niveau suivant. Le prochain James LeBron art qui gâchera votre art avec la tête qui ont secoué le Monde de l'Art qui se déplace art cinétique fusion photos photos images dans Photoshop ou PSP Paint Shop Pro 9. Um den Beginn der NBA-Saison 2009-2010 zu feiern, fusionierte ich die Gesichter von vier der größten Stars der NBA (LeBron James von den Cleveland Cavaliers, Kobe Bryant von den Los Angeles Lakers, Dwayne Wade von den Miami Heat und Chris Paul von den New Orleans Hornets). Ich habe auch Photoshop CS3 und Paint Shop Pro 9 zu diesem "artmorph" zu machen. Ich grundsätzlich aus digitalen Ausschnitte von Creative Commons (CC) Fotos. Ich habe die Mischung ein wenig Werkzeug, das digitale Schere (Skalpell), ich auch eine sehr hilfreiche Hell-Dunkel-Werkzeug, um Lichter und Schatten zu machen. Ich habe zu genießen Collagen mit zerrissenen Papier, sondern digital art-Technologie hilft nehmen Collage auf die nächste Ebene. den nächsten Lebron James Kunst, die Messe mit dem Kopf Kunst, die Kunst aus aller Welt, was sich bewegt kinetischen Kunst verschmelzen Bilder Fotos Bilder in Photoshop oder schüttelte wird psp Paint Shop Pro 9. Per celebrare l'inizio della stagione NBA 2009-2010, ho unito i volti di quattro delle più grandi stelle della NBA (LeBron James dei Cleveland Cavaliers, Kobe Bryant dei Lakers, Dwayne Wade dei Miami Heat e Chris Paul dei New Orleans calabroni). Ho usato Photoshop CS3 e Paint Shop Pro 9 a rendere questo artmorph ". Io fondamentalmente fatto outs tagliati digitale da Creative Commons (CC) Foto. Ho usato lo strumento di fusione un po ', la forbice digitale (bisturi), ho anche usato una luce molto utile / scuro strumento per rendere luci e le ombre. Mi piaceva fare collage con carta strappata, ma la tecnologia digitale consente di prendere l'arte del collage al livello successivo. l'arte successiva Lebron James che pasticciare con la tua arte testa che hanno scosso il mondo dell'arte che muove l'arte cinetica si fondono le immagini immagini foto in Photoshop o PSP Paint Shop Pro 9.

Facebook: http://facebook.com/kazanjianm
Twitter: http://twitter.com/kazanjianm
Visual Arts Category Forum: http://www.google.com/support/forum/p/youtube/thread?fid=2a9806f929074cbd0004b8b1b6901a56&hl=en
I am very fortunate to say that I have the most talented audience on YouTube and the last time that we took a vote on my Facebook page, my viewers decided that that they want me to do a tutorial on how to draw Kate Beckinsale. And I listened! So this video will give you step by step instruction on how to draw actress Kate Beckinsale. Even if you are new to drawing, I guarantee that you will surprise yourself if you follow my steps. So grab your pencil and some drawing paper. If you have your doubts or if you need some motivation, hit the button that says "playlist". Millions of people have viewed my videos and thousands have completed them successfully. I have over 10 years of teaching experience and I am someone who didn't start drawing until I was 20 years old, so I have a different perspective on how to train aspiring artists. Lets Begin!
Step 1: Draw the box that you see. Notice that there are three rectangles inside the box. The reason that there are three rectangles is because a face can often be divided in to three equal segments. Hairline to brow line. Brow line to bottom of nose. Bottom of nose to chin. This formula works perfectly on Kate Beckinsale.
Step 2: Make the U shape that you see for the chin.
Step 3: Make the two shapes for the eye region. Notice that her head is slightly turned so these shapes are shifted slightly towards your left.
Step 4: Make the line at the bottom of the nose. Notice that the septum is lower than the two nostrils. Also, be sure to notice the amount of separation from the eye shapes.
Step 5: Add eyebrows at the top of the eye shapes
Step 6: Look at the image of Kate Beckinsale. Notice that there is a perfect square that is made between the pupils of the eye and the corners of the mouth. Add the four dots that you see. Take some extra time for this step. It is very important for the likeness.
Step 7: Kate is looking down in this image, so her eyes should be banana shaped. Use the dots to guide your placement of the banana shapes. Did I just say that?
Step 8: Add the eyelids above the banana shapes and the lines below.
Step 9: Add the hair shape. Notice how this shape intersects the top rectangle. The height of the hair is more than a third of the face because her head is tilted downwards.
Step 10: Add the top lip. Just connect the dots. The top of the upper lip is like a flattened M shape.
Step 11: I am clearly bananas for Kate because her bottom lip is banana shaped .....the area in between? You guessed it....bananas!
Step 12: Now add some teeth. Here is a close up! If you need help drawing teeth, check out this tutorial or make her a vampire!
Step 13: Kate needs ears. Dont sweat it....Just don't make her Dumbo.
Step 14: is optional. Add her earrings. If you expect to draw this perfectly, curb your enthusiasm. All you need to do is add some squiggley shapes and connect them. Add a banana if it floats your boat!
Step 15: Add a neck.
Step 16: Erase all of the guidelines. In other words, erase what is left from the rectangles. Next, take notice of the link that I just added. After this step we will do shading. Just click this link if you feel that you are messing up. The video that I linked to will teach you an easy way to restart from this point.
Step 17: We will start our shading with the eye region. If you have never cross hatched before, you might want to view the video that I just added in the upper right corner. It is

This is the 11th addition to my how to basketball players playlist- https://www.youtube.com/playli....st?list=PL23760CEE22 Harden has been a frequent request and I am going to try to answer as many of those as possible in 2015. Thats my new years resolution!
Music during Time Lapse: "Winner Winner" by Kevin McLeod
james harden highlights , james harden defensive juggernaut , james harden crossover top 10 , james harden mix , james harden eurostep, james harden highlights 2014 mix, james harden crossover, james harden footlocker commercial, james harden dunk
Subscribe to kazanjianm (Don't miss any new videos that I make)- http://www.youtube.com/subscri....ption_center?add_use
Facebook: Like me on Facebook to find out about live hangouts or to post your work!- http://facebook.com/kazanjianm
Twitter: I tweet! Do you? http://twitter.com/kazanjianm
My Website: http://merrillk.com
Art Supplies I Use in my Art Work- http://merrillk.com/?sid=135&idpage=supplies_i_use
Petition: YouTube NEEDS a Visual Arts Category: http://www.change.org/petition....s/create-a-visual-ar
Step by Step Drawing Playlist: http://www.youtube.com/playlis....t?list=PLD6E34C7CD58

How to draw the Bugatti Veyron Step by Step
bugatti veyron + bugatti veyron top speed - bugatti veyron top speed 434 km h top gear - bugatti veyron vs mclaren f1 - bugatti veyron vs jet + bugatti veyron vs koenigsegg agera r + bugatti veyron vs f1 formula + bugatti veyron crash + bugatti veyron in india + bugatti veyron prank bugatti veyron burnout + bugatti veyron build + bugatti veyron brake test + bugatti veyron black bess + bugatti veyron black +
bugatti veyron blue + bugatti veyron beaten + bugatti veyron birthday present + bugatti veyron birdman + bugatti veyron brakingbugatti veyron crash + bugatti veyron crash test + bugatti veyron crash in water + bugatti veyron commercial + bugatti veyron convertible +bugatti veyron custom + bugatti veyron crash caught on tape +
bugatti veyron convertible roof + bugatti veyron cristiano ronaldo +
bugatti veyron commercial 2014 bugatti veyron quarter mile +
bugatti veyron quicksilver exhaust + bugatti veyron quad turbo bugatti veyron supersport + bugatti veyron sound + bugatti veyron startup +
bugatti veyron singapore + bugatti veyron supersport vs koenigsegg agera r + bugatti veyron speed bugatti veyron super sport vs hennessey venom gt bugatti veyron sound exhaust bugatti veyron super sport acceleration bugatti veyron ss vs hennessey venom gt
asphalt 8 bugatti veyron bugatti veyron 0-60 +bugatti veyron 0-400 km h + bugatti veyron 0-100 km/h + bugatti veyron 0 to 60 +
bugatti veyron 0- + bugatti veyron 0-200 mph + bugatti veyron 0-400 + bugatti veyron 0-100 mph + bugatti veyron 0-200 + bugatti veyron 0-250
Subscribe to kazanjianm (Don't miss any new videos that I make)- http://www.youtube.com/subscri....ption_center?add_use
asphalt 7 bugatti veyron
Facebook: Like me on Facebook to find out about live hangouts or to post your work!- http://facebook.com/kazanjianm
Twitter: I tweet! Do you? http://twitter.com/kazanjianm
My Website: http://merrillk.com
Art Supplies I Use in my Art Work- http://merrillk.com/?sid=135&idpage=supplies_i_use
Petition: YouTube NEEDS a Visual Arts Category: http://www.change.org/petition....s/create-a-visual-ar
Step by Step Drawing Playlist: http://www.youtube.com/playlis....t?list=PLD6E34C7CD58

This video will teach YOU how to draw Simon Cowell STEP by STEP. Grab a pencil and paper and watch the video! Drawing from observation is a lot like putting a jigsaw puzzle together. In both a puzzle and a drawing, a person looks for shapes that fit together. Once a fit is discovered, a person moves on to the next piece. Remember this analogy when drawing today. This video will show you how to draw Simon Cowell. Each step will be shown in two second intervals. Pause each step, as you need to or download a print version of this lesson from my website, http://merrillk.com. Feel free to save a copy to your computer and print it. Pause the video after each shape appears and try to draw it. Press play when it looks similar to mine. If you follow each step and fit the shapes together correctly, you should have a decent contour drawing of Simon Cowell. Give it a try. I think that you are going to surprise yourself! To shade, I used a number two pencil and a blending stub. Search for my demonstrational shading videos online. It took me about fifteen minutes to do the contour drawing and about thirty minutes to shade. Merrill KazanjianCette vidéo vous apprendra comment attirer Simon Cowell étape par étape. Prenez un crayon et du papier et de regarder la vidéo! Dessin de l'observation est un peu comme mettre un puzzle ensemble. Dans les deux casse-tête et un dessin, une personne qui cherche des formes qui s'emboîtent. Une fois que l'ajustement est découvert, une personne passe à la prochaine pièce. Rappelez-vous cette analogie lors de l'élaboration d'aujourd'hui. Cette vidéo vous montrera comment tirer Simon Cowell. Chaque étape sera présenté en deux secondes d'intervalle. Pause chaque étape, comme vous avez besoin d'imprimer ou de télécharger une version de cette leçon de mon site web, http://merrillk.com. N'hésitez pas à enregistrer une copie sur votre ordinateur et l'imprimer. Pause de la vidéo après chaque forme apparaît et essayez de dessiner. Appuyez sur play quand il ressemble à la mienne. Si vous suivez chaque étape et le montage des formes correctement, vous devrez avoir un contour dessin de Simon Cowell. Give it a try. Je pense que vous allez vous surprendre! À l'ombre, j'ai utilisé un crayon, et numéro deux un mélange tampon. Recherche pour ma démonstration shading vidéos en ligne. Il m'a fallu une quinzaine de minutes pour faire le contour de dessin et une trentaine de minutes à l'ombre. Merrill Kazanjian.
Este video le enseñará cómo dibujar Simon Cowell paso a paso. Agarra un lápiz y papel y ver el video! A partir de la observación es muy similar a poner juntos un rompecabezas. En tanto un rompecabezas y un dibujo, una persona que busca formas que encajan entre sí. Una vez que se descubre un ataque, una persona pasa a la siguiente pieza. Recordar esta analogía, cuando dibujo el día de hoy. Este video le mostrará cómo sacar Simon Cowell. Cada paso se muestra en dos intervalos de un segundo. Pausa cada paso, como usted necesidad de imprimir o descargar una versión de esta lección de mi sitio web, http://merrillk.com. Siéntase libre para guardar una copia a su computadora e imprimirlo. Pausa en el vídeo aparece después de cada forma y tratar de dibujar. Pulse el botón de reproducción cuando se ve similar a la mía. Si usted sigue cada paso y colocar correctamente las formas, usted debe tener un dibujo del contorno decente Simon Cowell. Darle una oportunidad. Creo que va a sorprender a ti! A la sombra, he usado un lápiz número dos y una mezcla de talón. Buscar mi demostrativas sombreado videos. Me llevó unos quince minutos para hacer el contorno de dibujo y unos treinta minutos a la sombra. Merrill Kazanjian

My Alternative to oil painting by Merrill Kazanjian- Recently, I have made a lot of videos teaching about the techniques that I use to make art. But, for once, I want to talk to you about choices that I made with my own art. The first medium that I was proficient in was oil painting. But after college ended, I was too drained to paint after I got home from a day of work. The setup and clean up of paints took as long as the process of painting and the drying time was way too slow for my needs. I estimate that I painted only once or twice per week for about three hours per day and I only produced about two finished paintings per year. I did this for six years.
I slowly started dabbling with mixed media art. What you are seeing now is a process that I have worked out over the past 2 years for the past two years. This process allows me to have results similar to oil paintings, done in one day rather than six months. I even incorporate oil paint in to one of the steps.
Here it is:
1.) Pencil Drawing
2.) Illustration Markers (prismacolor, Ad, Decocolor)
3.) Color Pencil
4.) Thin Layer of Oil Paint
5.) Digital Additions (Photoshop, Paint Shop Pro)
I use this process to make my characters. Over the last 2 years I have made over 1500 characters. I scan them and save them as PNG files and I use them over and over in my artwork. PNG files stand for Portable Network Graphic and they are basically a filetype that works like a sticker. Stay tuned until the end of the video and I will show you what I mean. Contact me through my website merrillk.com or leave me a youtube comment and I will be sure to get back to you.

Love him or hate him, Allen Iverson plays the game of basketball with a lot of heart. I remember him when he first came in to the NBA from Georgetown University and I followed his career through Philadelphia (76ers), Denver (Nuggets) and now the Detroit Pistons. Hes known for his killer cross over dribble and his tenacious drives to the basket, despite his small frame. He has not won a championship as of yet but reached the finals when he was with the Sixers- Practically carrying that team on his back. There are plenty of highlight / mix tapes out there so my tribute comes in the form of a drawing. I documented the different steps that I took: 1.) Pencil Drawing 2.) Markers 3.) Color Pencils and you can download a print version that shows you step by step how to draw AI at my website merrillk.com. The first part is stop motion with a scanner and the second part is a time lapse. Hopefully its a slam dunk. Please rate and comment! Merrill Kazanjian
