Лучшие

SNAP : CHADDIII INSTA : chadessinytb
➽ Matériel dessin :
► TouchFive : https://www.amazon.fr/TOUCHFIVE-Marker-marqueurs-peinture-animation/dp/B06XK4ZKP5/ref=as_sl_pc_tf_til?tag=chadessin-21&linkCode=w00&linkId=47bef29eb608fbbee052ca292451ce28&creativeASIN=B06XK4ZKP5
► Feutre à alcool : https://www.amazon.fr/Croquis-Stylos-Marqueurs-Pointes-Graphic/dp/B01KCRTTMU/ref=as_sl_pc_tf_til?tag=chadessin-21&linkCode=w00&linkId=eb8bfda52d4e6790ae67f78162cd1c1e&creativeASIN=B01KCRTTMU
► Graph'it : https://www.amazon.fr/Graphit-Marqueurs-alcool-double-pointe/dp/B00AVW9OZE/ref=as_sl_pc_tf_til?tag=chadessin-21&linkCode=w00&linkId=79d7403788890a5428dffd1da208112d&creativeASIN=B00AVW9OZE
► Gant dessin : https://www.amazon.fr/RUIYELE-Artiste-ANTISALISSURE-Tablette-lumi%C3%A8re/dp/B0776QJQT6/ref=as_sl_pc_tf_til?tag=chadessin-21&linkCode=w00&linkId=d9a08fc402130c645a19cc688539756e&creativeASIN=B0776QJQT6
► Feutre papermate : https://www.amazon.fr/Papermate-S0188046-Pointe-feutre-Lot/dp/B003UM70YE/ref=as_sl_pc_tf_til?tag=chadessin-21&linkCode=w00&linkId=f090c6d3adfea0ecc3d42c4553a1873c&creativeASIN=B003UM70YE
► Micro pigment : https://www.amazon.fr/Pigma-POXSDK6-Micron-6-Fineliners/dp/B004AQODNU/ref=as_sl_pc_tf_til?tag=chadessin-21&linkCode=w00&linkId=38fab2e999dfc0c1bc14e3195cf7df15&creativeASIN=B004AQODNU
► Feutre à gel blanc : https://www.amazon.fr/Uni-ball-Signo-UM-153-Stylo-pointe/dp/B00161UAJS/ref=as_sl_pc_tf_til?tag=chadessin-21&linkCode=w00&linkId=7d6d10fcd9887a12f1a7a922460ebbb7&creativeASIN=B00161UAJS
► Promarker set : https://www.amazon.fr/Winsor-Newton-Promarker-Marqueurs-Assortis/dp/B01893SW9A/ref=as_sl_pc_tf_til?tag=chadessin-21&linkCode=w00&linkId=2add5bae1d9e650516e410c5b661a7fa&creativeASIN=B01893SW9A
► Critérium pro : https://www.amazon.fr/Faber-Castell-134799-GRIP-1347-Porte-mine/dp/B000KT7JAK/ref=as_sl_pc_tf_til?tag=chadessin-21&linkCode=w00&linkId=67bc4df43885bd4ea7b2adbf299d5dfe&creativeASIN=B000KT7JAK
► Stylo POINTILLISME : https://www.amazon.fr/premi%C3%A8re-%C3%A9lectrique-cuttlelola-dotspen-charge/dp/B01894VUDE/ref=as_sl_pc_tf_til?tag=chadessin-21&linkCode=w00&linkId=eab582561dc7e76edd3132a368c1bdc1&creativeASIN=B01894VUDE
► Gomme pro : https://www.amazon.fr/Faber-Castell-187121-Gomme-Dust-Free-plastique/dp/B0071OT5E0/ref=as_sl_pc_tf_til?tag=chadessin-21&linkCode=w00&linkId=96fc4b6e94229f10e8ce5b831255adae&creativeASIN=B0071OT5E0
► Papier pro : https://www.amazon.fr/Canson-graphiques-Marker-layout-feuilles/dp/B001ANVINO/ref=as_sl_pc_tf_til?tag=chadessin-21&linkCode=w00&linkId=d27d87b0c5e93ce94b6ec73cc0dbdd3e&creativeASIN=B001ANVINO
➽ Matériel Fimo :
► Pâte : https://www.amazon.fr/gp/product/B0791ZS6F7?ie=UTF8&tag=chadessin-21&camp=1642&linkCode=xm2&creativeASIN=B0791ZS6F7
► Outils : https://www.amazon.fr/gp/product/B06XRYSV3D?ie=UTF8&tag=chadessin-21&camp=1642&linkCode=xm2&creativeASIN=B06XRYSV3D
► Feutres peintures : https://www.amazon.fr/gp/product/B000GPI48E?ie=UTF8&tag=chadessin-21&camp=1642&linkCode=xm2&creativeASIN=B000GPI48E
► Rouleau pour pâte : https://www.amazon.fr/Staedtler-acrylique-transparent-8700-05/dp/B000PUJD5S/ref=as_sl_pc_tf_til?tag=chadessin-21&linkCode=w00&linkId=89181742b896f5ed7ce91b7dde2666a0&creativeASIN=B000PUJD5S
★★ Peinture : https://www.amazon.fr/Crayola-Bouteille-Peinture-Lavable-Multicolore/dp/B004Z4LTWU/ref=as_sl_pc_tf_til?tag=chadessin-21&linkCode=w00&linkId=669552b7ec8d027e5f4fbe35a48b03d1&creativeASIN=B004Z4LTWU
★★ Feutre noir : https://www.amazon.fr/Papermate-S0188046-Pointe-feutre-Lot/dp/B003UM70YE/ref=as_sl_pc_tf_til?tag=chadessin-21&linkCode=w00&linkId=e95ab1e0c4748f00b7228594d8a547c1&creativeASIN=B003UM70YE
★★ Pinceau : https://www.amazon.fr/ATMOKO-Pinceaux-Palettes-Acrylique-Anniversaire/dp/B01MXW6SQM/ref=as_sl_pc_tf_til?tag=chadessin-21&linkCode=w00&linkId=9cc1295f4b376932bb4ed780feba441a&creativeASIN=B01MXW6SQM
★★ Papier : https://www.amazon.fr/Clairefontaine-1979C-dimpression-Clairalfa-impressions/dp/B015LILZDG/ref=as_sl_pc_tf_til?tag=chadessin-21&linkCode=w03UM70YE/ref=as_sl_pc_tf_til?tag=chadessin-21&linkCode=w00&linkId=0b11dc00b639109384863d33f66205a7&creativeASIN=B003UM70YE00&linkId=650622bf844c0db0a5efb66d73e4feba&creativeASIN=B015LILZDG
★★ Palette : https://www.amazon.fr/HERLITZ-Palette-peinture-plastique-blanche/dp/B001AM5R14/ref=as_sl_pc_tf_til?tag=chadessin-21&linkCode=w00&linkId=0871ae0d029cb3dcb1632a4ea2b737f1&creativeASIN=B001AM5R14
SNAP : CHADDIII INSTA : chadessinytb Code créa : CHADESSIN
Me soutenir gratuitement : https://utip.io/ChaDessin
➽ Matériel dessin :
► TouchFive : https://www.amazon.fr/TOUCHFIVE-Marker-marqueurs-peinture-animation/dp/B06XK4ZKP5/ref=as_sl_pc_tf_til?tag=chadessin-21&linkCode=w00&linkId=47bef29eb608fbbee052ca292451ce28&creativeASIN=B06XK4ZKP5
► Feutre à alcool : https://www.amazon.fr/Croquis-Stylos-Marqueurs-Pointes-Graphic/dp/B01KCRTTMU/ref=as_sl_pc_tf_til?tag=chadessin-21&linkCode=w00&linkId=eb8bfda52d4e6790ae67f78162cd1c1e&creativeASIN=B01KCRTTMU
► Graph'it : https://www.amazon.fr/Graphit-Marqueurs-alcool-double-pointe/dp/B00AVW9OZE/ref=as_sl_pc_tf_til?tag=chadessin-21&linkCode=w00&linkId=79d7403788890a5428dffd1da208112d&creativeASIN=B00AVW9OZE
► Gant dessin : https://www.amazon.fr/RUIYELE-Artiste-ANTISALISSURE-Tablette-lumi%C3%A8re/dp/B0776QJQT6/ref=as_sl_pc_tf_til?tag=chadessin-21&linkCode=w00&linkId=d9a08fc402130c645a19cc688539756e&creativeASIN=B0776QJQT6
► Feutre papermate : https://www.amazon.fr/Papermate-S0188046-Pointe-feutre-Lot/dp/B003UM70YE/ref=as_sl_pc_tf_til?tag=chadessin-21&linkCode=w00&linkId=f090c6d3adfea0ecc3d42c4553a1873c&creativeASIN=B003UM70YE
► Micro pigment : https://www.amazon.fr/Pigma-POXSDK6-Micron-6-Fineliners/dp/B004AQODNU/ref=as_sl_pc_tf_til?tag=chadessin-21&linkCode=w00&linkId=38fab2e999dfc0c1bc14e3195cf7df15&creativeASIN=B004AQODNU
► Feutre à gel blanc : https://www.amazon.fr/Uni-ball-Signo-UM-153-Stylo-pointe/dp/B00161UAJS/ref=as_sl_pc_tf_til?tag=chadessin-21&linkCode=w00&linkId=7d6d10fcd9887a12f1a7a922460ebbb7&creativeASIN=B00161UAJS
► Promarker set : https://www.amazon.fr/Winsor-Newton-Promarker-Marqueurs-Assortis/dp/B01893SW9A/ref=as_sl_pc_tf_til?tag=chadessin-21&linkCode=w00&linkId=2add5bae1d9e650516e410c5b661a7fa&creativeASIN=B01893SW9A
► Critérium pro : https://www.amazon.fr/Faber-Castell-134799-GRIP-1347-Porte-mine/dp/B000KT7JAK/ref=as_sl_pc_tf_til?tag=chadessin-21&linkCode=w00&linkId=67bc4df43885bd4ea7b2adbf299d5dfe&creativeASIN=B000KT7JAK
► Stylo POINTILLISME : https://www.amazon.fr/premi%C3%A8re-%C3%A9lectrique-cuttlelola-dotspen-charge/dp/B01894VUDE/ref=as_sl_pc_tf_til?tag=chadessin-21&linkCode=w00&linkId=eab582561dc7e76edd3132a368c1bdc1&creativeASIN=B01894VUDE
► Gomme pro : https://www.amazon.fr/Faber-Castell-187121-Gomme-Dust-Free-plastique/dp/B0071OT5E0/ref=as_sl_pc_tf_til?tag=chadessin-21&linkCode=w00&linkId=96fc4b6e94229f10e8ce5b831255adae&creativeASIN=B0071OT5E0
► Papier pro : https://www.amazon.fr/Canson-graphiques-Marker-layout-feuilles/dp/B001ANVINO/ref=as_sl_pc_tf_til?tag=chadessin-21&linkCode=w00&linkId=d27d87b0c5e93ce94b6ec73cc0dbdd3e&creativeASIN=B001ANVINO
➽ Matériel Fimo :
► Pâte : https://www.amazon.fr/gp/product/B0791ZS6F7?ie=UTF8&tag=chadessin-21&camp=1642&linkCode=xm2&creativeASIN=B0791ZS6F7
► Outils : https://www.amazon.fr/gp/product/B06XRYSV3D?ie=UTF8&tag=chadessin-21&camp=1642&linkCode=xm2&creativeASIN=B06XRYSV3D
► Feutres peintures : https://www.amazon.fr/gp/product/B000GPI48E?ie=UTF8&tag=chadessin-21&camp=1642&linkCode=xm2&creativeASIN=B000GPI48E
► Rouleau pour pâte : https://www.amazon.fr/Staedtler-acrylique-transparent-8700-05/dp/B000PUJD5S/ref=as_sl_pc_tf_til?tag=chadessin-21&linkCode=w00&linkId=89181742b896f5ed7ce91b7dde2666a0&creativeASIN=B000PUJD5S
★★ Peinture : https://www.amazon.fr/Crayola-Bouteille-Peinture-Lavable-Multicolore/dp/B004Z4LTWU/ref=as_sl_pc_tf_til?tag=chadessin-21&linkCode=w00&linkId=669552b7ec8d027e5f4fbe35a48b03d1&creativeASIN=B004Z4LTWU
★★ Feutre noir : https://www.amazon.fr/Papermate-S0188046-Pointe-feutre-Lot/dp/B003UM70YE/ref=as_sl_pc_tf_til?tag=chadessin-21&linkCode=w00&linkId=e95ab1e0c4748f00b7228594d8a547c1&creativeASIN=B003UM70YE
★★ Pinceau : https://www.amazon.fr/ATMOKO-Pinceaux-Palettes-Acrylique-Anniversaire/dp/B01MXW6SQM/ref=as_sl_pc_tf_til?tag=chadessin-21&linkCode=w00&linkId=9cc1295f4b376932bb4ed780feba441a&creativeASIN=B01MXW6SQM
★★ Papier : https://www.amazon.fr/Clairefontaine-1979C-dimpression-Clairalfa-impressions/dp/B015LILZDG/ref=as_sl_pc_tf_til?tag=chadessin-21&linkCode=w03UM70YE/ref=as_sl_pc_tf_til?tag=chadessin-21&linkCode=w00&linkId=0b11dc00b639109384863d33f66205a7&creativeASIN=B003UM70YE00&linkId=650622bf844c0db0a5efb66d73e4feba&creativeASIN=B015LILZDG
★★ Palette : https://www.amazon.fr/HERLITZ-Palette-peinture-plastique-blanche/dp/B001AM5R14/ref=as_sl_pc_tf_til?tag=chadessin-21&linkCode=w00&linkId=0871ae0d029cb3dcb1632a4ea2b737f1&creativeASIN=B001AM5R14

SNAP : CHADDIII INSTA : chadessinytb
➽ Matériel dessin :
► TouchFive : https://www.amazon.fr/TOUCHFIVE-Marker-marqueurs-peinture-animation/dp/B06XK4ZKP5/ref=as_sl_pc_tf_til?tag=chadessin-21&linkCode=w00&linkId=47bef29eb608fbbee052ca292451ce28&creativeASIN=B06XK4ZKP5
► Feutre à alcool : https://www.amazon.fr/Croquis-Stylos-Marqueurs-Pointes-Graphic/dp/B01KCRTTMU/ref=as_sl_pc_tf_til?tag=chadessin-21&linkCode=w00&linkId=eb8bfda52d4e6790ae67f78162cd1c1e&creativeASIN=B01KCRTTMU
► Graph'it : https://www.amazon.fr/Graphit-Marqueurs-alcool-double-pointe/dp/B00AVW9OZE/ref=as_sl_pc_tf_til?tag=chadessin-21&linkCode=w00&linkId=79d7403788890a5428dffd1da208112d&creativeASIN=B00AVW9OZE
► Gant dessin : https://www.amazon.fr/RUIYELE-Artiste-ANTISALISSURE-Tablette-lumi%C3%A8re/dp/B0776QJQT6/ref=as_sl_pc_tf_til?tag=chadessin-21&linkCode=w00&linkId=d9a08fc402130c645a19cc688539756e&creativeASIN=B0776QJQT6
► Feutre papermate : https://www.amazon.fr/Papermate-S0188046-Pointe-feutre-Lot/dp/B003UM70YE/ref=as_sl_pc_tf_til?tag=chadessin-21&linkCode=w00&linkId=f090c6d3adfea0ecc3d42c4553a1873c&creativeASIN=B003UM70YE
► Micro pigment : https://www.amazon.fr/Pigma-POXSDK6-Micron-6-Fineliners/dp/B004AQODNU/ref=as_sl_pc_tf_til?tag=chadessin-21&linkCode=w00&linkId=38fab2e999dfc0c1bc14e3195cf7df15&creativeASIN=B004AQODNU
► Feutre à gel blanc : https://www.amazon.fr/Uni-ball-Signo-UM-153-Stylo-pointe/dp/B00161UAJS/ref=as_sl_pc_tf_til?tag=chadessin-21&linkCode=w00&linkId=7d6d10fcd9887a12f1a7a922460ebbb7&creativeASIN=B00161UAJS
► Promarker set : https://www.amazon.fr/Winsor-Newton-Promarker-Marqueurs-Assortis/dp/B01893SW9A/ref=as_sl_pc_tf_til?tag=chadessin-21&linkCode=w00&linkId=2add5bae1d9e650516e410c5b661a7fa&creativeASIN=B01893SW9A
► Critérium pro : https://www.amazon.fr/Faber-Castell-134799-GRIP-1347-Porte-mine/dp/B000KT7JAK/ref=as_sl_pc_tf_til?tag=chadessin-21&linkCode=w00&linkId=67bc4df43885bd4ea7b2adbf299d5dfe&creativeASIN=B000KT7JAK
► Stylo POINTILLISME : https://www.amazon.fr/premi%C3%A8re-%C3%A9lectrique-cuttlelola-dotspen-charge/dp/B01894VUDE/ref=as_sl_pc_tf_til?tag=chadessin-21&linkCode=w00&linkId=eab582561dc7e76edd3132a368c1bdc1&creativeASIN=B01894VUDE
► Gomme pro : https://www.amazon.fr/Faber-Castell-187121-Gomme-Dust-Free-plastique/dp/B0071OT5E0/ref=as_sl_pc_tf_til?tag=chadessin-21&linkCode=w00&linkId=96fc4b6e94229f10e8ce5b831255adae&creativeASIN=B0071OT5E0
► Papier pro : https://www.amazon.fr/Canson-graphiques-Marker-layout-feuilles/dp/B001ANVINO/ref=as_sl_pc_tf_til?tag=chadessin-21&linkCode=w00&linkId=d27d87b0c5e93ce94b6ec73cc0dbdd3e&creativeASIN=B001ANVINO
➽ Matériel Fimo :
► Pâte : https://www.amazon.fr/gp/product/B0791ZS6F7?ie=UTF8&tag=chadessin-21&camp=1642&linkCode=xm2&creativeASIN=B0791ZS6F7
► Outils : https://www.amazon.fr/gp/product/B06XRYSV3D?ie=UTF8&tag=chadessin-21&camp=1642&linkCode=xm2&creativeASIN=B06XRYSV3D
► Feutres peintures : https://www.amazon.fr/gp/product/B000GPI48E?ie=UTF8&tag=chadessin-21&camp=1642&linkCode=xm2&creativeASIN=B000GPI48E
► Rouleau pour pâte : https://www.amazon.fr/Staedtler-acrylique-transparent-8700-05/dp/B000PUJD5S/ref=as_sl_pc_tf_til?tag=chadessin-21&linkCode=w00&linkId=89181742b896f5ed7ce91b7dde2666a0&creativeASIN=B000PUJD5S
★★ Peinture : https://www.amazon.fr/Crayola-Bouteille-Peinture-Lavable-Multicolore/dp/B004Z4LTWU/ref=as_sl_pc_tf_til?tag=chadessin-21&linkCode=w00&linkId=669552b7ec8d027e5f4fbe35a48b03d1&creativeASIN=B004Z4LTWU
★★ Feutre noir : https://www.amazon.fr/Papermate-S0188046-Pointe-feutre-Lot/dp/B003UM70YE/ref=as_sl_pc_tf_til?tag=chadessin-21&linkCode=w00&linkId=e95ab1e0c4748f00b7228594d8a547c1&creativeASIN=B003UM70YE
★★ Pinceau : https://www.amazon.fr/ATMOKO-Pinceaux-Palettes-Acrylique-Anniversaire/dp/B01MXW6SQM/ref=as_sl_pc_tf_til?tag=chadessin-21&linkCode=w00&linkId=9cc1295f4b376932bb4ed780feba441a&creativeASIN=B01MXW6SQM
★★ Papier : https://www.amazon.fr/Clairefontaine-1979C-dimpression-Clairalfa-impressions/dp/B015LILZDG/ref=as_sl_pc_tf_til?tag=chadessin-21&linkCode=w03UM70YE/ref=as_sl_pc_tf_til?tag=chadessin-21&linkCode=w00&linkId=0b11dc00b639109384863d33f66205a7&creativeASIN=B003UM70YE00&linkId=650622bf844c0db0a5efb66d73e4feba&creativeASIN=B015LILZDG
★★ Palette : https://www.amazon.fr/HERLITZ-Palette-peinture-plastique-blanche/dp/B001AM5R14/ref=as_sl_pc_tf_til?tag=chadessin-21&linkCode=w00&linkId=0871ae0d029cb3dcb1632a4ea2b737f1&creativeASIN=B001AM5R14

SNAP : CHADDIII INSTA : chadessinytb Code créa : CHADESSIN
Me soutenir gratuitement : https://utip.io/ChaDessin
➽ Matériel dessin :
► TouchFive : https://www.amazon.fr/TOUCHFIVE-Marker-marqueurs-peinture-animation/dp/B06XK4ZKP5/ref=as_sl_pc_tf_til?tag=chadessin-21&linkCode=w00&linkId=47bef29eb608fbbee052ca292451ce28&creativeASIN=B06XK4ZKP5
► Feutre à alcool : https://www.amazon.fr/Croquis-Stylos-Marqueurs-Pointes-Graphic/dp/B01KCRTTMU/ref=as_sl_pc_tf_til?tag=chadessin-21&linkCode=w00&linkId=eb8bfda52d4e6790ae67f78162cd1c1e&creativeASIN=B01KCRTTMU
► Graph'it : https://www.amazon.fr/Graphit-Marqueurs-alcool-double-pointe/dp/B00AVW9OZE/ref=as_sl_pc_tf_til?tag=chadessin-21&linkCode=w00&linkId=79d7403788890a5428dffd1da208112d&creativeASIN=B00AVW9OZE
► Gant dessin : https://www.amazon.fr/RUIYELE-Artiste-ANTISALISSURE-Tablette-lumi%C3%A8re/dp/B0776QJQT6/ref=as_sl_pc_tf_til?tag=chadessin-21&linkCode=w00&linkId=d9a08fc402130c645a19cc688539756e&creativeASIN=B0776QJQT6
► Feutre papermate : https://www.amazon.fr/Papermate-S0188046-Pointe-feutre-Lot/dp/B003UM70YE/ref=as_sl_pc_tf_til?tag=chadessin-21&linkCode=w00&linkId=f090c6d3adfea0ecc3d42c4553a1873c&creativeASIN=B003UM70YE
► Micro pigment : https://www.amazon.fr/Pigma-POXSDK6-Micron-6-Fineliners/dp/B004AQODNU/ref=as_sl_pc_tf_til?tag=chadessin-21&linkCode=w00&linkId=38fab2e999dfc0c1bc14e3195cf7df15&creativeASIN=B004AQODNU
► Feutre à gel blanc : https://www.amazon.fr/Uni-ball-Signo-UM-153-Stylo-pointe/dp/B00161UAJS/ref=as_sl_pc_tf_til?tag=chadessin-21&linkCode=w00&linkId=7d6d10fcd9887a12f1a7a922460ebbb7&creativeASIN=B00161UAJS
► Promarker set : https://www.amazon.fr/Winsor-Newton-Promarker-Marqueurs-Assortis/dp/B01893SW9A/ref=as_sl_pc_tf_til?tag=chadessin-21&linkCode=w00&linkId=2add5bae1d9e650516e410c5b661a7fa&creativeASIN=B01893SW9A
► Critérium pro : https://www.amazon.fr/Faber-Castell-134799-GRIP-1347-Porte-mine/dp/B000KT7JAK/ref=as_sl_pc_tf_til?tag=chadessin-21&linkCode=w00&linkId=67bc4df43885bd4ea7b2adbf299d5dfe&creativeASIN=B000KT7JAK
► Stylo POINTILLISME : https://www.amazon.fr/premi%C3%A8re-%C3%A9lectrique-cuttlelola-dotspen-charge/dp/B01894VUDE/ref=as_sl_pc_tf_til?tag=chadessin-21&linkCode=w00&linkId=eab582561dc7e76edd3132a368c1bdc1&creativeASIN=B01894VUDE
► Gomme pro : https://www.amazon.fr/Faber-Castell-187121-Gomme-Dust-Free-plastique/dp/B0071OT5E0/ref=as_sl_pc_tf_til?tag=chadessin-21&linkCode=w00&linkId=96fc4b6e94229f10e8ce5b831255adae&creativeASIN=B0071OT5E0
► Papier pro : https://www.amazon.fr/Canson-graphiques-Marker-layout-feuilles/dp/B001ANVINO/ref=as_sl_pc_tf_til?tag=chadessin-21&linkCode=w00&linkId=d27d87b0c5e93ce94b6ec73cc0dbdd3e&creativeASIN=B001ANVINO
➽ Matériel Fimo :
► Pâte : https://www.amazon.fr/gp/product/B0791ZS6F7?ie=UTF8&tag=chadessin-21&camp=1642&linkCode=xm2&creativeASIN=B0791ZS6F7
► Outils : https://www.amazon.fr/gp/product/B06XRYSV3D?ie=UTF8&tag=chadessin-21&camp=1642&linkCode=xm2&creativeASIN=B06XRYSV3D
► Feutres peintures : https://www.amazon.fr/gp/product/B000GPI48E?ie=UTF8&tag=chadessin-21&camp=1642&linkCode=xm2&creativeASIN=B000GPI48E
► Rouleau pour pâte : https://www.amazon.fr/Staedtler-acrylique-transparent-8700-05/dp/B000PUJD5S/ref=as_sl_pc_tf_til?tag=chadessin-21&linkCode=w00&linkId=89181742b896f5ed7ce91b7dde2666a0&creativeASIN=B000PUJD5S
★★ Peinture : https://www.amazon.fr/Crayola-Bouteille-Peinture-Lavable-Multicolore/dp/B004Z4LTWU/ref=as_sl_pc_tf_til?tag=chadessin-21&linkCode=w00&linkId=669552b7ec8d027e5f4fbe35a48b03d1&creativeASIN=B004Z4LTWU
★★ Feutre noir : https://www.amazon.fr/Papermate-S0188046-Pointe-feutre-Lot/dp/B003UM70YE/ref=as_sl_pc_tf_til?tag=chadessin-21&linkCode=w00&linkId=e95ab1e0c4748f00b7228594d8a547c1&creativeASIN=B003UM70YE
★★ Pinceau : https://www.amazon.fr/ATMOKO-Pinceaux-Palettes-Acrylique-Anniversaire/dp/B01MXW6SQM/ref=as_sl_pc_tf_til?tag=chadessin-21&linkCode=w00&linkId=9cc1295f4b376932bb4ed780feba441a&creativeASIN=B01MXW6SQM
★★ Papier : https://www.amazon.fr/Clairefontaine-1979C-dimpression-Clairalfa-impressions/dp/B015LILZDG/ref=as_sl_pc_tf_til?tag=chadessin-21&linkCode=w03UM70YE/ref=as_sl_pc_tf_til?tag=chadessin-21&linkCode=w00&linkId=0b11dc00b639109384863d33f66205a7&creativeASIN=B003UM70YE00&linkId=650622bf844c0db0a5efb66d73e4feba&creativeASIN=B015LILZDG
★★ Palette : https://www.amazon.fr/HERLITZ-Palette-peinture-plastique-blanche/dp/B001AM5R14/ref=as_sl_pc_tf_til?tag=chadessin-21&linkCode=w00&linkId=0871ae0d029cb3dcb1632a4ea2b737f1&creativeASIN=B001AM5R14
Music : https://www.youtube.com/channe....l/UCht8qITGkBvXKsR1B

SNAP : CHADDIII INSTA : chadessinytb Code créa : CHADESSIN
Me soutenir gratuitement : https://utip.io/ChaDessin
➽ Matériel dessin :
► TouchFive : https://www.amazon.fr/TOUCHFIVE-Marker-marqueurs-peinture-animation/dp/B06XK4ZKP5/ref=as_sl_pc_tf_til?tag=chadessin-21&linkCode=w00&linkId=47bef29eb608fbbee052ca292451ce28&creativeASIN=B06XK4ZKP5
► Feutre à alcool : https://www.amazon.fr/Croquis-Stylos-Marqueurs-Pointes-Graphic/dp/B01KCRTTMU/ref=as_sl_pc_tf_til?tag=chadessin-21&linkCode=w00&linkId=eb8bfda52d4e6790ae67f78162cd1c1e&creativeASIN=B01KCRTTMU
► Graph'it : https://www.amazon.fr/Graphit-Marqueurs-alcool-double-pointe/dp/B00AVW9OZE/ref=as_sl_pc_tf_til?tag=chadessin-21&linkCode=w00&linkId=79d7403788890a5428dffd1da208112d&creativeASIN=B00AVW9OZE
► Gant dessin : https://www.amazon.fr/RUIYELE-Artiste-ANTISALISSURE-Tablette-lumi%C3%A8re/dp/B0776QJQT6/ref=as_sl_pc_tf_til?tag=chadessin-21&linkCode=w00&linkId=d9a08fc402130c645a19cc688539756e&creativeASIN=B0776QJQT6
► Feutre papermate : https://www.amazon.fr/Papermate-S0188046-Pointe-feutre-Lot/dp/B003UM70YE/ref=as_sl_pc_tf_til?tag=chadessin-21&linkCode=w00&linkId=f090c6d3adfea0ecc3d42c4553a1873c&creativeASIN=B003UM70YE
► Micro pigment : https://www.amazon.fr/Pigma-POXSDK6-Micron-6-Fineliners/dp/B004AQODNU/ref=as_sl_pc_tf_til?tag=chadessin-21&linkCode=w00&linkId=38fab2e999dfc0c1bc14e3195cf7df15&creativeASIN=B004AQODNU
► Feutre à gel blanc : https://www.amazon.fr/Uni-ball-Signo-UM-153-Stylo-pointe/dp/B00161UAJS/ref=as_sl_pc_tf_til?tag=chadessin-21&linkCode=w00&linkId=7d6d10fcd9887a12f1a7a922460ebbb7&creativeASIN=B00161UAJS
► Promarker set : https://www.amazon.fr/Winsor-Newton-Promarker-Marqueurs-Assortis/dp/B01893SW9A/ref=as_sl_pc_tf_til?tag=chadessin-21&linkCode=w00&linkId=2add5bae1d9e650516e410c5b661a7fa&creativeASIN=B01893SW9A
► Critérium pro : https://www.amazon.fr/Faber-Castell-134799-GRIP-1347-Porte-mine/dp/B000KT7JAK/ref=as_sl_pc_tf_til?tag=chadessin-21&linkCode=w00&linkId=67bc4df43885bd4ea7b2adbf299d5dfe&creativeASIN=B000KT7JAK
► Stylo POINTILLISME : https://www.amazon.fr/premi%C3%A8re-%C3%A9lectrique-cuttlelola-dotspen-charge/dp/B01894VUDE/ref=as_sl_pc_tf_til?tag=chadessin-21&linkCode=w00&linkId=eab582561dc7e76edd3132a368c1bdc1&creativeASIN=B01894VUDE
► Gomme pro : https://www.amazon.fr/Faber-Castell-187121-Gomme-Dust-Free-plastique/dp/B0071OT5E0/ref=as_sl_pc_tf_til?tag=chadessin-21&linkCode=w00&linkId=96fc4b6e94229f10e8ce5b831255adae&creativeASIN=B0071OT5E0
► Papier pro : https://www.amazon.fr/Canson-graphiques-Marker-layout-feuilles/dp/B001ANVINO/ref=as_sl_pc_tf_til?tag=chadessin-21&linkCode=w00&linkId=d27d87b0c5e93ce94b6ec73cc0dbdd3e&creativeASIN=B001ANVINO
➽ Matériel Fimo :
► Pâte : https://www.amazon.fr/gp/product/B0791ZS6F7?ie=UTF8&tag=chadessin-21&camp=1642&linkCode=xm2&creativeASIN=B0791ZS6F7
► Outils : https://www.amazon.fr/gp/product/B06XRYSV3D?ie=UTF8&tag=chadessin-21&camp=1642&linkCode=xm2&creativeASIN=B06XRYSV3D
► Feutres peintures : https://www.amazon.fr/gp/product/B000GPI48E?ie=UTF8&tag=chadessin-21&camp=1642&linkCode=xm2&creativeASIN=B000GPI48E
► Rouleau pour pâte : https://www.amazon.fr/Staedtler-acrylique-transparent-8700-05/dp/B000PUJD5S/ref=as_sl_pc_tf_til?tag=chadessin-21&linkCode=w00&linkId=89181742b896f5ed7ce91b7dde2666a0&creativeASIN=B000PUJD5S
★★ Peinture : https://www.amazon.fr/Crayola-Bouteille-Peinture-Lavable-Multicolore/dp/B004Z4LTWU/ref=as_sl_pc_tf_til?tag=chadessin-21&linkCode=w00&linkId=669552b7ec8d027e5f4fbe35a48b03d1&creativeASIN=B004Z4LTWU
★★ Feutre noir : https://www.amazon.fr/Papermate-S0188046-Pointe-feutre-Lot/dp/B003UM70YE/ref=as_sl_pc_tf_til?tag=chadessin-21&linkCode=w00&linkId=e95ab1e0c4748f00b7228594d8a547c1&creativeASIN=B003UM70YE
★★ Pinceau : https://www.amazon.fr/ATMOKO-Pinceaux-Palettes-Acrylique-Anniversaire/dp/B01MXW6SQM/ref=as_sl_pc_tf_til?tag=chadessin-21&linkCode=w00&linkId=9cc1295f4b376932bb4ed780feba441a&creativeASIN=B01MXW6SQM
★★ Papier : https://www.amazon.fr/Clairefontaine-1979C-dimpression-Clairalfa-impressions/dp/B015LILZDG/ref=as_sl_pc_tf_til?tag=chadessin-21&linkCode=w03UM70YE/ref=as_sl_pc_tf_til?tag=chadessin-21&linkCode=w00&linkId=0b11dc00b639109384863d33f66205a7&creativeASIN=B003UM70YE00&linkId=650622bf844c0db0a5efb66d73e4feba&creativeASIN=B015LILZDG
★★ Palette : https://www.amazon.fr/HERLITZ-Palette-peinture-plastique-blanche/dp/B001AM5R14/ref=as_sl_pc_tf_til?tag=chadessin-21&linkCode=w00&linkId=0871ae0d029cb3dcb1632a4ea2b737f1&creativeASIN=B001AM5R14
SNAP : CHADDIII INSTA : chadessinytb
★★ Peinture : https://www.amazon.fr/Crayola-Bouteille-Peinture-Lavable-Multicolore/dp/B004Z4LTWU/ref=as_sl_pc_tf_til?tag=chadessin-21&linkCode=w00&linkId=669552b7ec8d027e5f4fbe35a48b03d1&creativeASIN=B004Z4LTWU
★★ Feutre noir : https://www.amazon.fr/Papermate-S0188046-Pointe-feutre-Lot/dp/B003UM70YE/ref=as_sl_pc_tf_til?tag=chadessin-21&linkCode=w00&linkId=e95ab1e0c4748f00b7228594d8a547c1&creativeASIN=B003UM70YE
★★ Pinceau : https://www.amazon.fr/ATMOKO-Pinceaux-Palettes-Acrylique-Anniversaire/dp/B01MXW6SQM/ref=as_sl_pc_tf_til?tag=chadessin-21&linkCode=w00&linkId=9cc1295f4b376932bb4ed780feba441a&creativeASIN=B01MXW6SQM
★★ Papier : https://www.amazon.fr/Clairefontaine-1979C-dimpression-Clairalfa-impressions/dp/B015LILZDG/ref=as_sl_pc_tf_til?tag=chadessin-21&linkCode=w03UM70YE/ref=as_sl_pc_tf_til?tag=chadessin-21&linkCode=w00&linkId=0b11dc00b639109384863d33f66205a7&creativeASIN=B003UM70YE00&linkId=650622bf844c0db0a5efb66d73e4feba&creativeASIN=B015LILZDG
★★ Palette : https://www.amazon.fr/HERLITZ-Palette-peinture-plastique-blanche/dp/B001AM5R14/ref=as_sl_pc_tf_til?tag=chadessin-21&linkCode=w00&linkId=0871ae0d029cb3dcb1632a4ea2b737f1&creativeASIN=B001AM5R14

SNAP : CHADDIII INSTA : chadessinytb Code créa : CHADESSIN
Me soutenir gratuitement : https://utip.io/ChaDessin
➽ Matériel dessin :
► TouchFive : https://www.amazon.fr/TOUCHFIVE-Marker-marqueurs-peinture-animation/dp/B06XK4ZKP5/ref=as_sl_pc_tf_til?tag=chadessin-21&linkCode=w00&linkId=47bef29eb608fbbee052ca292451ce28&creativeASIN=B06XK4ZKP5
► Feutre à alcool : https://www.amazon.fr/Croquis-Stylos-Marqueurs-Pointes-Graphic/dp/B01KCRTTMU/ref=as_sl_pc_tf_til?tag=chadessin-21&linkCode=w00&linkId=eb8bfda52d4e6790ae67f78162cd1c1e&creativeASIN=B01KCRTTMU
► Graph'it : https://www.amazon.fr/Graphit-Marqueurs-alcool-double-pointe/dp/B00AVW9OZE/ref=as_sl_pc_tf_til?tag=chadessin-21&linkCode=w00&linkId=79d7403788890a5428dffd1da208112d&creativeASIN=B00AVW9OZE
► Gant dessin : https://www.amazon.fr/RUIYELE-Artiste-ANTISALISSURE-Tablette-lumi%C3%A8re/dp/B0776QJQT6/ref=as_sl_pc_tf_til?tag=chadessin-21&linkCode=w00&linkId=d9a08fc402130c645a19cc688539756e&creativeASIN=B0776QJQT6
► Feutre papermate : https://www.amazon.fr/Papermate-S0188046-Pointe-feutre-Lot/dp/B003UM70YE/ref=as_sl_pc_tf_til?tag=chadessin-21&linkCode=w00&linkId=f090c6d3adfea0ecc3d42c4553a1873c&creativeASIN=B003UM70YE
► Micro pigment : https://www.amazon.fr/Pigma-POXSDK6-Micron-6-Fineliners/dp/B004AQODNU/ref=as_sl_pc_tf_til?tag=chadessin-21&linkCode=w00&linkId=38fab2e999dfc0c1bc14e3195cf7df15&creativeASIN=B004AQODNU
► Feutre à gel blanc : https://www.amazon.fr/Uni-ball-Signo-UM-153-Stylo-pointe/dp/B00161UAJS/ref=as_sl_pc_tf_til?tag=chadessin-21&linkCode=w00&linkId=7d6d10fcd9887a12f1a7a922460ebbb7&creativeASIN=B00161UAJS
► Promarker set : https://www.amazon.fr/Winsor-Newton-Promarker-Marqueurs-Assortis/dp/B01893SW9A/ref=as_sl_pc_tf_til?tag=chadessin-21&linkCode=w00&linkId=2add5bae1d9e650516e410c5b661a7fa&creativeASIN=B01893SW9A
► Critérium pro : https://www.amazon.fr/Faber-Castell-134799-GRIP-1347-Porte-mine/dp/B000KT7JAK/ref=as_sl_pc_tf_til?tag=chadessin-21&linkCode=w00&linkId=67bc4df43885bd4ea7b2adbf299d5dfe&creativeASIN=B000KT7JAK
► Stylo POINTILLISME : https://www.amazon.fr/premi%C3%A8re-%C3%A9lectrique-cuttlelola-dotspen-charge/dp/B01894VUDE/ref=as_sl_pc_tf_til?tag=chadessin-21&linkCode=w00&linkId=eab582561dc7e76edd3132a368c1bdc1&creativeASIN=B01894VUDE
► Gomme pro : https://www.amazon.fr/Faber-Castell-187121-Gomme-Dust-Free-plastique/dp/B0071OT5E0/ref=as_sl_pc_tf_til?tag=chadessin-21&linkCode=w00&linkId=96fc4b6e94229f10e8ce5b831255adae&creativeASIN=B0071OT5E0
► Papier pro : https://www.amazon.fr/Canson-graphiques-Marker-layout-feuilles/dp/B001ANVINO/ref=as_sl_pc_tf_til?tag=chadessin-21&linkCode=w00&linkId=d27d87b0c5e93ce94b6ec73cc0dbdd3e&creativeASIN=B001ANVINO
➽ Matériel Fimo :
► Pâte : https://www.amazon.fr/gp/product/B0791ZS6F7?ie=UTF8&tag=chadessin-21&camp=1642&linkCode=xm2&creativeASIN=B0791ZS6F7
► Outils : https://www.amazon.fr/gp/product/B06XRYSV3D?ie=UTF8&tag=chadessin-21&camp=1642&linkCode=xm2&creativeASIN=B06XRYSV3D
► Feutres peintures : https://www.amazon.fr/gp/product/B000GPI48E?ie=UTF8&tag=chadessin-21&camp=1642&linkCode=xm2&creativeASIN=B000GPI48E
► Rouleau pour pâte : https://www.amazon.fr/Staedtler-acrylique-transparent-8700-05/dp/B000PUJD5S/ref=as_sl_pc_tf_til?tag=chadessin-21&linkCode=w00&linkId=89181742b896f5ed7ce91b7dde2666a0&creativeASIN=B000PUJD5S
★★ Peinture : https://www.amazon.fr/Crayola-Bouteille-Peinture-Lavable-Multicolore/dp/B004Z4LTWU/ref=as_sl_pc_tf_til?tag=chadessin-21&linkCode=w00&linkId=669552b7ec8d027e5f4fbe35a48b03d1&creativeASIN=B004Z4LTWU
★★ Feutre noir : https://www.amazon.fr/Papermate-S0188046-Pointe-feutre-Lot/dp/B003UM70YE/ref=as_sl_pc_tf_til?tag=chadessin-21&linkCode=w00&linkId=e95ab1e0c4748f00b7228594d8a547c1&creativeASIN=B003UM70YE
★★ Pinceau : https://www.amazon.fr/ATMOKO-Pinceaux-Palettes-Acrylique-Anniversaire/dp/B01MXW6SQM/ref=as_sl_pc_tf_til?tag=chadessin-21&linkCode=w00&linkId=9cc1295f4b376932bb4ed780feba441a&creativeASIN=B01MXW6SQM
★★ Papier : https://www.amazon.fr/Clairefontaine-1979C-dimpression-Clairalfa-impressions/dp/B015LILZDG/ref=as_sl_pc_tf_til?tag=chadessin-21&linkCode=w03UM70YE/ref=as_sl_pc_tf_til?tag=chadessin-21&linkCode=w00&linkId=0b11dc00b639109384863d33f66205a7&creativeASIN=B003UM70YE00&linkId=650622bf844c0db0a5efb66d73e4feba&creativeASIN=B015LILZDG
★★ Palette : https://www.amazon.fr/HERLITZ-Palette-peinture-plastique-blanche/dp/B001AM5R14/ref=as_sl_pc_tf_til?tag=chadessin-21&linkCode=w00&linkId=0871ae0d029cb3dcb1632a4ea2b737f1&creativeASIN=B001AM5R14

SNAP : CHADDIII INSTA : chadessinytb
★★ Peinture : https://www.amazon.fr/Crayola-Bouteille-Peinture-Lavable-Multicolore/dp/B004Z4LTWU/ref=as_sl_pc_tf_til?tag=chadessin-21&linkCode=w00&linkId=669552b7ec8d027e5f4fbe35a48b03d1&creativeASIN=B004Z4LTWU
★★ Feutre noir : https://www.amazon.fr/Papermate-S0188046-Pointe-feutre-Lot/dp/B003UM70YE/ref=as_sl_pc_tf_til?tag=chadessin-21&linkCode=w00&linkId=e95ab1e0c4748f00b7228594d8a547c1&creativeASIN=B003UM70YE
★★ Pinceau : https://www.amazon.fr/ATMOKO-Pinceaux-Palettes-Acrylique-Anniversaire/dp/B01MXW6SQM/ref=as_sl_pc_tf_til?tag=chadessin-21&linkCode=w00&linkId=9cc1295f4b376932bb4ed780feba441a&creativeASIN=B01MXW6SQM
★★ Papier : https://www.amazon.fr/Clairefontaine-1979C-dimpression-Clairalfa-impressions/dp/B015LILZDG/ref=as_sl_pc_tf_til?tag=chadessin-21&linkCode=w03UM70YE/ref=as_sl_pc_tf_til?tag=chadessin-21&linkCode=w00&linkId=0b11dc00b639109384863d33f66205a7&creativeASIN=B003UM70YE00&linkId=650622bf844c0db0a5efb66d73e4feba&creativeASIN=B015LILZDG
★★ Palette : https://www.amazon.fr/HERLITZ-Palette-peinture-plastique-blanche/dp/B001AM5R14/ref=as_sl_pc_tf_til?tag=chadessin-21&linkCode=w00&linkId=0871ae0d029cb3dcb1632a4ea2b737f1&creativeASIN=B001AM5R14

Visit me on FB: https://www.facebook.com/LeonardoPereznieto
Follow Fine Art Tips on Google+: http://goo.gl/TqsmiJ
Visit my website: http://www.artistleonardo.com/
Visit: http://www.fineartebooks.com/ for free drawing tutorials.
If you would like to invest in a drawing, painting or sculpture by Leonardo Pereznieto, or to hire him for workshops or lectures, please write to: info@leopereznieto.com (Business only, not for personal messages.)
List of materials:
Mechanical pencil Rotring with a 0.7, 2B lead
Yellow lead holder: 2mm, 6B lead
Pencil stick eraser Tombow
Notebook
12 Color pencil set Prismaldo I, aquarelle
If you would like to see photos and brands of my tools, please go to my blog about materials with the following link:
http://www.fineartebooks.com/howtodraw_drawingschool/My_Blog/Entries/2012/8/1_My_materials.html
You may also follow me on:
My Blog: http://www.fineartebooks.com/howtodraw_drawingschool/My_Blog/My_Blog.html
My Twitter: https://twitter.com/#!/ArtistLeonardo
Fine Art Tips on Google+: http://goo.gl/TqsmiJ
My Google+ page as an artist (with my sculptures, paintings, etc): http://goo.gl/n7p96D
My Instagram: http://instagram.com/artistleonardo
My LinkedIn: http://www.linkedin.com/profile/view?id=89957576&trk=tab_pro
My Vine: https://vine.co/v/hKnn3rbwJmT
My Pinterest: http://pinterest.com/ArtistLeonardo/
My VK: http://vk.com/leonardopereznieto
My website Leonardo Pereznieto: http://www.leonardopereznieto.com/leo/Intro.html
I wish you great creations!
Audio file(s) provided by www.jewelbeat.com
Drawing 3D Sharks on my Notebook! - 3D Anamorphic Drawing (Time Lapse)

Check out my drawing book on Amazon: http://amzn.to/1K7L8Ed
Visit Leonardo´s FB Page: https://www.facebook.com/LeonardoPereznieto
My Blog: http://www.fineartebooks.com/h....owtodraw_drawingscho
Twitter: https://twitter.com/#!/ArtistLeonardo
LinkedIn: http://www.linkedin.com/profile/view?id=89957576&trk=tab_pro
Google+: https://plus.google.com/u/0/10....0373866809472929876/
Fine Art eBooks: http://www.fineartebooks.com/s....culptureebooks/home.
Leonardo Pereznieto:
Visit my website: http://www.artistleonardo.com/
By Leonardo Pereznieto.
Music: Gift of Life by JewelBeat.com
This tutorial shows how to draw a realistic golden eagle head. It also demonstrates a way of drawing different textures, in order to create the plumage of a bird. More than just drawing a bird per se, I want you to learn how to create different textures that will useful in other creations.
Visit my FB: https://www.facebook.com/LeonardoPereznieto
List of Materials:
Lead Holder (2mm leads), red. - See it here http://amzn.to/2kt5JAs
HB 2mm leads. See them here: http://amzn.to/2jWgVCo
Lead pointer - See it here: http://amzn.to/2ktexWH
Paper: Fabriano Ecological Drawing Pad, 8-1/4 X 11-3/4, white -. See it here: http://amzn.to/2jx7hKl
Visit my website: http://www.artistleonardo.com/
Follow Fine Art Tips on Google+ https://plus.google.com/u/0/b/....10270478833891898661
Visit: http://www.fineartebooks.com/ for free drawing tutorials.
If you would like to invest in a drawing, painting or sculpture by Leonardo Pereznieto, please write to: info@leonardopereznieto.com
You may also follow me on:
My Blog: http://www.fineartebooks.com/howtodraw_drawingschool/My_Blog/My_Blog.html
Twitter: https://twitter.com/#!/ArtistLeonardo
LinkedIn: http://www.linkedin.com/profile/view?id=89957576&trk=tab_pro
Google+: https://plus.google.com/u/0/10....0373866809472929876/
VK: http://vk.com/leonardopereznieto
Leonardo Pereznieto: http://www.leonardopereznieto.com/leo/Intro.html
Do you want to help me translating it into your language?
(Note: First check if it hasn´t been translated already by pressing the "CC" button on the lower part of the video).
All you need to do is translate the file at the link below and send it to me:
https://docs.google.com/file/d..../0B0UOw8r7hWG2eWE2Z2
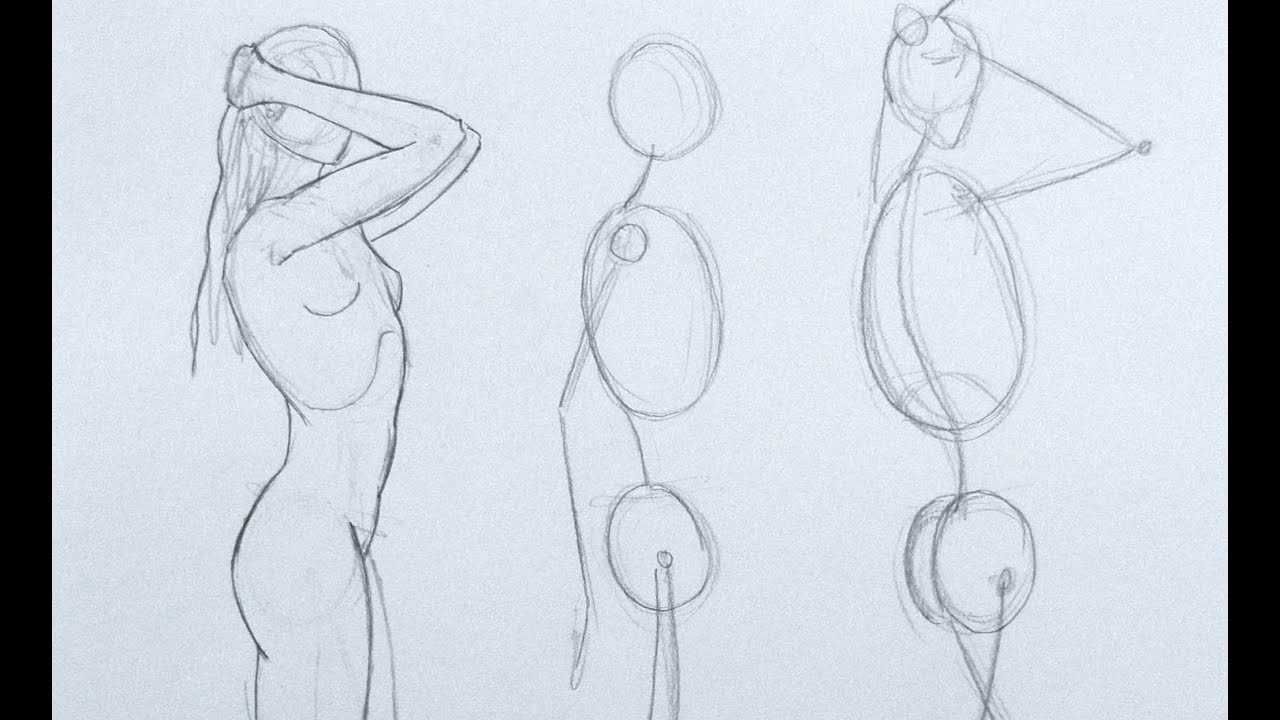
With this video I’ll teach you how to draw a figure from the imagination and the memory. I’ll show you how to do the basic structure of the boy in a simple and easy way, to draw a realistic person with movement. You’ll learn which basic bones are important to crate the physical structure and know how to apply gesture lines in order to imitate the movement of the body.
¡To draw a figure from the mind you should have a basic knowledge of anatomies in order to mimetic it!
Как нарисовать фигуру из воображения
Как нарисовать фигуру с ума
как нарисовать рисунок по памяти
Comment dessiner un personnage avec l'imagination
كيف ترسم جسم الانسان من خيالك
Come disegnare la figura umana a memoria
Come disegnare la figura umana dall'immaginazione
如何绘画想象中的人物
Eine Figur aus der Phantasie
Cum sa desenezi o figura din imaginatie
Як намалювати фігуру з уяви
Ինչպես նկարել մարդկային կերպար պատկերացումով, մաս 1
கற்பனையில் இருந்து உருவம் வரைவது எப்படி
Sådan tegner du en figur udfra din forstilling
