Los mejores videos
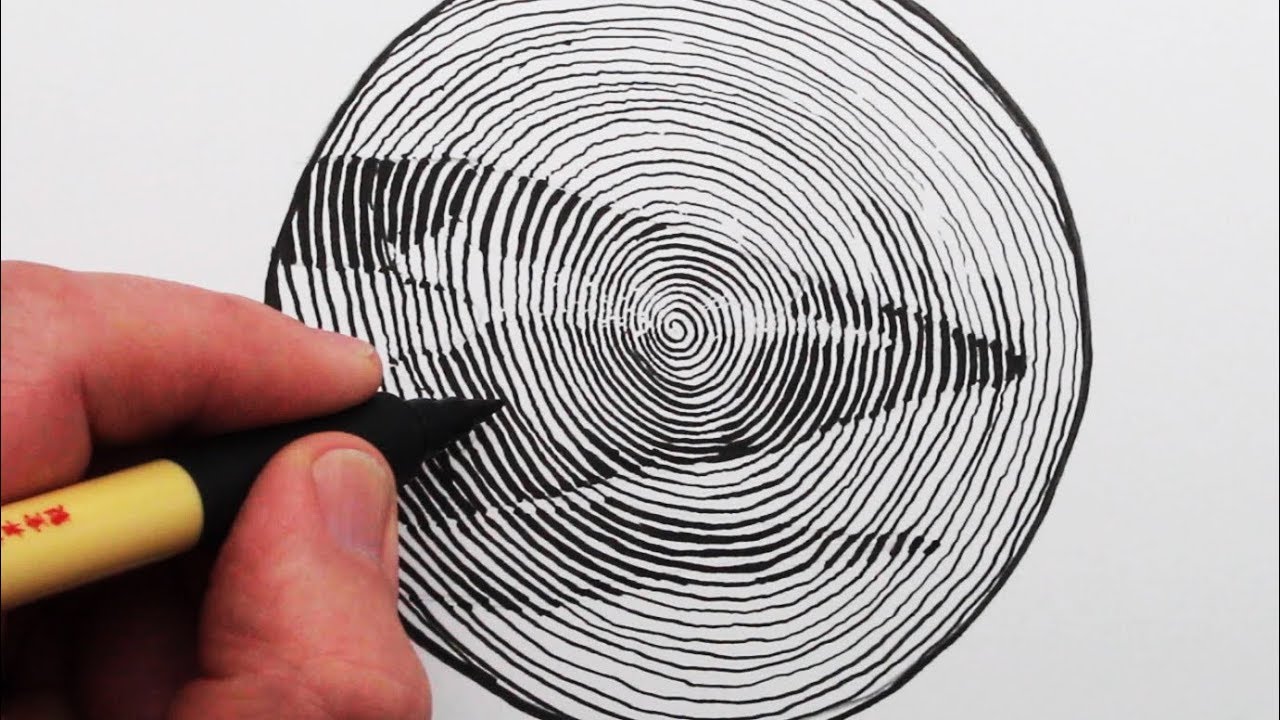
See how to draw a pencil using a single spiral! Subscribe for more: https://www.youtube.com/circlelineartschool Click to learn more: https://www.circlelineartschool.com
Watch Next: How to Draw a Sports Car: https://youtu.be/BXIsF-TJs2M
Circle Line Art School Episode #348: How to Draw a Continuous Spiral Pencil.
I hope you LIKE, COMMENT & SUBSCRIBE: https://youtube.com/circlelineartschool
Thank you for watching this drawing tutorial from my channel, Circle Line Art School, please subscribe to my channel for a new art tutorial each week, there are now more than 340 of my drawings to watch! https://www.youtube.com/circlelineartschool
Circle Line Art School
Hi, my name is Tom McPherson and I founded Circle Line Art School as an online art education resource for all. My aim is to inspire people to learn to draw and be more creative.
For more details on Circle Line Art School please visit my website: https://www.circlelineartschool.com
Music used in the drawing tutorial:
Forever Young by Wayne Jones
Thank you for your support and have a great day!
Tom McPherson
Circle Line Art School
https://www.circlelineartschool.com

See how to draw the famous Hagia Sophia, Istanbul, Turkey, in 1-Point Perspective. Subscribe to keep up to date: https://www.youtube.com/circlelineartschool Click to learn more: https://www.circlelineartschool.com
Watch Next: How to Draw Perspective Playlist: https://bit.ly/1QV3SsW
I hope you LIKE, COMMENT & SUBSCRIBE: https://youtube.com/circlelineartschool
Circle Line Art School: #345: How to Draw 1-Point Perspective: Hagia Sophia Museum, Istanbul, Turkey
Music used in this perspective drawing tutorial: Oud Dance by Dong Maxwell
For more details on Circle Line Art School please visit my website: https://www.circlelineartschool.com
Thank you for watching this 1-Point Perspective art tutorial from my channel, Circle Line Art School, please subscribe to my channel for a new art tutorial each week, there are now more than 300 of my drawings to watch! https://www.youtube.com/circlelineartschool.com
Circle Line Art School
Hi, my name is Tom McPherson and I founded Circle Line Art School as an online art education resource for all. My aim is to inspire people to learn to draw and be more creative.
Thank you for your support and have a great day!
Tom McPherson
Circle Line Art School
https://www.circlelineartschool.com
hagia sophia çekmek nasıl
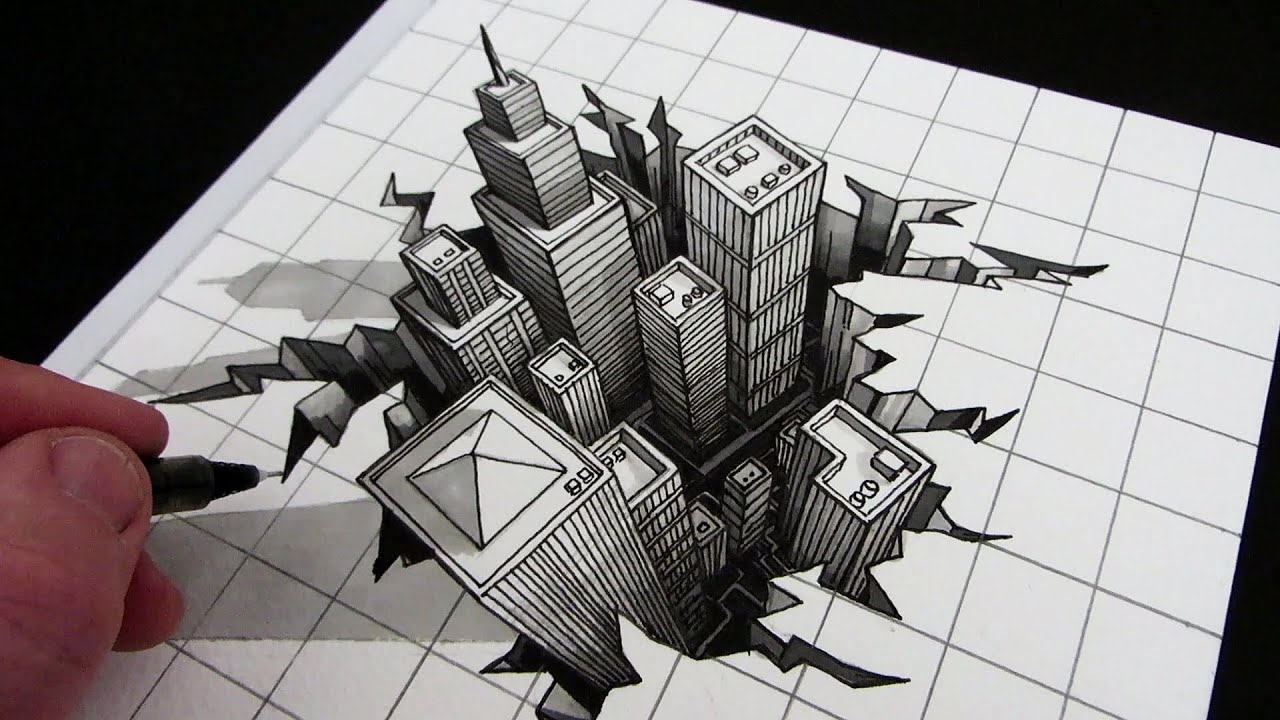
How to draw a 3D hole with a anamorphic 3D City Illusion. Thank you for watching, please subscribe! https://www.youtube.com/circlelineartschool
Watch Next: How to Draw Optical Illusions Playlist: http://bit.ly/1IJZr2a
I hope you like, comment, share and subscribe!
Narrated version now on my channel: http://www.youtube.com/circlelineartschool
There are now over 100 of my art tutorials on my channel, Circle Line Art School, with a new art tutorial each week.
Thank you for watching and see you next time.
Tom McPherson
Circle Line Art School
https://www.circlelineartschool.com
Music in this video:
Destiny Day by Kevin MacLeod is licensed under a Creative Commons Attribution licence (https://creativecommons.org/licenses/by/4.0/)
Source: http://incompetech.com/music/r....oyalty-free/index.ht
Artist: http://incompetech.com/
Circle Line Art School:
How to Draw a Hole 3D City Illusion
How to Draw a City
How to Draw an Optical Illusion
How to Draw an Amazing Optical Illusion

Learn how to draw a fish in this simple step by step narrated art video.
SUBSCRIBE: http://www.youtube.com/user/circlelinemedia
Follow this art video tutorial step by step to learn one way to draw a Koi Carp Fish from the first pencil drawing to the final watercolour detail.
I hope you like and share this video and subscribe to my You Tube Channel for many more How to Draw art videos: http://www.youtube.com/user/circlelinemedia

Learn How to Draw a Bird in this ink drip speed drawing, using ink and water. Subscribe: http://www.youtube.com/user/circlelinemedia. Watch more ink drip drawings: https://youtu.be/XwJa6k4kqfQ
Subscribe for over 170 How to Draw art tutorials. Materials used: Watercolour Paper, Water, Brush, Indian Ink Watercolour
How to Draw using Indian Ink Drip Technique
For this technique you need to use thick paper so that when you paint with just water, the water stays on the surface for a while, then you can draw the image with just water and then add some black ink and it will bleed out and fill the wet area you created earlier.
Watch next: How to Draw Animals: http://bit.ly/1HhONDQ
Thank you for watching and keep drawing!
Tom McPherson
Circle Line Art School
My Web: http://www.circlelineartschool.com
My Instagram: https://www.instagram.com/circlelineartschool/
Music used in this art tutorial:
Heartwarming by Kevin MacLeod is licensed under a Creative Commons Attribution licence (https://creativecommons.org/licenses/by/4.0/)
Source: http://incompetech.com/music/r....oyalty-free/index.ht
Artist: http://incompetech.com/
How to Draw a Bird
Indian Ink Drip Technique
How to Draw with Ink
How to Draw a Stork
How to Paint a Stork
How to Draw Animals

Learn how to draw a room step by step in this narrated line drawing in one point perspective. SUBSCRIBE: http://www.youtube.com/user/circlelinemedia
Next see my How to Draw a Room in One Point Perspective: http://youtu.be/yEymIyLbiAI
How to Draw a City, Bird's Eye View: http://youtu.be/_fnhWl2Z-Gw
I hope you find this drawing useful for your own drawing, if so please like, comment and share. Thank you!
Thank you for watching and see you next time.
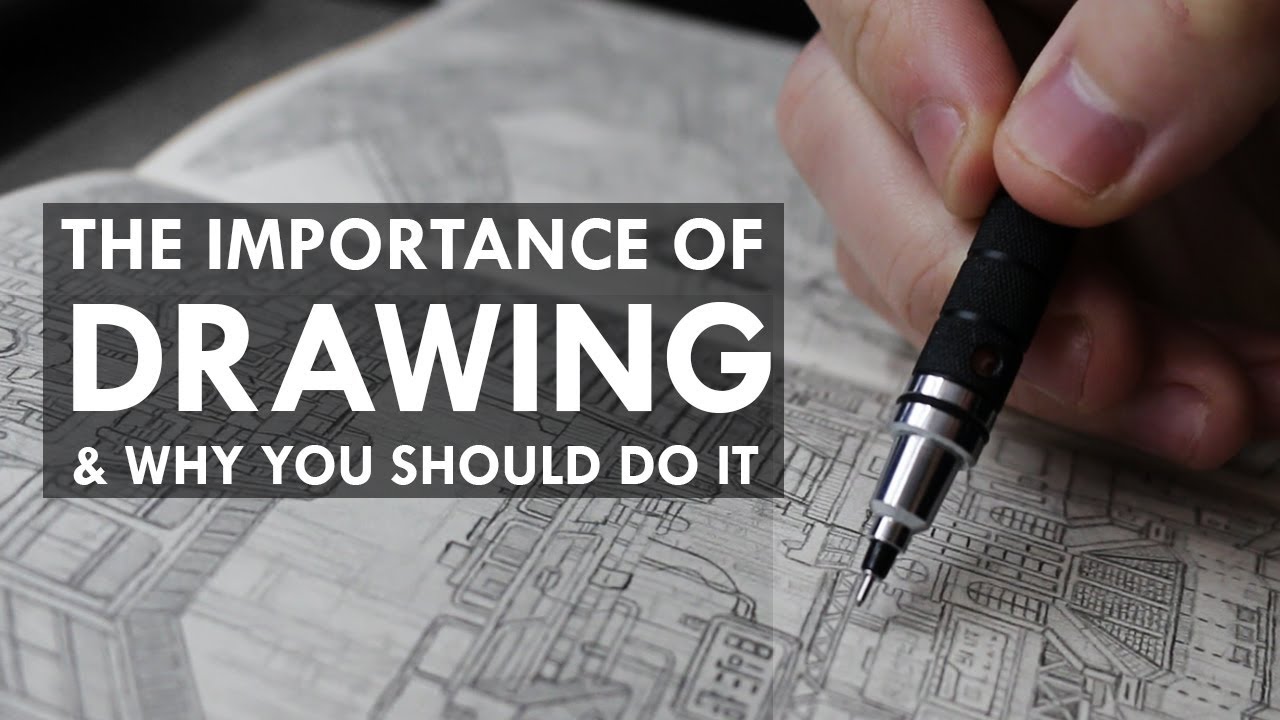
Drawing Is IMPORTANT - Why YOU Should Do It
In this video I do some sketching and talk about drawing as an activity, covering various aspects of the subject.
Subscribe Today For Awesome Weekly Drawing Videos!!
https://www.youtube.com/c/DanBeardshaw
Recent Videos You Should Check Out!:
HOW TO GET BETTER AT DRAWING:
https://www.youtube.com/watch?v=mio-_RyxOyQ
THE ULTIMATE REALISTIC DRAWING GUIDE:
https://www.youtube.com/watch?v=vrN4TOY8rSw&t=46s
The Equipment I Use:
Pencils:
Faber-Castell 9000 Art Set 12 x Pencils :
https://goo.gl/XpxSXX
Mechanical Pencils:
Uni Mechanical Pencil Kurutoga Roulette Model, 0.5 mm :
https://goo.gl/LRwCCV
Erasers:
Tombow Mono Eraser Set Includes Zero Round Tip Eraser :
https://goo.gl/HS9mMH
Derwent Eraser Pen :
https://goo.gl/FSK4p9
Paper:
Winsor & Newton Extra Smooth Bristol Board:
https://goo.gl/Rv1Nth
Follow Me Online!:
Instagram - https://www.instagram.com/danbeardshaw/
Facebook - https://www.facebook.com/danbeardshawart/
Twitter (I need to use this more) - https://twitter.com/dan_beardshaw
Thanks For Watching - Dan
The BEST approach to learn HOW TO DRAW - Beginner Advice
Discussion Video - In this video i talk about the appraoch to learning how to draw, and what i think is the best thing to do. This advice will be useful for beginners and covers some other aspects surrounding learning to draw.
Instagram: @danbeardshaw
Twitter (don't use it much) @dan_beardshaw

This Drawing Is The Start Of Something Big. (New Project Announcement)
Its something that I have had in the works for a while now, and it starts with this drawing. I haven't discussed the project much until now, and overtime ill be revealing more.
Subscribe Today For Awesome Weekly Drawing Videos!!
https://www.youtube.com/c/DanBeardshaw
Recent Videos You Should Check Out!:
HOW TO GET BETTER AT DRAWING:
https://www.youtube.com/watch?v=mio-_RyxOyQ
THE ULTIMATE REALISTIC DRAWING GUIDE:
https://www.youtube.com/watch?v=vrN4TOY8rSw&t=46s
The Equipment I Use:
Pencils:
Faber-Castell 9000 Art Set 12 x Pencils :
https://goo.gl/XpxSXX
Mechanical Pencils:
Uni Mechanical Pencil Kurutoga Roulette Model, 0.5 mm :
https://goo.gl/LRwCCV
Erasers:
Tombow Mono Eraser Set Includes Zero Round Tip Eraser :
https://goo.gl/HS9mMH
Derwent Eraser Pen :
https://goo.gl/FSK4p9
Paper:
Winsor & Newton Extra Smooth Bristol Board:
https://goo.gl/Rv1Nth
Follow Me Online!:
Instagram - https://www.instagram.com/danbeardshaw/
Facebook - https://www.facebook.com/danbeardshawart/
Twitter (I need to use this more) - https://twitter.com/dan_beardshaw
Thanks For Watching - Dan
Creating BACKGROUNDS for your DRAWINGS! [VLOG 05]
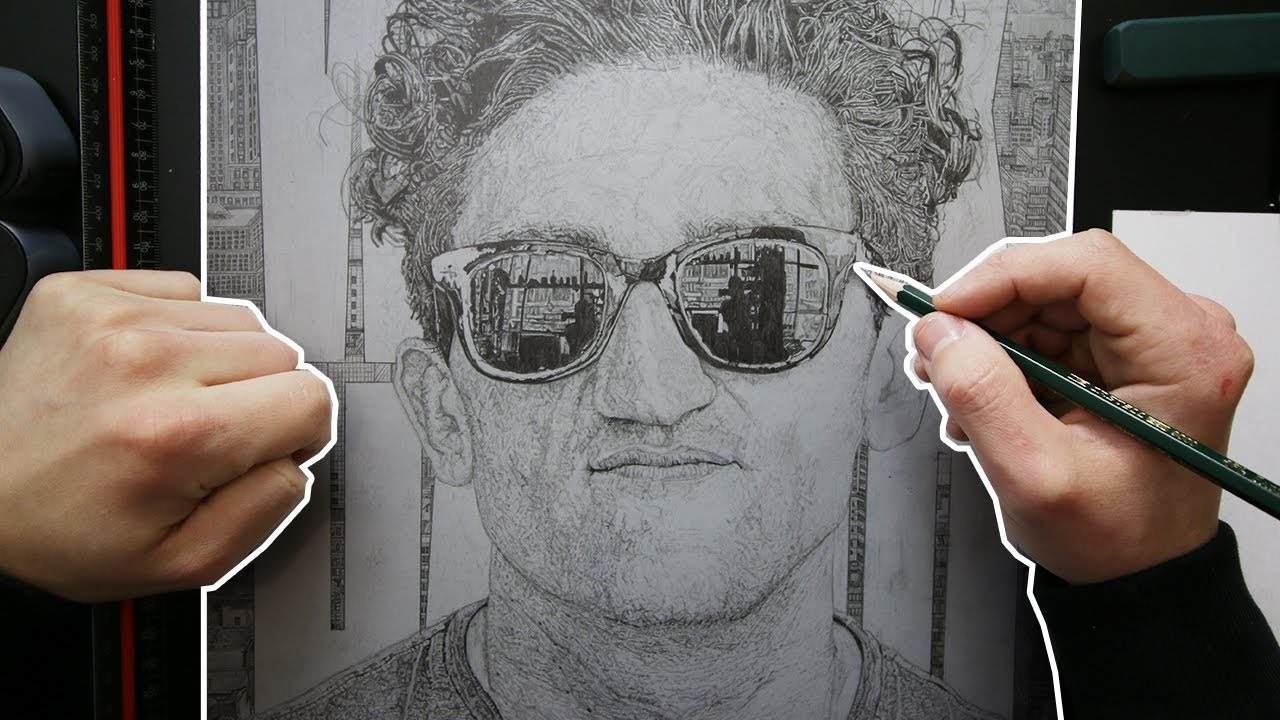
In this episode of the vlog i start to show off the new wide angle lens and also decorate the studio - until i find some old artwork i did 2 years ago, and decide to finish it off by adding a background! Its a casey neistat drawing/portrait and so i came up with a unique background. I also talk about how to add background to your own drawings and the things you should consider.
Subscribe Today For Awesome Weekly Drawing Videos!!
https://www.youtube.com/c/DanBeardshaw
Recent Videos You Should Check Out!:
HOW TO GET BETTER AT DRAWING:
https://www.youtube.com/watch?v=mio-_RyxOyQ
THE ULTIMATE REALISTIC DRAWING GUIDE:
https://www.youtube.com/watch?v=vrN4TOY8rSw&t=46s
The Equipment I Use:
Pencils:
Faber-Castell 9000 Art Set 12 x Pencils :
https://goo.gl/XpxSXX
Mechanical Pencils:
Uni Mechanical Pencil Kurutoga Roulette Model, 0.5 mm :
https://goo.gl/LRwCCV
Erasers:
Tombow Mono Eraser Set Includes Zero Round Tip Eraser :
https://goo.gl/HS9mMH
Derwent Eraser Pen :
https://goo.gl/FSK4p9
Paper:
Winsor & Newton Extra Smooth Bristol Board:
https://goo.gl/NkVupy
Follow Me Online!:
Instagram - https://www.instagram.com/danbeardshaw/
Facebook - https://www.facebook.com/danbeardshawart/
Twitter (I need to use this more) - https://twitter.com/dan_beardshaw
Thanks For Watching - Dan
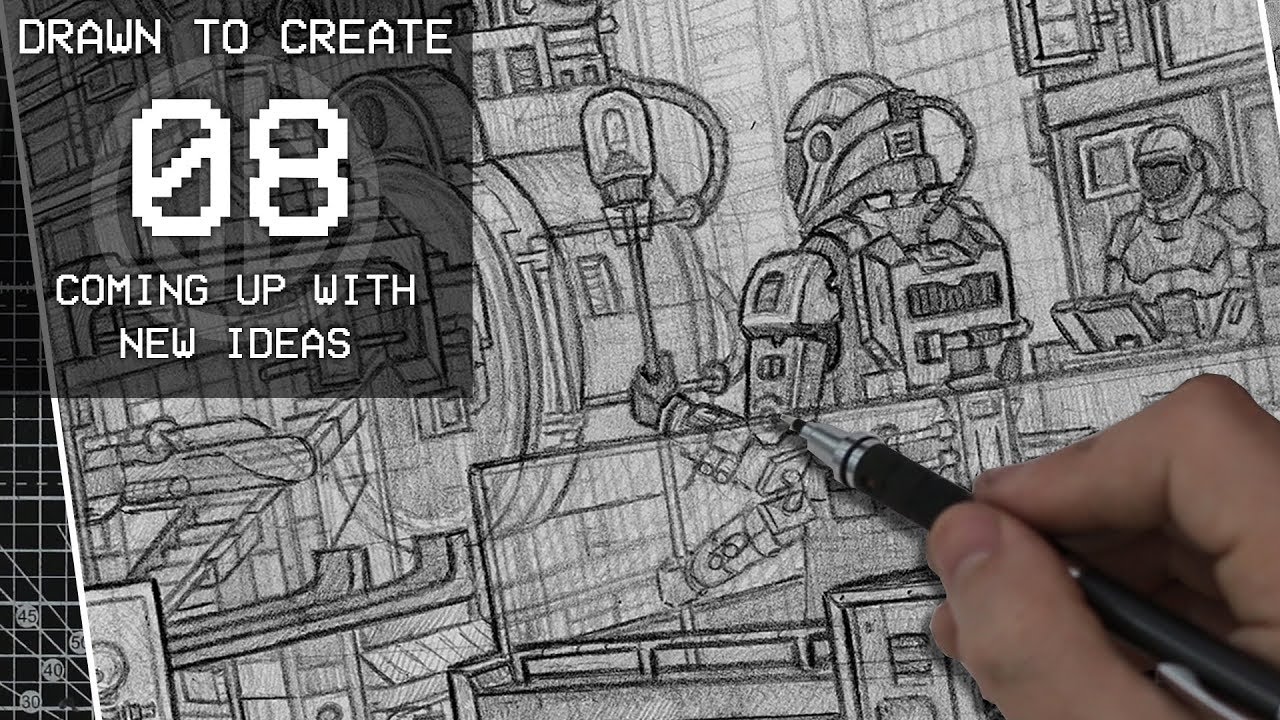
In this weeks episode of Drawn To Create I talk about ideas - how to come up with them and how they can often evolve into something bigger and unexpected. I also answer your questions and talk about avoiding burn out.
SUPPORT THE CHANNEL
Patreon: https://www.patreon.com/danbeardshaw
FIND ALL OF MY EQUIPMENT & RESOURCES HERE -
https://kit.com/DanBeardshaw
PURCHASE ARTWORK:
https://danbeardshaw.bigcartel.com/
FOLLOW ME HERE:
Instagram - https://www.instagram.com/danbeardshaw/
Facebook - https://www.facebook.com/danbeardshaw...
Twitter - https://twitter.com/dan_beardshaw
Second Channel - https://www.youtube.com/channe....l/UCVe8YnrWs_s_b_4kT
Patreon Tier Supporters:
E. Myrberg
Heimlich
Davi Molinari
Ian Stevens
Erik
Outro:
Calm Synthesizer, B.wav" by InspectorJ (www.jshaw.co.uk) of Freesound.org

In this weeks episode of Drawn To Create I talk about inspiration and how it influences your artwork and ideas. I also talk about what inspires me and how my work develops as a result.
SUPPORT THE CHANNEL
Patreon: https://www.patreon.com/danbeardshaw
FIND ALL OF MY EQUIPMENT & RESOURCES HERE -
https://kit.com/DanBeardshaw
PURCHASE ARTWORK:
https://danbeardshaw.bigcartel.com/
FOLLOW ME HERE:
Instagram - https://www.instagram.com/danbeardshaw/
Facebook - https://www.facebook.com/danbeardshaw...
Twitter - https://twitter.com/dan_beardshaw
Second Channel - https://www.youtube.com/channe....l/UCVe8YnrWs_s_b_4kT
Patreon Tier Supporters:
E. Myrberg
Heimlich
Davi Molinari
Ian Stevens
Outro:
Calm Synthesizer, B.wav" by InspectorJ (www.jshaw.co.uk) of Freesound.org

SNAP : CHADDIII INSTA : chadessinytb Code créa : CHADESSIN
Me soutenir gratuitement : https://utip.io/ChaDessin
➽ Matériel dessin :
► TouchFive : https://www.amazon.fr/TOUCHFIVE-Marker-marqueurs-peinture-animation/dp/B06XK4ZKP5/ref=as_sl_pc_tf_til?tag=chadessin-21&linkCode=w00&linkId=47bef29eb608fbbee052ca292451ce28&creativeASIN=B06XK4ZKP5
► Feutre à alcool : https://www.amazon.fr/Croquis-Stylos-Marqueurs-Pointes-Graphic/dp/B01KCRTTMU/ref=as_sl_pc_tf_til?tag=chadessin-21&linkCode=w00&linkId=eb8bfda52d4e6790ae67f78162cd1c1e&creativeASIN=B01KCRTTMU
► Graph'it : https://www.amazon.fr/Graphit-Marqueurs-alcool-double-pointe/dp/B00AVW9OZE/ref=as_sl_pc_tf_til?tag=chadessin-21&linkCode=w00&linkId=79d7403788890a5428dffd1da208112d&creativeASIN=B00AVW9OZE
► Gant dessin : https://www.amazon.fr/RUIYELE-Artiste-ANTISALISSURE-Tablette-lumi%C3%A8re/dp/B0776QJQT6/ref=as_sl_pc_tf_til?tag=chadessin-21&linkCode=w00&linkId=d9a08fc402130c645a19cc688539756e&creativeASIN=B0776QJQT6
► Feutre papermate : https://www.amazon.fr/Papermate-S0188046-Pointe-feutre-Lot/dp/B003UM70YE/ref=as_sl_pc_tf_til?tag=chadessin-21&linkCode=w00&linkId=f090c6d3adfea0ecc3d42c4553a1873c&creativeASIN=B003UM70YE
► Micro pigment : https://www.amazon.fr/Pigma-POXSDK6-Micron-6-Fineliners/dp/B004AQODNU/ref=as_sl_pc_tf_til?tag=chadessin-21&linkCode=w00&linkId=38fab2e999dfc0c1bc14e3195cf7df15&creativeASIN=B004AQODNU
► Feutre à gel blanc : https://www.amazon.fr/Uni-ball-Signo-UM-153-Stylo-pointe/dp/B00161UAJS/ref=as_sl_pc_tf_til?tag=chadessin-21&linkCode=w00&linkId=7d6d10fcd9887a12f1a7a922460ebbb7&creativeASIN=B00161UAJS
► Promarker set : https://www.amazon.fr/Winsor-Newton-Promarker-Marqueurs-Assortis/dp/B01893SW9A/ref=as_sl_pc_tf_til?tag=chadessin-21&linkCode=w00&linkId=2add5bae1d9e650516e410c5b661a7fa&creativeASIN=B01893SW9A
► Critérium pro : https://www.amazon.fr/Faber-Castell-134799-GRIP-1347-Porte-mine/dp/B000KT7JAK/ref=as_sl_pc_tf_til?tag=chadessin-21&linkCode=w00&linkId=67bc4df43885bd4ea7b2adbf299d5dfe&creativeASIN=B000KT7JAK
► Stylo POINTILLISME : https://www.amazon.fr/premi%C3%A8re-%C3%A9lectrique-cuttlelola-dotspen-charge/dp/B01894VUDE/ref=as_sl_pc_tf_til?tag=chadessin-21&linkCode=w00&linkId=eab582561dc7e76edd3132a368c1bdc1&creativeASIN=B01894VUDE
► Gomme pro : https://www.amazon.fr/Faber-Castell-187121-Gomme-Dust-Free-plastique/dp/B0071OT5E0/ref=as_sl_pc_tf_til?tag=chadessin-21&linkCode=w00&linkId=96fc4b6e94229f10e8ce5b831255adae&creativeASIN=B0071OT5E0
► Papier pro : https://www.amazon.fr/Canson-graphiques-Marker-layout-feuilles/dp/B001ANVINO/ref=as_sl_pc_tf_til?tag=chadessin-21&linkCode=w00&linkId=d27d87b0c5e93ce94b6ec73cc0dbdd3e&creativeASIN=B001ANVINO
➽ Matériel Fimo :
► Pâte : https://www.amazon.fr/gp/product/B0791ZS6F7?ie=UTF8&tag=chadessin-21&camp=1642&linkCode=xm2&creativeASIN=B0791ZS6F7
► Outils : https://www.amazon.fr/gp/product/B06XRYSV3D?ie=UTF8&tag=chadessin-21&camp=1642&linkCode=xm2&creativeASIN=B06XRYSV3D
► Feutres peintures : https://www.amazon.fr/gp/product/B000GPI48E?ie=UTF8&tag=chadessin-21&camp=1642&linkCode=xm2&creativeASIN=B000GPI48E
► Rouleau pour pâte : https://www.amazon.fr/Staedtler-acrylique-transparent-8700-05/dp/B000PUJD5S/ref=as_sl_pc_tf_til?tag=chadessin-21&linkCode=w00&linkId=89181742b896f5ed7ce91b7dde2666a0&creativeASIN=B000PUJD5S
★★ Peinture : https://www.amazon.fr/Crayola-Bouteille-Peinture-Lavable-Multicolore/dp/B004Z4LTWU/ref=as_sl_pc_tf_til?tag=chadessin-21&linkCode=w00&linkId=669552b7ec8d027e5f4fbe35a48b03d1&creativeASIN=B004Z4LTWU
★★ Feutre noir : https://www.amazon.fr/Papermate-S0188046-Pointe-feutre-Lot/dp/B003UM70YE/ref=as_sl_pc_tf_til?tag=chadessin-21&linkCode=w00&linkId=e95ab1e0c4748f00b7228594d8a547c1&creativeASIN=B003UM70YE
★★ Pinceau : https://www.amazon.fr/ATMOKO-Pinceaux-Palettes-Acrylique-Anniversaire/dp/B01MXW6SQM/ref=as_sl_pc_tf_til?tag=chadessin-21&linkCode=w00&linkId=9cc1295f4b376932bb4ed780feba441a&creativeASIN=B01MXW6SQM
★★ Papier : https://www.amazon.fr/Clairefontaine-1979C-dimpression-Clairalfa-impressions/dp/B015LILZDG/ref=as_sl_pc_tf_til?tag=chadessin-21&linkCode=w03UM70YE/ref=as_sl_pc_tf_til?tag=chadessin-21&linkCode=w00&linkId=0b11dc00b639109384863d33f66205a7&creativeASIN=B003UM70YE00&linkId=650622bf844c0db0a5efb66d73e4feba&creativeASIN=B015LILZDG
★★ Palette : https://www.amazon.fr/HERLITZ-Palette-peinture-plastique-blanche/dp/B001AM5R14/ref=as_sl_pc_tf_til?tag=chadessin-21&linkCode=w00&linkId=0871ae0d029cb3dcb1632a4ea2b737f1&creativeASIN=B001AM5R14

SNAP : CHADDIII INSTA : chadessinytb
➽ Matériel dessin :
► TouchFive : https://www.amazon.fr/TOUCHFIVE-Marker-marqueurs-peinture-animation/dp/B06XK4ZKP5/ref=as_sl_pc_tf_til?tag=chadessin-21&linkCode=w00&linkId=47bef29eb608fbbee052ca292451ce28&creativeASIN=B06XK4ZKP5
► Feutre à alcool : https://www.amazon.fr/Croquis-Stylos-Marqueurs-Pointes-Graphic/dp/B01KCRTTMU/ref=as_sl_pc_tf_til?tag=chadessin-21&linkCode=w00&linkId=eb8bfda52d4e6790ae67f78162cd1c1e&creativeASIN=B01KCRTTMU
► Graph'it : https://www.amazon.fr/Graphit-Marqueurs-alcool-double-pointe/dp/B00AVW9OZE/ref=as_sl_pc_tf_til?tag=chadessin-21&linkCode=w00&linkId=79d7403788890a5428dffd1da208112d&creativeASIN=B00AVW9OZE
► Gant dessin : https://www.amazon.fr/RUIYELE-Artiste-ANTISALISSURE-Tablette-lumi%C3%A8re/dp/B0776QJQT6/ref=as_sl_pc_tf_til?tag=chadessin-21&linkCode=w00&linkId=d9a08fc402130c645a19cc688539756e&creativeASIN=B0776QJQT6
► Feutre papermate : https://www.amazon.fr/Papermate-S0188046-Pointe-feutre-Lot/dp/B003UM70YE/ref=as_sl_pc_tf_til?tag=chadessin-21&linkCode=w00&linkId=f090c6d3adfea0ecc3d42c4553a1873c&creativeASIN=B003UM70YE
► Micro pigment : https://www.amazon.fr/Pigma-POXSDK6-Micron-6-Fineliners/dp/B004AQODNU/ref=as_sl_pc_tf_til?tag=chadessin-21&linkCode=w00&linkId=38fab2e999dfc0c1bc14e3195cf7df15&creativeASIN=B004AQODNU
► Feutre à gel blanc : https://www.amazon.fr/Uni-ball-Signo-UM-153-Stylo-pointe/dp/B00161UAJS/ref=as_sl_pc_tf_til?tag=chadessin-21&linkCode=w00&linkId=7d6d10fcd9887a12f1a7a922460ebbb7&creativeASIN=B00161UAJS
► Promarker set : https://www.amazon.fr/Winsor-Newton-Promarker-Marqueurs-Assortis/dp/B01893SW9A/ref=as_sl_pc_tf_til?tag=chadessin-21&linkCode=w00&linkId=2add5bae1d9e650516e410c5b661a7fa&creativeASIN=B01893SW9A
► Critérium pro : https://www.amazon.fr/Faber-Castell-134799-GRIP-1347-Porte-mine/dp/B000KT7JAK/ref=as_sl_pc_tf_til?tag=chadessin-21&linkCode=w00&linkId=67bc4df43885bd4ea7b2adbf299d5dfe&creativeASIN=B000KT7JAK
► Stylo POINTILLISME : https://www.amazon.fr/premi%C3%A8re-%C3%A9lectrique-cuttlelola-dotspen-charge/dp/B01894VUDE/ref=as_sl_pc_tf_til?tag=chadessin-21&linkCode=w00&linkId=eab582561dc7e76edd3132a368c1bdc1&creativeASIN=B01894VUDE
► Gomme pro : https://www.amazon.fr/Faber-Castell-187121-Gomme-Dust-Free-plastique/dp/B0071OT5E0/ref=as_sl_pc_tf_til?tag=chadessin-21&linkCode=w00&linkId=96fc4b6e94229f10e8ce5b831255adae&creativeASIN=B0071OT5E0
► Papier pro : https://www.amazon.fr/Canson-graphiques-Marker-layout-feuilles/dp/B001ANVINO/ref=as_sl_pc_tf_til?tag=chadessin-21&linkCode=w00&linkId=d27d87b0c5e93ce94b6ec73cc0dbdd3e&creativeASIN=B001ANVINO
➽ Matériel Fimo :
► Pâte : https://www.amazon.fr/gp/product/B0791ZS6F7?ie=UTF8&tag=chadessin-21&camp=1642&linkCode=xm2&creativeASIN=B0791ZS6F7
► Outils : https://www.amazon.fr/gp/product/B06XRYSV3D?ie=UTF8&tag=chadessin-21&camp=1642&linkCode=xm2&creativeASIN=B06XRYSV3D
► Feutres peintures : https://www.amazon.fr/gp/product/B000GPI48E?ie=UTF8&tag=chadessin-21&camp=1642&linkCode=xm2&creativeASIN=B000GPI48E
► Rouleau pour pâte : https://www.amazon.fr/Staedtler-acrylique-transparent-8700-05/dp/B000PUJD5S/ref=as_sl_pc_tf_til?tag=chadessin-21&linkCode=w00&linkId=89181742b896f5ed7ce91b7dde2666a0&creativeASIN=B000PUJD5S
★★ Peinture : https://www.amazon.fr/Crayola-Bouteille-Peinture-Lavable-Multicolore/dp/B004Z4LTWU/ref=as_sl_pc_tf_til?tag=chadessin-21&linkCode=w00&linkId=669552b7ec8d027e5f4fbe35a48b03d1&creativeASIN=B004Z4LTWU
★★ Feutre noir : https://www.amazon.fr/Papermate-S0188046-Pointe-feutre-Lot/dp/B003UM70YE/ref=as_sl_pc_tf_til?tag=chadessin-21&linkCode=w00&linkId=e95ab1e0c4748f00b7228594d8a547c1&creativeASIN=B003UM70YE
★★ Pinceau : https://www.amazon.fr/ATMOKO-Pinceaux-Palettes-Acrylique-Anniversaire/dp/B01MXW6SQM/ref=as_sl_pc_tf_til?tag=chadessin-21&linkCode=w00&linkId=9cc1295f4b376932bb4ed780feba441a&creativeASIN=B01MXW6SQM
★★ Papier : https://www.amazon.fr/Clairefontaine-1979C-dimpression-Clairalfa-impressions/dp/B015LILZDG/ref=as_sl_pc_tf_til?tag=chadessin-21&linkCode=w03UM70YE/ref=as_sl_pc_tf_til?tag=chadessin-21&linkCode=w00&linkId=0b11dc00b639109384863d33f66205a7&creativeASIN=B003UM70YE00&linkId=650622bf844c0db0a5efb66d73e4feba&creativeASIN=B015LILZDG
★★ Palette : https://www.amazon.fr/HERLITZ-Palette-peinture-plastique-blanche/dp/B001AM5R14/ref=as_sl_pc_tf_til?tag=chadessin-21&linkCode=w00&linkId=0871ae0d029cb3dcb1632a4ea2b737f1&creativeASIN=B001AM5R14
SNAP : CHADDIII INSTA : chadessinytb Code créa : CHADESSIN
Me soutenir gratuitement : https://utip.io/ChaDessin
➽ Matériel dessin :
► TouchFive : https://www.amazon.fr/TOUCHFIVE-Marker-marqueurs-peinture-animation/dp/B06XK4ZKP5/ref=as_sl_pc_tf_til?tag=chadessin-21&linkCode=w00&linkId=47bef29eb608fbbee052ca292451ce28&creativeASIN=B06XK4ZKP5
► Feutre à alcool : https://www.amazon.fr/Croquis-Stylos-Marqueurs-Pointes-Graphic/dp/B01KCRTTMU/ref=as_sl_pc_tf_til?tag=chadessin-21&linkCode=w00&linkId=eb8bfda52d4e6790ae67f78162cd1c1e&creativeASIN=B01KCRTTMU
► Graph'it : https://www.amazon.fr/Graphit-Marqueurs-alcool-double-pointe/dp/B00AVW9OZE/ref=as_sl_pc_tf_til?tag=chadessin-21&linkCode=w00&linkId=79d7403788890a5428dffd1da208112d&creativeASIN=B00AVW9OZE
► Gant dessin : https://www.amazon.fr/RUIYELE-Artiste-ANTISALISSURE-Tablette-lumi%C3%A8re/dp/B0776QJQT6/ref=as_sl_pc_tf_til?tag=chadessin-21&linkCode=w00&linkId=d9a08fc402130c645a19cc688539756e&creativeASIN=B0776QJQT6
► Feutre papermate : https://www.amazon.fr/Papermate-S0188046-Pointe-feutre-Lot/dp/B003UM70YE/ref=as_sl_pc_tf_til?tag=chadessin-21&linkCode=w00&linkId=f090c6d3adfea0ecc3d42c4553a1873c&creativeASIN=B003UM70YE
► Micro pigment : https://www.amazon.fr/Pigma-POXSDK6-Micron-6-Fineliners/dp/B004AQODNU/ref=as_sl_pc_tf_til?tag=chadessin-21&linkCode=w00&linkId=38fab2e999dfc0c1bc14e3195cf7df15&creativeASIN=B004AQODNU
► Feutre à gel blanc : https://www.amazon.fr/Uni-ball-Signo-UM-153-Stylo-pointe/dp/B00161UAJS/ref=as_sl_pc_tf_til?tag=chadessin-21&linkCode=w00&linkId=7d6d10fcd9887a12f1a7a922460ebbb7&creativeASIN=B00161UAJS
► Promarker set : https://www.amazon.fr/Winsor-Newton-Promarker-Marqueurs-Assortis/dp/B01893SW9A/ref=as_sl_pc_tf_til?tag=chadessin-21&linkCode=w00&linkId=2add5bae1d9e650516e410c5b661a7fa&creativeASIN=B01893SW9A
► Critérium pro : https://www.amazon.fr/Faber-Castell-134799-GRIP-1347-Porte-mine/dp/B000KT7JAK/ref=as_sl_pc_tf_til?tag=chadessin-21&linkCode=w00&linkId=67bc4df43885bd4ea7b2adbf299d5dfe&creativeASIN=B000KT7JAK
► Stylo POINTILLISME : https://www.amazon.fr/premi%C3%A8re-%C3%A9lectrique-cuttlelola-dotspen-charge/dp/B01894VUDE/ref=as_sl_pc_tf_til?tag=chadessin-21&linkCode=w00&linkId=eab582561dc7e76edd3132a368c1bdc1&creativeASIN=B01894VUDE
► Gomme pro : https://www.amazon.fr/Faber-Castell-187121-Gomme-Dust-Free-plastique/dp/B0071OT5E0/ref=as_sl_pc_tf_til?tag=chadessin-21&linkCode=w00&linkId=96fc4b6e94229f10e8ce5b831255adae&creativeASIN=B0071OT5E0
► Papier pro : https://www.amazon.fr/Canson-graphiques-Marker-layout-feuilles/dp/B001ANVINO/ref=as_sl_pc_tf_til?tag=chadessin-21&linkCode=w00&linkId=d27d87b0c5e93ce94b6ec73cc0dbdd3e&creativeASIN=B001ANVINO
➽ Matériel Fimo :
► Pâte : https://www.amazon.fr/gp/product/B0791ZS6F7?ie=UTF8&tag=chadessin-21&camp=1642&linkCode=xm2&creativeASIN=B0791ZS6F7
► Outils : https://www.amazon.fr/gp/product/B06XRYSV3D?ie=UTF8&tag=chadessin-21&camp=1642&linkCode=xm2&creativeASIN=B06XRYSV3D
► Feutres peintures : https://www.amazon.fr/gp/product/B000GPI48E?ie=UTF8&tag=chadessin-21&camp=1642&linkCode=xm2&creativeASIN=B000GPI48E
► Rouleau pour pâte : https://www.amazon.fr/Staedtler-acrylique-transparent-8700-05/dp/B000PUJD5S/ref=as_sl_pc_tf_til?tag=chadessin-21&linkCode=w00&linkId=89181742b896f5ed7ce91b7dde2666a0&creativeASIN=B000PUJD5S
★★ Peinture : https://www.amazon.fr/Crayola-Bouteille-Peinture-Lavable-Multicolore/dp/B004Z4LTWU/ref=as_sl_pc_tf_til?tag=chadessin-21&linkCode=w00&linkId=669552b7ec8d027e5f4fbe35a48b03d1&creativeASIN=B004Z4LTWU
★★ Feutre noir : https://www.amazon.fr/Papermate-S0188046-Pointe-feutre-Lot/dp/B003UM70YE/ref=as_sl_pc_tf_til?tag=chadessin-21&linkCode=w00&linkId=e95ab1e0c4748f00b7228594d8a547c1&creativeASIN=B003UM70YE
★★ Pinceau : https://www.amazon.fr/ATMOKO-Pinceaux-Palettes-Acrylique-Anniversaire/dp/B01MXW6SQM/ref=as_sl_pc_tf_til?tag=chadessin-21&linkCode=w00&linkId=9cc1295f4b376932bb4ed780feba441a&creativeASIN=B01MXW6SQM
★★ Papier : https://www.amazon.fr/Clairefontaine-1979C-dimpression-Clairalfa-impressions/dp/B015LILZDG/ref=as_sl_pc_tf_til?tag=chadessin-21&linkCode=w03UM70YE/ref=as_sl_pc_tf_til?tag=chadessin-21&linkCode=w00&linkId=0b11dc00b639109384863d33f66205a7&creativeASIN=B003UM70YE00&linkId=650622bf844c0db0a5efb66d73e4feba&creativeASIN=B015LILZDG
★★ Palette : https://www.amazon.fr/HERLITZ-Palette-peinture-plastique-blanche/dp/B001AM5R14/ref=as_sl_pc_tf_til?tag=chadessin-21&linkCode=w00&linkId=0871ae0d029cb3dcb1632a4ea2b737f1&creativeASIN=B001AM5R14
