Лучшие
![Как заработать на Ютубе [даже маленькому каналу без монетизации]?](https://i.ytimg.com/vi/kFaNdW9nW_M/maxresdefault.jpg)
Заказать личную консультацию у меня ➜ http://1010.su/v9
✉ Скачайте Чек-листы по оптимизации канала YouTube ➜ http://1010.su/v1
✉ Скачайте мою кнопку подписки ➜ http://1010.su/v3
Как увеличить просмотры на новых видео YouTube и дать вторую жизнь старым? https://www.youtube.com/watch?v=iRFMVetlpkk
5 обязательных навыков успешного ютубера, без которых невозможно раскрутить канал на YouTube https://www.youtube.com/watch?v=jVTz7Cxn5UU
Как время просмотра видео влияет на попадание в рекомендованные (похожие) видео и поиск YouTube? https://www.youtube.com/watch?v=zn3r5DhklIA
Переоптимизация видео или как увеличить просмотры на youtube? https://www.youtube.com/watch?v=IKQsaff1Gsw
7 ПРОВЕРЕННЫХ ШАГОВ, как набрать 4000 часов просмотров на youtube и включить монетизацию https://www.youtube.com/watch?v=dhoRL4OxNw0
Как назвать канал на ютубе? Как влияет название канала на его продвижение? https://www.youtube.com/watch?v=pyHGDn8y-wg
Сколько раз можно смотреть свои видео не получив БАН о YouTube? https://www.youtube.com/watch?v=Ml6Xr4HpuTI
Как заработать на ютубе с нуля МАЛЕНЬКОМУ КАНАЛУ? 2 универсальных способа https://www.youtube.com/watch?v=1dt2YGssXUc
Как раскрутить канал на youtube бесплатно (без денег). Реальный пример как раскрутить канал на ютубе https://www.youtube.com/watch?v=dIC8hIlsx_0
Вибум (viboom) - как сделать посев видео и ПРО$РАТЬ свой канал на YouTube? https://www.youtube.com/watch?v=JVsmMLS2OG0
ПРИСОЕДИНЯЙТЕСЬ В СОЦ СЕТЯХ
Вконтакте http://vk.com/1videoseo
Facebook http://www.facebook.com/1videoseo
Twitter http://twitter.com/1videoseo
Google+ https://plus.google.com/+1videoseo
YouTube http://www.youtube.com/user/1videoseo
Сайт http://firstvideoseo.com
Видео снято на Samsung Note 9
Звук - Sony ECM-77B
Стабилизатор Moza Mini

Cколько платит youtube за 1000 просмотров этот вопрос волнует многих. Я расскажу за что именно YouTube платит и сколько в этом видео.
Я заметил, что многие пользователи интересуются: сколько же платит Youtube за 1000 просмотров видео. И в интернете есть куча информации, которая сбивает новичков с толку. В этом видео я постараюсь расставить все точки и объяснить, за что ютуб платит, а за что нет.
В интернете летает мнение, что ютуб платит за 1000 просмотров видео. И это ложь. Так как youtube не платит за просмотры ваших видео ничего. И вообще почему ютуб должен платить за просмотры ваших видео? Он и так дает вам возможность пользоваться своим сервисом совершенно бесплатно.
Ютуб оплачивает только за просмотры рекламы и за клики по ней. И то даже тут есть много нюансов. Так как не за каждый просмотр вы получите денежное начисление и даже не за каждый клик.
В видео я детально обьяснил, за что youtube вам заплатит, а за что нет.
Cколько платит youtube за 1000 просмотров ? Точную цифру вычислить невозможно. Так как тут все зависит от того, сколько рекламодатель готов палатить. В среднем эта цифра составляет 1,5$. Довольно таки не большая сумма. Но как бонус пойдет)
Если у вас остались еще вопросы -- пишите их в комментариях. Я обязательно всем отвечу.
Так же подписывайтесь на канал, что бы всегда смотреть новые видео первыми и успешно развивать свои каналы.
http://www.youtube.com/subscri....ption_center?add_use
РУКОВОДСТВО ПО ПРОДВИЖЕНИЮ ВИДЕО
http://firstvideoseo.com/youtube/spetsotchet/
КНОПКА УВЕЛИЧЕНИЯ ПОДПИСЧИКОВ YOUTUBE:
http://firstvideoseo.com/youtube/podpis-knop-2/
Предыдущие видео:
Как раскрутить канал на YouTube - 7 основных МЕТОДОВ
https://www.youtube.com/watch?v=dEmumLWxLJM
Основные виды заработка на YouTube (серия 1)
https://www.youtube.com/watch?v=ON49q6MIRnk
Как изменить название канала YouTube БЫСТРО и ЛЕГКО
https://www.youtube.com/watch?v=wWTJ-DnBOLI
МУЗЫКА для видео YouTube, которую МОЖНО МОНЕТИЗИРОВАТЬ
https://www.youtube.com/watch?v=kSF6tgvP_5w
ПРИСОЕДИНЯЙТЕСЬ В СОЦ СЕТЯХ
Вконтакте http://vk.com/1videoseo
Facebook http://www.facebook.com/1videoseo
Twitter http://twitter.com/1videoseo
Google+ https://plus.google.com/+1videoseo
YouTube http://www.youtube.com/user/1videoseo
Сайт http://firstvideoseo.com
Cколько платит YouTube за 1000 просмотров
https://www.youtube.com/watch?v=0c2aLzdqgpM

Привет. Вчера на всех каналах YouTube упали просмотры почти в 2 раза. Но не стоит расстраиваться. На самом деле просмотры не упали, просто неправильно отображаются данные в аналитике творческой студии YouTube.
Поэтому не переживайте, это случилось не по вашей вине. Продолжайте и дальше продвигать свои каналы на YouTube и набирать просмотры на видео :) В скором времени эту ошибку исправят и аналитика вернется в нормальное русло.
Заказать личную консультацию у меня ➜ http://1010.su/v9
✉ Скачайте Чек-листы по оптимизации канала YouTube ➜ http://1010.su/v1
✉ Скачайте мою кнопку подписки ➜ http://1010.su/v3
ТЕЛЕГРАМ КАНАЛ https://t.me/firstvideoseo
Всем, привет. Сегодна расскажу о желтом значке монетизации и какие последствия для видео он несет. Расскажу режет ли YouTube продвижение видео с желтым значком монетизации или нет. Также покажу несколько способов, как вернуть монетизацию на видео, которое получило ограничения на показ рекламы. Приятного просмотра.
ПРИСОЕДИНЯЙТЕСЬ В СОЦ СЕТЯХ
Вконтакте http://vk.com/1videoseo
Facebook http://www.facebook.com/1videoseo
Twitter http://twitter.com/1videoseo
YouTube http://www.youtube.com/user/1videoseo
Сайт http://firstvideoseo.com
Видео снято на Samsung None 9
Звук - Sony ECM-77B

Когда лучше загружать видео на ютуб? Как выбрать лучшее время публикации на Вашем канале?
✉ Чек-листы по оптимизации канала YouTube ➜ http://1010.su/v1
Присоединяйтесь в мой Telegram канал ➜ https://t.me/firstvideoseo
Чтобы заказать платную консультацию у меня пишите в ВК: https://vk.com/sergy_voytyuk или на почту mail@firstvideoseo.com
ПРЕДЫДУЩЕЕ ВИДЕО:
►Алгоритмы работы YouTube: зачем они нужны и как работают? Выпуск №1 https://www.youtube.com/watch?v=498wMaDYBI0
►Продвижение видео на youtube. Как работает поисковый алгоритм YouTube? | Продвижение на YouTube №2 https://www.youtube.com/watch?v=Of7KiNj7JZo
►Как продвинуть видео на ютубе? КАК ПОПАДАТЬ В ПОХОЖИЕ ВИДЕО? | Продвижение на YouTube №3 https://www.youtube.com/watch?v=QiHNG95sPQE
►Как попасть в тренды ютуба? Алгоритм подбора видео | Продвижение на YouTube №4 https://www.youtube.com/watch?v=HlqtxUiEm80
►Как YouTube подбирает видео на Главную страницу? | Продвижение на YouTube №5 https://www.youtube.com/watch?v=c7JhnM1sf9M
►Оповещения на YouTube. Как сделать, что бы Ваши подписчики их получали? Как они работают? https://www.youtube.com/watch?v=jkJSH4VelBY
Если Вы хотите развить успешный канал на YouTube, тогда подписывайтесь на кана прямо сейчас: http://www.youtube.com/user/1v....ideoseo?sub_confirma
ПРИСОЕДИНЯЙТЕСЬ В СОЦ СЕТЯХ
Вконтакте http://vk.com/1videoseo
Facebook http://www.facebook.com/1videoseo
Twitter http://twitter.com/1videoseo
Google+ https://plus.google.com/+1videoseo
YouTube http://www.youtube.com/user/1videoseo
Сайт http://firstvideoseo.com
Доход YouTube.
Канал Тараса по юриспруденции https://www.youtube.com/channe....l/UCxS4p_IE2fQG5kJu9
Получите руководство по раскрутке видео на YouTube тут: http://firstvideoseo.com/
Подписывайтесь на канал, чтобы получать новые видео первыми: http://www.youtube.com/user/1v....ideoseo?sub_confirma
➊ 9 Проверенных Шагов Как Набрать 1000 Подписчиков на YouTube: https://www.youtube.com/watch?v=ViZVCctDHDw
➋ Когда стоит загружать видео, чтобы набрать больше просмотров? https://www.youtube.com/watch?v=4wDRZV686qE
➌ Content ID. Что делать, если поступила Заявка? На сколько это серьезно? https://www.youtube.com/watch?v=JgznTiJiks4
➍ Аннотации YouTube. Все что нужно знать, чтобы правильно их использовать. https://www.youtube.com/watch?v=cJmoxqpAS4A
ПРИСОЕДИНЯЙТЕСЬ В СОЦ СЕТЯХ
Вконтакте http://vk.com/1videoseo
Facebook http://www.facebook.com/1videoseo
Twitter http://twitter.com/1videoseo
Google+ https://plus.google.com/+1videoseo
YouTube http://www.youtube.com/user/1videoseo
Сайт http://firstvideoseo.com
Сколько раз можно смотреть свои видео не получив БАН о YouTube? Как правильно проверять комментарии?
✉ Скачайте Чек-листы по оптимизации канала YouTube ➜ http://1010.su/v1
Присоединяйтесь в мой Telegram канал ➜ https://t.me/firstvideoseo
Заказать личную консультацию у меня ➜ http://1010.su/v9
Привет. С вами Сергей Войтюк. Сегодня отвечаю на довольно интересный вопрос своего подписчика: Сколько раз можно просматривать видео, чтобы YouTube не посчитал это накруткой. И как правильно работать с комментариями на канале.
На самом деле вопрос может показаться банальным с точки зрения тех, кто уже давно раскручивает свой канал на YouTube. Но я часто его встречаю у новичков. Надеюсь это виео будет Вам полезно для продвижения канала на youtube.
Приятно просмотра.
Если Вы хотите развить успешный канал на YouTube, тогда подписывайтесь на канал прямо сейчас: http://www.youtube.com/user/1v....ideoseo?sub_confirma
Посмотрите еще видео с моего канала:
➜ Фильтр YouTube блокирует попадание в "ПОХОЖИЕ ВИДЕО". Что делать? https://www.youtube.com/watch?v=FUvkCHgGQKo
➜ Как заработать на ютубе с нуля МАЛЕНЬКОМУ КАНАЛУ? https://www.youtube.com/watch?v=1dt2YGssXUc
➜ Как увеличить просмотры на ютубе? Метод, который работает абсолютно для всех https://www.youtube.com/watch?v=-qb5JrETfWA
➜ Как увеличить время просмотра видео YouTube? 3 способа удержания зрителя для продвижение в youtube https://www.youtube.com/watch?v=wGyZpjIcGGo
ПРИСОЕДИНЯЙТЕСЬ В СОЦ СЕТЯХ
Вконтакте http://vk.com/1videoseo
Facebook http://www.facebook.com/1videoseo
Twitter http://twitter.com/1videoseo
Google+ https://plus.google.com/+1videoseo
YouTube http://www.youtube.com/user/1videoseo
Сайт http://firstvideoseo.com

Draw & COLOR at your own pace with Fun2draw APPs!
Apple: https://itunes.apple.com/artis....t/mei-yu/id674269351
Android: https://play.google.com/store/....apps/dev?id=64643504
Each Fun2draw App features NEVER-BEFORE-SEEN Fun2draw characters, with over 100 drawing & color steps available, plus my own easy voice instructions & tips! It's like having me as your very own portable art teacher on your mobile devices!
Each Collection in each app has 1 free character for you to try out. The rest of the characters in that Collection, in that app, are available for purchase.
See my Fun2draw APP INTRO video:http://youtu.be/4f6WS4sOfyI
---------------------------------------------
"How to draw a rose" in 5 ways under 4 min! Learn "how to draw easy rose" step by step :) "how to draw cool stuff but easy" - 100+ easy cartoon drawings: http://www.youtube.com/Fun2draw
Awesome Fun2draw playlists:
How to Draw Valentines, Love & Romantic Cartoons
http://www.youtube.com/playlis....t?list=PLC52EB3AAE6A
How to Draw Roses & Flowers
http://www.youtube.com/playlis....t?list=PL3C2D4695824
How to Draw Horses, Unicorns & Pegasus
http://www.youtube.com/playlis....t?list=PLB94D377B1AD
How to Draw Bunny Rabbits
http://www.youtube.com/playlis....t?list=PL17198401144
How to Draw Pets
http://www.youtube.com/playlis....t?list=PLBC2638D9ACE
LIKE Fun2draw on Facebook: http://www.facebook.com/Fun2draw
Mei Yu, a Canadian artist and how to draw cartoon book author, shows you "how to draw roses step by step" . I hope this "art tutorial" will make it easier for you when you're "drawing roses" for "Valentine's day", "Mother's day", birthdays, and anniversaries. You can also "draw a Valentines rose" for your boy friend, girl friend, best friend, sweet heart, honey, mom, dad, grand ma, grand pa, lover, your Valentine, or just to say "Be my Valentine". "How to draw flowers" is easy in this simple drawing tutorial :)
Watch more "how to draw cartoons" and romantic designs at the Fun2draw youtube channel: http://www.youtube.com/fun2draw
BEFORE YOU REQUEST please read the INFO REGARDING REQUESTS:
Please note I just DON'T have the time to draw everyone's requests. Also, I cannot promise to draw anyone's request as soon as they want, or as exactly as they want. Your request may not get drawn at all.
I won't be able to reply to every comment. Also, I won't be able to tell you whether or when I'm going to draw your request or not. Thanks for understanding!
Disrespectful comments will not be considered and may be removed.
---------- COPYRIGHT NOTICE -------------
Fun2draw, its logo, videos, drawings, characters, and their distinctive likeness belong to Mei Yu, and are protected by Copyright Laws. ANY COMMERCIAL USE IS STRICTLY PROHIBITED. Please report any copyright violations to Mei Yu by personal message.

Watch me draw & color LIVE 20 requests! New live stream art challenge fun art video. Watch more new inspirational art challenges and fun art videos on my Fun2draw art channel!
Shop Mei Yu's Art Merchandise on Zazzle:
US + Int:
https://www.zazzle.com/meiyuart*
UK and Europe:
https://www.zazzle.co.uk/meiyuart*
Canada:
https://www.zazzle.ca/meiyuart*
Australia:
https://www.zazzle.com.au/meiyuart*
DRAW + COLOR with Fun2draw Apps!
- Apple: https://itunes.apple.com/artis....t/mei-yu/id674269351
- Android: https://play.google.com/store/....apps/dev?id=64643504
MeiYuArt channel:
https://www.youtube.com/user/meiyuart/videos

Draw & COLOR at your own pace with Fun2draw APPs!
Apple: https://itunes.apple.com/artis....t/mei-yu/id674269351
Android: https://play.google.com/store/....apps/dev?id=64643504
Each Fun2draw App features NEVER-BEFORE-SEEN Fun2draw characters, with over 100 drawing & color steps available, plus my own easy voice instructions & tips! It's like having me as your very own portable art teacher on your mobile devices!
Each Collection in each app has 1 free character for you to try out. The rest of the characters in that Collection, in that app, are available for purchase.
See my Fun2draw APP INTRO video:http://youtu.be/4f6WS4sOfyI
--------------------------------
NEW videos every THURSDAY & SATURDAY
Become a Fun2drawer!
SUBSCRIBE: http://www.youtube.com/subscri....ption_center?add_use
How to draw a cute cartoon parrot in 1 min! Mei Yu shows you how to draw a chibi cartoon bird step by step in this easy drawing tutorial. 100+ how to draw animals / people: http://www.youtube.com/fun2draw
----- AWESOME Fun2draw playlists: --------
Uploaded Videos
http://www.youtube.com/playlis....t?list=UUFf_ebUsE0QH
Fun2draw Halloween:
http://www.youtube.com/playlis....t?list=PLppWsG9UuVI9
Celebrity Chibi Drawings! (Super Cute & Easy)
http://www.youtube.com/playlis....t?list=PLppWsG9UuVI-
Draw Cute Baby Animals!
http://www.youtube.com/playlis....t?list=PLCBDD2772D28
Draw Horses, Unicorns & Pegasus!
http://www.youtube.com/playlis....t?list=PLB94D377B1AD
Draw Cartoon People!
http://www.youtube.com/playlis....t?list=PLF154B123208
Draw Dragons!
http://www.youtube.com/playlis....t?list=PL6D61D9B57C7
Draw Fantasy Characters!
http://www.youtube.com/playlis....t?list=PLB23465365E1
Draw Wild Animals!
http://www.youtube.com/playlis....t?list=PL3B3DAEBF471
Draw CUTE Pets!
http://www.youtube.com/playlis....t?list=PLBC2638D9ACE
Draw Cool Graffiti & Bubble LETTERS!
http://www.youtube.com/playlis....t?list=PLppWsG9UuVI-
Draw CUTE Food!
http://www.youtube.com/playlis....t?list=PLppWsG9UuVI9
Draw Monsters, Beasts & Aliens!
http://www.youtube.com/playlis....t?list=PLppWsG9UuVI9
Draw Kitty Cats, Lions and Tigers!
http://www.youtube.com/playlis....t?list=PLCD71AC61C34
Draw Puppy Dogs!
http://www.youtube.com/playlis....t?list=PLA2FF3D49311
~~~~~ EVERY SINGLE Fun2draw Playlist here: ~~~~~
http://www.youtube.com/user/Fun2draw/videos?flow=grid&view=1
----------------------------------
FACEBOOK: http://www.facebook.com/Fun2draw
TWITTER: http://www.twitter.com/Fun2draw
-----------------------------------
More easy cute & cool drawing lessons (including more "how to draw a bird" videos) : http://www.youtube.com/Fun2draw
Please leave a LIKE and comment! ^____^
BEFORE YOU REQUEST please read the INFO REGARDING REQUESTS:
Please note I just DON'T have the time to draw everyone's requests. Also, I cannot promise to draw anyone's request as soon as they want, or as exactly as they want. Your request may not get drawn at all.
I won't be able to reply to every comment. Also, I won't be able to tell you whether or when I'm going to draw your request or not. Thanks for understanding!
Disrespectful comments will not be considered and may be removed.
---------- COPYRIGHT NOTICE -------------
Fun2draw, its logo, videos, drawings, characters, and their distinctive likeness belong to Mei Yu, and are protected by Copyright Laws. ANY COMMERCIAL USE IS STRICTLY PROHIBITED. Please report any copyright violations to Mei Yu by personal message.

Drawing famous cartoon and game characters in REAL LIFE Challenge! This new inspirational art challenge is one of Fun2draw's popular art challenges. Watch her draw and color, colour, by hand. A great realism art challenge and fun art video.
SUBSCRIBE http://www.youtube.com/subscri....ption_center?add_use
Shop 1000+ Mei Yu's Art Merchandise:
US + Int:
https://www.zazzle.com/meiyuart*
UK and Europe:
https://www.zazzle.co.uk/meiyuart*
Canada:
https://www.zazzle.ca/meiyuart*
DRAW + COLOR with Fun2draw Apps!
- Apple: https://itunes.apple.com/artis....t/mei-yu/id674269351
- Android: https://play.google.com/store/....apps/dev?id=64643504
Music:
Evil March by Kevin MacLeod is licensed under a Creative Commons Attribution license (https://creativecommons.org/licenses/by/4.0/)
Source: http://incompetech.com/music/r....oyalty-free/index.ht
Artist: http://incompetech.com/
Music from the YouTube Audio Library
https://www.youtube.com/audiolibrary
Mei Yu on TV:
http://www.cbc.ca/news/canada/....british-columbia/loo
Learn how to draw a realistic eye step by step in this easy art tutorial video! Draw pretty eyes. Watch how to draw more easy to advanced art lessons on my Fun2draw channel.
Shop 1000+ Mei Yu's Art Merchandise:
US + Int:
https://www.zazzle.com/meiyuart*
UK and Europe:
https://www.zazzle.co.uk/meiyuart*
Canada:
https://www.zazzle.ca/meiyuart*
DRAW + COLOR with Fun2draw Apps!
- Apple: https://itunes.apple.com/artis....t/mei-yu/id674269351
- Android: https://play.google.com/store/....apps/dev?id=64643504
Music from the YouTube Audio Library
https://www.youtube.com/audiolibrary

Art for kids & beginners - How to Draw step by step easy! This drawing tutorial shows you how to draw cute food (jellybean candy). SUBSCRIBE http://www.youtube.com/subscri....ption_center?add_use Draw & COLOR at your own pace with Fun2draw APPs! Apple: https://itunes.apple.com/artis....t/mei-yu/id674269351 Android: https://play.google.com/store/....apps/dev?id=64643504
*NOTE: App selection may vary by store.
Each Fun2draw App features NEVER-BEFORE-SEEN Fun2draw characters, with over 100 drawing & color steps available, plus my own easy voice instructions & tips! It's like having me as your very own portable art teacher on your mobile devices!
Each Collection in each app has 1 free character for you to try out. The rest of the characters in that Collection, in that app, are available for purchase. Each Collection in each app is sold separately.
See my latest Fun2draw APP video:
http://youtu.be/p1usr0weBWk
--------------------------------------------
Learn how to draw easy! In this easy drawing, you can learn to draw a cute jellybean candy / snack as a cute kawaii character with big cartoon eyes step by step from the popular Youtube art channel Fun2draw!
It's Simple! It's Quick! It's Fun2draw!
This cartoon art lesson is great for beginners, kids, children, teens and artists of all ages & skill levels.
Other best and popular online art lessons from Fun2draw include drawings of the Fun2draw watermelon, popsicle, ice cream, cake pop, Fun2draw chocolate bar, apple, strawberry, smoothie, lemonade (summer drink), soda pop drink (soft drink), fast food like pizza, cute fries and a Fun2draw hamburger, bacon, waffle, cupcake, cake slice, Halloween lollipop, candy corn, hot chocolate, heart lollipop and more!
Fun2draw shows you how to draw easy things, cute cartoons, animals, food, kawaii things, Holidays, chibi people, celebrities, movie, cartoon and game characters, in MINUTES!
450 + easy things to draw, popular cartoon videos & art lesson tutorials here: http://www.youtube.com/fun2draw
SUBSCRIBE so you won't miss new videos!
http://www.youtube.com/subscri....ption_center?add_use
----- AWESOME Fun2draw playlists: --------
Uploaded Videos
http://www.youtube.com/playlis....t?list=UUFf_ebUsE0QH
Celebrity Chibi Drawings! (Super Cute & Easy)
http://www.youtube.com/playlis....t?list=PLppWsG9UuVI-
Draw Cute Baby Animals!
http://www.youtube.com/playlis....t?list=PLCBDD2772D28
Draw Horses, Unicorns & Pegasus!
http://www.youtube.com/playlis....t?list=PLB94D377B1AD
Draw Cartoon People!
http://www.youtube.com/playlis....t?list=PLF154B123208
Draw Dragons!
http://www.youtube.com/playlis....t?list=PL6D61D9B57C7
Draw Fantasy Characters!
http://www.youtube.com/playlis....t?list=PLB23465365E1
Draw Wild Animals!
http://www.youtube.com/playlis....t?list=PL3B3DAEBF471
Draw CUTE Pets!
http://www.youtube.com/playlis....t?list=PLBC2638D9ACE
Draw Cool Graffiti & Bubble LETTERS!
http://www.youtube.com/playlis....t?list=PLppWsG9UuVI-
Draw CUTE Food!
http://www.youtube.com/playlis....t?list=PLppWsG9UuVI9
Draw Monsters, Beasts & Aliens!
http://www.youtube.com/playlis....t?list=PLppWsG9UuVI9
Draw Kitty Cats, Lions and Tigers!
http://www.youtube.com/playlis....t?list=PLCD71AC61C34
Draw Puppy Dogs!
http://www.youtube.com/playlis....t?list=PLA2FF3D49311
~~~~~ EVERY SINGLE Fun2draw Playlist here: ~~~~~
https://www.youtube.com/user/Fun2draw/playlists
----------------------------------
FACEBOOK: http://www.facebook.com/Fun2draw
TWITTER: http://www.twitter.com/Fun2draw
-----------------------------------
INFO REGARDING REQUESTS:
Due to lots of requests, I don't have the time to do everyone's. There's a chance your request may not get done at all. Thanks for understanding :)
---------- COPYRIGHT / TRADEMARK NOTICE -------------
Fun2draw, its logo, videos, drawings, characters, and their distinctive likeness belong to Mei Yu, and are protected by Copyright & Trademark Laws. ANY COMMERCIAL USE IS STRICTLY PROHIBITED. Please report any copyright & trademark violations to Mei Yu by personal message.
Draw & COLOR at your own pace with Fun2draw APPs!
Apple: https://itunes.apple.com/artis....t/mei-yu/id674269351
Android: https://play.google.com/store/....apps/dev?id=64643504
Each Fun2draw App features NEVER-BEFORE-SEEN Fun2draw characters, with over 100 drawing & color steps available, plus my own easy voice instructions & tips! It's like having me as your very own portable art teacher on your mobile devices!
Each Collection in each app has 1 free character for you to try out. The rest of the characters in that Collection, in that app, are available for purchase.
See my Fun2draw APP INTRO video here:http://youtu.be/4f6WS4sOfyI
------------------------------------
Learn how to draw cartoon characters in this easy drawing tutorial, step by step! 100 + art lessons, cartoon drawings & videos (farm animals, pets, zoo animals) : http://www.youtube.com/fun2draw
Awesome Fun2draw playlists:
Uploaded Videos
http://www.youtube.com/playlis....t?list=UUFf_ebUsE0QH
How to Draw Cute Baby Animals!
http://www.youtube.com/playlis....t?list=PLCBDD2772D28
How to Draw Farm Animals
http://www.youtube.com/playlis....t?list=PL7106735E110
How to Draw Cartoon People
http://www.youtube.com/playlis....t?list=PLF154B123208
How to Draw Dragons!
http://www.youtube.com/playlis....t?list=PL6D61D9B57C7
How to Draw Wild Animals
http://www.youtube.com/playlis....t?list=PL3B3DAEBF471
How to Draw Pets
http://www.youtube.com/playlis....t?list=PLBC2638D9ACE
LIKE Fun2draw on Facebook :) http://www.facebook.com/Fun2draw
Watch and request more "how to draw animals" and "how to draw people" on the Fun2draw youtube channel!
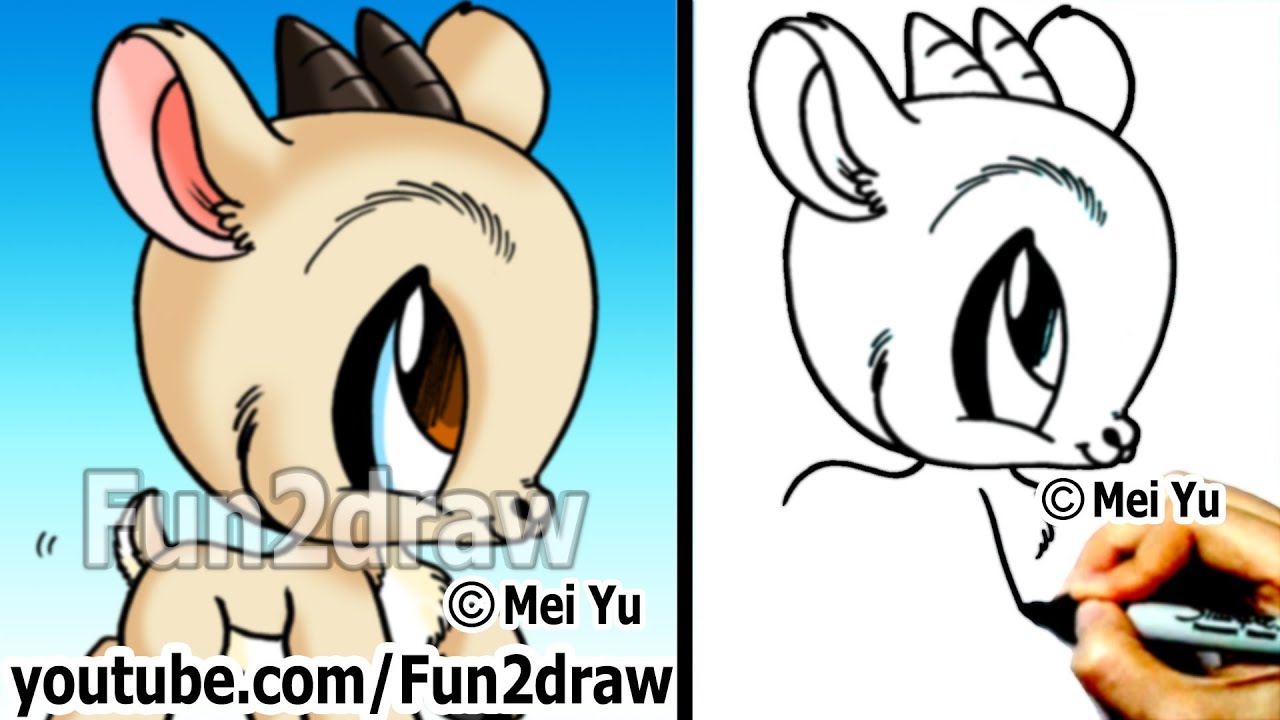
Fun2draw is created by Mei Yu, a Canadian artist, "how to draw cartoons" and "how to draw anime" instructor. In this easy cartoon drawing lesson, she shows you how to draw a cute cartoon baby goat step by step. How to draw a cartoon animal is easy and simple in this drawing tutorial - great for beginners or aspiring artists with some drawing experience.
Try to draw this little goat with the other livestock / farm animals from Fun2draw's channel: the pig, cow, sheep, donkey, chicken, horse & pig! http://www.youtube.com/Fun2draw
BEFORE YOU REQUEST please read the INFO REGARDING REQUESTS:
Please note I just DON'T have the time to draw everyone's requests. Also, I cannot promise to draw anyone's request as soon as they want, or as exactly as they want. Your request may not get drawn at all.
I won't be able to reply to every comment. Also, I won't be able to tell you whether or when I'm going to draw your request or not. Thanks for understanding!
Disrespectful comments will not be considered and may be removed.
---------- COPYRIGHT NOTICE -------------
Fun2draw, its logo, videos, drawings, characters, and their distinctive likeness belong to Mei Yu, and are protected by Copyright Laws. ANY COMMERCIAL USE IS STRICTLY PROHIBITED. Please report any copyright violations to Mei Yu by personal message.
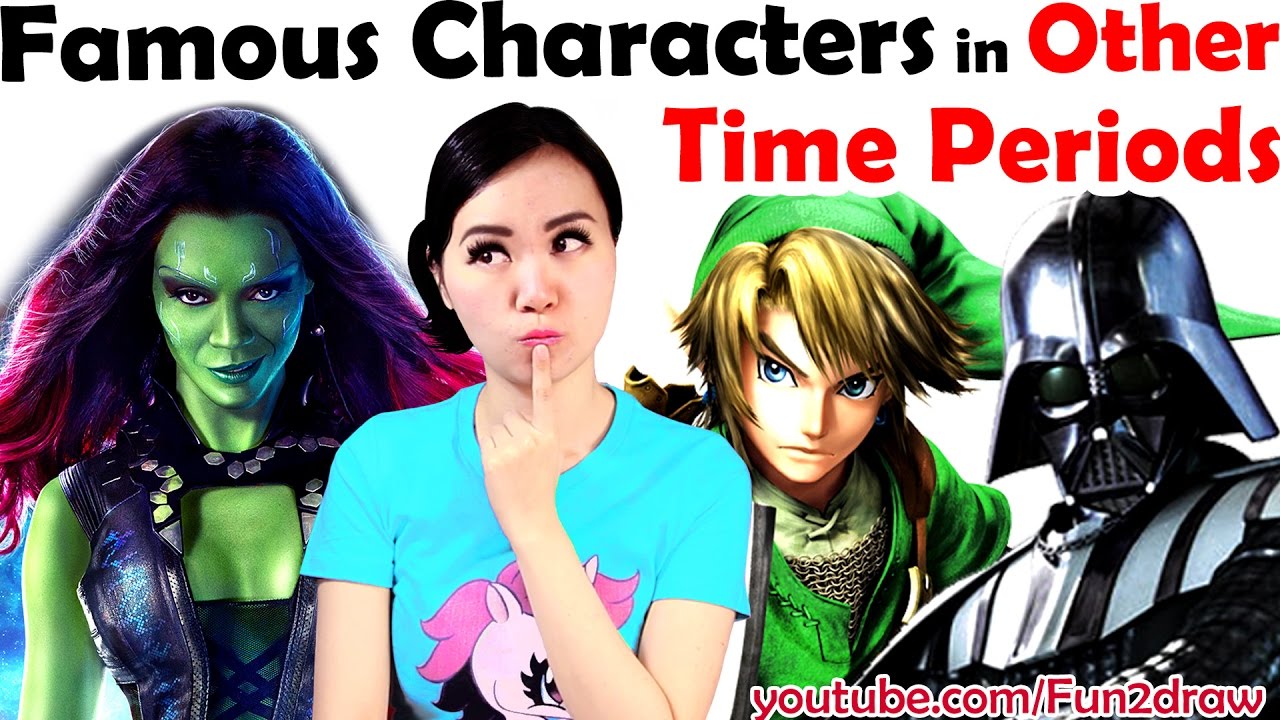
A new art challenge by Mei Yu. Draw and colour, color famous characters in art as in Renaissance, Medieval, and Modern times. More new inspirational art challenges and art videos on my Fun2draw art channel.
Shop 1000+ Mei Yu's Art Merchandise:
US + Int:
https://www.zazzle.com/meiyuart*
UK and Europe:
https://www.zazzle.co.uk/meiyuart*
Canada:
https://www.zazzle.ca/meiyuart*
DRAW + COLOR with Fun2draw Apps!
- Apple: https://itunes.apple.com/artis....t/mei-yu/id674269351
- Android: https://play.google.com/store/....apps/dev?id=64643504
MeiYuArt channel:
https://www.youtube.com/user/meiyuart/videos
Music:
Hero's Theme by Twin Musicom is licensed under a Creative Commons Attribution license (https://creativecommons.org/licenses/by/4.0/)
Source: http://www.twinmusicom.org/song/280/heros-theme
Artist: http://www.twinmusicom.org
Death of Kings 2 by Kevin MacLeod is licensed under a Creative Commons Attribution license (https://creativecommons.org/licenses/by/4.0/)
Source: http://incompetech.com/music/r....oyalty-free/index.ht
Artist: http://incompetech.com/
Cut and Dry - Electronic Hard by Kevin MacLeod is licensed under a Creative Commons Attribution license (https://creativecommons.org/licenses/by/4.0/)
Source: http://incompetech.com/music/royalty-free/index.html?isrc=USUAN1100852
Artist: http://incompetech.com/
Stopping By the Inn by Twin Musicom is licensed under a Creative Commons Attribution license (https://creativecommons.org/licenses/by/4.0/)
Source: http://www.twinmusicom.org/song/298/stopping-by-the-inn
Artist: http://www.twinmusicom.org
Long Road Ahead by Kevin MacLeod is licensed under a Creative Commons Attribution license (https://creativecommons.org/licenses/by/4.0/)
Source: http://incompetech.com/music/royalty-free/index.html?isrc=USUAN1100588
Artist: http://incompetech.com/
Music from the YouTube Audio Library
https://www.youtube.com/audiolibrary

Draw & COLOR at your own pace with Fun2draw APPs!
Apple: https://itunes.apple.com/artis....t/mei-yu/id674269351
Android: https://play.google.com/store/....apps/dev?id=64643504
*NOTE: App selection may vary by store.
Each Fun2draw App features NEVER-BEFORE-SEEN Fun2draw characters, with over 100 drawing & color steps available, plus my own easy voice instructions & tips! It's like having me as your very own portable art teacher on your mobile devices!
Each Collection in each app has 1 free character for you to try out. The rest of the characters in that Collection, in that app, are available for purchase. Each Collection in each app is sold separately.
See my latest Fun2draw APP video:
http://youtu.be/p1usr0weBWk
--------------------------------------------
Learn how to draw Rapunzel from Disney's Tangled as a cute kawaii cartoon character with Fun2draw eyes step by step in this easy drawing tutorial from the drawing channel Fun2draw! Draw Rapunzel with her long, beautiful hairstyle, pretty dress, and cute pose! Also learn how to draw a girl, a girl's body, and a girl's face and hair easily in this art lesson.
It's Simple! It's Quick! It's Fun2draw!
This cartoon art lesson is great for beginners, kids, children, teens and artists of all ages & skill levels.
Other online art lessons from Fun2draw include drawings of cute princesses with pretty dresses and hairstyles, like the Fun2draw Anna and Elsa from Frozen, Snow White, Cinderella, a Fairy Princess, a chibi mermaid and a Butterfly Fairy girl! Make your own Fairy Tales picture, an enchanted scene or a royal, magical drawing!
Fun2draw shows you how to draw easy things, cute cartoons, animals, food, kawaii things, Holidays, chibi people, celebrities, movie, cartoon and game characters, in MINUTES!
400 + easy things to draw & cartoon art tutorials here: http://www.youtube.com/fun2draw
NEW video every week :)
Become a Fun2drawer!
SUBSCRIBE: http://www.youtube.com/subscri....ption_center?add_use
----- AWESOME Fun2draw playlists: --------
Uploaded Videos
http://www.youtube.com/playlis....t?list=UUFf_ebUsE0QH
Celebrity Chibi Drawings! (Super Cute & Easy)
http://www.youtube.com/playlis....t?list=PLppWsG9UuVI-
Draw Cute Baby Animals!
http://www.youtube.com/playlis....t?list=PLCBDD2772D28
Draw Horses, Unicorns & Pegasus!
http://www.youtube.com/playlis....t?list=PLB94D377B1AD
Draw Cartoon People!
http://www.youtube.com/playlis....t?list=PLF154B123208
Draw Dragons!
http://www.youtube.com/playlis....t?list=PL6D61D9B57C7
Draw Fantasy Characters!
http://www.youtube.com/playlis....t?list=PLB23465365E1
Draw Wild Animals!
http://www.youtube.com/playlis....t?list=PL3B3DAEBF471
Draw CUTE Pets!
http://www.youtube.com/playlis....t?list=PLBC2638D9ACE
Draw Cool Graffiti & Bubble LETTERS!
http://www.youtube.com/playlis....t?list=PLppWsG9UuVI-
Draw CUTE Food!
http://www.youtube.com/playlis....t?list=PLppWsG9UuVI9
Draw Monsters, Beasts & Aliens!
http://www.youtube.com/playlis....t?list=PLppWsG9UuVI9
Draw Kitty Cats, Lions and Tigers!
http://www.youtube.com/playlis....t?list=PLCD71AC61C34
Draw Puppy Dogs!
http://www.youtube.com/playlis....t?list=PLA2FF3D49311
~~~~~ EVERY SINGLE Fun2draw Playlist here: ~~~~~
http://www.youtube.com/user/Fun2draw/videos?flow=grid&view=1
----------------------------------
FACEBOOK: http://www.facebook.com/Fun2draw
TWITTER: http://www.twitter.com/Fun2draw
-----------------------------------
INFO REGARDING REQUESTS:
Due to lots of requests, I don't have the time to do everyone's. There's a chance your request may not get done at all. Thanks for understanding :)
---------- COPYRIGHT / TRADEMARK NOTICE -------------
Fun2draw, its logo, videos, drawings, characters, and their distinctive likeness belong to Mei Yu, and are protected by Copyright & Trademark Laws. ANY COMMERCIAL USE IS STRICTLY PROHIBITED. Please report any copyright & trademark violations to Mei Yu by personal message.

Fun Things to Do, to See, to Draw in LEGOLAND - Travel with Artist Vlog #1. Travel with me, Mei Yu, in this travel video. See inspirational travel art - how I draw Lego Movie & Lego Friends characters on the spot, build with Lego, go on fun rides, shop at Lego stores, stay at LEGOLAND Florida Hotel + Lego displays. Thank you to David & LEGOLAND Florida staff for their assistance and their permission for using some of their photos in this video. ❤ SUBSCRIBE http://www.youtube.com/subscri....ption_center?add_use
Draw & COLOR at your own pace with Fun2draw APPs! ✿ Apple: https://itunes.apple.com/artis....t/mei-yu/id674269351 ✿ Android: https://play.google.com/store/....apps/dev?id=64643504
End Card Links:
- SUBSCRIBE to Fun2draw for new videos! http://www.youtube.com/user/Fu....n2draw?sub_confirmat
- Fun2draw Copic vs Crayola Challenge:
https://www.youtube.com/watch?v=VEwM2Ji_1CA&index=18&list=UL7n2J1jSnbcw
- Fun2draw Dollar Store Marker Challenge:
https://www.youtube.com/watch?v=7n2J1jSnbcw&list=ULFU3H884j79A&index=10
- Fun2draw Intense 1 Minute Drawing Challenge:
https://www.youtube.com/watch?v=FU3H884j79A&list=UL
INFO REGARDING REQUESTS:
Due to lots of requests, I don't have the time to do everyone's. There's a chance your request may not get done at all. Thanks for understanding :)
MUSIC:
8-Bit March by Twin Musicom is licensed under a Creative Commons Attribution license (https://creativecommons.org/licenses/by/4.0/)
Artist: http://www.twinmusicom.org/
Green Monday by Twin Musicom is licensed under a Creative Commons Attribution license (https://creativecommons.org/licenses/by/4.0/)
Artist: http://www.twinmusicom.org/
Vanishing Horizon by Audionautix is licensed under a Creative Commons Attribution license (https://creativecommons.org/licenses/by/4.0/)
Artist: http://audionautix.com/
Eighties Action by Kevin MacLeod is licensed under a Creative Commons Attribution license (https://creativecommons.org/licenses/by/4.0/)
Source: http://incompetech.com/music/r....oyalty-free/index.ht
Artist: http://incompetech.com/
Music from the Youtube Audio Library
https://www.youtube.com/audiolibrary
---------- COPYRIGHT / TRADEMARK NOTICE -------------
Fun2draw, its logo, videos, drawings, characters, and their distinctive likeness belong to Mei Yu, and are protected by Copyright & Trademark Laws. ANY COMMERCIAL USE IS STRICTLY PROHIBITED. Please report any copyright & trademark violations to Mei Yu by personal message.

Draw & COLOR at your own pace with Fun2draw APPs!
Apple: https://itunes.apple.com/artis....t/mei-yu/id674269351
Android: https://play.google.com/store/....apps/dev?id=64643504
Each Fun2draw App features NEVER-BEFORE-SEEN Fun2draw characters, with over 100 drawing & color steps available, plus my own easy voice instructions & tips! It's like having me as your very own portable art teacher on your mobile devices!
Each Collection in each app has 1 free character for you to try out. The rest of the characters in that Collection, in that app, are available for purchase. Each Collection in each app is sold separately.
See my latest Fun2draw APP video:
http://youtu.be/p1usr0weBWk
--------------------------------------------
Learn how to draw a cute cartoon Sunflower for Mom for her birthday, for Mother's Day, or for summer! Make your own pictures with Fun2draw's cute easy cartoon drawing lessons and art tutorials.
Draw this cute kawaii flower with the other Fun2draw flowers, hearts, and summer characters, like the rose, flower heart with "Mom" letters inside, love hearts, sun, hummingbird, hula girl, summer beach girl in a bathing suit, watermelon, popsicle, lemonade, soda pop drink, ice cream or bear girl in a rainbow skirt!
How to draw easy things, cute cartoons, animals, food, kawaii things, chibi people and cartoon celebrities with Fun2draw!
300 + easy things to draw & cartoon art tutorials here: http://www.youtube.com/fun2draw
NEW video every week :)
Become a Fun2drawer!
SUBSCRIBE: http://www.youtube.com/subscri....ption_center?add_use
----- AWESOME Fun2draw playlists: --------
Uploaded Videos
http://www.youtube.com/playlis....t?list=UUFf_ebUsE0QH
Celebrity Chibi Drawings! (Super Cute & Easy)
http://www.youtube.com/playlis....t?list=PLppWsG9UuVI-
Draw Cute Baby Animals!
http://www.youtube.com/playlis....t?list=PLCBDD2772D28
Draw Horses, Unicorns & Pegasus!
http://www.youtube.com/playlis....t?list=PLB94D377B1AD
Draw Cartoon People!
http://www.youtube.com/playlis....t?list=PLF154B123208
Draw Dragons!
http://www.youtube.com/playlis....t?list=PL6D61D9B57C7
Draw Fantasy Characters!
http://www.youtube.com/playlis....t?list=PLB23465365E1
Draw Wild Animals!
http://www.youtube.com/playlis....t?list=PL3B3DAEBF471
Draw CUTE Pets!
http://www.youtube.com/playlis....t?list=PLBC2638D9ACE
Draw Cool Graffiti & Bubble LETTERS!
http://www.youtube.com/playlis....t?list=PLppWsG9UuVI-
Draw CUTE Food!
http://www.youtube.com/playlis....t?list=PLppWsG9UuVI9
Draw Monsters, Beasts & Aliens!
http://www.youtube.com/playlis....t?list=PLppWsG9UuVI9
Draw Kitty Cats, Lions and Tigers!
http://www.youtube.com/playlis....t?list=PLCD71AC61C34
Draw Puppy Dogs!
http://www.youtube.com/playlis....t?list=PLA2FF3D49311
~~~~~ EVERY SINGLE Fun2draw Playlist here: ~~~~~
http://www.youtube.com/user/Fun2draw/videos?flow=grid&view=1
----------------------------------
FACEBOOK: http://www.facebook.com/Fun2draw
TWITTER: http://www.twitter.com/Fun2draw
-----------------------------------
INFO REGARDING REQUESTS:
Due to lots of requests, I don't have the time to do everyone's. There's a chance your request may not get done at all. Thanks for understanding :)
---------- COPYRIGHT NOTICE -------------
Fun2draw, its logo, videos, drawings, characters, and their distinctive likeness belong to Mei Yu, and are protected by Copyright & Trademark Laws. ANY COMMERCIAL USE IS STRICTLY PROHIBITED. Please report any copyright & trademark violations to Mei Yu by personal message.
Draw & COLOR at your own pace with Fun2draw APPs!
Apple: https://itunes.apple.com/artis....t/mei-yu/id674269351
Android: https://play.google.com/store/....apps/dev?id=64643504
Each Fun2draw App features NEVER-BEFORE-SEEN Fun2draw characters, with over 100 drawing & color steps available, plus my own easy voice instructions & tips! It's like having me as your very own portable art teacher on your mobile devices!
Each Collection in each app has 1 free character for you to try out. The rest of the characters in that Collection, in that app, are available for purchase.
See my Fun2draw APP INTRO video here:http://youtu.be/4f6WS4sOfyI
--------------------------------------------
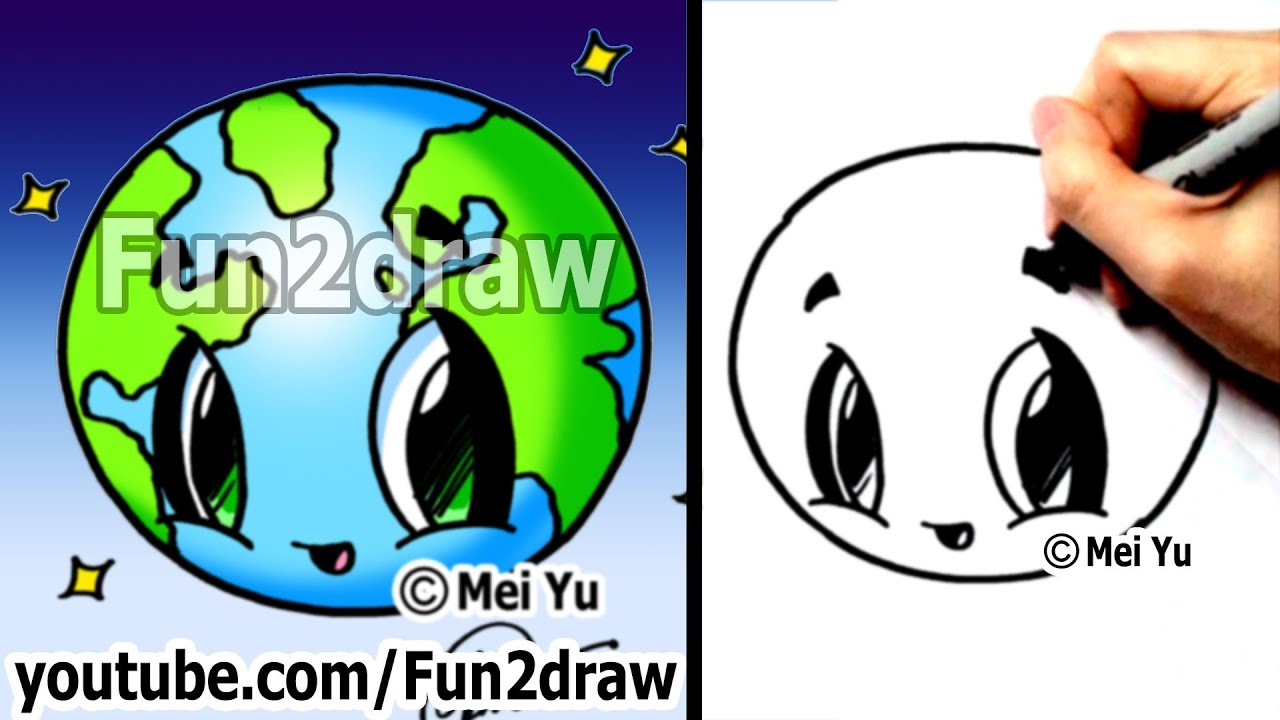
Go GREEN and draw our beautiful blue planet for Earth Day, school, recycling projects or friends! 100 + easy cartoon art lessons & drawings: http://www.youtube.com/fun2draw
NEW videos every THURSDAY & SATURDAY
SUBSCRIBE so you can be among the first to see them: http://www.youtube.com/subscri....ption_center?add_use
It'll be Fun2draw this cute planet Earth with the other kawaii things from Fun2draw's youtube channel, like the sun, star, cloud, flower, or the many cute endangered animals. http://www.youtube.com/Fun2draw
TIPS FOR A GREENER ENVIRONMENT:
Ways to save our planet, protect our environment, go green, save elecriticy and cut down on pollution:
1) Always turn lights, computers, electronics, lamps, appliances and other things off when they're not in use.
2) Try reusing plastic bags for shopping, carrying your lunch, or organize stuff :)
3) Reduce waste by recycling plastics and other recyclable items. Reduce landfill pollution by composting food waste.
4) If you can, ride a bike or walk instead of taking public transportation or the car - it's good exercise, too!
5) Plant a tree :D
Hopefully we can reduce our carbon footprint, help clean our air, our homes and communities, and pave the way to using more efficient, clean energy so future generations can benefit from our beautiful planet Earth =)
Check out some other cute Fun2draw drawings as well:
----- AWESOME Fun2draw playlists: --------
Uploaded Videos
http://www.youtube.com/playlis....t?list=UUFf_ebUsE0QH
Celebrity Chibi Drawings! (Super Cute & Easy)
http://www.youtube.com/playlis....t?list=PLppWsG9UuVI-
How to Draw Cute Baby Animals!
http://www.youtube.com/playlis....t?list=PLCBDD2772D28
How to Draw Horses, Unicorns & Pegasus
http://www.youtube.com/playlis....t?list=PLB94D377B1AD
How to Draw Cartoon People
http://www.youtube.com/playlis....t?list=PLF154B123208
How to Draw Dragons!
http://www.youtube.com/playlis....t?list=PL6D61D9B57C7
How to Draw Fantasy Characters
http://www.youtube.com/playlis....t?list=PLB23465365E1
How to Draw Wild Animals
http://www.youtube.com/playlis....t?list=PL3B3DAEBF471
How to Draw Pets
http://www.youtube.com/playlis....t?list=PLBC2638D9ACE
How to Draw Cool Graffiti & Bubble LETTERS!
http://www.youtube.com/playlis....t?list=PLppWsG9UuVI-
How to Draw CUTE Food!
http://www.youtube.com/playlis....t?list=PLppWsG9UuVI9
How to Draw Monsters, Beasts & Aliens!
http://www.youtube.com/playlis....t?list=PLppWsG9UuVI9
How to Draw Kitty Cats, Lions and Tigers
http://www.youtube.com/playlis....t?list=PLCD71AC61C34
How to Draw Puppy Dogs!
http://www.youtube.com/playlis....t?list=PLA2FF3D49311
~~~~~ See EVERY SINGLE Fun2draw Playlist here: ~~~~~
http://www.youtube.com/user/Fun2draw/videos?flow=grid&view=1
----------------------------------
FACEBOOK: http://www.facebook.com/Fun2draw
TWITTER: http://www.twitter.com/Fun2draw
* you can also request on these social networks, too!
-----------------------------------
Watch and request more "how to draw animals" and "how to draw people" on the Fun2draw youtube channel!
Fun2draw is created by Mei Yu, a Canadian artist, "how to draw cartoons" and "how to draw anime" instructor.
BEFORE YOU REQUEST please read the INFO REGARDING REQUESTS:
Please note I just DON'T have the time to draw everyone's requests. Also, I cannot promise to draw anyone's request as soon as they want, or as exactly as they want. Your request may not get drawn at all.
I won't be able to reply to every comment. Also, I won't be able to tell you whether or when I'm going to draw your request or not. Thanks for understanding!
Disrespectful comments will not be considered and may be removed.
---------- COPYRIGHT NOTICE -------------
Fun2draw, its logo, videos, drawings, characters, and their distinctive likeness belong to Mei Yu, and are protected by Copyright Laws. ANY COMMERCIAL USE IS STRICTLY PROHIBITED. Please report any copyright violations to Mei Yu by personal message.
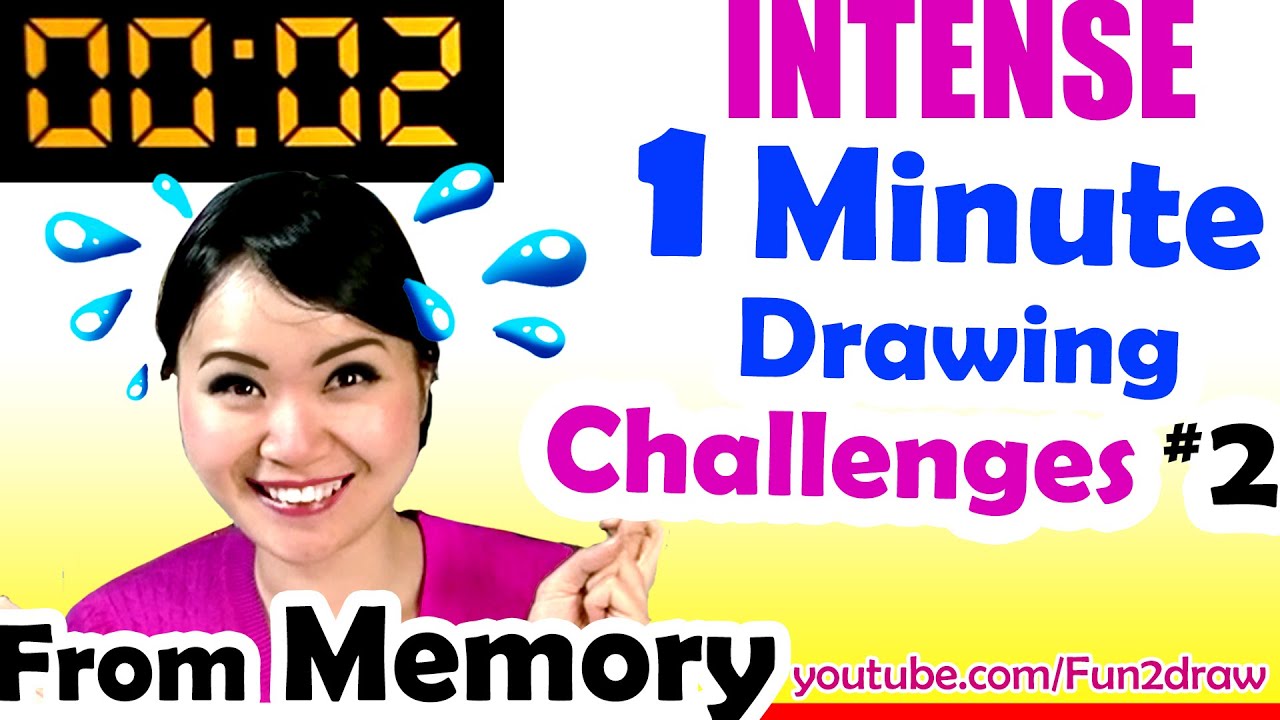
Real time art challenge in one minute or less! Popular artist Mei Yu draws famous movie, cartoon & game characters in 1 minute real time, from memory! A fun inspirational Drawing challenge from Art Channel Fun2draw ❤ dibujar, vídeo de la diversión del arte, dibujo, dibujos de la historieta ❤ SUBSCRIBE http://www.youtube.com/subscri....ption_center?add_use Draw & COLOR at your own pace with Fun2draw APPs! ✿ Apple: https://itunes.apple.com/artis....t/mei-yu/id674269351 ✿ Android: https://play.google.com/store/....apps/dev?id=64643504
End Card Links:
★ SUBSCRIBE to Fun2draw for new videos! http://www.youtube.com/user/Fu....n2draw?sub_confirmat
★ Art Challenges:
https://www.youtube.com/watch?v=7n2J1jSnbcw&list=PLppWsG9UuVI85zzpFj5E8QfxK-WhLHv82&index=1
★ How to Draw Fun2draw & Manga:
https://www.youtube.com/watch?v=iIP39Z2qQ44&index=37&list=PLppWsG9UuVI-TOtt0wKwgTwLvr5y6yCHc
★ Travel with the Artist:
https://www.youtube.com/watch?v=Vj8Qwj9abWE&index=1&list=PLppWsG9UuVI-2p_b4DEOBBEzCwEdWRNGP
★ Specials, My Apps & eBooks:
https://www.youtube.com/watch?v=2lcD9ZmAGXE&index=1&list=PLppWsG9UuVI-tVWmmElAS3AgS8wwAnAsR
Music from the Youtube Audio Library
https://www.youtube.com/audiolibrary
