סרטונים מובילים

Two people inspired me to create this portrait. Nelson Mandela, the first democratically elected president of South Africa is obviously one. The other is an artist named Igor Kazarin who has a popular art channel on youtube called portraitdrawing. I wanted to try his amazing Dry Brush Technique which combines oil paint, watercolor paper and a kneaded eraser. I added my own touch to this portrait by finishing it with a prismacolor pencil. -Merrill Kazanjian
If you want to try Dry Brush Technique, you will need:
- Watercolor paper (At least 150 LBS)
- Oil Paint (I am using Lamp Black.....this technique works in with color too)
- Kneaded Eraser
- I also used Prismacolor Color Pencils at the end (optional)

NARRATED VERSION: https://youtu.be/BHScClfSaO8
REALISM CHALLENGE BOOK: http://amzn.com/0385346298
SUBSCRIBE: http://bit.ly/markcrilleySUBSCRIBE
All 6 "Brody's Ghost" books at Amazon: http://bit.ly/BRODYSGHOSTbooks
"Mastering Manga" books at Amazon: http://bit.ly/MASTERINGMANGA
All 4 “Miki Falls” books at Amazon: http://bit.ly/MIKIFALLSbooks
Brody 1-Shot Comic at TFAW: http://bit.ly/BRODYoneshot
OFFICIAL CRILLEY PLAYLIST: http://bit.ly/CRILLEYPLAYLIST
All of my books are available through your local bookstore-- Ask them to special order if they don't have my books on the shelf. Thanks for your support!! ~Mark
FACEBOOK: http://www.facebook.com/markcrilleyOFFICIAL
TWITTER: http://www.twitter.com/markcrilley
INSTAGRAM: http://instagram.com/markcrilleyreal/
All music created in GarageBand
Visit my channel for YouTube’s #1 most-viewed drawing videos!

Step by Step drawing instruction. Learn to draw John Lennon from the Beatles.
Link- http://merrillk.com/?part=fineart&articles_id=13483&act=artist1&artist=69&collection=461
WE NEED A VISUAL ARTS CATEGORY ON YOUTUBE THREAD-http://www.google.com/support/forum/p/youtube/thread?tid=2a9806f929074cbd&hl=en&fid=2a9806f929074cbd0004b630ad37cc3e
Facebook- http://facebook.com/kazanjianm
Twitter- http://twitter.com/kazanjianm
Website- http://merrillk.com
(Merrill) Supplies I Use- http://www.jdoqocy.com/click-4....247664-805536?url=ht
The Long and Winding Road of YouTube searches has brought you here and today, YOU are going to draw an excellent portrait of John Lennon with a little help from your friend Merrill of course. Under ideal circumstances I would want to hold your hand to directly assist you with this portrait; but since im a real Nowhere Man; your high speed internet connection and this step by step tutorial will have to do.
But Rest assured,we can work it out since this video is available to you on YouTube eight days a week! All that You will need ......Is Love, a pencil and workable listening skills. Ill take care of the rest. I recommend that you pause the video at the end of each step and hit the link in the video description to go to my cheat sheet for this video. It will definitely help you. Lets get started
Step 1: Draw the three shapes that you see. Notice that the three shapes resemble a childs drawing of a car.
Step 2: Make the two crescent moon shapes that I just added.
Step 3: Make the nose shape. Notice that the length of the nose is equal with the height of the forehead. Here is a close up
Step 4: Make the moustache and the mouth.
Step 5: Add the details that I just added to the eyes. Be sure to notice their placement within the frames of the glasses. Here is a close up.
Step 6: Observe and add the outline of John Lennon's face. Stop at the chin.
Step 7: Add the other side of John Lennon's face and then add the "P" shape.
Step 8: Add John's hair. But dont stress out if it's not perfect. Just let it be.

WE NEED A VISUAL ARTS CATEGORY ON YOUTUBE THREAD-http://www.google.com/support/forum/p/youtube/thread?tid=2a9806f929074cbd&hl=en&fid=2a9806f929074cbd0004b630ad37cc3e
Facebook- http://facebook.com/kazanjianm
Twitter- http://twitter.com/kazanjianm
Website- http://merrillk.com
(Merrill) Supplies I Use- http://www.jdoqocy.com/click-4....247664-805536?url=ht
Search the internet or your library for information on the proportions of the human face. You will find a ton of information, but each source seems to say something different. This is video 1 in a series of videos which will make you less confused about the proportions of the human face. You will be less confused, because I will give you proof that a lot of the formulas that you learned for portrait drawing were wrong. At the end of this video, I will give you a new formula to help you draw the human face from memory.
In this experiment, I have taken the most common formulas for facial proportion and tested them on a group of people in a similar pose. I used a computer program to help me take accurate measurements. I made sure that my control group was comprised of both males and females and were of many different races.
So lets get started with a very common proportion rule. The question is- Is it one eye length between each eye? The answer, as you can see, is yes. But this was the only rule that I found to be universally correct.
Lets stick with the eyes for question 2. It is often stated that it is five eye lengths across the face. It turns out that for 9 of the 10 people that I tested, that rule is incorrect. I found that if you included the width of the ear on to the face, then that rule would be closer to true, but definitely not universal. Of the control group, only one person, had a fit, so we can conclude that this proportion does exist, but it does not fit the majority of people and thus, shouldn't be part of a drawing formula.
I recently saw on the internet that the outer corners of the nose, should line up with the inner corners of the eye. Only one of 10 people that I tested proved that proportion to be true. There were also two people who came close. Once again, we can conclude that this proportion does exist, but it does not fit the majority of people and thus, shouldn't be part of a drawing formula. Most often, the outer nose lined up where the tear ducts met the white of the eye. For the record, I hope that the lady in the bottom left never catches a cold.
Question four asks: Does the pupil and iris line up with the corners of the mouth when the face is calm? I will warn you that this was the most difficult to answer, because the mouth is the most variable feature of the face. The shape slightly differs from person to person and it moves a lot. I found that only two people had eyes and mouths which lined up, but, everybody except the gentleman on the top left was extremely close. So, despite the results, I would include this measurement for a general face proportion formula, but I would also be sure to observe the person who I am drawing to get my answer. It is also important to note that 8 of the 10 peoples mouths fit between the lines drawn down from the middle of each eye.
Since question five is related to the placement of the ears, I changed a few of the photos in the control group. In order to gauge this, I had to be able to see the ears clearly. Most portrait formulas state that the ears go from the top of the eye to the bottom of the nose. This turned out to be a pretty accurate statement. Question six is directly related to question five and asks whether the nose and the ears are generally the same size. Although there were only two exact measurements, every other person was very close in measurement. So we can conclude that it is Accurate to say that the ear generally goes between the upper eye and the bottom of the nose and is very close in height to the nose.
Now lets test the most common and controversial face proportion question.....Are the eyes at the exact half way point of the head? You will find top results on the search engines stating that this is the case. I once had a teacher who insisted this and took off points on any student who disagreed with him.....If he only did his homework! The eyes are NOT at the center of the head. The actual middle of the head is just below the orbits of each eye. There was only one person whose eyes were measured as the center of their head, and of course it was MacAulay Culkin.

SUBSCRIBE: http://bit.ly/markcrilleySUBSCRIBE
All 3 "Brody's Ghost" books at Amazon: http://bit.ly/BRODYSGHOSTbooks
All 4 "Miki Falls" books at Amazon: http://bit.ly/MIKIFALLSbooks
"Mastering Manga" book at Amazon: http://bit.ly/MASTERINGMANGA
Brody 1-Shot Comic at TFAW: http://bit.ly/BRODYoneshot
OFFICIAL CRILLEY PLAYLIST: http://bit.ly/CRILLEYPLAYLIST
All of my books are available through your local bookstore-- Ask them to special order if they don't have my books on the shelf. Thanks for your support!! ~Mark
FACEBOOK: http://www.facebook.com/markcrilleyOFFICIAL
TWITTER: http://www.twitter.com/markcrilley
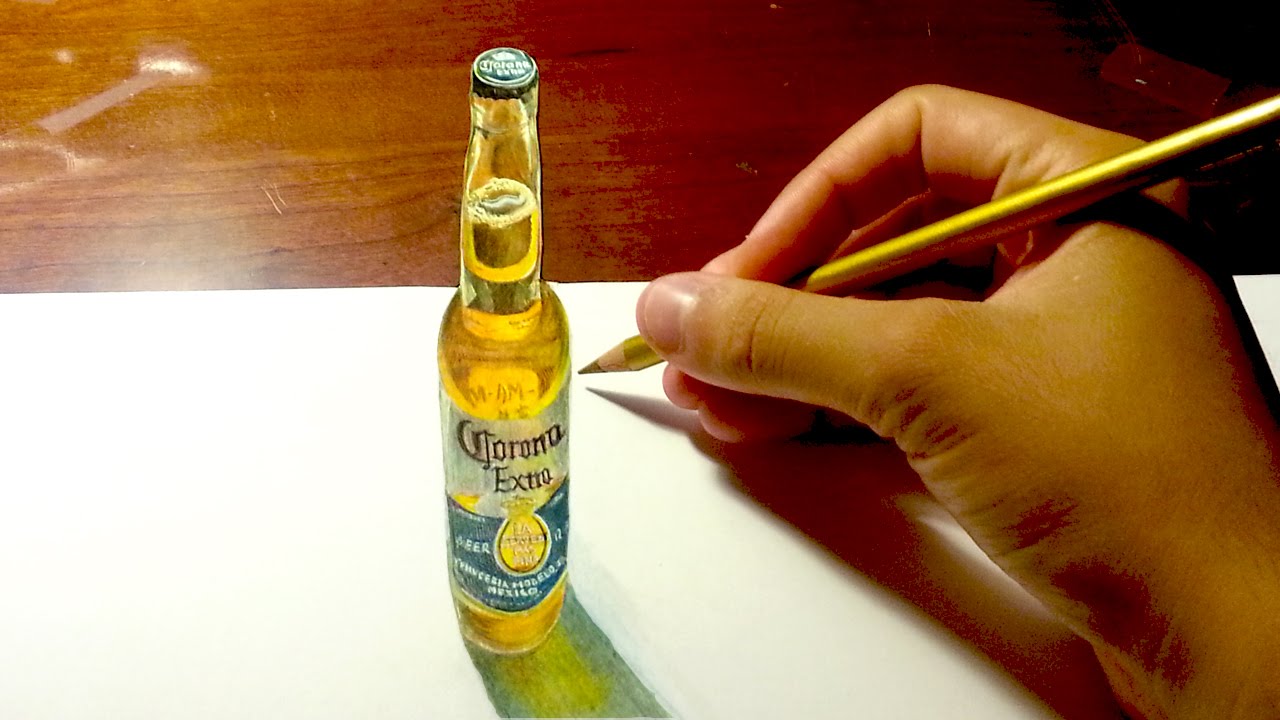
Hello YouTube, i hope you all enjoy this video. This is a simple but amazing illusion. It is a "Corona" beer bottle drawn using Prismacolor color pencils
Drawing by: Serafin Ureno
Other sites where you can find me!
FACEBOOK: https://www.facebook.com/OrangeMonkey92
DEVIANTART: http://omkdrawings.deviantart.com/
THIS DRAWING ON DA:
INSTAGRAM: http://instagram.com/orangemonkey92
Also royalty free music Music Provided by: Argofox Creative Commons
http://www.youtube.com/MMMontageMusic
Artist: Meizong
Name of track: Sound of Hope
Link to licence terms
http://creativecommons.org/licenses/by/3.0/

Hi youtube this is my portrait / drawing of Lady Gaga i used an HB, B3, B4, B6 pencils a Tortillion and a paper Towel for smudging. See the Drawing on DeviantArt Here http://fav.me/d2kj4ri
Music By : MIKE KALOMBO (KlassicMaster)
- http://www.youtube.com/klassicmaster
Song: Bad Romance Instrumental Remake
http://www.youtube.com/watch?v=_VWA7mfj7Qw
Thanks 4 Watching!!!
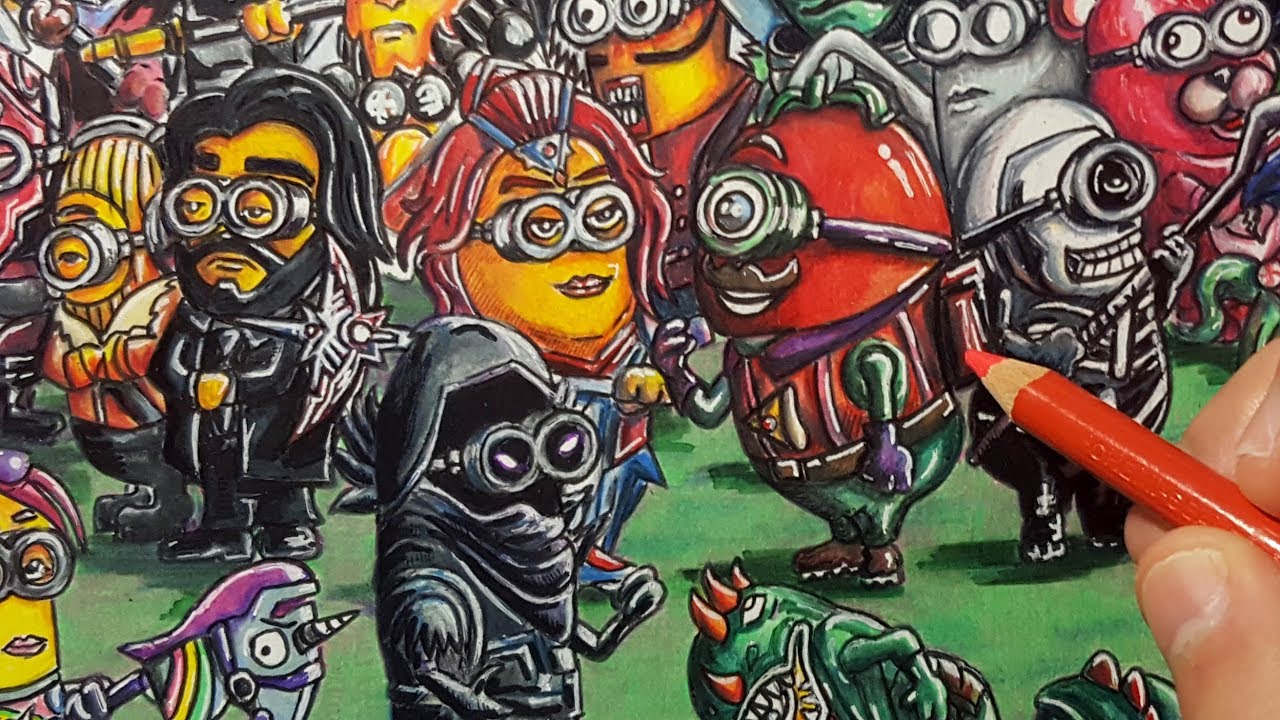
If Minions were Fortnite Skins, they would probably look like this.
Medium: Colored Pencils on Bristol Paper
Who is your favorite? comment below!
Please ????, Comment and Subscribe
???? Drawing by: Serafin Ureno ✏️️
___
➡️ WEBSITE: http://www.serafinureno.com
➡️ FACEBOOK: http://www.facebook.com/OrangeMonkey92
➡️ DEVIANTART: http://omkdrawings.deviantart.com/
➡️ INSTAGRAM: http://instagram.com/orangemonkey92
????MUSIC????
Music provided by Argofox:
Meizong & Yeeflex - Traverse
https://youtu.be/1StMlRg4Hoo
licensed under a Creative Commons license: http://creativecommons.org/licenses/by/4.0/
-----------
Music by Teknoaxe
Name of Track : This is My City
https://youtu.be/08aevamNz60
licensed under a Creative Commons license: http://creativecommons.org/licenses/by/4.0/

3D drawing of Jason Voorhees from Friday the 13th film series.
Hello YouTube, I hope you enjoy this 3D drawing of Jason Voorhees from Friday the 13th film series. It is done using color pencil and ballpoint pen on Bristol paper.
More videos like this coming this Halloween season...We still have some months to go, but...yeah...
Thanks for Watching!
Drawing by: Serafin Ureno
Other sites where you can find me!
FACEBOOK: http://www.facebook.com/OrangeMonkeyart
DEVIANTART: http://omkdrawings.deviantart.com/
THIS DRAWING ON DA:
INSTAGRAM: http://instagram.com/orangemonkeyart
(You Can follow me on Instagram; I'm constantly posting progress pictures and sketches on there.)
I am using royalty free music by: Kevin Macleod
http://incompetech.com/music/royalty-free/
Name of tracks used: Zombie Chase, Very Low Note & Blue Sizzle
Music licensed under a Creative Commons license: http://creativecommons.org/licenses/by/3.0/
---------------------------------------------------------------------
I am also using music by YouTube's Audio Library
Track Name: U Make Me Feel
Artist: MK2
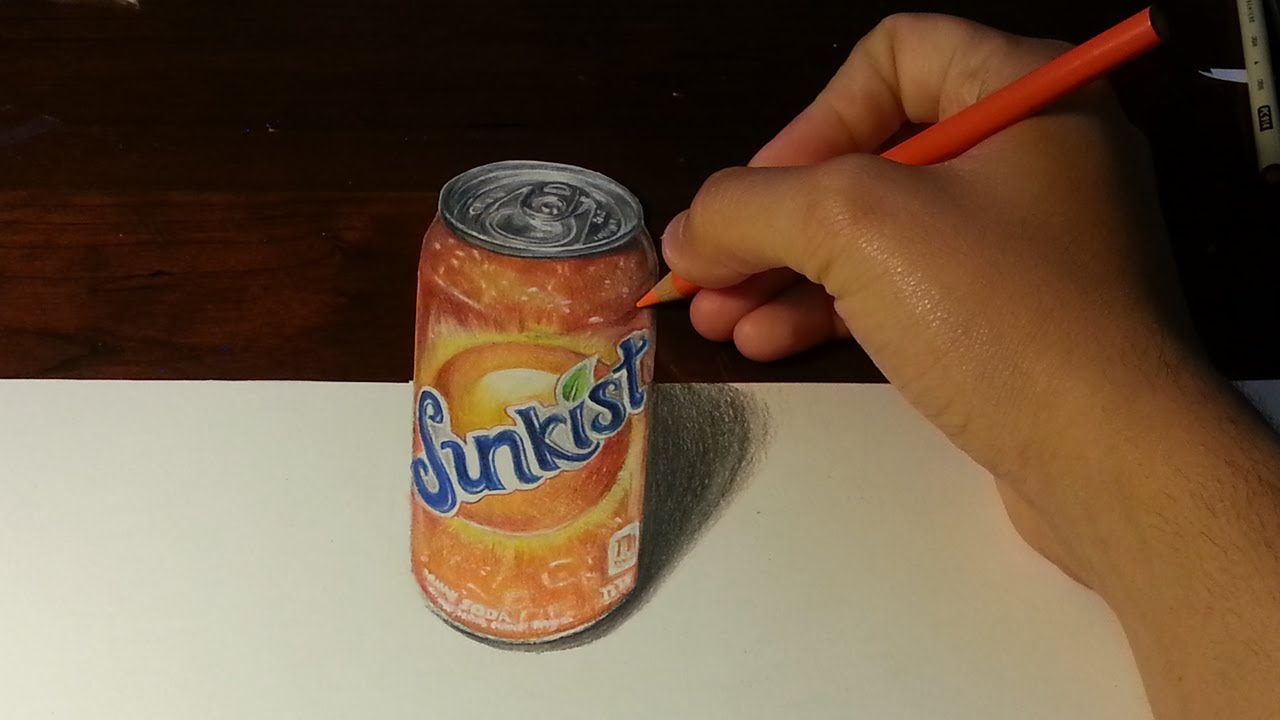
Hello YouTube, i hope you all enjoy this video. This is a simple but amazing illusion. i fooled some people when i showed them a picture of the can just from the right angle.
It is a "Sunkist" soda can drawn using Prismacolor color pencils and a bit of acrylic paint for some highlights. Sorry, no ballpoint pen for this one folks. This drawing took me approximately about 4 1/2 hours to complete. Share it with your friends if you enjoyed it.
Drawing by: Serafin Ureno
Other sites where you can find me!
FACEBOOK: https://www.facebook.com/OrangeMonkeyart
DEVIANTART: http://omkdrawings.deviantart.com/
THIS DRAWING ON DA:
INSTAGRAM: http://instagram.com/orangemonkeyart
Also royalty free music Music Provided by: Argofox Creative Commons
http://www.youtube.com/MMMontageMusic
Artist: Aether
Name of track: Dawn
Link to licence terms
http://creativecommons.org/licenses/by/3.0/

This drawing was inspired by the video game Bioshock, zombies, and a bunch of other things. It has nothing to do with the game.
Medium: Color Pencil & Ballpoint Pen on 11 x 14 bristol paper
Drawing by: Serafin Ureno
Other sites where you can find me!
FACEBOOK: http://www.facebook.com/OrangeMonkey92
DEVIANTART: http://omkdrawings.deviantart.com/
THIS DRAWING ON DA:
INSTAGRAM: http://instagram.com/orangemonkey92
(You Can follow me on Instagram; I'm constantly posting progress pictures and sketches on there.)
------------------------------------------------------------
Music Provided by: Gee
https://www.youtube.com/user/Geemeeofficial
Link to song: https://youtu.be/ZkkNgbkcvog
Gee's Soundcloud: https://soundcloud.com/geemeeofficial
Gee's Facebook: https://www.facebook.com/Geemeeofficial
Music Licence: Creative Commons Attribution license (reuse allowed)
Music also provided by Twin Musicom
Midnight in the Graveyard by Twin Musicom is licensed under a Creative Commons Attribution license (https://creativecommons.org/licenses/by/4.0/)
Source: http://www.twinmusicom.org/son....g/252/midnight-in-th
Artist: http://www.twinmusicom.org

Here is a drawing of Tom Holland as Spider-Man from the Movie Spider-Man Homecoming.
What did you all think of the movie?
Medium: Ballpoint pen on 11 x 14 Bristol Paper
Please ????, Comment and Subscribe
???? Drawing by: Serafin Ureno ✏️️
___
YOU DECIDE WHAT I DRAW NEXT! COMMENT OR TAKE THE POLL HERE: ➡️ goo.gl/icwQTM
➡️ WEBSITE: http://www.serafinureno.com
➡️ FACEBOOK: http://www.facebook.com/OrangeMonkey92
➡️ DEVIANTART: http://omkdrawings.deviantart.com/
➡️ INSTAGRAM: http://instagram.com/orangemonkey92
????MUSIC????
I am using royalty free music by: Jingle Punks
The music is from YouTube's Audio Library
Name of track: The Driving Force
licensed under a Creative Commons license: http://creativecommons.org/licenses/by/4.0/

3D drawing of BATMAN in his Mech Armor Suit that appears in "Batman v Superman: Dawn of Justice"
Hello YouTube, I hope you enjoy this 3D drawing of Batman. It is done using color pencils, ballpoint pens, and a white gel pen. Anyways, who is excited for this movie?
Thanks for Watching! Please share this video with your friends.
Drawing by: Serafin Ureno
find me here!
FACEBOOK: http://www.facebook.com/OrangeMonkey92
DEVIANTART: http://omkdrawings.deviantart.com/
THIS DRAWING ON DA:
INSTAGRAM: http://instagram.com/orangemonkey92
I am using royalty free music provided by: Argofox | Royalty Free Music
https://www.youtube.com/channe....l/UC56Qctnsu8wAyvzf4
From The Dust - Interstellar Rush: http://youtu.be/MEuOd83MWjA
Release: https://soundcloud.com/ftdmusi....c/from-the-dust-inte
License: http://bit.ly/CCAttribution
licensed under a Creative Commons license: http://creativecommons.org/licenses/by/3.0/

Artist Merrill Kazanjian shows his technique for drawing from pictures. This technique is tailored for beginners. You do not have to have any experience to try this. Step one is called a mass drawing. Step two is called a line drawing. In step three, Kazanjian demonstrates how to do a rubbing. In step 4 the rubbing is reprinted. Step five is shading. This is an excellent process for beginners to learn how to render from a picture. All that you will need is. A yellow marker, two sheets of paper, a pencil, a picture to work from and a black pen. Drawing lessons for beginners. Drawing lessons for beginners.

Quick! Look in the mirror! I am hoping that you are smiling. If you are, you are seeing the Zygomaticus major, Zygomaticus minor and Risorius muscles working together to retract the corners of the mouth upwards and towards the back of your head. But, smiles are not just limited to the mouth. Your orbicularis oculi muscle has raised your cheeks and compressed your eyes.
Face proportions face anatomy head
Lets look at a smiling face and compare it with a straight face. Here are a few tips to remember. The forehead is very relaxed during a smile. The two eyelids get closer together and the top lid forms a less curved rainbow shape. The cheeks become pushed up like a mountain growing in height due to the movement of continental plates. In other words, the cheeks are literally pinched between the eye and the mouth, and this pushes the cheeks flesh away from the skull. There is little change to the nose.
There are common features to smiles. Notice how straight the top lip becomes and notice the trapezoid shape that forms above it. The corners of the mouth usually extend past the mid point of the eye. The eyebrows of most people remain neutral during a smile. Notice the symmetrical arcs that form which seem to connect the eyebrows to the folds in the cheek. Finally, notice that when people smile, the top row of teeth are often the only teeth, which are visible.
Now lets learn how to draw a smiling face. Please note that this is only the first of two videos which I plan to release on the topic. In this video, I will make eight cartoon like sketches. In video two will do a realistic two hour drawing. I hope that you will watch both videos, because they will give you a solid understanding of how to draw a smile. But, before the demo, we have an incoming message from the moon. Aw thanks, Little Old Man. It is OK to leave the whites of the eyes a little darker when drawing a smile! Trapezoid shape between the nose and upper lip. Slightly darker shadows around the eyes...especially if you are drawing an older person. This figure has eyes which seem totally shut (which is OK). Notice the strong line (arc) from the eyebrows to the folds in the cheek. Everything on the face can be a bit tighter. A smile tightens the skin like a face lift (with the exception of the neck). If the lighting calls for it, you can be more distinct with lines on the face. Notice the dark edges at the side of the mouth. These occur due to the rounded shape of the gums and teeth. Notice this in all of the figures so far. Drawing the head from three quarters (3/4) view.....General Tip: The eyes get foreshortened and the inner corners are slightly closer together. The trapezoid becomes more triangular. The rule about the mouth reaching past the middle of the eye becomes skewed. A more subtle smile. If the smile was more intense, his facial muscles would be more taut. Crows FeetT happen to older people when the eyes are taut!!!! CAW! The raising of the cheeks can affect the appearance of the jaw bone. (Mandible)
The song is called "Alien Restaurant" from Kevin MacLeod of Incompetech.com- a site recommended to youtube partners in the partner tutorial. The audio at the beginning is from Creative Commons Search and is listed in the public domain- http://blip.tv/file/2363588/. Some images are from creative commons search. For example the image of George Clooney- http://upload.wikimedia.org/wi....kipedia/commons/e/e9 The image of Beyonce- www.army.mil/.../army.mil-2007-08-30-154516.jpg "free online art lessons"

A very bi-partisan artwork. Put your political differences aside and watch artist Merrill Kazanjian merge the faces of our last four Presidents (Barack Obama, George W. Bush, Bill Clinton, George H.W. Bush. A presidential portrait this is not- it sets the precedent for merging presidents- not ideologically- but aesthetically. I started out by creating a collage / photomontage with digital cut outs and combining them with Photoshop CS3 and Paint Shop Pro 8. Next, I printed on a medium format printer (13 x 17 inches). Next I added a layer of color pencils (prismacolor) and markers (AD and prisma) to fill in the gaps and tie everything together. Finally, I added a layer of oil paint to make it look life like. I added the body of Richard Nixon in his iconic peace pose and ironically the face wound up looking a little bit like a young Nixon (I did not intend this). I call the method that I use, tradigital art. It merges traditional art (2D drawing and painting) with digital possibilities (computer art and digital photography). My website is http://merrillk.com

LINK- http://merrillk.com/?part=fineart&articles_id=11123&act=artist1&artist=69&collection=462
WE NEED A VISUAL ARTS CATEGORY ON YOUTUBE THREAD-http://www.google.com/support/forum/p/youtube/thread?tid=2a9806f929074cbd&hl=en&fid=2a9806f929074cbd0004b630ad37cc3e
Facebook- http://facebook.com/kazanjianm
Twitter- http://twitter.com/kazanjianm
Website- http://merrillk.com
(Merrill) Supplies I Use- http://www.jdoqocy.com/click-4....247664-805536?url=ht
We are faced with the fact my friends the tomorrow is today. Procrastination is still the thief of time. Over the bleached bones and jumbled residues of numerous civilizations are written the pathetic words, "too late". There's no gain without struggle but if you're willing to try to draw Dr. King, i'll make sure that you have a good chance of succeeding. But dont just watch this video, participate; because no work is insignificant all labor that uplifts humanity has dignity and importance and should be undertaken with painstaking excellence that excellence is not the end result for the finished work is the growth that is sustained through your effort. If you have a dream and the motivation to improve your drawing abilities, here's your blueprint to success- hit the link video description right now then reopen this video on my webpage. As you scroll down, you will see photo and text resources to accompany this video. The combination of the step-by-step instructions in this video and the text and print resources will give you a great chance to succeed. If you're up to the challenge, let's begin.
Step 1: In step one we are going to make shapes which will eventually become the eye. Both shapes look like a skinny pac man eating an almond. Be sure to notice that there is a slight difference between the two shapes. Use your observation skills because each shape is not symmetrical. Here is a close up.
Step 2: Draw in the pupil and iris. Notice that you can see the bottom of the circle for the pupil and iris but not the top.
Step 3: Draw in the nose shape and the extra shapes for the shadows around it. The height of this shape should be about one third the height of the pac man shapes from step one. The width should be exactly as wide as the pac man/eye shape on your left. Notice that the nose shape does not attach to the eye shape.
Step 4: Add the quadruple shape that you see. The top shape will be Dr. King's moustache which looks like a flattened M shape. The second shape from the top will be a highlight between the moustache and the top lip. The third shape resembles a lightning bolt and will be the top lip. The fourth shape is the bottom lip. Notice that it is bowl shaped and slightly thicker than the top lip.
Step 5: Add the shape of the forehead. This shape is about twice as tall as the pac man shape for the eye to the left.
Step 6: Dont freak out! Calm down! Add the shape for the outline of the head and hair. Focus on the edge of the head. The lines for the shadow on the face DO NOT have to be perfect but the outside has to be close. I repeat, focus your efforts on the outline of the head.
Step 7: Add the ear shape and the outline for the rest of the face.
Step 8: Add the shape for the clothing. It is going to be in heavy shadow so just go for the general shape and dont stress out if its not perfect.
Step 9: Complete the clothing. Again, it will be in heavy shadow so dont become a perfectionist for this step.
Step 10: Fix the ear and the hairline.

I am going to be using illustration markers, color pencils and oil paint. Just drop me a line if you have any questions
In step 1 I scanned and reprinted my original drawing- I do this for 2 reasons- 1.) If I mess up, I could just reprint it and 2.) marker and color pencil coexist better with printer ink than with graphite from a pencil.
Next I add a layer of the illustration markers. These markers are totally transparent and they enable me to add a layer of color and still be able to see the lines from my pencil drawing. These markers give the artist a similar effect to watercolor paint, but without the messy setup and clean up.. I am still following the Polaroid picture development analogy from the first video- in that I am adding color to all areas at an even pace and slowly building up the darker tones on the sides and bottom of the glass.
The color pencil is great at this point of the drawing, because it adds a translucent layer of color above the marker. In addition to that, color pencils are mixed with wax. The wax will be very handy in the next step when I add oil paint on top of the marker and color pencil. Working with color pencil also allows me to be very precise with my marks on the page. It can be very challenging to be as accurate with a paint brush. This step allows me to make my drawing more accurate and these clarifications will eventually be absorbed by the oil paint.
Now you are going to see me add three layers of oil paint to finish my drawing. I am using oil paint because I want to edit the colors of this composition and it is much easier to mix and match color with oil paint than it is with color pencil. It is also easier to apply large areas of color with a paintbrush rather than the tiny tip of a pencil. I did all of my editing in the last step and now I am just applying color, trying to notice the nuances of the edges of each shape on my reference. If I need to soften an edge I use a dry, soft brush and I pull the paint with that. The color pencil from the layer below is blending nicely with the paint.

What happens when the faces of art icons Bob Ross, Pablo Picasso and Chuck Close are morphed together. Watch the video to find out. Tradigital artwork by Merrill Kazanjian http://merrillk.com . I used Paint Shop Pro 8, Photoshop CS3, a printer, color pencils and oil paint to make this artwork.

Hint number 1 is to see things as shapes. I like to analogize drawing with assembling a jigsaw puzzle because in both you look for shapes to fit together Hint number 2 is to pay close attention to the edges of what you are drawing. Light and shadows can do funny things and in almost anything that you draw you will see a disparity between the qualities of each edge. Hint number three is to develop your drawing like a Polaroid photograph. Polaroid was the company that innovated instant photography. After pushing the shutter button the photograph would come out of the camera and develop before your eyes. What I want you to know about this is that every part of the photo would develop at the same rate and that is how I want you to try to draw next time. In other words, move the drawing tool around, dont get stuck in a favorite spot. Alright, lets slow it down. What you are seeing me do here is pay close attention to the form and the proportions. In other words, I am comparing the sizes of the different shapes and making sure that the placement of each line is correct. I am using vine charcoal a HB pencil and an eraser. I started out with the vine charcoal because it is easy to erase and move around. You will see later in this video that after I am satisfied with the placement of the charcoal, I will hatch over it with a pencil to keep it undisturbed. I am also trying to be aware of the edges of my shapes and I am especially cognizant of the highlight on the top because that will require me shading the areas around it and using the white of the page as a representation of the strong light. Now when I look back at my reference, I notice that the tone of the background is much darker than the white of the page. I use the side of the charcoal to darken the mid tone of my drawing. This step will make it easy to draw in the highlights with an eraser a little bit later. Now I am folding a piece of paper towel to smudge in the charcoal. You will get a very similar result with a blending stump (also known as a tortillion) but the towel will smudge the charcoal more quickly. To be perfectly honest, many teachers that I have had have told me not to use a blending stump, fingers or anything that comes in to contact with the surface of the paper. I partially agree. Oil from fingers when combined with pencil or charcoal leaves a stain that is tough to work around. Notice that my hand is resting on a sheet of paper. Artists call these slip sheets, but it is just a sheet of computer paper. I like working with the blending stump and the paper and this process works for my needs. It would be dishonest if I changed my process for the sake of making a video. Before, I mentioned the term hatching. Hatching is the short name for the drawing technique of cross hatching. It is simply putting a series of lines next to one another with a drawing tool. These lines usually follow the shape of the object that is being drawn. Once I am done adding pencil marks, I take the blending stub to burnish over my hatch marks. This gives my drawing a more smudged look and possibly my former art teachers a heart attack. I like to smudge the pencil and charcoal because it also gives me a surface that is smooth in tone. Hatching can be layered and I usually stop using the blending stump after the second layer. I once did ten layers of hatching in a pencil drawing. Lets recap and take this to the end of part 1. My focus, over the course of any drawing that I do from observation, is to see a simple pattern of shapes on my reference and to accurately render these shapes, on to the piece of paper that I am drawing. After I get the shapes aligned correctly, I attempt to build up tones with charcoal and pencil. When I am building the tones, I am very aware of the nuances of the edges of each shape, because they are usually different. My focus is also on building the tones of my drawing in a similar manner to how a Polaroid photograph develops.
In part 2, I will teach you a way to add color to any pencil drawing. Thanks for watching the video and please let me know if this helped.
