סרטונים מובילים

В седьмой части мы рассмотрим, как можно сделать листья сирени с помощью вышивки и с помощью аппликации, а также случаи, когда цветочки расположены на листьях.

Вышивка лентами от Разживаловой Натальи. В цикле мастер-классов мы рассмотрим, как вышить лилию классическим способом, а также сделать с помощью аппликации. Сделаем тонировку и тычинки. А также рассмотрим вышивку лилий на принте. В четвертой части мы рассмотрим разные виды готовых тычинок и пестиков, а также способы изготовления тычинок и пестиков своими руками из разных материалов.
Ссылка на канал ПЧЕЛА ХОЗЯЮШКА https://www.youtube.com/channe....l/UCPS7Ssj3zk07GRLl1
Ссылка на группу "Рамы. Принты. Ленты. Низкие цены" в Одноклассниках https://ok.ru/ramydlyaka

В седьмой части курса мы вышьем бутон гвоздики, цветок гвоздики, отвернутый от нас, чашелистики, проведем тонировку лепестков. #ВышивкаЛентами #РазживаловаНаталья

В восьмой части мы рассмотрим вышивку гвоздики, лежащей на столе. Вышьем стебелек, чашечку и листики, проведем дополнительную тонировку зелени. Сделаем цветок.

В третьей части цикла по вышивке сирени на принте мы рассмотрим два способа, как сделать зеленые веточки у грозди сирени, как пришить цветочки и сделать к ним серединки.

В пятой части серии мастер-классов по вышивке гвоздик мы рассмотрим новый способ сборки цветка - из отдельных кружков диаметром 5 см.

В четвертой части мы рассмотрим вышивку зелени с использованием ниток и узких лент, а также разные стежки.

Вышивка лентами от Разживаловой Натальи. В цикле МК мы рассмотрим вышивку мальвы разными способами. В десятой части мы сделаем прожилки на листьях мальвы с использованием паяльника и без паяльника, затонируем листья и пришьем к работе.
Первые части можно посмотреть в плейлисте https://www.youtube.com/playli....st?list=PLYyHokl8ybp

В четвертой части мы проведем легкую тонировку вышитых роз. #РазживаловаНаталья #ВышивкаЛентами

Дорогие рукодельницы! Сегодня заключительная серия курса "Школа для новичков. Вышивка лентами." В 18 серии мы присоединим аппликационные листья к работе двумя способами! Всем творческих успехов!

Во второй части мы рассмотрим, как вышить колокольчики, у которых видно задние лерестки, проведем тонировку цветов, сделаем стебельки, веточки и листики, познакомимся со швом в раскол и петлей в прикреп. #вышивкалентами #РазживаловаНаталья

В этом ролике показано, как сделать рисунки в Фотошоп для начинающих за 15 минут. Арт в итоге получается очень качественный и вы сможете забыть про рисование по клеточкам или простые рисунки.
#простой_рисунок #рисунки #уроки_рисования #уроки_фотошопа #уроки_для_начинающих #рисование_на_планшете #cg_speak #быстрый_рисунок
Ссылка на сайт игры: https://goo.gl/bFQz6w
Скачать Braveland Heroes в Appstore: https://goo.gl/C6P8At
Скачать Braveland Battles в Google Play: https://goo.gl/m7koKM
ORIGINAL VIDEO: https://www.youtube.com/watch?v=wutC5Xk4sRc
В этом видео автор расскажет о том, как нарисовать фон и окружение за 15 минут в Фотошоп СС 2017 - 2018 и как сделать это быстро. За перевод огромное спасибо нашему переводчику Маше Пушковой.
Хочешь поддержать проект? Жми сюда! » http://www.donationalerts.ru/r/cgspeak
Wanna support our project? Here is the link! » http://www.donationalerts.ru/r/cgspeak
OUR LINKS || НАШИ ССЫЛКИ:
➤ VK » https://vk.com/cgspeak
➤ FACEBOOK » https://facebook.com/cgspeak
➤ GUMROAD » https://gumroad.com/cgspeak
➤ INSTGRAM » https://instagram.com/cgspeak
➤ TWITTER » https://twitter.com/cg_speak
———————————————————
По вопросам сотрудничества:
???? cgspeak@yandex.ru
———————————————————
P.S. Не забывай, что активность канала зависит от лайков и комментариев! Так что если хочешь нам помочь – ты знаешь, что делать ;)
☛ 2D artist. CG Sketches & Art ☚

Курс по оружию: https://goo.gl/T6URVW
ЛЕКЦИИ СО СКИДКАМИ:
Роман Куприянов: https://goo.gl/Lwhmus
Анна Лепешкина: https://goo.gl/jJXdyZ
Максим Верехин: https://goo.gl/c6SLMi
Вадим Марченков: https://goo.gl/mkc1Hg
SUBSCRIBE! ☛ http://bit.ly/CGSpeak ☚
Ведущие: Алексей Мельников и Алиса Хуснутдинова.
ARTIST's PORTFOLIO:
Работы автора можно найти по следующим ссылкам:
➤ https://www.artstation.com/jama
Хочешь поддержать проект? Жми сюда! » http://www.donationalerts.ru/r/cgspeak
Wanna support our project? Here is the link! » http://www.donationalerts.ru/r/cgspeak
OUR LINKS || НАШИ ССЫЛКИ:
➤ VK » https://vk.com/cgspeak
➤ FACEBOOK » https://facebook.com/cgspeak
➤ GUMROAD » https://gumroad.com/cgspeak
➤ INSTGRAM » https://instagram.com/cgspeak
➤ TWITTER » https://twitter.com/cg_speak
———————————————————
По вопросам сотрудничества:
???? cgspeak@yandex.ru
———————————————————
P.S. Не забывай, что активность канала зависит от лайков и комментариев! Так что если хочешь нам помочь – ты знаешь, что делать ;)
☛ 2D artist. CG Sketches & Art ☚

Кусудама – бумажный цветочный шар.Волшебный шар из бумаги в технике кусудама "Арлекино" Делается просто, выглядит красиво и отлично подойдет для декора, можно повесить на новогоднюю елку. Для изготовления этой кусудамы нам потребуется: бумажные квадраты размером 8х8 см – 60 шт. и клей ПВА
Искусство "Кусудамы" происходит от древней японской традиции, когда кусудамы использовались для фимиама и смеси сухих лепестков; возможно, это были первые настоящие букеты цветов или трав. Само слово представляет комбинацию двух японских слов кусури (лекарство) и тама (шар). В настоящее время "Кусудамы" обычно используют для украшения или в качестве подарков.
Кусудама – это отдельное направление в оригами, которое подразумевает изготовление разных шаров, цветов из бумаги. Отдельные детали могут быть склеены вместе или сшиты. Схемы и вариации бываю самые разные – от простых к сложным https://www.youtube.com/watch?v=A7nU51CtaqA
Спасибо что смотрите наше видео!
Подписывайтесь на наш канал:
https://www.youtube.com/c/Masi....kBon?sub_confirmatio
Наша Партнерская программа Yoola https://youpartnerwsp.com/join?102059
#оригами #кусудама #шар #kusudama #origami

Сделать украшение или декор для подарка и комнаты - просто. Разнообразные украшения из бумаги для интерьера сделают его индивидуальным и непревзойденным.Чтобы добавить интерьеру изюминки достаточно использовать различные декоративные элементы или бумажные украшения. Оригинально и красиво украсить дом элементами декора из бумаги можно очень просто своими руками. С таким занятием справятся даже малыши.
https://www.youtube.com/watch?v=ln891bokhnQ
Подписывайтесь на наш канал, у нас много интересных видео: https://www.youtube.com/c/Masi....kBon?sub_confirmatio
#цветы #избумаги #оригами #цветок #сделать #поделки

Как сделать бабочки из бумаги. Самый простой и красивый вариант декора – бабочка из бумаги. Бабочками украшают открытки, блокноты, альбомы с фотографиями, мебель и даже просто стены. Готовые изделия можно приобрести в магазине и просто прилепить на нужное место, а можно изготовить своими руками, что, несомненно, более увлекательное занятие.
https://www.youtube.com/watch?v=lvlcG0c6OFo
Подписывайтесь на наш канал:
https://www.youtube.com/c/Masi....kBon?sub_confirmatio
Наша Партнерская программа Yoola https://youpartnerwsp.com/join?102059
#БабочкиИзБумаги #ОригамиИзБумаги #PaperButterfly #DIYCrafts #ПоделкиИзБумаги #OrigamiButterfly

Простой зимний сюжет шерстью - по мотивам картины Клода Моне.
Автор мк - Александра Фёдорова
❤ Хотите научиться рисовать картины шерстью по моим урокам?
▶ Закажите полный обучающий курс по живописи шерстью: https://sashafedorova.ru/y/8b67cf2
__
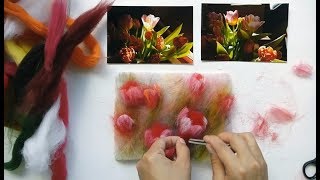
Очень простой мастер-класс - рисуем шерстью тюльпаны.
Подойдет для новичков, можно рисовать с ребенком (от 8 лет).
Научитесь работать с шерстью и создадите акварельную картину-открытку с тюльпанами.
Для рисования потребуется шерсть овечья окрашенная в виде гребенной ленты,цвета: белый, голубой, синий, коричневый, зелёный, оранжевый, красный, бордовый, розовый тёплый, розовый холодный, оливковый;
флизелин (в качестве подложки), фоторамка 15х20см, ножницы и пинцет (обычный, для бровей).
---
❤ Хотите научиться рисовать картины шерстью по моим урокам?
▶ Закажите полный обучающий курс по живописи шерстью: https://sashafedorova.ru/y/8b67cf2
__

WE NEED A VISUAL ARTS CATEGORY ON YOUTUBE THREAD-http://www.google.com/support/forum/p/youtube/thread?tid=2a9806f929074cbd&hl=en&fid=2a9806f929074cbd0004b630ad37cc3e
Face Proportions For Portrait Drawing- Formula Hey welcome back everybody....Its Merrill, I recommend that you watch part 1 before you see part 2. Just click on the image if you havent seen part 1 yet.
This is a very important video for anyone who wants to learn portraiture. In this video, I will model the formula taught in part 1 to teach you how to draw a face from your memory. In order to make things easy to remember, I will demonstrate my process step by step. People who memorize these steps will be able to draw a human face from memory without a reference image. Lets get started.
Step 1: Draw an oval. Next put a horizontal line through the oval, slightly higher than the half way point. Then add four evenly spaced dots. These four dots will mark the inner and outer corners of each eye. Remember that there is one eye length in between the two eyes. It is imperative that the dots are evenly spaced. You will also need two bigger dots to mark the center of each eye.
Step 2: Now add a rectangular shape. The rectangle should be taller than it is wide. The corners of the rectangle should line up with the two dots that mark the center of each eye.
Step 3: Add the ears and eyebrows. The ears most often line up with the top of the eye and the bottom of the nose.
Step 4: Add the eye shape. Generalized eyes are almond shaped. You will see the bottom of the iris but not the top. Most eyes also have a second line for the eyelid above the eye.
Step 5: Add the nose. Notice that I did not add lines for the bridge of the nose. The only lines that exist on a nose are towards the bottom.
Step 6: Add the lips. Generally, the top lip is M shaped and smaller than the bottom one, which is bowl shaped. When the face is calm, the corners of the mouth usually does not line up with the middle of the eye.
Step 7: Add hair. Be creative.In this experiment, I have taken the most common formulas for facial proportion and tested them on a group of people in a similar pose. I used a computer program to help me take accurate measurements. I made sure that my control group was comprised of both males and females and were of many different races.
So lets get started with a very common proportion rule. The question is- Is it one eye length between each eye? The answer, as you can see, is yes. But this was the only rule that I found to be universally correct.
Lets stick with the eyes for question 2. It is often stated that it is five eye lengths across the face. It turns out that for 9 of the 10 people that I tested, that rule is incorrect. I found that if you included the width of the ear on to the face, then that rule would be closer to true, but definitely not universal. Of the control group, only one person, had a fit, so we can conclude that this proportion does exist, but it does not fit the majority of people and thus, shouldn't be part of a drawing formula.
I recently saw on the internet that the outer corners of the nose, should line up with the inner corners of the eye. Only one of 10 people that I tested proved that proportion to be true. There were also two people who came close. Once again, we can conclude that this proportion does exist, but it does not fit the majority of people and thus, shouldn't be part of a drawing formula. Most often, the outer nose lined up where the tear ducts met the white of the eye. For the record, I hope that the lady in the bottom left never catches a cold.
Question four asks: Does the pupil and iris line up with the corners of the mouth when the face is calm? I will warn you that this was the most difficult to answer, because the mouth is the most variable feature of the face. The shape slightly differs from person to person and it moves a lot. I found that only two people had eyes and mouths which lined up, but, everybody except the gentleman on the top left was extremely close. So, despite the results, I would include this measurement for a general face proportion formula, but I would also be sure to observe the person who I am drawing to get my answer. It is also important to note that 8 of the 10 peoples mouths fit between the lines drawn down from the middle of each eye.
Since question five is related to the placement of the ears, I changed a few of the photos in the control group. In order to gauge this, I had to be able to see the ears clearly. Most portrait formulas state that the ears go from the top of the eye to the bottom of the nose. This turned out to be a pretty accurate statement. Question six is directly related to question five and asks whether the nose and the ears are generally the same size. Although there were only two exact measurements, every other person was very close in measurement. So we can conclude that it is Accurate to say that the ear generally

This video will teach you how to draw a cat step by step, and then paint it. This video was made for aspiring artists who are new to drawing and painting. Just follow my steps and you should surprise yourself.
Reference Image by PCStock (deviantart)- http://browse.deviantart.com/?q=cat+stock#/d1jadwz
Subscribe to kazanjianm (Don't miss any new videos that I make)- http://www.youtube.com/subscri....ption_center?add_use
Facebook: Like me on Facebook to find out about live hangouts or to post your work!- http://facebook.com/kazanjianm
Twitter: I tweet! Do you? http://twitter.com/kazanjianm
My Website: http://merrillk.com
Art Supplies I Use in my Art Work- http://merrillk.com/?sid=135&idpage=supplies_i_use
YouTube Visual Arts Category Petition: http://www.change.org/petition....s/create-a-visual-ar
Step by Step Drawing Playlist: http://www.youtube.com/playlis....t?list=PLD6E34C7CD58
