Лучшие

Today, I decided to incorporate oil pastels in to a mixed media work of art. I also used/combiled oil paint illustration markers and Prismacolor Color Pencils to create the portrait that you see. I describe my process as I narrate: First, I did a pencil sketch which I inked. Second I used illustration markers (Prismacolor and Ad Chartpak) to lay down the first layer of color. Then I added a layer of oil pastels atop the layer of illustration marker. The oil pastels are more mixable than the color pencils and are also more opaque. They mix with liquin (like the color pencils and oil paint). I discovered that the process closely resembles painting (especially) when you mix the pastels on a palette, with liquin and then apply with a paintbrush. I finished my (quasi- Bob Ross demonstration) with a few layers of oil paint, since there is no substitute for oil paints mixability and layering capabilities (as well as the range of opacities). I am happy with the portrait that I made of youtube user armanchik24. I learned a lot while incorporating the oil pastels in to my artwork.
"oil pastels" "crayola oil pastels" "how to use oil pastels" "sennelier oil pastels" "using oil pastels" "pentel oil pastels" "oil pastels how to use" "holbein oil pastels" "cray pas oil pastels" "buy oil pastels" "blending oil pastels" "how to paint with oil pastels" "oil pastels paintings" "oil pastels painting" "van gogh oil pastels" "oil pastels for beginners" "painting with oil pastels" "oil pastels tutorial" "drawing oil pastels" "oil pastels for kids" "painting oil pastels" "working with oil pastels" "sakura oil pastels" "oil pastels for children"

NARRATED VERSION TOMORROW (SAT.)!
"Mastering Manga 3" at Amazon: http://amzn.com/1440340935
"The Drawing Lesson" at Amazon: http://amzn.com/0385346336
SUBSCRIBE: http://bit.ly/markcrilleySUBSCRIBE
"The Realism Challenge" at Amazon: http://amzn.com/0385346298
Brody's Ghost Collected Edition at Amazon: http://amzn.com/1616559012
"Mastering Manga" books at Amazon: http://bit.ly/MASTERINGMANGA
All 4 “Miki Falls” books at Amazon: http://bit.ly/MIKIFALLSbooks
All 6 "Brody's Ghost" books at Amazon: http://bit.ly/BRODYSGHOSTbooks
OFFICIAL CRILLEY PLAYLIST: http://bit.ly/CRILLEYPLAYLIST
THE ART SUPPLIES I USE: https://www.youtube.com/watch?v=xEBzCr_kNns
All of my books are available through your local bookstore-- Ask them to special order if they don't have my books on the shelf. Thanks for your support!! ~Mark
FACEBOOK: http://www.facebook.com/markcrilleyOFFICIAL
TWITTER: http://www.twitter.com/markcrilley
INSTAGRAM: http://instagram.com/markcrilleyreal/
All music created in GarageBand
Visit my channel for YouTube’s #1 most-viewed drawing videos!

NARRATED VERSION: https://www.youtube.com/watch?v=EenmvQuDRVo
SUBSCRIBE: http://bit.ly/markcrilleySUBSCRIBE
All 3 "Brody's Ghost" books at Amazon: http://bit.ly/BRODYSGHOSTbooks
"Mastering Manga" book at Amazon: http://bit.ly/MASTERINGMANGA
All 4 "Miki Falls" books at Amazon: http://bit.ly/MIKIFALLSbooks
Brody 1-Shot Comic at TFAW: http://bit.ly/BRODYoneshot
OFFICIAL CRILLEY PLAYLIST: http://bit.ly/CRILLEYPLAYLIST
All of my books are available through your local bookstore-- Ask them to special order if they don't have my books on the shelf. Thanks for your support!! ~Mark
FACEBOOK: http://www.facebook.com/markcrilleyOFFICIAL
TWITTER: http://www.twitter.com/markcrilley
All music created in GarageBand
Visit my channel for YouTube's #1 most-viewed drawing videos!

This video will teach you how to draw a realistic looking face with a happy (smile) expression. The "calm" eye is almond shaped but when a person is smiling, squeeze the two eyelids together. The "calm" eye is almond shaped but when a person is smiling, squeeze the two eyelids together.Notice that you can see the fold of the upper eyelid a little bit more. The eyebrows and forehead are in a relaxed position. To draw a smiling face successfully, you need to be able to make the cheeks seem more rounded....especially with the shadow below the cheek! Right now, I am adding a construction line for where the shading will go.( I am working from a reference picture, BTW.) To draw a smiling face successfully, you need to be able to make the cheeks seem more rounded....especially with the shadow below the cheek! Right now, I am adding a construction line for where the shading will go.( I am working from a reference picture, BTW.) SLOWLY build up the shading and be very patient! CONFESSION: I used non drawing paper for this drawing! Watch and see what it does when I erase! ARGH!!!! Yes there is a difference!OK couldn't wait! "Drawing paper" is more textured....or as artists say...."has more tooth"....watch the shading VANISH when I erase because the surface is as slippery as ICE! ARGH!!!! The eyebrows are NOT one solid tone. Try to observe the eyebrows of whoever you are drawing before shading them. The only exception is when heavy make up is applied.....Maybe its Maybelline! Shading is ALWAYS dependant upon LIGHT! There are no universal rules to applying tones to drawing.....because lighting conditions vary so much! REMEMBER THAT! In this case, the light came from above. This is most often the case. Notice the shadow that I am adding between the brow and eye. When drawing a smiling face, the area UNDER the eye is very important! The orbicularis oculi muscle (muscle around eye) contracts...The eye is ball shaped.....thus "eyeball"....our shading has to show that it is ROUNDED!The brush is a BIG help. It allows me to shade something delicately....which is needed, when drawing skin.....I use bristle AND soft tipped brushes.... both give slightly different effects. REMEMBER, when a person is smiling, you will (usually) only see their top row of teeth. ALSO, notice the corners of the mouth. Notice that the two sides of the mouth are shaded dark (because the teeth wrap around in a horseshoe shape).REMEMBER, when a person is smiling, you will (usually) only see their top row of teeth. Everyones smile (the shape of their mouth during a smile) is unique! OBSERVE OBSERVE OBSERVE! Draw in the lashes as triangular masses. Notice that the top eyelashes are a LOT longer and fuller than the bottom lashes. This is the case for everybody. Males, in general have shorter lashes than females...Maybe he's born with it...Maybe its TESTOSTERONE! If you are GOOD at line drawings and want to work on shading, make photocopies of your work so that you can make multiple attempts at shading....you will learn FAST! TRUST ME! CLICK HERE to go to my shading tutorial.....It gives you a link to a print out worksheet (so that you could shade along with me.) Remember SHADING is all about RELATIVITY! So compare the tones of different areas of your reference image or sitter. Be sure NOT to make the "smile line" look too much like a "line".....just like the eyebrows, it is NOT a solid shape! Right now I am using a tortillion (blending stump). It moves the graphite from the pencil more quickly and efficiently than the paint brush. Tortillions are also very good at making lines. They are simply stumps of paper shapes like pencils. The edges of the face are TRICKY.......YES, they need to be darker in tone to seem rounded but they cannot appear as a solid line, or else your drawing will not seem believable. NOTICE that I am using the technique of cross hatching (line next to line) to apply the tones....then I am smudging it....followed by another layer of hatching...or I could then create a highlight with the eraser. Be careful with the hairline. It is always a gradual transition of tone....Believe it or not, even if a person is BALD, the top of the head is rounded and requires a gradual gradation of tone! The areas around the eyes seemed dark before.....right?....See what happens when you add darker tones? Shading is ALL ABOUT RELATIVITY! I did the hair with a 9B graphite stick BTW! Try to notice the subtle shading that I am doing to round the forehead.....Remember that I want to make it seem serene, since the facial expression is a smile. I am going to darken the corners to make it seem rounded. QUICK! DONT LOOK AT THE SCREEN! Merrill is using his fingers! Tsk Tsk! I am only using them because of the "skating rink" that I am drawing on (I am using non drawing paper which does not have a textured surface
Canon Performed by Kevin Macleod (http://incompetech.com) ISRC: USUAN1100301

PHOTO-REALISTIC EYE VIDEO: https://www.youtube.com/watch?v=lJ25OngOLts
ART SUPPLIES I USE: https://www.youtube.com/watch?v=xEBzCr_kNns
SUBSCRIBE: http://bit.ly/markcrilleySUBSCRIBE
OFFICIAL CRILLEY PLAYLIST: http://bit.ly/CRILLEYPLAYLIST
All 3 "Brody's Ghost" books at Amazon: http://bit.ly/BRODYSGHOSTbooks
"Mastering Manga" book at Amazon: http://bit.ly/MASTERINGMANGA
All 4 "Miki Falls" books at Amazon: http://bit.ly/MIKIFALLSbooks
Brody 1-Shot Comic at TFAW: http://bit.ly/BRODYoneshot
All of my books are available through your local bookstore-- Ask them to special order if they don't have my books on the shelf. Thanks for your support!! ~Mark
FACEBOOK: http://www.facebook.com/markcrilleyOFFICIAL
TWITTER: http://www.twitter.com/markcrilley

Welcome to 「PIN KORO - YouTube」♪
Today's drawing & painting video is「Art Challenge!Turn my subscriber's doodle into an Anime original character」
I hope this "how to draw" video will help.
I hope to turn your drawing into your Anime OCs next time.
Please send me a picture with Instagram Direct.
My Instagram URL
⇒ https://www.instagram.com/pinkoro_draw
I'll be waiting for your picture (^_^)
How to Direct Message with Pictures on Instagram
①Open the Instagram app.
If you aren't logged into Instagram, tap Login.
②Tap the paper plane icon.(It's in the top right corner of your screen.)
Doing so will open Instagram Direct.
③Select people you'd like to send a message to.
④Tap the "Write a message" field, and type in a message.
If you want to send a photo instead, you can tap the icon to the side of the text field and tap a photo to select it.
⑤Tap the Send.
Video for reference
⇒https://www.youtube.com/watch?v=YvlyYQpHoqA

I tried how to draw 3D "The Good Dinosaur" disney
my favorite movie
↓ ↓ ↓ ↓ ↓
The Good Dinosaur - Official US Trailer
https://youtu.be/O-RgquKVTPE
"Above The Clouds" Clip - The Good Dinosaur
https://youtu.be/ENOKlLFNaAM
Music material provided
↓ ↓ ↓ ↓ ↓
Music-Note.jp URL:http://www.music-note.jp/
効果音ラボ URL:http://soundeffect-lab.info/
ハコニワ デザイン http://hakoniwadesign.com
Please Subscribe.
↓ ↓ ↓ ↓ ↓
https://www.youtube.com/user/pinkorojapan

Amazing japanese clean Public Restroom.
Japanese toilets are kept clean by high-tech.
日本のトイレは、世界でもキレイだと評判をいただいているようですね。

Vos dessins du Challenge en vidéo !
------------------------------------------
Cette vidéo n'est qu'une compilation de vos dessins pour le défis des 3 marqueurs
Il n'y a ni classement ni prix à gagner, seulement du partage et un bon moment ensemble !
Des personnages, des dragons, des elfes ou encore du pixel art.. Vous avez débordés d'imagination !
------------------------------------------
Musique: heroboard – Musique Sans Copyright
Best No Copyright Music #01 — NoCopyrightSounds Mix
https://www.youtube.com/watch?v=29gG2a-STNU
------------------------------------------
My Instagram : @marine_le_dolphin
https://www.instagram.com/marine_le_dolphin/
My FaceBook : Pixy Art
https://www.facebook.com/pixyartyoutube/
Merci d'avoir regardé !

Les dessins de vos plus beaux costumes
dans une compilation
Quelques mots importants en fin de vidéo !
Je suis de retour !
----------------------------------------------------------------
Musiques :
https://www.youtube.com/watch?v=18M_1406UcA
https://www.youtube.com/watch?v=QHoqD47gQG8
https://www.youtube.com/watch?v=HiM2VWFUom0
https://www.youtube.com/watch?v=TPOTb0bodw8
https://www.youtube.com/watch?v=-erN69Uaqc8
----------------------------------------------------------------
Noms des comptes instagram et chaînes Youtube des participants:
Instagram:
-emma_rcft
- pen.cc.l
- angelmetiz
- arcturia.draw
- margauxcoco2_
YouTube:
- B Grafik art
- les vidéo de coco
- Hoikuen tuto
- Lix' PixelArt
- nono artwork
- theosimplement

Comment dessiner un Cupcake Kawaii Chat ?
(Accessible à tous !)
MATERIEL dans la description -
-------------------------------------------------
Temps: 20 minutes
Tools/Outils :
- Règle
- Gomme
- Equerre
- Critérium
- Promarkers
Promarkers couleurs :
- Rouge
- Rose rose
- Vert forêt
- Vanille
- Bourgeon
- Vert pastel
--------------------------------------------------
Vidéo annonce défis:
https://www.youtube.com/watch?v=Vv4jsaaxDvg
--------------------------------------------------
Musique :
https://www.youtube.com/watch?v=_oxXgfyBTFk
--------------------------------------------------
Niveau : Facile !
--------------------------------------------------
Mon Instagram : @marine_le_dolphin
https://www.instagram.com/marine_le_dolphin/
Mon FaceBook : Pixy Art
https://www.facebook.com/pixyartyoutube/
Merci :D

How to draw little dog with pixels (20 min)
MATERIAL / MATERIEL dans la description -
-------------------------------------------------
Tools/Outils :
Ruler
Promarkers list:
- Noir / Black
- Gris Glacé 1 et 4 / Ice Grey 1 and 4
- Rose rose / Rose Pink
- Bourgeon / Blossom
- gum
--------------------------------------------------
music : Music For Monetize Creative Commons FREE MUSIC
Del - Cold Sun (Original Mix) FREE Tropical House Music For Monetize
https://www.youtube.com/watch?v=G49IO7zSNMw
--------------------------------------------------
Level : Easy !
Pour dessiner ce Husky Sibérien le niveau de difficulté
est Facile !
--------------------------------------------------
Thanks for watch :D

Inktober jour 14 : « Féroce »
Temps : 25 min
Matériel :
- Critérium (croquis)
- Micro pigment noir
- Promarkers (gris glacé 1 - 3 - 4, Noir)
Musique :
https://www.youtube.com/watch?v=atYHbIxW-30
La Team Draw : @_teamdraw
https://www.instagram.com/_teamdraw/?hl=fr
Mon Instagram : @marine_le_dolphin
https://www.instagram.com/marine_le_dolphin/
Mon FaceBook : Pixy Art
https://www.facebook.com/pixyartyoutube/
A demain !

Je suis une licorne !
Et vous, qu'êtes vous ? ;)
RÈGLEMENT A LIRE CI DESSOUS !!
-----------------------------------------
Le défis – Règlement
- Un dessin par participant
(Pour ceux qui veulent envoyer leur photo modèle, vous pouvez)
- Donner votre nom ou pseudo ( !! )
- Dessin libre
- Thème : Vous en Cosplay
- Couleur libre
- Matériel libre
- Date : 15 mars (jusqu’à minuit)
- Envoi : Par mail uniquement !
challengepixyart@outlook.fr
Attention à l'écriture de l'adresse mail !!
Une fonction sur votre boîte mail permet de demander un accusé de réception
* Un mail de confirmation sera envoyé à tous les participants quelques jours avant la fin du délai
Si il n'est pas reçu vérifié l'adresse et renvoyer au plus vite avant le 15 à minuit !
-----------------------------------------
Où me suivre ?
Mon Instagram : @marine_le_dolphin
https://www.instagram.com/marine_le_d...
Mon FaceBook : Pixy Art
https://www.facebook.com/pixyartyoutube/
-----------------------------------------
Musiques:
https://www.youtube.com/watch?v=f3fX6dxSjTc
Merci et bonne chance ! ;)

How to draw Hello Kitty with pixel ?!
Time = 20 min
MATERIAL / MATERIEL dans la description -
-------------------------------------------------
Tools/Outils :
Ruler
Gum
Promarkers list:
- Noir / Black
- Bourgeon / Blossom
- Magenta
- Or / Gold
--------------------------------------------------
music by : 4Tune
Sad Piano Music Instrumental | Winter Dawn by Jens Kiilstofte | Royalty Free Music
https://www.youtube.com/watch?v=qYLIanjXq7Y&index=8&list=PLRm766YvPiO9xR0wEIIBvwM2JEBGVVCAG
--------------------------------------------------
Level : Easy !
Niveau : Facile !
--------------------------------------------------
My Instagram : @marine_le_dolphin
https://www.instagram.com/marine_le_dolphin/
My FaceBook : Pixy Art
https://www.facebook.com/pixyartyoutube/
Thanks :D

How to draw Pokemon Squirtle with pixels
MATERIAL / MATERIEL dans la description -
-------------------------------------------------
Tools/Outils :
Ruler
Promarkers list:
- Noir / Black
- Aqua frais / Cool Aqua
- Bleu ciel / Sky Blue
- Cannelle / Cinnamon
- Jaune pastel / Pastel Yellow
- Abricot / Apricot
- Cacao / Chocolate
- Gris glacé 1 / Ice grey 1
- gum
--------------------------------------------------
music by : Argofox | Royalty Free Music
Hinkik - Explorers [Creative Commons]
https://www.youtube.com/watch?v=GtSfk...
--------------------------------------------------
Level : Medium
Pour dessiner ce Pokemon Carapuce le niveau de difficulté
est Moyen !
--------------------------------------------------
Thanks for watch :D
J'espère qu'il vous plait ! Il est mignon nan ? ^^

WE NEED A VISUAL ARTS CATEGORY ON YOUTUBE THREAD-http://www.google.com/support/forum/p/youtube/thread?tid=2a9806f929074cbd&hl=en&fid=2a9806f929074cbd0004b630ad37cc3e
Facebook- http://facebook.com/kazanjianm
Twitter- http://twitter.com/kazanjianm
Website- http://merrillk.com
(Merrill) Supplies I Use- http://www.jdoqocy.com/click-4....247664-805536?url=ht
The Dark Ages (Middle Ages, Medieval Times) is my favorite period in art history. Monks did most of the artwork and kept literacy alive. The Roman infrastructure broke down after Constantine the Great (Constantine II) moved the capital to Byzantium (later Constantinople). Roads crumbled, barbarians sacked....people stayed still.....Latin broke down in to English, French, Spanish Italian, Romanian and Catalan. The artwork was called "gothic" by later art historians (which was an insulting term).
While the work lacked realism, it sure had a lot of character! I was inspired to do this mixed media work of art due to my fascination on this period in history. To make this artwork, Church vs. Crown, I used, pencil, color pencil, illustration marker,
Link- http://merrillk.com/?part=fineart&articles_id=6935&act=artist1&artist=69&collection=114
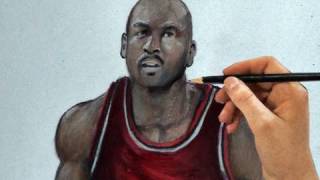
Illustration markers are incredible tools for artists! They add color quickly and accurately without a time consuming set up or a messy clean up. They can be used alone or in combination with other artistic media. This tutorial will teach you what you need to know about illustration markers. You will learn how to use them as I demonstrate by drawing a basketball player. Lets Get Started with thos tutorial!
Lets start by giving you some background knowledge.
1a.) Brands- The most popular brands are Prismacolor, Copic , Ad Chartpak and Pantone. I will do a drawing demonstration of Ad Chartpak in this video.
1.) Markers- When you use illustration markers, think of yourself as a watercolor artist. Watercolor artists create their work with beautiful transparent colors. If you choose to try illustration markers, you will definitely be able to apply and make multiple layers of transparent color. But there is a difference......the ability to mix. The colors are pre mixed and they do not blend together like wet paint as you can see in this demonstration.
2.) Special Markers- There are two different types of special illustration markers; Blender markers and gray markers for tones. The blender marker is a little deceptive. It is simply a marker without color in it. It is comprised of the fluid that the marker is mixed in. When it is applied on paper, the colors will bleed together. Notice how the line in between the two colors has disappeared. You will see more examples of how to use the blender in my demonstration. The gray markers are used to build tones. They come is Warm and Cool chromas. The warm gray markers lean towards the warm orange half of the color wheel and the cool ones lean towards the cool blue half. As you saw in the previous section, we cant mix marker colors on a palette like paint, so these gray markers become extremely important. These markers give an illustrator the ability to add tones......and tones make an artwork interesting by giving it depth. As you can see, these markers have a range of tones from one to ten. Ten is the darkest tone and one is the lightest.
3.) Paper- In order to use Illustration Markers to their full capacity, you will need Bleedproof paper. It is specifically made for markers, and it prevents markers from running. Notice the difference in the amount of bleeding of the printer paper on the left, compared to the Bleedproof paper on the right.
4.) As a final point before you see the demonstration, I wanted to make you aware of an article that I wrote that goes in to depth about the nuances of illustration markers. I will recommend color palettes, compare brands and describe techniques for illustrators. It is a good resource for people who wish to learn about illustration or for any person who is in the market for illustration markers. I will leave a link in the video description.
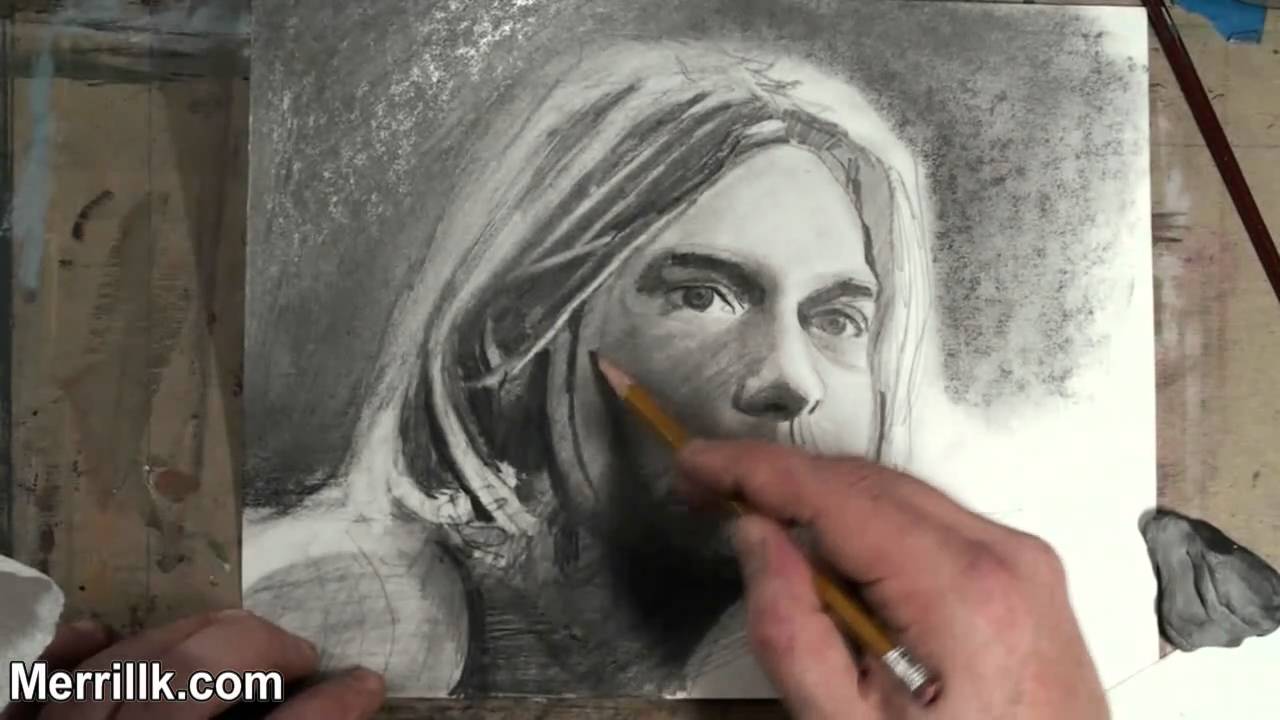
This is the extended shading tutorial on how to draw Kurt Cobain of Nirvana. Pause the video at different points and use the image on the screen as your reference image. I am combining two methods called 1.) cross hatching and 2.) smudging.....right now. Pause the video at different points and use the image on the screen as your reference image. It doesnt get very dark under the eyes.......however, above the eyes (between the eye and the eyebrow) it gets very dark. Kurt has dark and full eyebrows. Use a #2 (HB) pencil to start. Dont be scared to press hard in the eye region. The nose is tricky. The darkest part is the nostril (not part of the step by step video). But the entire shape of the bottom of the nose gets pretty dark. After, I fill it in, observe it, then draw it. I am using a #7 Bristle Flat brush for the shading. The top lip is dark and solid in shape. The LEFT side of his face (the side on YOUR right) is lighter in tone than the right side. The bottom left corner of the page will get very dark. I "went right in" with a 6B pencil. REMEMBER, shading is all about RELATIVITY, so compare the tones of the different areas of the image, The shape at the bottom of the face will eventually be blended in with other dark tones. In order to make the hair "pop out" you need to darken the background. (Its all about relativity!!!) The hair is a LOT of Adding....then erasing.....adding...then erasing ....Be sure to make your strokes in the same direction at the hair in this reference image.....Notice that I am using the eraser to "draw". Now the "PORTRAIT" begins....Now it looks like a human being......but I have to "wrestle" with it to make it look like Kurt Cobain. Use a slip sheet (look under my hand) when you get this far. The darkest areas have several layers of hatching. (8B pencil).
The Machine Thinks, Toccata and Fugue in D Minor and Waltz - Tschikovsky Op. 40 are by Kevin MacLeod of Incompetech.com and are under a Creative Commons license (attribution). I will credit Mr. MacLeod in the video description. All visuals are made by me (Merrill Kazanjian). I understand and choose to comply with the rules of copyright law.

Hi, YouTube this is my Drawing of Venom from the movie / MARVEL comic books Spider-Man. This drawing took probably took about 3 hrs to draw. Drawing his teeth was the hardest (a lot of detail) i think it turned out good! Please comment, Rate, and Subscribe tell me what you think of this one and what should i draw next! thank you for watching PLEASE SUBSCRIBE FOR MORE VIDS LIKE THIS!
Instagram.com/orangemonkeyart
Facebook.com/orangemonkeyart
