


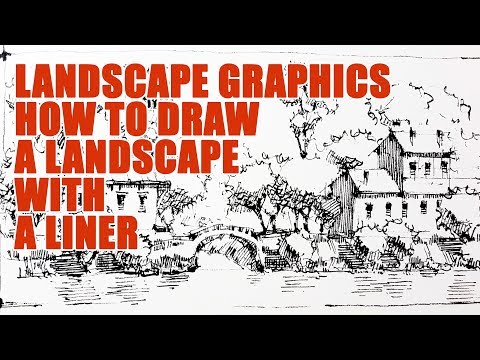


Pencil Drawing Tips- Smile Expression- Demonstration How to Draw and Shade a Realistic Face

This video will teach you how to draw a realistic looking face with a happy (smile) expression. The "calm" eye is almond shaped but when a person is smiling, squeeze the two eyelids together. The "calm" eye is almond shaped but when a person is smiling, squeeze the two eyelids together.Notice that you can see the fold of the upper eyelid a little bit more. The eyebrows and forehead are in a relaxed position. To draw a smiling face successfully, you need to be able to make the cheeks seem more rounded....especially with the shadow below the cheek! Right now, I am adding a construction line for where the shading will go.( I am working from a reference picture, BTW.) To draw a smiling face successfully, you need to be able to make the cheeks seem more rounded....especially with the shadow below the cheek! Right now, I am adding a construction line for where the shading will go.( I am working from a reference picture, BTW.) SLOWLY build up the shading and be very patient! CONFESSION: I used non drawing paper for this drawing! Watch and see what it does when I erase! ARGH!!!! Yes there is a difference!OK couldn't wait! "Drawing paper" is more textured....or as artists say...."has more tooth"....watch the shading VANISH when I erase because the surface is as slippery as ICE! ARGH!!!! The eyebrows are NOT one solid tone. Try to observe the eyebrows of whoever you are drawing before shading them. The only exception is when heavy make up is applied.....Maybe its Maybelline! Shading is ALWAYS dependant upon LIGHT! There are no universal rules to applying tones to drawing.....because lighting conditions vary so much! REMEMBER THAT! In this case, the light came from above. This is most often the case. Notice the shadow that I am adding between the brow and eye. When drawing a smiling face, the area UNDER the eye is very important! The orbicularis oculi muscle (muscle around eye) contracts...The eye is ball shaped.....thus "eyeball"....our shading has to show that it is ROUNDED!The brush is a BIG help. It allows me to shade something delicately....which is needed, when drawing skin.....I use bristle AND soft tipped brushes.... both give slightly different effects. REMEMBER, when a person is smiling, you will (usually) only see their top row of teeth. ALSO, notice the corners of the mouth. Notice that the two sides of the mouth are shaded dark (because the teeth wrap around in a horseshoe shape).REMEMBER, when a person is smiling, you will (usually) only see their top row of teeth. Everyones smile (the shape of their mouth during a smile) is unique! OBSERVE OBSERVE OBSERVE! Draw in the lashes as triangular masses. Notice that the top eyelashes are a LOT longer and fuller than the bottom lashes. This is the case for everybody. Males, in general have shorter lashes than females...Maybe he's born with it...Maybe its TESTOSTERONE! If you are GOOD at line drawings and want to work on shading, make photocopies of your work so that you can make multiple attempts at shading....you will learn FAST! TRUST ME! CLICK HERE to go to my shading tutorial.....It gives you a link to a print out worksheet (so that you could shade along with me.) Remember SHADING is all about RELATIVITY! So compare the tones of different areas of your reference image or sitter. Be sure NOT to make the "smile line" look too much like a "line".....just like the eyebrows, it is NOT a solid shape! Right now I am using a tortillion (blending stump). It moves the graphite from the pencil more quickly and efficiently than the paint brush. Tortillions are also very good at making lines. They are simply stumps of paper shapes like pencils. The edges of the face are TRICKY.......YES, they need to be darker in tone to seem rounded but they cannot appear as a solid line, or else your drawing will not seem believable. NOTICE that I am using the technique of cross hatching (line next to line) to apply the tones....then I am smudging it....followed by another layer of hatching...or I could then create a highlight with the eraser. Be careful with the hairline. It is always a gradual transition of tone....Believe it or not, even if a person is BALD, the top of the head is rounded and requires a gradual gradation of tone! The areas around the eyes seemed dark before.....right?....See what happens when you add darker tones? Shading is ALL ABOUT RELATIVITY! I did the hair with a 9B graphite stick BTW! Try to notice the subtle shading that I am doing to round the forehead.....Remember that I want to make it seem serene, since the facial expression is a smile. I am going to darken the corners to make it seem rounded. QUICK! DONT LOOK AT THE SCREEN! Merrill is using his fingers! Tsk Tsk! I am only using them because of the "skating rink" that I am drawing on (I am using non drawing paper which does not have a textured surface
Canon Performed by Kevin Macleod (http://incompetech.com) ISRC: USUAN1100301
