Лучшие

Did this drawing with oil pastels on a 12 by 16 inch acrylic sheet of paper. Took me about 2 hours to complete this over 2 days.
Supplies
Sennelier oil pastels
Canson Acrylic grade paper 185 pound
Blending stump
standard pencil
You can view this drawing on my deviant art page.
http://digg409.deviantart.com/....art/Fall-Stream-1623
Song: Home Again
Artist: Ryan Farish
Farish Music International (BMI)
Licensed with permission, RYTONE Entertainment
You can download this song from the Itunes store.
http://itunes.apple.com/us/alb....um/from-the-sky-delu

It takes me on average about 5 days to put a cutting board together from scratch. What I am showing here is the very beginning process of doing so. I will be posting further vlogs which documents the process.
Brand of oil pastels used is Sennelier. They are a great brand but can be costly. I recommend that if you have fine art stores near you that carry the brand, sign yourself up to their newsletters because usually during the back to school sales, they will put them on sale for a pretty good price. That is how I got my first set of them.
Other Places to Find my Art
Website: http://www.tylersartshack.com
Facebook: http://www.facebook.com/tylersartshack
Twitter: https://twitter.com/#!/TylersArtShack
Google+: https://plus.google.com/115405....344518849808905/post
Deviant: http://tylersartshack.deviantart.com/
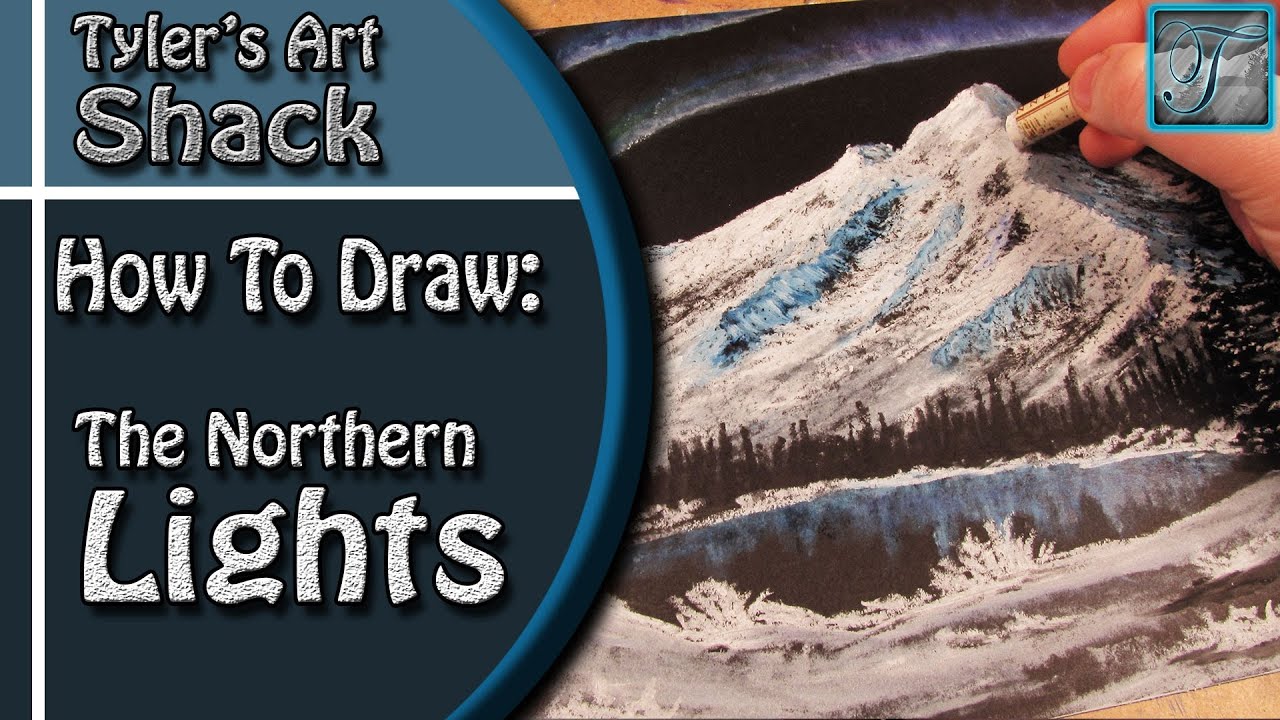
Welcome back everyone to an oil pastel drawing of the northern lights! This was a suggestion that I had gotten on facebook after asking what sorts of drawings everyone would like to see and that one sparked my interest. After searching around for some images, I decided to sort of keep it a bit more bob ross styled but with my own touch of course.
I started this one off with drawing in the mountains. I didn't have to worry about the sky because the paper was black to begin with and that is the color that I wanted the sky to be. It also makes it a lot easier to draw in the mountains with having a black background.
With drawing in the mountains, I started off with a pencil sketch to see where I wanted different details. and general placement of the objects overall. I then got myself going with the oil pastel. I used straight white for the highlighted side of the mountain. I also didn't press too hard on the pastel so that it would give it nice break look so that it would leave a nice texture for it. For the shadowed side, I used a very dark blue and then applied the white oil pastel on top of it to bring out a lighter color.
For the Northern Lights, I simply applied a very potent blue line followed by 2 more to create 3 lines all together. After applying some purple and green to give it added color, I took a blending stump and blended them towards the top of the page to help spread them to give them a better look. Later on I added a lot of white to really help bring them out more.
The trees were done with black oil pastels and did them in the traditional way that I normally do pine trees. I have quite a few videos that explain how to draw in this way. I also decided to add a bit of white oil pastel to make it look like a fresh snowfall just for the added effect.
On the foreground, I literally went to town with that oil pastel just creating different textures and such just to help create a nice area to finish things off. I didn't spend too much time with that. but In the end I think that this one came out really well.
Thank you everyone for watching and I hope you enjoyed the drawing!
Music info:
Artist: DJ_Rkod
Song: Faster than the Eye Can Persieve
Did another one of those abstract/nonobjective art drawings. Ive done drawings like this a lot in the past and can be great fun to do. Its just doodling on an entire page with random stuff and it looks awesome in the end. It also gives a great boost in drawing technique and skill.
You can view this drawing along with all my other works of art from my deviant art page.
http://digg409.deviantart.com/gallery/
Song: Deep
Artist: Ryan Farish
Farish Music International (BMI)
Licensed with permission, RYTONE Entertainment
www.ryanfarish.com
You can purchase this song from Itunes here.
http://itunes.apple.com/us/album/deep/id327192176?i=327192284&ign-mpt=uo%3D4

Welcome back everyone! This video will be about The Basics of Highlights Midtones and Shadows
Other Places to Find my Art
Website: http://www.tylersartshack.com
Facebook: http://www.facebook.com/tylersartshack
Twitter: https://twitter.com/#!/TylersArtShack
Google+: https://plus.google.com/115405....344518849808905/post
Deviant: http://tylersartshack.deviantart.com
Make a Donation Via Paypal! http://tinyurl.com/o6cnnpv
This video is all about highlights, midtones, shadows, cast shadows, and reflected light. I will use an apple to demonstrate all of these and give you a basic understanding of this so that you can apply this method to other drawings.
I wanted to start out by explaining different types of lighting to show you how one light source or multiple can really change how an object looks. Using one light source is a great way of being able to clearly see highlights and shadows. Think of a highlight as a direct reflection or the brightest area of a drawing and a shadow as the absence of light. The midtones are indirect light that is illuminating an object.
Now that this has been established, the next thing is to begin drawing. Before that though, we need to understand where the highlights midtones, and shadows are. This can be difficult when looking at an object in color. So what I like to do is take a photo of the object and turn it into black and white with a filter. This gets rid of all the color and you can see the true value scale of the drawing. This helps a huge amount and this method can be used for anything you wish to replicate in pencil.
Working on the drawing now, I really only used an HB and 2B pencil for the entire piece. I began by drawing a rough circle for the overall apple shape and then the cast shadow. Afterwards, I toned the background. Keeping in mind where the lightest tones would be, I began to shade the whole apple in that tone. Then with the darker tones, I shaded the overall apple starting in those darker areas and working my way around. I want to build up layers while shading to help build up depth. This is a process that can take a bit of time and with practice, you should see some improved results.
I hope you all enjoyed this video and thanks a lot for watching!
Music Info:
Song: Corporate Uplifting Rock
Artist: Plastic 3
http://tinyurl.com/nthpoga

This is great drawing practice if anybody wants to gain a boost in artistic talent. Believe me, when I first started drawing, I could only draw stick figures. After drawing like this for about a year or so, I can do all the things I do now. I do believe that art is something you are born with but I also believe that one can also learn the skill. Try and draw at least 1 thing every day and you will get much better as time goes on.
Song: Indian Summer
Artist: Ryan Farish
Farish Music International (BMI)
Licensed with permission, RYTONE Entertainment
www.ryanfarish.com
You can purchase this song from this link.
http://itunes.apple.com/us/album/beau...

Cool Trick Art Drawing 3D on paper - Anamorphic illusion - Draw step by step.
Please Like and Subscribe to follow my work.
Follow me on Instagram: sonhoscomdimensao (https://www.instagram.com/sonh....oscomdimensao/?hl=pt
Truque Arte Desenho 3D em papel- Ilusão Ótica - Desenho passo a passo.
Não te esqueças do "Like" e subscreve o canal para seguires o meu trabalho.
Material used:
Paper A4 180g
Graphit and dry pastel pencil
Markers
Eraser
Materiais usados:
Papel A4 180g
Lápis de carvão e de pastel seco
Marcadores
Borracha

Cool Trick Art Drawing 3D on paper - Anamorphic illusion - Draw step by step.
Please Like and Subscribe to follow my work.
Follow me on Instagram: sonhoscomdimensao (https://www.instagram.com/sonh....oscomdimensao/?hl=pt
Truque Arte Desenho 3D em papel- Ilusão Ótica - Desenho passo a passo.
Não te esqueças do "Like" e subscreve o canal para seguires o meu trabalho.
Material used:
Paper A4 180g
Graphit and dry pastel pencil
Markers
Eraser
Materiais usados:
Papel A4 180g
Lápis de carvão e de pastel seco
Marcadores
Borracha
![Stickers, Pens, Planners, Stationery and more ~ | New Art & Planner Supplies [Haul]](https://i.ytimg.com/vi/u4UyuG7I0vc/maxresdefault.jpg)
New Doodle Book ~ Kawaii Doodle Cuties: http://bit.ly/KDC2preview
[Available on Amazon and other online stores]
........................................................
More videos like this ~
Unboxing + Haul Videos: http://bit.ly/unboxing-haul
........................................................
Here are multiple hauls, bought from different online stores, Mango, MUJI and local art supplies store (all from October). I was sent ScrawlrBox (http://scrawlrbox.uk) which is also included in the video (more art supplies, yay!) :D I hope you enjoy the video!
For sketches, doodles and updates ~
• Instagram: http://www.instagram.com/piccandle
• Facebook: http://www.facebook.com/piccandle
• Twitter: http://www.twitter.com/piccandle
Feel free to like, comment, share and subscribe :)
........................................................
❖ See another video:
waterdoodle: http://bit.ly/waterdoodle
Tin Cans waterdoodle: http://bit.ly/tinCansWaterdoodle
❖ Playlists:
PicCandle Doodles: http://bit.ly/piccandleDoodles
PicCandle Tutorials: http://bit.ly/piccandleTutorials
30 Things to Doodle: http://bit.ly/30ThingsToDoodle
Inktober'16 Doodles: http://bit.ly/piccandleInktober2016Doodles
........................................................
❖ Follow Me:
• Facebook: http://www.facebook.com/piccandle
• Twitter: http://www.twitter.com/piccandle
• Instagram: http://www.instagram.com/piccandle
• Tumblr: http://piccandle.tumblr.com
❖ Shop:
Etsy: https://www.etsy.com/shop/piccandle
........................................................
❖ Music:
Title: New Places
Artist: Nicolai Heidlas
........................................................
GET LIST OF MY TOP 5 DRAWING TOOLS HERE http://www.thecartoonblock.com
How to draw Sonic The Hedgehog by Evan Burse. The speedy little hedgehog with attitude. From the classic Sega video games and cartoons, to the modern 3D games and crossovers, the design hasn't changed too much.
How to Draw Sonic The Hedgehog step-by-step:
Start by drawing his head his head which is a big ball. His body is a small oval drawn at an angle. For now the legs are sticks and his feet are just triangles or pyramids for now. This is the basic shape of his body. Now let's focus on drawing his face and getting the details on there. Sketch his center line down and you're going to draw his eye line diagonally going away from his nose area. He has these huge eyes like Spiderman's mask just with his mean looking brows looks furrowed brow pointing down. His nose is like a pencil shape that is poking out. There is one pupil over here and you're going to draw in some simple guidelines, so you can match the other one with it. Next, tighten up his mouth areas by drawing a simple curve with the little cheek that he has. His ears have little triangles on top and the other side is turned away from us. His top fin or hair rather, goes out like a sharp fin. His second one comes down and goes just where his mouth begins. The last one comes out and ends at the base of his neck.
Next, draw his arms down .They are just straight lines. The palm of his hand is a circle, a basic shape. His fingers are kind of like bananas. If you need reference, draw your own. Now you're going to thicken up the lines in his legs. And add these donuts on his ankles. His shoes are just flushing out the big triangle. Sketch out each one out here, put the strap going across his foot. Now back to those donuts around his ankle. I did those because that's the basic shape of his sock. Instead of just drawing the sock, you want to show how everything has a shape underneath. His other arm is just resting on his hip. Now erase the construction drawing lines that you don't want. And darken in the ones that you do want. Lastly, shade in his arms.
Subscribe to the vlog channel:
http://www.youtube.com/cartoonblockuncut
Join me on Facebook:
http://tinyurl.com/244896b
Follow me on Twitter:
http://twitter.com/CartoonBlock

Click this LINK to get my sketchbook on Kickstarter NOW:
http://www.kickstarter.com/pro....jects/1713540701/car
Twitter: http://twitter.com/CartoonBlock
Facebook: https://www.facebook.com/thecartoonblock
Have you ever wanted to learn how to draw "Metal Skin"? You see this on characters like Colossus & Cable from X-Men. I'll show you the secrets in this tutorial.
Materials Used:
-Blue & Red ColErase pencils
-HB drawing pencil
-Copic Multiliner 0.3
-Copic Sketch Markers (C3 & C5)
-Sakura Gelly Roll pen
Music by: http://www.youtube.com/teunzeist

GET LIST OF MY TOP 5 DRAWING TOOLS HERE http://www.thecartoonblock.com
How To Draw Kakashi by Evan Burse. Learn how to draw Kakashi Hatake from Naruto! He is the leader & teacher of Team 7 (consisting of Naruto, Sasuke & Sakura.
Don't forget to enter the Kakashi Drawing Contest. Hurry! The contest ends Sunday, May 2 @11pm Pacific Time.
Thanks to BigBadToyStore.com for supplying the prizes for this contest: http://www.bigbadtoystore.com
Music by Breakz17: http://www.youtube.com/breakz17
Follow me on Twitter:
http://twitter.com/CartoonBlock

GET LIST OF MY TOP 5 DRAWING TOOLS HERE http://www.thecartoonblock.com
How To Draw Shadow The Hedgehog by Evan Burse. Today, I'm gonna show you how to draw SHADOW The Hedgehog! Shadow is the Anti-hero from the famous Sonic video games & animated series. I'm going to show you step-by-step on how to draw Shadow. Let's get started!
Beginning with his head, which is a simple sphere. Next we are going to draw the body. It's smaller like a bean or jellybean shape just below the head at an angle. His legs, we're going to draw in sticks for his legs; they're just diagonal. Don't have them just straight up and down. That's a boring pose. So now you're going to put his feet as triangles and pyramids. Now you're going to draw the center line going down on the head. This line goes right between the eyes down to the bottom of his face. And you're going to go ahead and draw his eyes diagonal. The upper eyelid looks kind of like Spiderman's mask to try and give him that mean expression with his eyes. Start drawing in his muzzle here, his mouth area where his nose and mouth will go. When you curve his eyebrow area that gives him a mean expression. One detail you want to keep in mind when drawing Shadow is in the corner of his eyelid, there is a red accent. I guess you can say that it's the under part of his eyelid. His nose is like a pickle shape. There is nothing difficult about it.
Now add guidelines for his eye balls. Keep them on the same level so one eyeball isn't higher or more crooked than the other. We are going to modify his expression. He looks meaner than sonic because he means he's a more serious character. Let's add a shine here on his nose. You want to make sure his eyebrow is very curvey. The more curved they are the meaner he looks. All around Shadow has more detail than sonic. His ears are shaped like a triangle; it's pretty simple. There is one triangle inside of another one. For his hair you want to start near the base of his neck for his lower strand of the hair and make a square with a triangle at the end of it. Connect them and curve them off. The same goes for his upper strand of hair. Like a slanted square, then a triangle, then you curve it off. Kind of connect them together and just make sure that his upper strand of hair sticks out further from his head than his lower strand. A lot of people make the mistake of making that one shorter, but his upper stand is longer. Now I'm going to put that middle hair fin in his head. And then you're going to draw the red streaks. You can decide what lines you want to keep and get rid of. Make sure the curves go along with the shape of his head. For his other ear and his hair on the other side of the head they are just the same as the side we just drew but just smaller because they're in perspective and are further away. Making it smaller gives the illusion that it's further away from you; you can use this trick with anything you draw. Now I'm getting those red streaks down here for his highlights. Now we are going for that white fur on his chest. As you can see I just started out with a triangle and we're just putting in the fur. Next, draw the hairs on his back. And then his tail down below may be a little too big so we may have to shrink that back hair fin. And his arm can just be extended, and put a square at the end of it. Let's go ahead and give it some thickness.
Subscribe to the vlog channel:
http://www.youtube.com/cartoonblockuncut
Join me on Facebook:
http://tinyurl.com/244896b
Follow me on Twitter:
http://twitter.com/CartoonBlock
Music by:
www.youtube.com/tekkaxe

Do you wanna know how to draw Bart Simpson....the easy way? My buddy Chance Raspberry was kind enough to do a Bart Simpson drawing tutorial. He works on "The Simpsons" series.
Step-by-Step Guide on How to draw Bart Simpson:
Let's start drawing Bart. His head is sort of like the shape of a soda can. So get that shape down first. You want to draw really strong solid shapes.
And then his neck is kind of like a can of tuna, flat and wide. And then once you get those two shapes drawn you're basically going to draw the center line for his head and then do another line about the same distance from the side of his head. And that's going to tell you where his eyes go in just a little bit.
Then you're going to cut his head in half and that will tell you where the top of his eye goes and then from that middle center point to the bottom, cut that in half. And now we can see where his eyes go. And so you're just going to block that in. Go ahead and put that other eye in there. And then, see what we've done now, is created an entire grid for his face.
So because we've got this eye line here I know that his nose is cut in half by that eye line and his ear is starting just below that eye line and ends about right where his neck needs to end at the bottom of his head. So now to get Bart's hair we'll just go ahead and draw a guideline for his hair and Bart had exactly nine spikes on the top of his head.
So the to do it is we get those two hair spikes on the outside first, draw the one in the middle, and then we draw the hair spikes in between those just keeping them equal distance from one another equally spread apart. And then we just fill in the gaps. And then you get nine equally spaced spikes.
Next we're going to go ahead and add in his eyebrow. Look at the bottom of his head. The lip is about the same thickness as his eyebrow. Go ahead and add the details of his ear and complete those eyes. And let's go ahead and add his pupils, which by the way you can draw a line about half way through the eyes. And that's pretty much Bart Simpson.
So once you've got his head drawn the rest is pretty simple. Or I guess I should just say that the head is the most difficult part. We're going to continue that center line down his neck and into his chest. And then we're going to draw kind of like an upside down light bulb shape just like Homer.
Next, draw the characters legs and arms; make sure to bend them ever so slightly. Just give a little bow and that will create a more life like feel so they're not so stiff. So once you've got that figured out you can just kind of block in his shoes.
Keep your drawing rough and loose right now; you'll come back later and clean it up. It doesn't have to be clean as your figuring out the shapes. And this will actually help you in the long run. Go ahead and draw almost upside down tea cups for sleeves. Again you want to give his arms more a little bow into them. And his hand pretty much comes down to where the bottom of his stomach is, sort of the crotch area.
On the palm of the hand and we just go ahead and add the fingers onto there, break those apart and add little bit of a thumb. Just tie down all of our lines and clean up Bart. And we're going to go ahead and fix everything that is not necessarily working. And you get a nice solid Bart drawing.
And darken in the lines there and solidify the shapes. Get everything finished and neat by cleaning up the rough lines. Go through and get those fingers working, the volume of his shorts, move those legs slightly adjust and get our detail all in there and all the details that make Bart, Bart. Give the shoes some dimension and we're pretty much done there, all the details.
And there you have it, Bart Simpson. Thank you for watching guys. ☺
Be sure to check out his channel too:
http://www.youtube.com/ChanceRaspberry
Let me know what Simpsons character you'd like to see next here on CartoonBlock. Just leave a comment below.

GET LIST OF MY TOP 5 DRAWING TOOLS HERE http://www.thecartoonblock.com
Learn how to draw Silver The Hedgehog by Evan Burse. I show you step-by-step how to draw the 3rd most popular character in the Sonic universe. Silver is from 200 years in the future. Now you can learn how to draw him the.
Subscribe to the vlog channel:
http://www.youtube.com/cartoonblockuncut
Join me on Facebook:
http://tinyurl.com/244896b
Follow me on Twitter:
http://twitter.com/CartoonBlock
Cartoon Block
P.O. Box 7461
Northridge, CA 91327
Music by:
http://www.youtube.com/ForgeTrackAudio1024
http://www.youtube.com/tekkaxe

At Wondercon, Batman Beyond comic book artist (Ryan Benjamin) drew one of my favorite characters of all time--Spartacus.
Cartoon Block
P.O. Box 7461
Northridge, CA 91327
Subscribe to the vlog channel:
http://www.youtube.com/cartoonblockuncut
Join me on Facebook:
http://tinyurl.com/244896b
Follow me on Twitter:
http://twitter.com/CartoonBlock
Music by:
http://www.youtube.com/newyorkoutlawz
http://www.youtube.com/breakz17

Check out the concept art in the book The Art of Thor. It has cool concept art from the film. These are the same artists that developed the art for the Iron Man films.
Also, be sure to check out the end of the video to learn how you can participate in the drawing contest.
Thanks to Sakura Of America for sponsoring this contest:
http://www.youtube.com/Sakuracolorproducts
Subscribe to the vlog channel:
http://www.youtube.com/cartoonblockuncut
Join me on Facebook:
http://tinyurl.com/244896b
Follow me on Twitter:
http://twitter.com/CartoonBlock
Music by:
www.youtube.com//teunzeist

Get My FREE Superhero Mini Course
http://www.thecartoonblock.com/superherominicourse
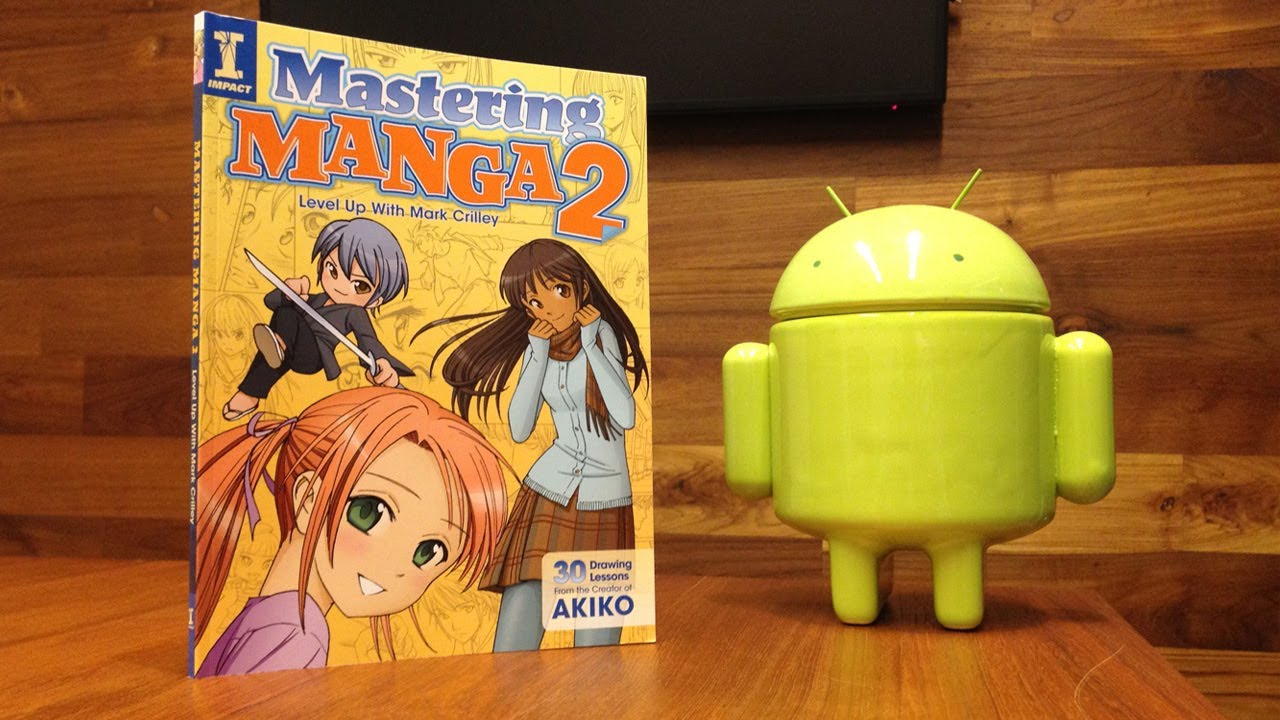
Here's a quick look at Mark Crilley's new book, Mastering Manga 2 Level Up With Mark Crilley. Be sure to subscribe to Mark's channel: http://www.youtube.com/markcrilley
Facebook: http://tinyurl.com/244896b
Twitter: http://twitter.com/CartoonBlock
Music by: http://EpidemicSound.com

My buddy, Chance Raspberry, who is an animator on the Simpsons did this cool tutorial of Jake from "Adventure Time".
Cartoon Block
P.O. Box 7461
Northridge, CA 91327
Subscribe to the vlog channel:
http://www.youtube.com/cartoonblockuncut
Join me on Facebook:
http://tinyurl.com/244896b
Follow me on Twitter:
http://twitter.com/CartoonBlock