Лучшие

スマホでスクショ(スクリーンショット)を撮る方法を動画で解説します。
この動画では、
Android(アンドロイド)Xperia acro IS11Sを使って解説してますので、
ぜひ参考にしてみてください。

Very Easy! How to tie with a string in an instant - life hacks in japan
雑誌や新聞、段ボールなどを縛るときに使ってください。
紐が緩まずに簡単に縛れます。
リボンの結びにも応用できます。

Welcome to 「PIN KORO - YouTube」♪
Thank you for the visit.
Today's video is 「 Easy OREO Cookie Art!How to Draw Love Heart(Happy Valentine's Day!)step by step.」
Let's learn "how to turn words into cartoon", "3D drawing", and so on from this YouTube channel.
Drawing is easy and fun.
With this channel, Everyone can learn how to draw with simple way.
I hope you enjoy this video.
Please SUBSCRIBE for new video. Thanks
▷SUBSCRIBE
https://www.youtube.com/user/pinkorojapan
▷CONTACT
Instagram https://www.instagram.com/pinkoro_draw
Facebook https://www.facebook.com/pinkoro66/

Welcome to 「PIN KORO - YouTube」♪
Thank you for the visit.
Urgent News !!
A large typhoon will land in Japan tomorrow, and so I may not be able to respond to comments for a while.
I'm sorry.
Thank you for your understanding in advance.
I hope I can see you again.

Welcome to 「PIN KORO - YouTube」♪
Thank you for the visit.
Today's video is 「Very Easy ! How to magic - Remove your thumb optical Illusion」

Welcome to 「PIN KORO - YouTube」♪
Thank you for the visit.
Today's video is 「Very Easy ! Art Style Challenge Drawing - How to Draw Myself in 5 Animated "Teen Titans Go!", Cartoon and Comic art styles challenge」
I draw Robin & Cyborg & Starfire & Beast Boy & Raven today.
Let's learn how to drawing Kawaii doodle with me.

Welcome to 「PIN KORO - YouTube」♪
Thank you for the visit.
Today's video is 「How to turn word WARN step by step into a Cartoon - Learning Cute doodling art on paper」
Let's learn drawing with me.
SACAR UN DIBUJO DE LA LETRA "WARN" - Dibujos faciles paso a paso

Welcome to 「PIN KORO - YouTube」♪
Today's drawing & painting video is「Art Challenge!Turn my subscriber's doodle into an Anime original character」
I hope this "how to draw" video will help.
I hope to turn your drawing into your Anime OCs next time.
Please send me a picture with Instagram Direct.
My Instagram URL
⇒ https://www.instagram.com/pinkoro_draw
I'll be waiting for your picture (^_^)
How to Direct Message with Pictures on Instagram
①Open the Instagram app.
If you aren't logged into Instagram, tap Login.
②Tap the paper plane icon.(It's in the top right corner of your screen.)
Doing so will open Instagram Direct.
③Select people you'd like to send a message to.
④Tap the "Write a message" field, and type in a message.
If you want to send a photo instead, you can tap the icon to the side of the text field and tap a photo to select it.
⑤Tap the Send.
Video for reference
⇒https://www.youtube.com/watch?v=YvlyYQpHoqA
Link- http://merrillk.com/?part=fineart&articles_id=6935&act=artist1&artist=69&collection=114
Illustration markers are incredible tools for artists! They add color quickly and accurately without a time consuming set up or a messy clean up. They can be used alone or in combination with other artistic media. This tutorial will teach you what you need to know about illustration markers. You will learn how to use them as I demonstrate by drawing a basketball player. Lets Get Started with thos tutorial!
Lets start by giving you some background knowledge.
1a.) Brands- The most popular brands are Prismacolor, Copic , Ad Chartpak and Pantone. I will do a drawing demonstration of Ad Chartpak in this video.
1.) Markers- When you use illustration markers, think of yourself as a watercolor artist. Watercolor artists create their work with beautiful transparent colors. If you choose to try illustration markers, you will definitely be able to apply and make multiple layers of transparent color. But there is a difference......the ability to mix. The colors are pre mixed and they do not blend together like wet paint as you can see in this demonstration.
2.) Special Markers- There are two different types of special illustration markers; Blender markers and gray markers for tones. The blender marker is a little deceptive. It is simply a marker without color in it. It is comprised of the fluid that the marker is mixed in. When it is applied on paper, the colors will bleed together. Notice how the line in between the two colors has disappeared. You will see more examples of how to use the blender in my demonstration. The gray markers are used to build tones. They come is Warm and Cool chromas. The warm gray markers lean towards the warm orange half of the color wheel and the cool ones lean towards the cool blue half. As you saw in the previous section, we cant mix marker colors on a palette like paint, so these gray markers become extremely important. These markers give an illustrator the ability to add tones......and tones make an artwork interesting by giving it depth. As you can see, these markers have a range of tones from one to ten. Ten is the darkest tone and one is the lightest.
3.) Paper- In order to use Illustration Markers to their full capacity, you will need Bleedproof paper. It is specifically made for markers, and it prevents markers from running. Notice the difference in the amount of bleeding of the printer paper on the left, compared to the Bleedproof paper on the right.
4.) As a final point before you see the demonstration, I wanted to make you aware of an article that I wrote that goes in to depth about the nuances of illustration markers. I will recommend color palettes, compare brands and describe techniques for illustrators. It is a good resource for people who wish to learn about illustration or for any person who is in the market for illustration markers. I will leave a link in the video description.
Extended shading tutorial
You will see the dry brush painting technique in a slower version of this video- http://www.youtube.com/watch?v=5kAAErTo1SU
WE NEED A VISUAL ARTS CATEGORY ON YOUTUBE THREAD-http://www.google.com/support/forum/p/youtube/thread?tid=2a9806f929074cbd&hl=en&fid=2a9806f929074cbd0004b630ad37cc3e
Facebook- http://facebook.com/kazanjianm
Twitter- http://twitter.com/kazanjianm
Website- http://merrillk.com
(Merrill) Supplies I Use- http://www.jdoqocy.com/click-4....247664-805536?url=ht
- Watercolor Paper
- Bristle Brushes
- Black Oil Paint
- Mineral Spirits
- Kneaded Eraser
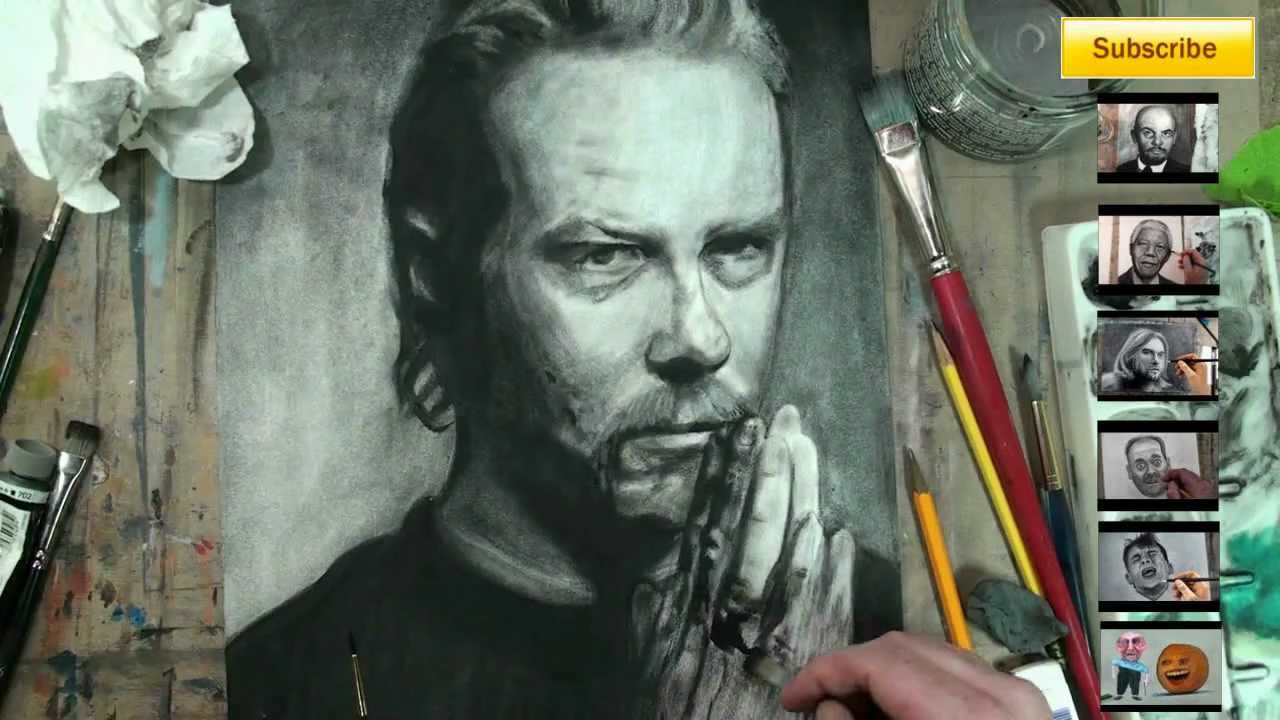
All music by Kevin MacLeod http://incompetech.com Thank you Kevin!
0:25 Right now I am blocking in all of the black shapes. I am NOT doing "dry brush" right now. My brush is quite wet. You can call this a "wash" of black. It is to speed the process up a bit. 0:43 Notice that I will use SEVERAL different brushes on this portrait. I try to use the larger brushes whenever possible so that I could block in SHAPES not LINES! Using bigger brushes accurately is a skill which is built over time.
Even though lines BARELY EXIST on the human body, people seem more comfortable working with a fine point.
If you want to be good at drybrush, break that habit (get used to rendering shapes NOT lines).
1:08 I am still using too much mineral spirits at this point. You want your brush to be relatively dry. DUH! Dry brush?
1:08 The watercolor paper is like QUICK SAND! It will separate the paint from the mineral spirits and the binder instantaneously and leave a charcoal like residue on the surface. Eventually, we will erase part of this residue to create the highlights.
1:28 Squint your eyes (if you have to) at the reference image (easy to find online) to see the tones. It is important that you see the tones in the composition as separate shapes (almost like a puzzle) The brush gives you A LOT MORE CONTROL of the tones than a pencil.
1:28 Brushes are also SUPERIOR at creating variation in the edges of shapes (hard edge, soft edge). 1:51 Do NOT be tempted to draw in the whites of James' eyes. They do not exist in this image. "Draw what you SEE, rather than what you KNOW to be true" - Betty Edwards 2:06 The moustache is quite complicated.....but then again...isn't EVERY moustache!
Its really just an extension of nostril hair! Don't you think?
ANYHOO- Paint the "stache" in more dark than it really is, and we will use the eraser later to soften it and create highlights.
The darkest part of the stache connects with the top lip. 2:31- Dont stress the ear too much. You can scratch it away with the dry brush or do a wash with the paint and mineral spirits (which is cheating I suppose if your going to call it "dry brush") EHH....There is no CHEATING in art. Use the "kitchen sink" if you have to! 3:02- You will notice that the paint does not SPREAD in drybrush. It SINKS
If Oil paint "floats" like a boat on canvas.....It "sinks" like an anchor on watercolor paper.
Be as accurate as possible and use this to your advantage. Get the "puzzle pieces" (the shapes formed by the tones) that you are sure of in first.
3:34 Background is darker on the right. Notice that this is the OPPOSITE of the tones on his face. You will need to use some mineral spirits for the background.3:58 James has very difficult eyebrows to paint. They are long and white like Pai Mei from Kill Bill.....Well maybe not that long.
The skin tone will be a bit darker than parts of the eyebrow (he is greying). Notice the darker parts of the eye socket around the bridge of the nose. This area will be dark but not quite as dark as the shirt. 4:26 It took me about 2 hours to paint this. Take your time! If you have a low frustration tolerance, know that there are always CREATIVE ways to fix things
For instance, if you think you went too dark, use the kneaded eraser. If you struggle with the paint brush, finish your work with color pencil
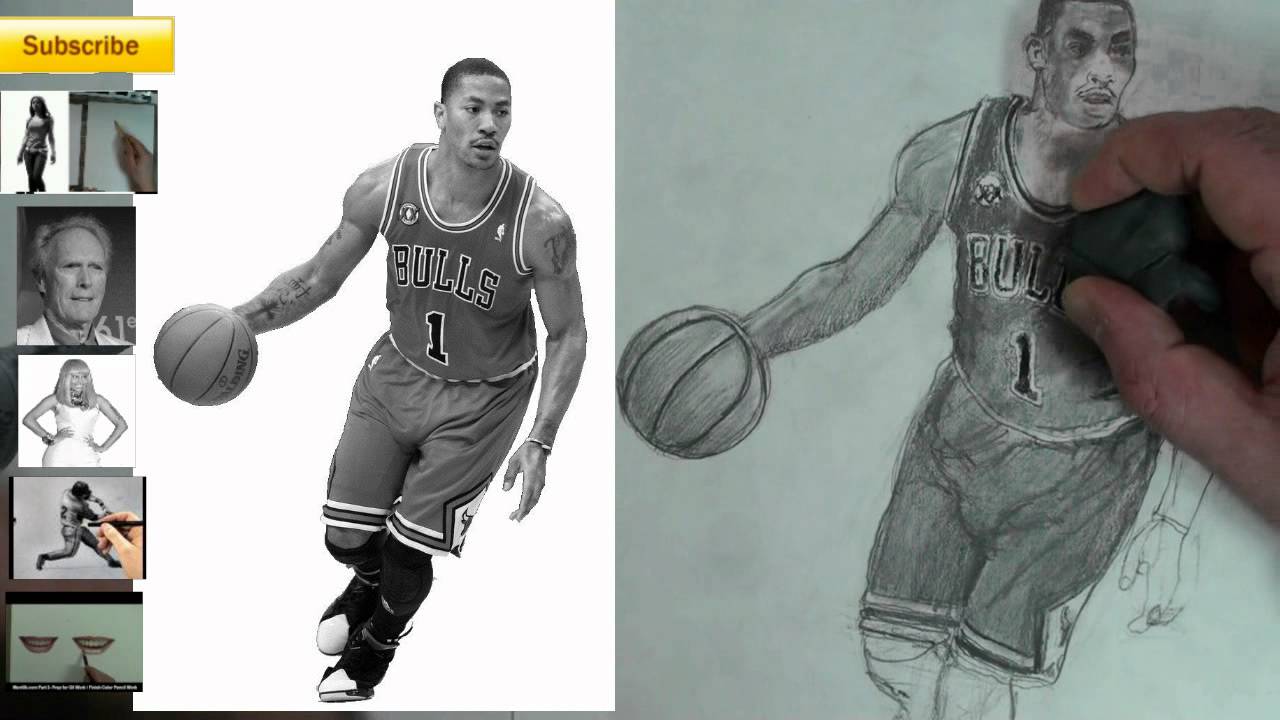
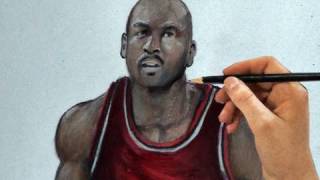
Learn to draw Chicago Bulls star Derrick Rose with pencil. Instruction by Merrill Kazanjian (kazanjianm)
Link- http://merrillk.com/?part=fineart&articles_id=14077&act=artist1&artist=69&collection=464
(Merrill) Supplies I Use- http://www.jdoqocy.com/click-4....247664-805536?url=ht
WE NEED A VISUAL ARTS CATEGORY ON YOUTUBE THREAD-http://www.google.com/support/forum/p/youtube/thread?tid=2a9806f929074cbd&hl=en&fid=2a9806f929074cbd0004b630ad37cc3e
Facebook- http://facebook.com/kazanjianm
Twitter- http://twitter.com/kazanjianm
Website- http://merrillk.com
Hello everybody it's Merrill. Welcome to the
fourth installment of you draw. Last time
Last time, we drew pink haired Nicki Minaj. This time we are going to be drawing the NBA's Most Valuble Player Derrick Rose. He has been one of my top requests. You might be asking, what is YOUDRAW?
You draw is an interactive figure
drawing series that you get a chance
to draw along with me.This series is made for graduates of my step-by-step videos. I am probably known best on YouTube for that series.
Many of my viewers have gotten too good for that approach. And
They need a new challenge. So this is the next step. If you wish, you can hit the link in the video description and you could print out the reference image.
You don't have to do that though. The image is on the screen.
let's get started. One order of business before I start talking about mister Derrick Rose. A lot of people that make the extra
effort to post video responses to my videos and i greatly appreciate that.
I really enjoy seeing your work.
It helps me see that I am helping people.
The column on the left of the screen are some of my favorite video responses. I encourage you to post yours. I will put your responses in a playlist that others can see and you will get hits.
Please keep posting those video responses.
I am starting out my drawing by scribbling in the shape.
Scribble lightly and dont worry about making mistakes.
Keep your lines light enough to erase with the pencil. Look for the overall shape. Don't worry about the outlines yet. Focus on drawing in the overall shape of Derrick Rose. You will definitely make changes to this as we progress with the drawing.
In a moment, pause the video and look!
Quickly scribble in what you see and then pause the video. Pause the video right now. There will be four of these breaks in this video.
There is no substitute for the real thing. Life Drawing. This is the internet version of life drawing. We will do our best. It will teach you what to look for when you draw from life in the future. This video series is the only interactive life drawing series on the internet.
I am teaching you from across the country or across the world.
2:04 Pause the video for a few minutes during each break and scribble out the "gesture". Dont look at my work, look at the reference image.
2:04 Try not to notice anything but his silhouette for now. Look for shapes in the negative space (under his arms).
2:22 Now you can "sculpt out" your contour lines.
2:32 Notice the DIFFERENCES! I was WAY OFF with my first guess (Most people are)! We correct our drawing with the contour lines.
4:37 By now, you should have completed the contour of the body. Its a video. Take your time. Go at your own pace.
6:25 Notice that most photo realistic portraits are LARGE in scale. The face will be a struggle.
6:42 Tip: I am using a mechanical pencil because the graphite is thinner. I will teach you how to shade with a pencil.
6:43 TIP: Squint your eyes and exaggurate the shadows on the face
7:53 Ink is absorbed in to the surface of a paper. Graphite slides on the top. The effect will be different.
I used the colored pencil because there is no tonal variation in the lettering of the jersey.
9:39 By now, if you haven't done so already, start your shading.
11:41 To finish a drawing, we must consider the qualities of edges

Crazy Cheerleader- The "inspiration" behind this artwork was a SCARY, ESPN fitness competition and a viral cheerleading video on YouTube. Bring it on. Movie. Some thirty-something woman dressed up as a cheerleader and danced around the stage, did backflips and finger push ups............All with a DISTURBING smile on her face!!!!....I coundn't get the imagery out of my head, so I did some art! I use Paint Shop Pro 9 instead of Photoshop because it is EASY. cheerleader cheering espn competition college football. It allows me to distort images and cut out images and juxtapose them over each other. I will later print my creation out and finish it with a color pencil. I did a creative commons search for "shocked" "surprised" and "OMG' and came up with these images. I am using the digital scissor to cut out my favorite parts! I made sure to widen the Eyes using the "Warp Brush" tool in PSP9. College sorority sports fitness flirting funny farts pwned owned. Widening the eyes and creating space between the iris and eyelids on both sides gives her that CRAZY and PERKY look! I will move the pupil and iris......because, at the moment, she has a "raptured" look. It gets tricky when merging photos together. Notice the different color schemes, tones and chromas happening! I will have to adjust that by blending and adjusting the color and tonal balances. I used the "burn tool" to draken the areas around the eyes. I also made sure to shrink and dilate the pupil and iris. She needed a new "DO"! Creative Commons Search here I come! Merging things on PSP9 is tricky. The girls from the three images which i've used so far, probably have similar skin tones, but the photographs were taken in different lighting. So I "blend", "dodge" and "burn" to fix this. I could also choose to cut out part of the original (the first girl) face and add it over the new section. (I didnt do that here because I am going to tie everything together with color pencil later. I am using the warp brush (pull) tool to extend the hair. I do this because I couldnt fully crop out the background. Yes, that was Obama. I am using the chromatic adjustment tool to manipulate the flesh tones. Often, when I cut out an image, the edge is destroyed. I am trying to recreate the pom pom edges. I am using the paint brush tool at a 90 percent opacity to cover over (both) uniforms (the top and bottom), since they are different colors. I will color over the uniform with color pencil next (and make my own design). Now, I am using prismacolor color pencils (they are the most opaque brand) to color over my print. @bunbear1308 The four songs that I use are from http://incompetech.com....They are FREE to use for any video and they were created by a cool guy named Kevin MacLeod. University of California Arizona Wisconsin SEC Big East WAC Southwest beach. Maui Invitational.The songs were- Royal Banana, Spazzmatica Polka (my favorite), Merry go and Scheming Weasel (faster). I use prismacolor color pencils. I have a lot of info on them in the "supplies I use" section of my website. Prismas are MUCH better in my opinion b/c they are semi opaque and mixable. My process which I am using in this video was inspired by Harlem Renaissance artist Romare Bearden. Bearden would use media cutouts to create an amazing narrative in his work.....often he would paint over them.

I was honored to do a live stream with:
http://youtube.com/sycra
http://youtube.com/cartoonblock
Links Mentioned
Lisa Irby's channel- http://youtube.com/lisa3876
DeviantArt - http://deviantart.com

Today, I decided to incorporate oil pastels in to a mixed media work of art. I also used/combiled oil paint illustration markers and Prismacolor Color Pencils to create the portrait that you see. I describe my process as I narrate: First, I did a pencil sketch which I inked. Second I used illustration markers (Prismacolor and Ad Chartpak) to lay down the first layer of color. Then I added a layer of oil pastels atop the layer of illustration marker. The oil pastels are more mixable than the color pencils and are also more opaque. They mix with liquin (like the color pencils and oil paint). I discovered that the process closely resembles painting (especially) when you mix the pastels on a palette, with liquin and then apply with a paintbrush. I finished my (quasi- Bob Ross demonstration) with a few layers of oil paint, since there is no substitute for oil paints mixability and layering capabilities (as well as the range of opacities). I am happy with the portrait that I made of youtube user armanchik24. I learned a lot while incorporating the oil pastels in to my artwork.
"oil pastels" "crayola oil pastels" "how to use oil pastels" "sennelier oil pastels" "using oil pastels" "pentel oil pastels" "oil pastels how to use" "holbein oil pastels" "cray pas oil pastels" "buy oil pastels" "blending oil pastels" "how to paint with oil pastels" "oil pastels paintings" "oil pastels painting" "van gogh oil pastels" "oil pastels for beginners" "painting with oil pastels" "oil pastels tutorial" "drawing oil pastels" "oil pastels for kids" "painting oil pastels" "working with oil pastels" "sakura oil pastels" "oil pastels for children"

Part 1- I will start this drawing by taking a second to look at my reference photograph on the left. I try to see the mouth as one big shape first and I try to match that shape as best as I can to start. Next, I break the mouth in to three smaller shapes. I notice that the top lip looks like a flattened McDonalds Arch and the bottom lip looks similar to a crescent moon shape. The area in between is more complex but that is ok since I can create that shape by noticing the nuances of upper and lower lip.
Part 2- Take a second to notice that the lower lip is slightly fuller than the top lip. This is true for every person. Once I am somewhat satisfied with the upper and lower lip, I start to notice the space between the lips. That space is divided between the upper teeth and the negative space below the teeth. Please notice that when a person smiles, the bottom lip comes up and blocks the lower set of teeth. Many people make the mistake of drawing the upper and lower teeth in a smile. While drawing the teeth, I am very careful about not pressing too hard. Notice that there are NO dark tones, separating the teeth, only light to medium ones. The front of our face is rounded and the formations of the upper and lower sets of teeth are in a horseshoe shape. When drawing a person from the front, notice that as the teeth go further back towards the throat, they become more foreshortened. Also, as the teeth go back towards the throat, they are blocked more in a smile by the lips and are more shadowed. Be careful because this can easily be overdone. The color of the teeth are not white, they are bone colored, which is a cool off white.
It is a conscious choice for me to start this drawing with color pencil. I use color pencil because the fine tip of the color pencil gives me a lot of accuracy, and also because, color pencils can be mixed with oil paint. You will see me mix color pencil with oil paint in step four.
Part 3- At this point I am satisfied with the placement of all of my shapes. Once that task is accomplished, I focus on building tones and colors. In other words, my focus to this point has been to get all of the pieces of the puzzle in to the right place and now, I can have fun by mixing colors and matching tones. I try to also notice the qualities of the edges of shapes. For instance, there is a fuzzy, unclear edge between the upper lip and the gums above the teeth. It is there but it is hard to see. In contrast, there is a solid, distinct edge between the upper teeth and the darker area of negative space, below the teeth.
Color pencil is a great medium for a contemporary artist to learn. I greatly value the accuracy and detail work that can be achieved with color pencils. The flaws to this medium is that color pencil cannot be layered as well as paint, since it doesn't fully dry. Its biggest strength is also a big weakness. The fine tip of the color pencil, covers surfaces at an extremely slow rate. Both weaknesses can be fixed however. I found that if you dip a paintbrush in a painting medium called Liquin and start to paint, the color pencils essentially pick up the properties of oil paint. In the next step, I will use liquin and mix it with both the oil paint atop of the color pencil.
Part 4- Now I am painting with Liquin and oil paint over the color pencil. They are very compatible with each other and are essentially made with the same materials. The pigment of the color pencil is bound with wax; and wax has been used in parts of many painting mediums throughout the history of oil painting.
Oil paint is considered a traditional medium but many of its artistic capabilities have not yet been matched by other, newer mediums. Oil paint gives to the ability to work opaque, transparently and translucently. Today, I am using the combination of the oil paint and the liquin to soften my color pencil drawing below. I am using small soft paintbrushes and they pick up some of the color that was left below. The paintbrush is a great tool to create soft blends. That makes perfect sense if you compare it to the tip of a color pencil
I hope that you have enjoyed this video and I hope that you learned something. Feel free to ask me questions and please subscribe to my channel if you like concise, information rich videos on art.
Created by Merrill Kazanjian http://merrillk.com
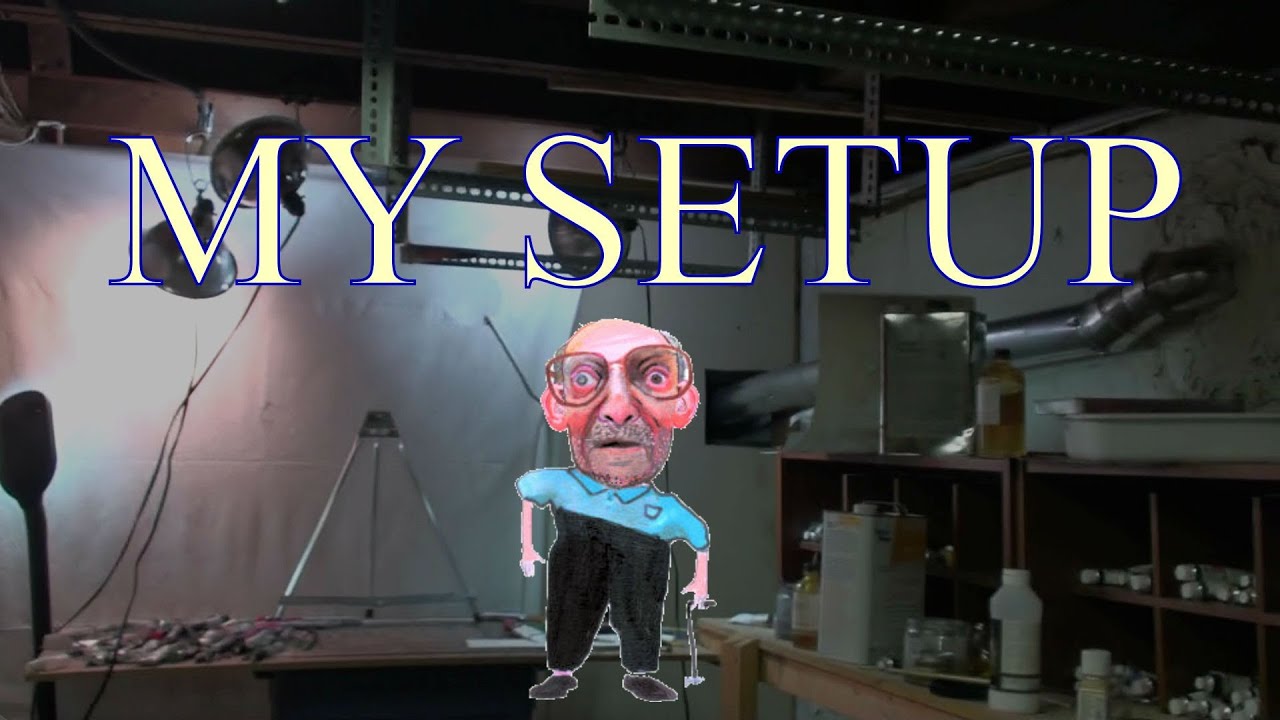
This video will show my viewers how I film one of my videos. It will give a mini tour of my studio and will make recommendations on lighting.
YouTube Visual Arts Category Forum- http://www.google.com/support/forum/p/youtube/thread?tid=2a9806f929074cbd&...
Supplies I Use- http://www.jdoqocy.com/click-4....247664-805536?url=ht
Facebook Page- http://facebook.com/kazanjianm
Twitter- http://twitter.com/kazanjianm
This video will show you:
1.) How to film a drawing video.
2.) How to film a speed painting video.
3.) How to film an art video.
4.) How to position the camera from above.
5.) How to position a camera mount.
6.) How to Film a drawing.
7.) Lighting for a drawing video.
8.) Setup for a drawing video.
9.) how to set up a camera for drawing
10.) drawing camera set up
11.) video camera for drawing
12.) camara setup for drawing
13.) Art Setup

Im bringing artsy back
My YouTube channel it deserves a plaque
Im gonna teach you how to draw like that
Go grab your pencil and your sketching pad
Take em to the bridge
Artsy babe
Dont waste your money on an MFA
Watch me on YouTube and subscribe its free
Follow my steps and you will draw JT (Justin Timberlake)
Take em to the chorus
Subscribe to kazanjianm (Don't miss any new videos that I make)- http://www.youtube.com/subscri....ption_center?add_use
Facebook: Like me on Facebook to find out about live hangouts or to post your work!- http://facebook.com/kazanjianm
Twitter: I tweet! Do you? http://twitter.com/kazanjianm
My Website: http://merrillk.com
Art Supplies I Use in my Art Work- http://merrillk.com/?sid=135&idpage=supplies_i_use
YouTube Visual Arts Category Petition: http://www.change.org/petition....s/create-a-visual-ar
Step by Step Drawing Playlist: http://www.youtube.com/playlis....t?list=PLD6E34C7CD58
