Лучшие
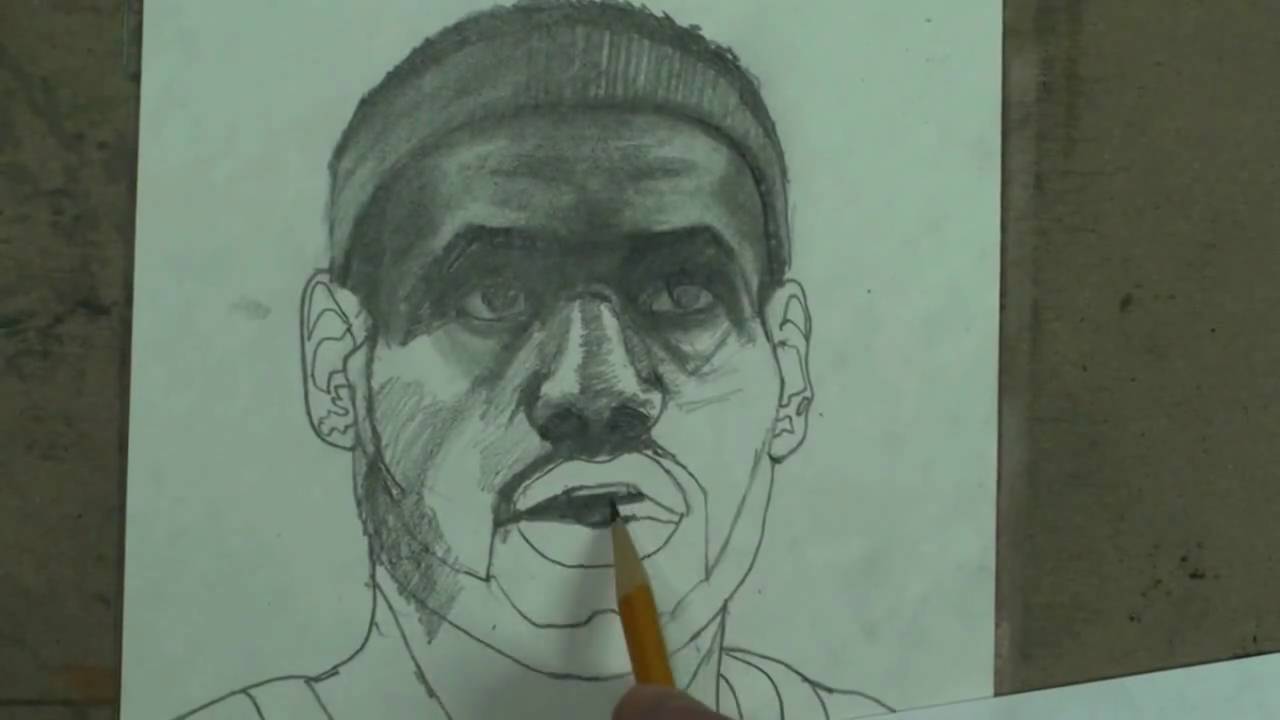
This is a demonstration of how I shaded a drawing of LeBron James. This is part 2- I will hyperlink part 1
Hints- The eyes, and hair (including eyebrows and facial hair) always have the darkest tones. I am using 2 methods- 1.) cross hatching and 2.) blending w/ a blending stump (tortillion). When I combine them, I get the best (tonal) effect.... Here's what I do- I do a layer of cross hatching, and then I push it down with a blending stump. Followed by another layer of hatching atop. This can be repeated many times.
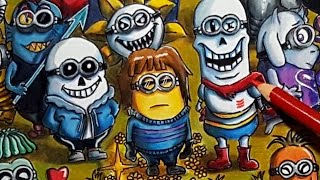
If Minions were Undertale characters they would probably look like this.
Who is your favorite Undertale Character? Comment Below
This drawing was done using Prismacolor pencils on bristol paper.
1. Frisk
2. Sans
3. Papyrus
4. Flowey
5. Toriel
6. Undyne
7. Monster Kid
8. Alphys
9. Annoying Dog
10. Mettaton
11. Chara
12. Napstablook
13. Muffet
14. Temmie
15. Whimsun
16. Froggit
17. Lesser Dog
18. Vegetoid
19. Greater Dog
20. Asgore
21. Knight Knight
22. Madjick
23. Asriel
24. Loox
25. Mettat
Drawing by: Serafin Ureno
_________________________________________________________________
SOCIAL LINKS
FACEBOOK: http://www.facebook.com/OrangeMonkeyart
DEVIANTART: http://omkdrawings.deviantart.com/
THIS DRAWING ON DA:
INSTAGRAM: http://instagram.com/orangemonkeyart
________________________________________________________________
HUMAN GO CHECK OUT THE AMAZING UNDERTALE COVER/REMIXES BY TIEFF! NYEH HEH HEH!
Original Music is by Toby Fox
I am using music by: Tieff
Channel: https://www.youtube.com/channe....l/UClzqmwGhPxkCNCISJ
Name of track used: Undertale - Main Theme (tieff's Remix)
https://youtu.be/8CSNLNTd-3A
Name of track used: Undertale - Ghost Fight (tieff's Remix) [Complextro]
https://youtu.be/BU1fDbKv_xg
Name of track used: Undertale - Bonetrousle (tieff's Remix)
https://youtu.be/_pcqGbDzyX8
All tracks are Licensed under a Creative Commons Attribution license (reuse allowed)
http://creativecommons.org/licenses/by/3.0/

Pennywise the Dancing Clown from Stephen King's IT. Which version of this character is your favorite, the original (Tim Curry) 1990 version or the new (Bill Skarsgård) 2017 version? let me know what you think in the comments below.
Medium: Ballpoint pen on 11 x 14 Bristol board
Please ????, Comment and Subscribe
???? Drawing by: Serafin Ureno ✏️️
___
➡️ WEBSITE: http://www.serafinureno.com
➡️ FACEBOOK: http://www.facebook.com/OrangeMonkeyart
➡️ DEVIANTART: http://omkdrawings.deviantart.com/
➡️ INSTAGRAM: http://instagram.com/orangemonkeyart
????MUSIC????
I am using royalty free music by: Myuuji
https://www.youtube.com/channe....l/UCiSKnkKCKAQVxMUWp
Name of tracks used: Creepy Clown Symphony - myuu
Direct Link to video: https://youtu.be/pqCnSiJiP6M
licensed under a Creative Commons license: http://creativecommons.org/licenses/by/4.0/
-------------------------------------------
I am using royalty free music by: Audionautix
Artist: http://audionautix.com/
Busybody by Audionautix is licensed under a Creative Commons
Attribution license (https://creativecommons.org/licenses/by/4.0/)

Hi, everybody!!!
- Let's see how many of your favorite Disney characters you can SPY on this drawing?
- There are 3 different versions of Mickey Mouse hidden, can you find them all?
- Leave a comment when you find them, but dont look at the comments for the answers
Please share this with Disney on their Facebook, Twitter, or anywhere. I hope sombody at Disney will see it... Thanks!!! This drawing took about 24 hrs to draw and it's done on Bristol paper/board. I used a regular fine tip marker and ballpoint Pens to outline the drawings
Drawing By: Serafin Ureno
BUY PRINTS:
http://fineartamerica.com/feat....ured/walt-disney-mem
Add me on Facebook: http://www.facebook.com/orangemonkey92
This drawing on DeviantART: http://fav.me/d56ld1b
I used Royalty-Free Music By: Kevin Macleod
http://incompetech.com
Tracks used: Frost Waltz & The Path of the Goblin King v2
Thanks 4 Watching!!!!

Hello YouTube, I saw Master Mark Crilley's amazing realism challenge videos where he places an object on a piece of paper and attempts to draw it as realistic as possible. I tried to do the same thing in this video. Challenge Accepted!
Drawing by me: Serafin Ureno
Like me on FACEBOOK: http://facebook.com/orangemonkeyart
1+ on DeviantART: http://OMKdrawings.deviantart.com
i am using royalty free music by: Kevin Macleod
http://incompetech.com
Name of Track Used: RetroFuture
THANKS 4 WATCHING!

They're spooky and they're kooky, It's a drawing of The Addams Family! Who is your favorite character?
This is a Ballpoint Pen drawing of The Addams Family done with a crosshatching technique. The paper I used was 9x12 toned tan paper.
Thank You for all of your support! I really appreciate it. If you would like to support me, check out my links below.
Please ????, Comment and Subscribe
???? Drawing by: Serafin Ureno ✏️️
___
➡️ BUY PRINTS HERE: https://fineartamerica.com/pro....files/serafin-ureno/
➡️ WEBSITE: http://www.serafinureno.com
➡️ FACEBOOK: http://www.facebook.com/OrangeMonkeyArt
➡️ DEVIANTART: http://omkdrawings.deviantart.com/
➡️ INSTAGRAM: http://instagram.com/orangemonkeyart
????MUSIC????
I am using royalty free music Provided by Ted Kerr
https://www.youtube.com/channe....l/UCORbedtjuXJbI_2u4
Name of track used: Spooky Skeleton Waltz - Original
https://soundcloud.com/wolfgan....gchiptune/skeleton-w
https://www.youtube.com/watch?v=tugQXlgkfAA
licensed under a Creative Commons license: http://creativecommons.org/licenses/by/4.0/
#TheAddamsFamily #LoslocosAddam #Crosshatching

Hello YouTube, i got a lot of great feedback from my previous realism challenge video, so i decided to make another one... Thank You Mark Crilley for tweeting back my previous realism challenge video you are awesome... :D
Drawing by me: Serafin Ureno
Like me on FACEBOOK: http://facebook.com/orangemonkeyart
1+ on DeviantART: http://OMKdrawings.deviantart.com
www.Instagram.com/orangemonkeyart
I am using royalty free music by: spinningmerkaba (feat. Fireproof_Babies)
Name of Track Used: Rise Up To Heaven (instrumental)
Link to website: http://ccmixter.org/files/jlbrock44/33913
Music is licensed under a Creative Commons license:
http://creativecommons.org/licenses/by-sa/3.0
THANKS 4 WATCHING!!

Here is a drawing in memory of the great "Roberto Gómez Bolaños" A.K.A. Chespirito. For those who may have not known who he was, he was a Mexican comedian, actor, director and Television icon. He was most famous for his comedic shows "El Chavo del Ocho" and "El Chapulin Colorado". I grew up watching his shows, and i still watch them to this day. He was a big part of my childhood, so it's only right I pay tribute. R.I.P Chespirito
Drawing is done using Prismacolor pencils on tone tan paper.
I am Mexican American...in case anyone was wondering. :)
In Spanish:
Holla a todos, este es mi dibujo de el gran "Roberto Gómez Bolaños" más bien conocido como Chespirito. El era un gran comediante, actor, director Mexicano. Yo crecí viendo sus comedias, y las sigo viendo. El fue una gran parte de mi infancia. Descanse en paz Chespirito
Este dibujo está hecho con lápices de colores marca Prismacolor en papel cafe.
Drawing by: Serafin Ureno
Other sites where you can find me!
FACEBOOK: http://www.facebook.com/OrangeMonkeyart
DEVIANTART: http://omkdrawings.deviantart.com/
THIS DRAWING ON DA: http://fav.me/d897wxp
INSTAGRAM: http://instagram.com/orangemonkeyart
(You Can follow me on Instagram; i'm constantly posting progress pictures and sketches on there.)
I am using royalty free music by: Kevin Macleod
http://incompetech.com/music/royalty-free/
Name of track used: Hyperfun
licensed under a Creative Commons license: http://creativecommons.org/licenses/by/3.0/

Hello, YouTube!.....This is my drawing of The Mona Lisa one most famous paintings of ALL TIME by Leonardo Da Vinci. Its done with Ballpoint Pen & Colored Pencils. It took approximately about 6-7hrs to draw. So...Yeah...tell me... What is a UFO doing here??? - Comment Below! lol i like reading the comments...
Drawing By: Serafin Ureno
(YouTube) http://www.youtube.com/orangemonkeyArt
(FaceBook) http://www.facebook.com/pages/OrangeMonKeyart
DeviantART: http://fav.me/d39wrvk
Music By: Kevin MacLeod
- http://incompetech.com
Tracks Used:
- Colossus (1)
- Sneaky Snitch (2)
Here are some other videos
http://www.youtube.com/view_pl....ay_list?p=73B1475522
THANKS FOR WATCHING!!!

Have you seen #Disenchantment ? It's the new #Netflix animated show from the creator of the Simpsons and Futurama #MattGroening . I binged watched the show in one day, and now it's my new favorite show. I hope you all enjoy this video. I have a lot of fun making it.
Medium: Prismacolor pencils on tone tan paper
Please ????, Comment and Subscribe
???? Drawing by: Serafin Ureno ✏️️
___
➡️ WEBSITE: http://www.serafinureno.com
➡️ FACEBOOK: http://www.facebook.com/OrangeMonkey92
➡️ DEVIANTART: http://omkdrawings.deviantart.com/
➡️ INSTAGRAM: http://instagram.com/orangemonkeyart
????MUSIC????
I am using royalty free music by: Kevin Macleod
http://incompetech.com/music/royalty-free/
Name of track used: Master of the Feast
licensed under a Creative Commons license: http://creativecommons.org/licenses/by/4.0/
-------------------------
I am using Royalty Free Music by: TeknoAxe
https://www.youtube.com/teknoaxe
Name of Track used: Royalty Free Background Music #46 (Totally Not a Scary Accordion) World/Comedy
licensed under a Creative Commons license: http://creativecommons.org/licenses/by/4.0/

HAPPY HALLOWEEN!!!
Have you heard of the ledged of bloody Mary/ Mary worth?
This is my drawing / illustration of Bloody Mary...I asked people "What urban legend should I draw for Halloween"- I got lots request to draw Bloody Mary. The Sasquatch came in 2nd... Anyways, I'm kind of scared to look at my own drawing. Lol... I have never tried to say her name in front of a mirror, has anyone of you tried? comment... This drawing took almost 3 days to finish; too much crosshatching. It's done with black and red ballpoint pens.
Drawing By: Serafin Ureno
(YT) http://youtube.com/orangemonkey92
(DeviantART) http://fav.me/d4eh5z1
(FB) http://www.facebook.com/pages/....OrangeMonKey92/11659
Music By: Kevin MacLeod
- http://incompetech.com
Track used: The House of Leaves
Thanks for watching HAPPY HALLOWEEN

What if all horror Movie Villains were combined into a single character? This an all in one Mashup drawing of some of the most popular Horror Movie Villains.
For this drawing, I used ballpoint pens, Copic Markers, and a white gel pen. This is has been one of my favorite drawings to work on recently. Let me know if you would like to see more character mashups like this one in the future. Thanks You for watching.
Please ????, Comment and Subscribe
???? Drawing by: Serafin Ureno ✏️️
___
➡️ BUY PRINTS HERE: https://fineartamerica.com/pro....files/serafin-ureno/
➡️ WEBSITE: http://www.serafinureno.com
➡️ FACEBOOK: http://www.facebook.com/OrangeMonkeyArt
➡️ DEVIANTART: http://omkdrawings.deviantart.com/
➡️ INSTAGRAM: http://instagram.com/orangemonkeyart
????MUSIC????
I am using royalty free music provided by YouTube Audio Library
Name of track used: TheStalker
Artist: Hainbach
licensed under a Creative Commons license: http://creativecommons.org/licenses/by/4.0/
_______________
I am using royalty free music provided by Teknoaxe
https://www.youtube.com/channe....l/UCtgf00GvfFQVsYBA7
Name of track used: Pumpkin Hour
https://www.youtube.com/watch?v=95yBjGw2kgI
Artist: Teknoaxe
licensed under a Creative Commons license: http://creativecommons.org/licenses/by/4.0/
_______________
I am using royalty free music provided by Ross Bugden
https://www.youtube.com/channe....l/UCQKGLOK2FqmVgVwYf
Name of track used: Something Wicked
https://www.youtube.com/watch?v=Zuw_O5MU5CE
Artist: Ross Bugden
licensed under a Creative Commons license: http://creativecommons.org/licenses/by/4.0/

I hope you all like this drawing of "The King of Rock" Elvis Presley.
Medium: Ballpoint pen on 11 x 14 Bristol paper.
Thanks for watching!
Drawing by: Serafin Ureno
Other sites where you can find me!
FACEBOOK: http://www.facebook.com/OrangeMonkey92
DEVIANTART: http://omkdrawings.deviantart.com/
THIS DRAWING ON DA:
INSTAGRAM: http://instagram.com/orangemonkey92
(You Can follow me on Instagram; I'm constantly posting progress pictures and sketches on there.)
-----------------------------------------------
1st song:
Music by: YouTube Audio Library
Name of track used: Marvin's Dance
Artist: Silent Partner
licensed under a Creative Commons license: http://creativecommons.org/licenses/by/3.0/
----------------------------------------------------
2nd song:
Music by: FREESOUND MUSIC
"Lets Twist and Roll (royalty free music) "by FREESOUND MUSIC Website: (www.freesound-music.com)
Link to YT video: https://youtu.be/O1pk8IRJ7as
licensed under a Creative Commons license: http://creativecommons.org/licenses/by/3.0/

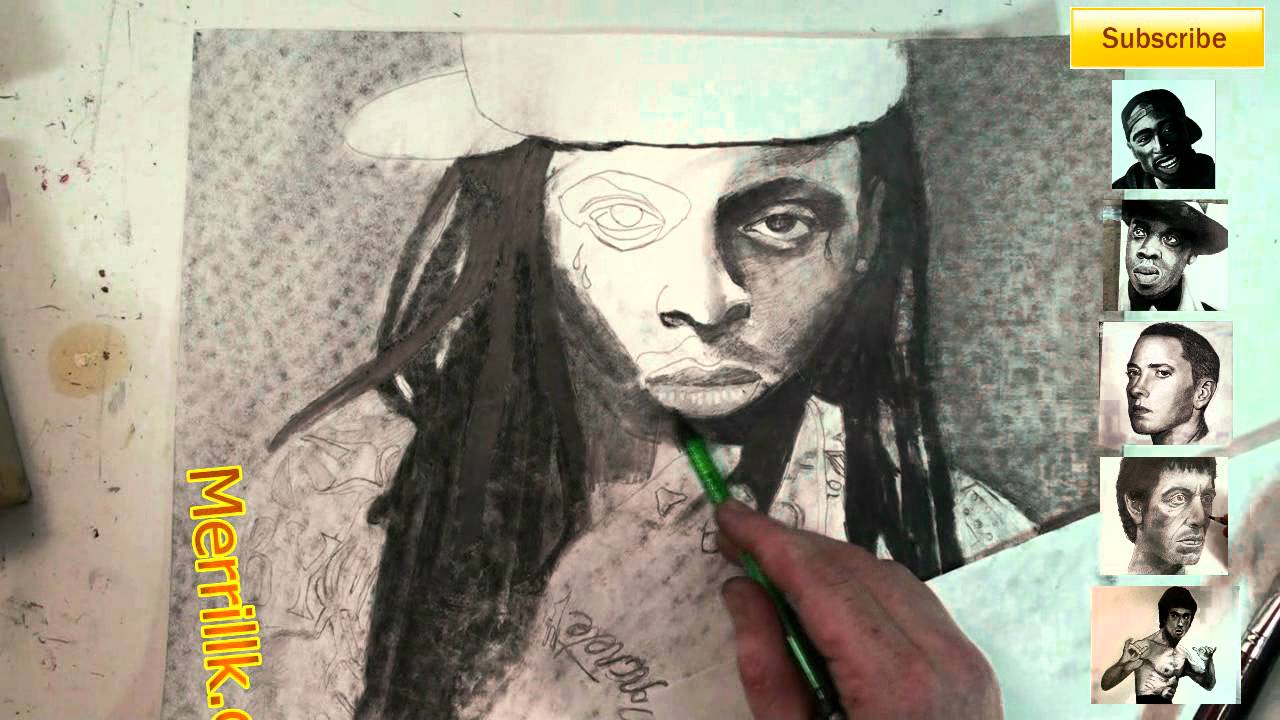
Hello YouTube, This is my drawing of 2Pac (One of the greatest rappers of ALL TIME!...2Pac music will always be Alive!) This drawing was done with ballpoint pen & it took about 8-9hours to finish. Please Share This video with Pac Fans Thank You!
Drawing by: Serafin Ureno
(YouTube) http://www.youtube.com/orangemonkey92
(FaceBook) ADD ME http://www.facebook.com/pages/....OrangeMonKey92/11659
(DeviantART) http://omkdrawings.deviantart.com/
This Drawing on DeviantArt: http://fav.me/d3bg4cu
Music by: Kevin MacLeod
- http://incompetech.com
Track used: Griphop
Thanks 4 Watching!

Facebook: http://facebook.com/kazanjianm
Twitter: http://twitter.com/kazanjianm
Visual Arts Category Forum: http://www.google.com/support/forum/p/youtube/thread?fid=2a9806f929074cbd0004b8b1b6901a56&hl=en
I am very fortunate to say that I have the most talented audience on YouTube and the last time that we took a vote on my Facebook page, my viewers decided that that they want me to do a tutorial on how to draw Kate Beckinsale. And I listened! So this video will give you step by step instruction on how to draw actress Kate Beckinsale. Even if you are new to drawing, I guarantee that you will surprise yourself if you follow my steps. So grab your pencil and some drawing paper. If you have your doubts or if you need some motivation, hit the button that says "playlist". Millions of people have viewed my videos and thousands have completed them successfully. I have over 10 years of teaching experience and I am someone who didn't start drawing until I was 20 years old, so I have a different perspective on how to train aspiring artists. Lets Begin!
Step 1: Draw the box that you see. Notice that there are three rectangles inside the box. The reason that there are three rectangles is because a face can often be divided in to three equal segments. Hairline to brow line. Brow line to bottom of nose. Bottom of nose to chin. This formula works perfectly on Kate Beckinsale.
Step 2: Make the U shape that you see for the chin.
Step 3: Make the two shapes for the eye region. Notice that her head is slightly turned so these shapes are shifted slightly towards your left.
Step 4: Make the line at the bottom of the nose. Notice that the septum is lower than the two nostrils. Also, be sure to notice the amount of separation from the eye shapes.
Step 5: Add eyebrows at the top of the eye shapes
Step 6: Look at the image of Kate Beckinsale. Notice that there is a perfect square that is made between the pupils of the eye and the corners of the mouth. Add the four dots that you see. Take some extra time for this step. It is very important for the likeness.
Step 7: Kate is looking down in this image, so her eyes should be banana shaped. Use the dots to guide your placement of the banana shapes. Did I just say that?
Step 8: Add the eyelids above the banana shapes and the lines below.
Step 9: Add the hair shape. Notice how this shape intersects the top rectangle. The height of the hair is more than a third of the face because her head is tilted downwards.
Step 10: Add the top lip. Just connect the dots. The top of the upper lip is like a flattened M shape.
Step 11: I am clearly bananas for Kate because her bottom lip is banana shaped .....the area in between? You guessed it....bananas!
Step 12: Now add some teeth. Here is a close up! If you need help drawing teeth, check out this tutorial or make her a vampire!
Step 13: Kate needs ears. Dont sweat it....Just don't make her Dumbo.
Step 14: is optional. Add her earrings. If you expect to draw this perfectly, curb your enthusiasm. All you need to do is add some squiggley shapes and connect them. Add a banana if it floats your boat!
Step 15: Add a neck.
Step 16: Erase all of the guidelines. In other words, erase what is left from the rectangles. Next, take notice of the link that I just added. After this step we will do shading. Just click this link if you feel that you are messing up. The video that I linked to will teach you an easy way to restart from this point.
Step 17: We will start our shading with the eye region. If you have never cross hatched before, you might want to view the video that I just added in the upper right corner. It is
Facebook- http://facebook.com/kazanjianm
Twitter- http://twitter.com/kazanjianm
Website- http://merrillk.com
(Merrill) Supplies I Use- http://www.jdoqocy.com/click-4....247664-805536?url=ht
Music by Kevin Macleod- http://incompetech.com Rules- http://incompetech.com/m/c/royalty-free/faq.html Thank you Kevin!
0:39 It is vine medium charcoal. I broke a stick and used the side to block in the masses for the hair.
0:55 There is a shadow that stretches across his neck. You can slightly see both sides of the neck. Under the lips is very dark.
1:24 Notice that I used a dry paper towel to blend the background (as well as the brush).
1:40- I am now adding pencil hatching directly above the charcoal.
2:01 To me, it is important to hatch over the charcoal, to UNIFY the surface of the drawing.....
HUH? What do you mean?- Charcoal is MATTE (Not shiny) and pencil is SHINY. -Charcoal MOVES and pencil is STABLE (doesn't move)
2:26 I am now using a graphite stick. Graphite sticks are really just BIG PENCILS!!!!!
They come in different tones like drawing pencils (HB, 2B, 4B, 8B, etc.)
2:51- Notice that I am holding my drawing in place with a paper towel in my hand. Try not to let your hands touch the surface of the paper (I always struggle with that.
2:51 I don't like to fasten my drawing with tape because I usually shade my background and the tape leaves white triangles in the corners where the tape was.....Maybe someone could give ME a tip on that!!!!
3:38 Eventually, the hair, the eyes, the area under the mouth and the area under the hands will be the darkest in tone.
4:03 The paper under my hand prevents my hand from touching the paper surface of the drawing.
3:52 Look at the C shape around the eye.
4:03 Also, notice once again, I laid the initial tones down in charcoal, and followed it with pencil hatching. I am using a CHEAP mechanical pencil now because it has thinner graphite, which helps me do detail work.
4:23 I am using the blending stump now.......and getting PISSED OFF!!!!!! The reason I am mad is because I made the mistake to put a piece of cardboard under the surface of my drawing (look at the dots in the background and on his face).....I gave Weezy Chicken Pocks!!!!! Argh! You'll see me remove the cardboard soon.
5:00 The top lip will be darker than the bottom one. Don't forget to leave the highlight over the top lip.
5:13 The shape under the nose (the nostrils) is not one tone. It is a complex shadow. The shadow under the neck is even more complex!
5:58 Our ultimate goal when we shade a drawing is to eliminate lines and maintain the likeness.
6:28- Eyebrows are never one solid tone, they are always darker towards the center of the face. The one exception is when a girl wears make up and darkens her eyebrows in to one tone.
7:00 Notice that I erased most of the original lines from the step by step.
7:50 I am breaking the rules a bit and using a prismacolor black colored pencil for super dark tones.
8:11 At this point, I only used the Prisma Black on one eye. Look at the difference.
8:33 The hat will be lighter than the background and darker than the highlights on the face
9:53 Have some fun with the tattoos! Know that I did not get them perfectly. Just mess around and practice your tones.
11:13 Don't get too complex with the shading of the hand. Focus on rounding the edges ar first. The spaces between the fingers are going to be dark.
11:32 The edges of the arm are going to be dark. DO NOT outline though!!!! Hatch (Cross hatching is adding line next to line next to line) and blend.
12:02 Highlight at the top of each shoulder. Use your kneaded eraser.
12:25 His chain can be carved out with an eraser.
13:09- Create a highlight on the upper tip of the hand.
14:01 To finish, I enhanced a few of the highlights with a white Conti Crayon.

Click on the images to go to the other four parts of this series.
Welcome to the fifth and final installment of my series about drawing the human head from memory. This video will give you a dizzying amount of information on how to draw the head at 3/4 view. Lets start out by observing what happens when the head turns. Notice what little space the face takes up when the head is turned in profile view. Notice that the back of the head becomes more rounded as the face seems to shrink. Lets take a closer look at the face. The green shape connects the two outer corners of the eye and the outer corners of the mouth. Observe what happens to this trapezoid shape as the head turns from side to side. Notice that as the green shape gets smaller, the back of the head becomes more rounded. Now lets look at a silhouette of the face. Be sure to observe what happens to the silhouette of the face at 3/4 view- It is no longer an oval shape. There are indentations and protrusions
In the 3/4 view of the head, there is an indentation by the eye and a protrusion at the cheekbone and mouth. This is due to underlying bone and muscle structures.
Now, lets look at the individual features of the face starting with the eyes. Notice that the eye shifts in shape as the head turns. When the head is in profile... the shape of the eye looks like a Hershey's kiss turned to the side.....as the head turns, it morphs to an almond shape. Since I am teaching you how to draw the eye 3/4 view for this video, we will remember that the 3/4 view eye resembles Pac Mans mouth. Notice that the pupil and iris are more oval like and that there is no white on the inner corner of the eye.
Now lets observe the nose. Notice the relationship between the nose and the cheek. In the 3/4 view, the nose is partially covering the cheek and almost to the edge of the face. Notice how the nostrils shift as the head turns. When you draw a head in 3/4 view, you essentially draw 1 1/2 nostrils.
As for the mouth, take a few seconds to notice the changes. The top lip morphs from a flattened M shape from the front....to a lightning bolt shape in 3/4 view. The bottom lip has a squared section and triangles on each side.
The ears move from being close to the center of the head from profile view, to the edge of the head in front view. In 3/4 view, the ears seem to be at the verge of protruding through the back of the head....but they are not there yet.
Now its time for the demonstration. Since we studied a male head in the first part of the video, lets switch it up and draw a female head. Just follow the directions for each step and also on the shading tutorial.
Step 1: Draw the shape that you see. Notice that it is an egg shape with various protrusions and indentations. This is the most difficult step so take some extra time.
Step 2: Notice the rectangular shape. The four dots are the centers of each eye and the corners of each mouth. Place each dot in the appropriate place. Then, about 2/3 of the way down add a line for the bottom of the nose.
Step 3: Add the eyebrows and ears.
Step 4: Fill in the eye shape. Remember the Pac Man rule. Here is a close up.
Step 5: Complete the nose. Notice the solid line leading from the bottom of the nose to the brow. Also, remember the rule about 1 1/2 nostrils. Here is a close up.
Step 6: Complete the mouth. Overall the mouth looks like a flattened heart shape. For now, put in one solid shape and ignore the rules that you learned before. We will make the rectangular shape on the bottom lip and the lightning bolt shape on the top when we shade.
Shape 7 Add the hair. Be creative, you dont have to re create this hairstyle.
The pictures used were from Thirteen of Clubs Photostream on flickr. They are under a Creative Commons License (Attribution). I will credit him in the video description- http://www.flickr.com/photos/t....hirteenofclubs/sets/ All other imagery and audio were made by me (Merrill Kazanjian)

This video is going to teach you how to draw a portrait of NBA All Star, Chris Paul Step by Step.
WE NEED A VISUAL ARTS CATEGORY ON YOUTUBE THREAD-http://www.google.com/support/forum/p/youtube/thread?tid=2a9806f929074cbd&hl=en&fid=2a9806f929074cbd0004b630ad37cc3e
Facebook- http://facebook.com/kazanjianm
Twitter- http://twitter.com/kazanjianm
Website- http://merrillk.com
(Merrill) Supplies I Use- http://www.jdoqocy.com/click-4....247664-805536?url=ht
And I promise that I am going to make this VERY EASY for you. What? You dont believe me? Well fine! I guess that you are one of those people that need proof. Click the Little Old Man on the screen to go to a playlist of peoples drawings made from my videos. Oh, so you're back.....And you believe me now. Good! Now you can grab a pencil and some drawing paper. You are about to draw Chris Paul. But first, a quick word from our channel mascot......
Step 1: Draw the shape that you see. Take some extra time to compare the height versus the width.
Step 2: Add the two ovals. Notice their overall size compared to the shape from step 1.
Step 3: Add the nose shape. Notice that it is triangular and the line on the bottom resembles a bird in flight.
Step 4: This step is small, but tricky. It is the upper lip and the moustache. Notice how close the moustache is to the nose and draw both shapes.
Step 5: I just added two shapes, but for now ignore the line in the middle and see the two shapes as one larger shape. The larger shape resembles an ear of corn. After you add the large shape, add the squiggly line in the middle. This line has 8 points pointing downwards.
Step 6: Now add the bottom lip and the soul patch below it. Notice the size difference compared to the top lip.
Step 7: Add the U shape for the bottom of the face.
Step 8: Add the ears and the hair. A tip for the ears is to notice their placement compared to other features of the face.
Step 9: Add the eyebrows. CP3 isnt quite Drake, but his eyebrows are thick.
Step 10: Add the two rainbow shapes under the eyebrows.
Step 11: This is the hardest step. A trick to make it easier is to observe that there is one eye length between each eye. Overall the shape of the eye is almond like and the top of the iris is blocked by the upper eye lid.
Step 12: Add the lines that you see in the ears.
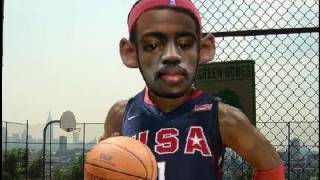
To celebrate the start of the 2009-2010 NBA season, I merged the faces of four of the NBA's biggest stars ( LeBron James of the Cleveland Cavaliers, Kobe Bryant of the Lakers, Dwayne Wade of the Miami Heat and Chris Paul of the New Orleans Hornets). I used both Photoshop CS3 and Paint Shop Pro 9 to make this "artmorph". I basically made digital cut outs from Creative Commons (CC) Photos.(see end of video) All images taken are from Creative Commons or are designated public domain. I respect copyright! used the blending tool a bit, the digital scissor (scalpel), I also used a very helpful light/dark tool to make highlights and shadows.
I used to enjoy making collages with torn paper, but digital art technology helps take collage to the next level. the next lebron james art that will mess with your head art that shook the world art that moves kinetic art merging pictures photos images in photoshop or psp paint shop pro 9. Para celebrar el inicio de la temporada 2009-2010 de la NBA, que fusionó los rostros de cuatro de las mayores estrellas de la NBA (LeBron James de los Cleveland Cavaliers, Kobe Bryant de los Lakers, Dwyane Wade de los Miami Heat y Chris Paul de Nueva Orleáns Hornets). Que utilice tanto Photoshop CS3 y Paint Shop Pro 9 para hacer este "artmorph". Yo básicamente recortes digitales de Creative Commons (CC) Fotos. Usé la herramienta de la mezcla un poco, la tijera digital (bisturí), que también se utiliza una luz muy útil / herramienta oscuro para luces y sombras. Me gustaba hacer collages con papel rasgado, pero la tecnología ayuda a tener el arte digital collage para el siguiente nivel. el próximo LeBron James arte que ensuciar con su arte la cabeza que sacudió el mundo del arte que se mueve el arte cinético, fusión de imágenes Fotos de imágenes en Photoshop o taller de pintura PSP Pro 9. Pour fêter le début de la saison NBA 2009-2010, j'ai fusionné les visages de quatre des plus grandes stars de la NBA (LeBron James des Cavaliers de Cleveland, Kobe Bryant des Lakers, Dwayne Wade du Miami Heat et Chris Paul de la Nouvelle Orléans frelons). J'ai utilisé les deux Photoshop CS3 et Paint Shop Pro 9 pour faire de ce artmorph ". J'ai pratiquement fait découpes numériques de Creative Commons (CC) Photos. J'ai utilisé l'outil de mélange un peu, les ciseaux numérique (scalpel), j'ai aussi utilisé un éclairage très utile / outil sombres de faire tons clairs et foncés. J'avais l'habitude de plaisir à faire des collages avec du papier déchiré, mais la technologie de l'art numérique permet de prendre collage pour le niveau suivant. Le prochain James LeBron art qui gâchera votre art avec la tête qui ont secoué le Monde de l'Art qui se déplace art cinétique fusion photos photos images dans Photoshop ou PSP Paint Shop Pro 9. Um den Beginn der NBA-Saison 2009-2010 zu feiern, fusionierte ich die Gesichter von vier der größten Stars der NBA (LeBron James von den Cleveland Cavaliers, Kobe Bryant von den Los Angeles Lakers, Dwayne Wade von den Miami Heat und Chris Paul von den New Orleans Hornets). Ich habe auch Photoshop CS3 und Paint Shop Pro 9 zu diesem "artmorph" zu machen. Ich grundsätzlich aus digitalen Ausschnitte von Creative Commons (CC) Fotos. Ich habe die Mischung ein wenig Werkzeug, das digitale Schere (Skalpell), ich auch eine sehr hilfreiche Hell-Dunkel-Werkzeug, um Lichter und Schatten zu machen. Ich habe zu genießen Collagen mit zerrissenen Papier, sondern digital art-Technologie hilft nehmen Collage auf die nächste Ebene. den nächsten Lebron James Kunst, die Messe mit dem Kopf Kunst, die Kunst aus aller Welt, was sich bewegt kinetischen Kunst verschmelzen Bilder Fotos Bilder in Photoshop oder schüttelte wird psp Paint Shop Pro 9. Per celebrare l'inizio della stagione NBA 2009-2010, ho unito i volti di quattro delle più grandi stelle della NBA (LeBron James dei Cleveland Cavaliers, Kobe Bryant dei Lakers, Dwayne Wade dei Miami Heat e Chris Paul dei New Orleans calabroni). Ho usato Photoshop CS3 e Paint Shop Pro 9 a rendere questo artmorph ". Io fondamentalmente fatto outs tagliati digitale da Creative Commons (CC) Foto. Ho usato lo strumento di fusione un po ', la forbice digitale (bisturi), ho anche usato una luce molto utile / scuro strumento per rendere luci e le ombre. Mi piaceva fare collage con carta strappata, ma la tecnologia digitale consente di prendere l'arte del collage al livello successivo. l'arte successiva Lebron James che pasticciare con la tua arte testa che hanno scosso il mondo dell'arte che muove l'arte cinetica si fondono le immagini immagini foto in Photoshop o PSP Paint Shop Pro 9.

This is my video response to Phil Hansen's (Philinthecircle) interactive toilet paper printing tutorial.
Here is his video- http://www.youtube.com/watch?v=4EudkS-U6QQ
YouTube Visual Arts Category Forum- http://www.google.com/support/forum/p/youtube/thread?tid=2a9806f929074cbd&...
Supplies I Use- http://www.jdoqocy.com/click-4....247664-805536?url=ht
Facebook Page- http://facebook.com/kazanjianm
Twitter- http://twitter.com/kazanjianm
