Лучшие
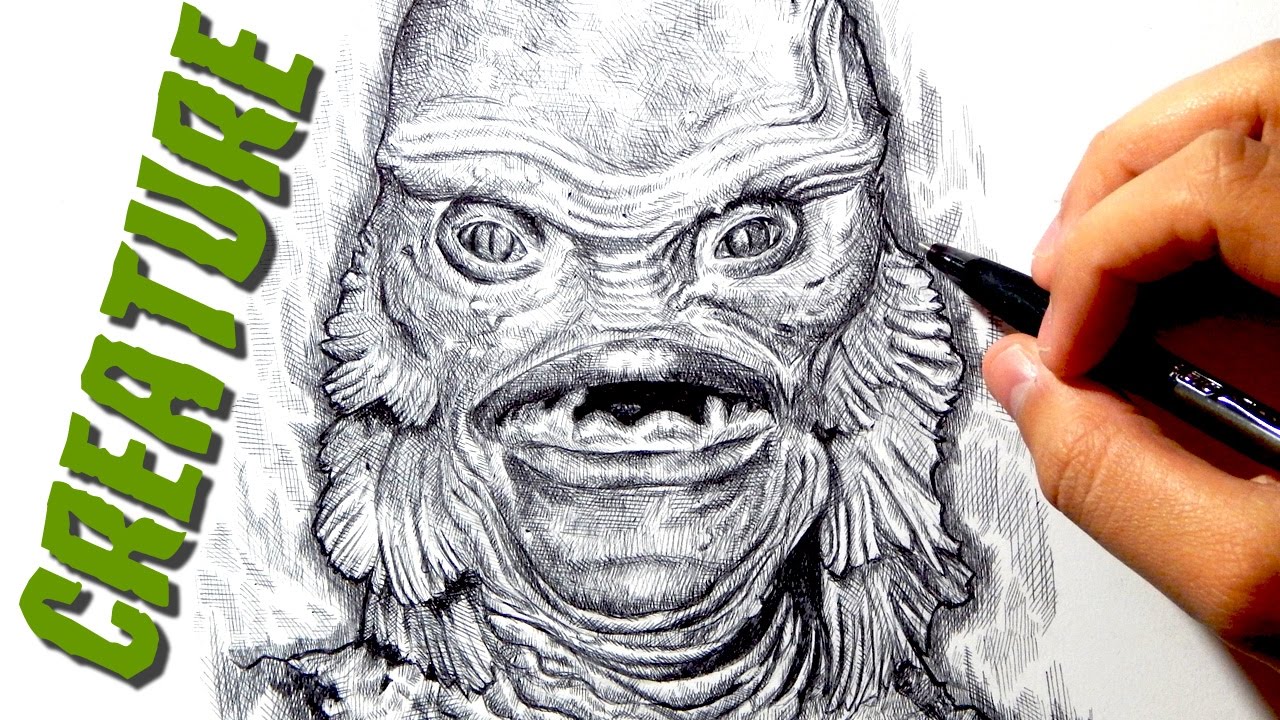
Creature from the Black Lagoon is a classic 1954 black and white film by Universal Studios. The "Creature from the Black Lagoon" also known as Gill-Man is part of the Universal Monsters Squad. He is not as well known as Frankenstein and Dracula, but is still considered an Iconic character.
This drawing was done with ballpoint pen on 11 x 14 Bristol paper.
Drawing by: Serafin Ureno
Other sites where you can find me!
FACEBOOK: http://www.facebook.com/OrangeMonkey92
DEVIANTART: http://omkdrawings.deviantart.com/
THIS DRAWING ON DA:
INSTAGRAM: http://instagram.com/orangemonkey92
----------------------------------------------------------------------------------------------------------
I am using royalty free music by: Kevin Macleod
http://incompetech.com/music/royalty-free/
Name of tracks used: Attack of the Mole Men & Ignosi
licensed under a Creative Commons license: http://creativecommons.org/licenses/by/3.0/
-----------------------------------------------------------------------------------------------------------
I am also using music provided by YouTube Audio Library
Artist: Silent Partner
Name of track: Lurking

Today I drew actress Margot Robbie as "Harley Quinn" from the Upcoming DC comics Movie "Suicide Squad". This drawing was done using several ballpoint pens and one white Gelly Roll for a few of the highlights. Thanks For Watching! Please help me out by sharing my work with your friends.
Drawing by: Serafin Ureno
Other sites where you can find me!
FACEBOOK: http://www.facebook.com/OrangeMonkey92
DEVIANTART: http://omkdrawings.deviantart.com/
THIS DRAWING ON DA: http://fav.me/d9p6rso
INSTAGRAM: http://instagram.com/orangemonkey92
I am using Music Provided by: ArgoFox
https://youtube.com/ArgofoxCC
Song By: SANDR - Retrofunkish
Direct Link to song: https://youtu.be/pgEk-U1BtdY
Release: https://soundcloud.com/sandred....m/sandr-retrofunkish
License: http://bit.ly/CCAttribution
I am also using additional royalty free music by: Kevin Macleod
http://incompetech.com/music/royalty-free/
Name of track used: Clean Soul
licensed under a Creative Commons license: http://creativecommons.org/licenses/by/3.0/

Hello YouTube, i hope you enjoy my drawing of Johnny Depp as "Tonto" from the Disney movie The Lone Ranger. Drawing was done using ballpoint pen on Bristol paper. It took me approximately 11 hours to finish this drawing.
Drawing by: Serafin Ureno
BUY ART PRINTS:
http://fineartamerica.com/prof....iles/serafin-ureno.h
Other sites where you can find me!
- FACEBOOK: https://www.facebook.com/OrangeMonkey92
- DEVIANTART: http://omkdrawings.deviantart.com/
- THIS DRAWING ON DA: http://fav.me/d6gmoep
- INSTAGRAM: http://instagram.com/orangemonkey92
(Follow my art on Instagram i'm constantly posting new drawings/sketches/ not seen on my YouTube channel)
I am using royalty free music by: Kevin Macleod
http://incompetech.com
Name of track used: Hitman, and Night of the owl
licensed under a Creative Commons license:
http://creativecommons.org/licenses/by/3.0/

The Mona Lisa Painting: Amazing Anamorphic drawing illusion #7
Hello YouTube, I hope you enjoy this 3D drawing of Leonardo da Vinci's "Mona Lisa" painting. It is done using Prismacolor color pencils on bristol paper.
- There are four hidden objects in this drawing.
- Let's see if you can find them, there is a skull, a question mark, a frog, and an iphone.
- Comment Below when you find them
- Did You find them?
More 3D ART Playlist:
https://www.youtube.com/playli....st?list=PL6ryeD0q11u
Drawing by: Serafin Ureno
Other sites where you can find me!
FACEBOOK: http://www.facebook.com/OrangeMonkey92
DEVIANTART: http://omkdrawings.deviantart.com/
THIS DRAWING ON DA: http://fav.me/d92d8e1
INSTAGRAM: http://instagram.com/orangemonkey92
(You Can follow me on Instagram; i'm constantly posting progress pictures and sketches on there.)
I am using royalty free music by: Argofox Creative Commons
http://youtube.com/MMMontageMusic
Name of tracks used: Cease [Creative Commons]
Artist of Track: A Himitsu
Link to song: https://www.youtube.com/watch?v=wXpB0X0_xDo
licensed under a Creative Commons license: http://creativecommons.org/licenses/by/3.0/

In the spirit of Halloween here is a drawing of Emily from Tim Burton's Corpse Bride. This drawing was done using only ballpoint pens on Bristol paper board. What is your favorite Tim Burton Movie?
Drawing by: Serafin Ureno
Other sites where you can find me!
FACEBOOK: http://www.facebook.com/OrangeMonkey92
DEVIANTART: http://omkdrawings.deviantart.com/
THIS DRAWING ON DA: http://fav.me/d82fo51
INSTAGRAM: http://instagram.com/orangemonkey92
Follow me on Instagram i'm constantly posting new drawings sketches :)
I am using royalty free music by: Kevin Macleod
http://incompetech.com/music/royalty-free/
Name of tracks used: The Path of the Goblin King & Long Note Four
licensed under a Creative Commons license: http://creativecommons.org/licenses/by/3.0/
Royalty Free Music By: Argofox Creative Commons
https://www.youtube.com/mmmontagemusic
End Track:
Artist: High Scarlet
Track Used: All This Time [House]
Link to licence terms
http://creativecommons.org/licenses/by/3.0/

LINK- http://merrillk.com/?part=fineart&articles_id=7450&act=artist1&artist=69&collection=114Lets get started.
with the most common unit of measurement- a head length. Head lengths are the most common measurement in figure drawing From antiquity through the Renaissance, artists painted and sculpted figures that were 8 or 9 head lengths tall. For instance, Michelangelo's David, when measured, is 8 head lengths tall. The proportions of the David are idealized and heroic and different than the proportions of the average person, such as myself. I measured 7 1/4 head lengths tall. Now, I could never get a consistant answer on how many headlengths tall the average human body is....so I decided to construct an experiment. have read in some places that the body is as short as 7 head lengths and as tall as 8. I measured 100 people. 50 males and 50 females....right now you are seeing only a small sample... I made sure to include various body types to make this study scientific. I was able to learn that a humans proportions in head lengths is directly related with a persons height. The shortest person measured only 5 and 1/3 head lengths...the tallest was 8 and a half head lengths. ...But the vast majority were very close to 7.5 head lengths....and When I averaged the 100 people together, the result was 7.47 head lengths. Merrill! What the Hell is that .....and how does this relate to figure drawing? ......Oh dont worry, this chart shows you a normal distribution of heights. All that you need to know is that you can use 7.5 head lengths as a fairly accurate measurement, 95 percent of the time. So there its settled. The average human is 7.5 head lengths tall. Spaces on our bodies equivalent to one head length are...on our arm, 1.) from the top of the armpit to the joint of the elbow 2.) From the bottom of our chin to our nipples 3.) From our nipples to our navel 4. ) The height of our rear end. While females have differences in their anatomy, these measurements will work on them as well.Where do two head lengths fit on the human body?
1.) Its two head lengths down the upper leg
2.) It is also two head lengths down the lower leg
3.) It is two head lengths between the clavicle and the anterior iliadic crest...also known as the bony area that protrudes slightly lower than and on either side of your navel.
4.) It is also two head lengths from the elbow to the tip of the middle finger
5.) It is also two head lengths down the back, not including the neck
Across
1.) Two heads across the shoulders
What about three head lengths?
1.) 3 head lengths from the top of the head to the belly button
2.) 3 head lengths from the top of the armpit to the tip of the middle finger
and Four head lengths?
1.) The length of the leg is four head lengths
I have an important suggestion for when we draw the entire body. We know that the average body is 7 1/2 head lengths. Split up these head lengths in to three from the top and four from the bottom, with the extra half head length in the middle of the body. Splitting up the body in this way allows us to identify the landmarks more easily. We know that the height of the leg is four heads and the nipples and navel are landmarks that can be used from the top down.
Another suggestion that I have is to remember the belly button rule. This comes from Leonardo DaVinci who states that if a persons legs are chopped off below the knee, the belly button becomes the center of the body.
Also, it is the same distance from the top of the head to the tip of the middle finger, as it is from the ground to the belly button.
Davinci also said that the width of a persons shoulders is 1/4 of their height. I have found this measurement to be less accurate than head lengths but it is still applicable most of the time. Knowing this information also gives us the ability to break the body in to four parts.
1.) Head to nipples
2.) nipples to groin
3.) Groin to kneecap
4.) Kneecap to ground
Now lets talk about size relationships between similar body parts. On average, the arm is about 25 percent smaller than the leg. The hand is the same size as the face. It is also the same size as the foot without the toes. The head is very similar in size to the foot. Finally there is about one hand length between the rib cage and the pelvis. The video was planned and created by me (Merrill Kazanjian). All music is from Incompetech.com, a site with royalty free music. The intro song was: Brandenburg No4-1 BWV1049 (Kevin MacLeod). This song was followed by "Zap Beat" (Kevin Macleod). In addition to my own photographs, I used creative commons royalty free images. For instance- 1.) http://www.flickr.com/photos/f....elipeskroski/1596099 2.) Ming- http://www.flickr.com/photos/s....jsharktank/356095129 3.) Wadlow- http://www.flickr.com/photos/fallout/2509803773/ 4.) Skeleton- http://search.creativecommons.org/?q=female+bathing+suit&sourceid=Mozilla-search# 5.) http://www.flickr.com/photos/yourdon/3757583035/
WE NEED A VISUAL ARTS CATEGORY ON YOUTUBE THREAD-http://www.google.com/support/forum/p/youtube/thread?tid=2a9806f929074cbd&hl=en&fid=2a9806f929074cbd0004b630ad37cc3e
Facebook- http://facebook.com/kazanjianm
Twitter- http://twitter.com/kazanjianm
Website- http://merrillk.com
(Merrill) Supplies I Use- http://www.jdoqocy.com/click-4....247664-805536?url=ht
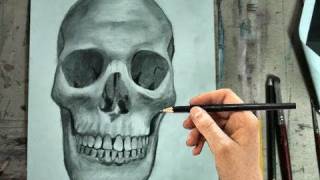
Today, you are going to learn how to draw the human skull in front view. Just follow my step my step instructions and I promise you that you will surprise yourself. But I want to try something new. After you complete your drawing, take a video of it and post it as a video response to this video. I will personally critique the first ten video responses to this video.
Step 1: Draw a half circle shape, with two tiny half circles on each end.
Step 2: Draw the holes for the eyes and the nose. Notice that the top of the eye shape starts at the bottom of the half circle shape from step one. Also, notice that the nose shape is triangular and it starts 1/3 of the way up the eye shape.
Step 3: is a tricky step. Add the line that I just added to complete the shape. Notice the perfect symmetry on each side. Notice that the bottom has a squiggly line.
Step 4: Add the upper teeth. There are 12 upper teeth visible and the largest ones appear to be at the front of the mouth. The mouth curves back in a horseshoe shape and the back teeth are blocked. Be sure to make the teeth smaller as they go further back in the mouth. Also be sure to notice that the teeth in the front are somewhat trapezoidal in shape and widest away from the gum.
Step 5: Add the bottom row of teeth. Notice that they are slightly smaller than the top teeth. Also, notice that the top row partially overlaps the bottom. Finally, be sure to see that their widest point is also away from the gum. Here is a close up.
Step 6: Add the jawline. Be sure to notice the shapes that connect the jaw with the rest of the skull.
Step 7: Add the details on the eye sockets and nose.

NARRATED VERSION TOMORROW (SAT.)!
REALISM CHALLENGE BOOK: http://amzn.com/0385346298
SUBSCRIBE: http://bit.ly/markcrilleySUBSCRIBE
All 6 "Brody's Ghost" books at Amazon: http://bit.ly/BRODYSGHOSTbooks
"Mastering Manga" bookS at Amazon: http://bit.ly/MASTERINGMANGA
All 4 “Miki Falls” books at Amazon: http://bit.ly/MIKIFALLSbooks
Brody 1-Shot Comic at TFAW: http://bit.ly/BRODYoneshot
OFFICIAL CRILLEY PLAYLIST: http://bit.ly/CRILLEYPLAYLIST
All of my books are available through your local bookstore-- Ask them to special order if they don't have my books on the shelf. Thanks for your support!! ~Mark
FACEBOOK: http://www.facebook.com/markcrilleyOFFICIAL
TWITTER: http://www.twitter.com/markcrilley
INSTAGRAM: http://instagram.com/markcrilleyreal/
All music created in GarageBand
Visit my channel for YouTube’s #1 most-viewed drawing videos!

"Come as You Are", but bring a pencil......because you are going to learn how to draw Kurt Cobain step by step, "On a Plain" piece of paper. "All Apologies" if this intro gives you an "Aneurysm", I just want to state that if you think that your drawing skills have "Plateaued" you should try my step by step videos to get them "In Bloom". My videos wont "Drain you" and you wont think they're "Dumb"....unless if you're a "Negative Creep"......and I have over 100 on my channel so be sure to "milk it"........... So, unless if you have "Something in the Way", please commit a "Sliver" of time to learning how to draw Kurt Cobain. Please don't forget to Subscribe. Just click on my "Scentless Apprentice" who "Smells Like Teen Spirit"..................SUBSCRIBE........................Sorry, I have "Tourettes".........Err "Nevermind.
Step 1: Draw the arch and the two shapes. Notice that the shape on the left is egg shaped and the shape on the right is shaped like home plate in the game of baseball.
Step 2: Add the hair shape on the left side of the page. Dont stress, this shape doesnt have to be perfect but it should be proportionately larger than the shape from step one.
Step 3: Add the hair shape on the right side. Dont stress out on the hair shape, but take extra time on the shape of the face.
Step 4: Add the nose shape. Draw what you see rather than what you know. The nose looks like this because of a strong shadow shape. Just trust me and draw it.
Step 5: Add the mouth shape. The top lip is like a flattened M and the bottom lip is like a cereal bowl. Be sure to notice its placement compared to the other features of the face.
Step 6: Fill in the eye shapes. Take extra time on this step. The eyes are the key to the likeness.
Step 7: Add the shapes to the hair. These do not have to be placed perfectly since hair is a "Radio Friendly Unit Shifter".
Step 8: Add the shapes for the facial hair.
I am combining two methods called 1.) cross hatching and 2.) smudging.....right now. Pause the video at different points and use the image on the screen as your reference image. It doesnt get very dark under the eyes.......however, above the eyes (between the eye and the eyebrow) it gets very dark. Kurt has dark and full eyebrows. Use a #2 (HB) pencil to start. Dont be scared to press hard in the eye region. The nose is tricky. The darkest part is the nostril (not part of the step by step video). But the entire shape of the bottom of the nose gets pretty dark. After, I fill it in, observe it, then draw it. I am using a #7 Bristle Flat brush for the shading. The top lip is dark and solid in shape. The LEFT side of his face (the side on YOUR right) is lighter in tone than the right side. The bottom left corner of the page will get very dark. I "went right in" with a 6B pencil. REMEMBER, shading is all about RELATIVITY, so compare the tones of the different areas of the image, The shape at the bottom of the face will eventually be blended in with other dark tones. In order to make the hair "pop out" you need to darken the background. (Its all about relativity!!!) The hair is a LOT of Adding....then erasing.....adding...then erasing ....Be sure to make your strokes in the same direction at the hair in this reference image.....Notice that I am using the eraser to "draw". Now the "PORTRAIT" begins....Now it looks like a human being......but I have to "wrestle" with it to make it look like Kurt Cobain. Use a slip sheet (look under my hand) when you get this far. The darkest areas have several layers of hatching. (8B pencil).
Link- http://merrillk.com/?part=fineart&articles_id=13272&act=artist1&artist=69&collection=461#
WE NEED A VISUAL ARTS CATEGORY ON YOUTUBE THREAD-http://www.google.com/support/forum/p/youtube/thread?tid=2a9806f929074cbd&hl=en&fid=2a9806f929074cbd0004b630ad37cc3e
Facebook- http://facebook.com/kazanjianm
Twitter- http://twitter.com/kazanjianm
Website- http://merrillk.com
(Merrill) Supplies I Use- http://www.jdoqocy.com/click-4....247664-805536?url=ht
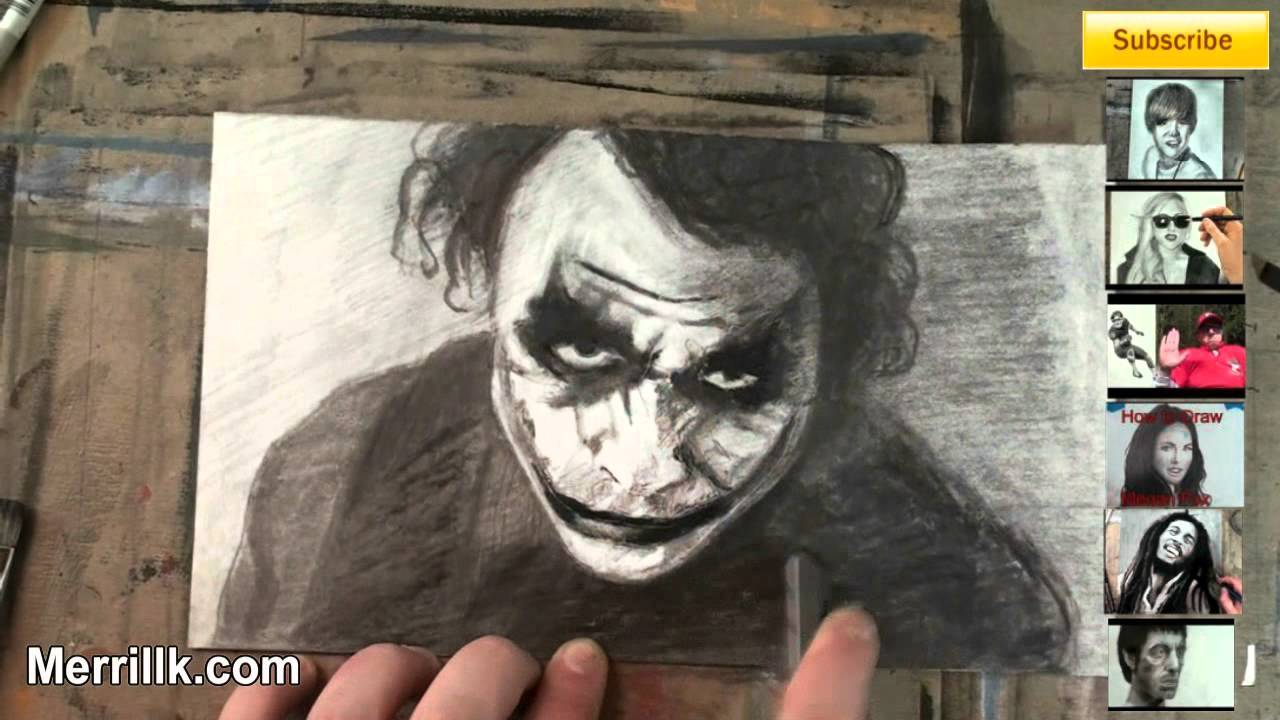
Do you want to know how Little Old Man got these scars? He kissed a pencil sharpener.......with his tongue. And while that was a big mistake I am going to prevent you from making drawing mistakes on your portrait of Heath Ledger as the Joker. Just follow my step by step instructions, pause the video at the end of each step and don't Christian Bale on me and you will surprise yourself on this drawing.
Do I sound like a man with a plan? Well I have one. Hit the link in the video description to go to my Joker cheat sheet on my website. It has photos and text and it will supplement the instruction that you receive in this video. Go grab your pencils and paper. Lets begin.
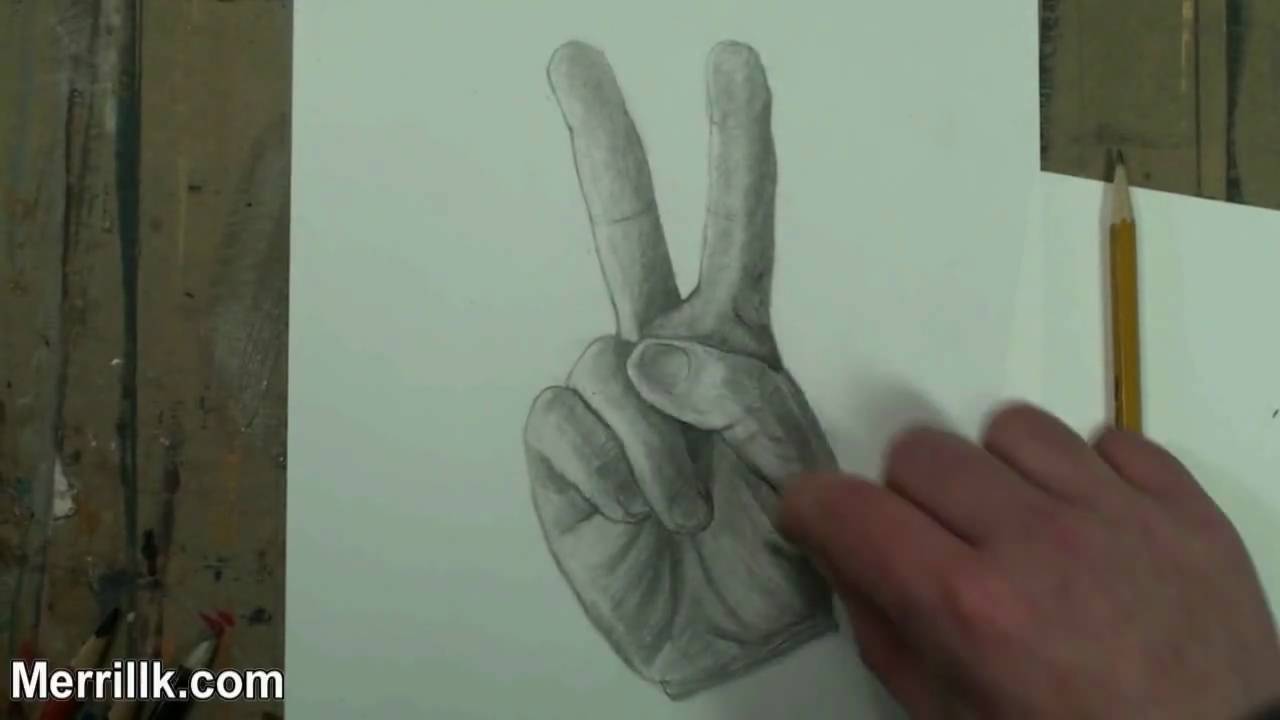
Link- http://merrillk.com/index.php?part=fineart&articles_id=6556&collection=114 This is the second in a series of twenty videos, that will show you how to draw the hand in various poses. This video will specifically focus on the peace sign hand gesture. I broke the process down in to simple steps and I went the "extra mile" to make sure that EVERYONE could do it, even if you havent had much experience with art. The link in the videos description will take you to a web page with step by step instructions and a PDF Book that you could download and print for free..... Lets get ready to draw
As a general recommendation, pause the video at the end of each step and look at the reference image often.
Step 1: Draw the two fingertip shapes. Notice that the fingertip on the left is at a different angle than the fingertip on the right.
Step 2: Add the next two shapes. Notice that they are slightly longer than the fingertip shapes.
Step 3: Draw the trapezoid shape in addition to the two shapes that complete the fingers. Notice that the bottoms of the fingers are slightly longer than the mid sections of the fingers.
Step 4: Step four is a tricky step! Be sure to spend some extra observation time. Notice that the thumb overlaps the trapezoid shape. Also notice that the thumb in this position, resembles a flying saucer tilting to the side.....YES...a flying saucer with a thumbnail in it.
Step 5: Draw the traingle shape. Notice that it is directly below the V shape from the two fingers. Also notice the tiny shape that I made tp the right side of the thumb.
Step 6: Draw the tilted U shape, to the left of the triangle. Also, draw in the fingernail.
Step 7: Observe the picture to close the U shape from step 6.
Step 8: Add in the shape that I just added. It will eventually be a part of the pinky finger.
Step 9: Add in the fingertip and fingernail to complete the shape for the pinky finger.
Step 10: Add the triangle shape next to the pinky finger. This will eventually be part of the palm.
Step 11: Add in the shape for the lower palm.
Step 12: Observe the line that was just added. It is similar to the bottom of a cup. It starts at the middle of the ring finger and ends at the thumb shape from Step 4.
Step 13: Take some extra time to observe the line that I just added. Then, complete the shape for the bottom of the palm
Step 14: Now, take a second to observe the lines that I ALMOST totally erased.
SHADING
Step 15: Build the tones up slowly. Start cross hatching with an HB (#2) pencil.
Step 16: (NOT SHOWN) I use a blending stump to smudge my hatches. And then I do more hatching atop of the smudges.
Step 17: The darkest parts will be the triangle in the center and the areas on the edges of the right side of the hand (and fingers....see this developed in the next few steps).
Step 18: At this point I am using my darker (in tone) 2B, 3B, 4B and 5B pencils. I also use the eraser (A LOT) to create highlights.
Step 19: I always try to finish a drawing by smoothing it out by using the pencil, the eraser and the blending stub (tortillion).
Step 20: Finished!

Want to learn to shade a drawing? This video will make it easy! I usually focus on breaking down images in to simple shapes, but this video is different. We chose a simple object (a seashell) and the focus of this video is learning to shade, step by step. Music by Kevin McLeod: Song- Local Forecast - Elevator http://incompetech.com/music/r....oyalty-free/index.ht
Subscribe to kazanjianm (Don't miss any new videos that I make)- http://www.youtube.com/subscri....ption_center?add_use
Facebook: Like me on Facebook to find out about live hangouts or to post your work!- http://facebook.com/kazanjianm
Twitter: I tweet! Do you? http://twitter.com/kazanjianm
My Website: http://merrillk.com
Art Supplies I Use in my Art Work- http://merrillk.com/?sid=135&idpage=supplies_i_use
YouTube Visual Arts Category Petition: http://www.change.org/petition....s/create-a-visual-ar
Step by Step Drawing Playlist: http://www.youtube.com/playlis....t?list=PLD6E34C7CD58

NARRATED VERSION: http://youtu.be/__8TdtcU5gQ
SUBSCRIBE: http://bit.ly/markcrilleySUBSCRIBE
All 5 "Brody's Ghost" books at Amazon: http://bit.ly/BRODYSGHOSTbooks
"Mastering Manga" book at Amazon: http://bit.ly/MASTERINGMANGA
All 4 “Miki Falls” books at Amazon: http://bit.ly/MIKIFALLSbooks
Brody 1-Shot Comic at TFAW: http://bit.ly/BRODYoneshot
OFFICIAL CRILLEY PLAYLIST: http://bit.ly/CRILLEYPLAYLIST
All of my books are available through your local bookstore-- Ask them to special order if they don't have my books on the shelf. Thanks for your support!! ~Mark
FACEBOOK: http://www.facebook.com/markcrilleyOFFICIAL
TWITTER: http://www.twitter.com/markcrilley
All music created in GarageBand
Visit my channel for YouTube’s #1 most-viewed drawing videos!

J'ai enfin décidé de dessiner notre cher Cyprien..
J'avais peur jusqu'à là,
De cette Barbe mon dieu!!
J'espère que ce dessin vous aura plu, ce n'est pas un tuto,
même si je l'ai réalisé étape par étape, ci dessous la liste de mon matériel de Draw.
Un grand merci à l'équipe de Voxmakers et à Shindehai d'avoir accepté d'utiliser leur musique pour illustrer, n'hésitez pas à foncer voir leur chaîne, car ils sont ENORMISSIMES, si vous avez aimé ce son, vous aimerez les autres !
Lien de la musique
On vous prends pour des cons (Cyprien, feat Squeezie, ft Norman)
ICI :
https://www.youtube.com/watch?v=HAkSaa6zU2g
La chaîne de Voxmakers :
https://www.youtube.com/user/VoxMakersChannel
La chaîne de Shindehai et Sasha :
https://www.youtube.com/user/SHINDEHAI
Chaîne de Cyprien :
https://www.youtube.com/user/MonsieurDream
Mes liens :
https://www.youtube.com/user/TutoDraw
Instagram : http://www.instagram.com/tutodraw
Support & News FB : http://www.facebook.com/TutoDraw
Web Site : http://www.tutodraw.com
Matériel :
Promarkers et Pastels et Criterium, et deux mains, et une gomme, et stylo à micro pigment, et puis quelques crayons aquarelles
AAAAAAAAAAAAAAHHHHHHHHHHHH
![10 Cool illusions - Hand Art Makeup [Compilation]](https://i.ytimg.com/vi/qOz9vHDV-C0/maxresdefault.jpg)
Compilation of my 10 last optical Makeup Illusions on my hand !
GO : http://bit.ly/1P5u0q2 & Joins the team of drawers!
► Instagram : http://www.instagram.com/tutodraw
► Support & News FB : http://www.facebook.com/TutoDraw
-----------------------------
Question :
Sachant que j'ai une seconde chaîne de dessin que je n'utilise pas.
Que préférez-vous que je fasse des mes anciens concepts TutoDraw "Anglophones" ? Time-Lapse et illusions ?
1 - Je continue d'en publier sur cette chaîne
2 - Je préserve cette chaîne que pour du contenu 100% Français
3 - Je publie mes vidéos anglophones sur ma seconde chaîne : https://www.youtube.com/TutoDrawBonus
Pour en faire une chaîne de Time Lapse en parallèle à celle-ci
(Sans conséquence sur mon rythme actuel)
J'aimerais avoir vos avis, sachant que ma seconde chaîne n'est pas alimenté depuis des mois...
MERCI
---------------
Musiques CC :
https://www.youtube.com/watch?v=i6LoR3o2oL4
https://www.youtube.com/watch?v=TR1AeAHMXb8
-------
Optical Illumination
Blague ou Illusion d'Optique Géante ?!
Je vous montre tout ça!
S'abonner : http://bit.ly/1P5u0q2 pour D'autres choses sur le dessin!
► Instagram : http://www.instagram.com/tutodraw
► Support & News FB : http://www.facebook.com/TutoDraw
► Market : http://www.drawmarket.fr
Merci à Eléa et Elise pour leur jolie prestation en direct !
Une super rencontre pendant le tournage !
Son album en vidéo :')
https://www.youtube.com/watch?v=MbugimJT6K4
FB : https://www.facebook.com/eliseestherharp/
SITE : https://www.elise-esther.com/
L'illusion géante : Par Felice Varini,
- http://www.varini.org/
" Cercles concentriques excentriques "
N'hésitez pas à regarder les autres performances de l'artiste !
------------------
Musiques cc 3.0
https://www.youtube.com/watch?v=U5fIxTlB8LI
https://www.youtube.com/watch?v=zaduztRKacY
and Kevin Macleod music
https://www.youtube.com/watch?v=RVMxPA7SPLo&start_radio=1&list=RDRVMxPA7SPLo
Outro musique : Elise Esther
------------------
C'était le thème de l'illusion d'optique anamorphique :'D
à bientôt à Carcassonne heiiiin!
Aujourd’hui, Un défi de dessin! Avec Le chef Otaku
Challenge/Duel : Naruto DRAWING, Me vs. Chef.
Une envie donc on l'a fait !
Son dessin : https://www.youtube.com/watch?v=0fa1D1Xidus&feature=youtu.be
Mon tuto : https://www.youtube.com/watch?v=g2IxkMmJw48
Ma chaîne :
https://www.youtube.com/user/TutoDraw
Chaîne du Chef
otaku
https://www.youtube.com/channe....l/UC5sbGkJ_Fuzn_NCxF
Outils pour le dessin : Criterium / Promarkers / Pastel / Feuille grise / Stylo à micro pigment / Gomme
Music and drawing created by me (Tutodraw) and (TutoArt)
Moi :
Facebook:
http://www.facebook.com/TutoDraw
Instagram :
http://www.instagram.com/TutoDraw
Merci beaucoup,
Thanks you very m....!

Compilation of 10 pixel art :D
YouTube:
http://www.youtube..com/TutoDraw
Facebook:
http://www.facebook.com/TutoDraw
Instagram :
http://www.instagram.com/TutoDraw
MUSIC :
Slinz - Other Side
License: http://bit.ly/CCAttribution
A Creative Commons Attribution License (CC BY)
The Name of Life Piano, Orchestra & Choir Version
https://www.youtube.com/watch?v=4ZdvFiq6pD4
Creative commons 3.0
----
Happy holliday's 2016 :p
![Comment dessiner une bouche réaliste rapidement [Tutoriel]](https://i.ytimg.com/vi/Yw5lY8jAQoo/maxresdefault.jpg)
Peut-on dessiner des bouches réalistes facilement ?
Une astuce ou un secret pour aller vite ?
S'abonner : http://bit.ly/1P5u0q2 & rejoins la team des drawers!
► Ma boutique : https://www.drawmarket.fr/
► Instagram : http://www.instagram.com/tutodraw
► Support & News FB : http://www.facebook.com/TutoDraw
-----------------------------
Tu possèdes une bouche, des lèvres et des yeux je me trompe ?
-----------------------------
Instruments de dessin :
- Critérium (drawmarket)
- Main (sur ton corps)
- Gomme (drawmarket)
- Crayon de couleur noir simple alternative STABILO (drawmarket)
- Promarker
- Papier Kraft extra Lisse
- Stylo à Gel blanc Uni-ball (DrawMarket)
-----------------------------
Musiques CC :
https://www.youtube.com/watch?v=FRvA74q3znI
Death note music cover by fabulous artist
https://www.youtube.com/watch?v=OfwDDvT365A
And :
Kevin macleod
and
https://www.youtube.com/watch?v=03AKy9bhOMU
https://www.youtube.com/watch?v=oENchWN1UiA
https://www.youtube.com/watch?v=H535YA7YC38&t=76s
https://www.youtube.com/watch?v=JrbOGypCJvE
-------
Le dessin est un oiseau qui attend sagement dans sa cage grise.
![Comment dessiner un Champignon Creature [Tutoriel] Spe. Dofus](https://i.ytimg.com/vi/EbXe_iW5uQo/mqdefault.jpg)
Dans cette vidéo, voici comment dessiner un champignon RPG! Pour découvrir le jeu : http://wizdeo.com/s/tuto_dofus_01
Dans cette vidéo tutoriel, spécial Dofus, je montre comment dessiner
une champignon mignon RPG, "Champ champ" du jeu étape par étape..
La vidéo du panda kawai :
https://www.youtube.com/watch?v=kV5ZeE6Clpw
Pour découvrir le jeu / Essayer :
http://wizdeo.com/s/tuto_dofus_01
Ce jeu ayant bercé mes années de Lycée, comme je suis assez fou de stratégie, et de l'univers héroic-fantasy, j'ai passé
énormément de temps dessus.. et encore aujourd'hui de temps en temps
Pour le matériel de dessin :
Critérium / Crayon
Gomme
Pastel noir et blanc
Pastel jaune, noir, simple marron
Promarkers : ruby, cannelle
Si vous n'avez pas le matériel pas de problème, on peut utiliser des crayons, ou de la peinture aquarelle, on peut facilement arriver
a un résultat similaire avec nos doigts, un stylo noir, et un crayon + un outils de couleur si possible
Pour me suivre ailleurs :
https://www.instagram.com/tutodraw/
https://www.facebook.com/TutoDraw/
https://www.youtube.com/TutoDraw/
Musiques par Kevin MacLeod 3.0 cc
et Brume Leap of love
https://www.youtube.com/watch?v=3U4e5V1TSWw
-----------
Tutoriel par Jordan Molina - 2016 Coup critique
Special Dofus 3/4
