Образование
Подкатегория

What would a "merger" of Alan Greenspan, Ben Bernanke, Donald Trump, Mr. Krabs, Jim Cramer and the Monopoly Guy look like? Watch the video to find out! Sell Sell Sell !!!! Artmorph by Merrill Kazanjian
Charles S. Hamlin, William P. G. Harding, Daniel R. Crissinger, Roy A. Young, Eugene I. Meyer, Eugene R. Black, Marriner S. Eccles, Thomas B. McCabe, William McChesney Martin, Jr., Arthur F. Burns, G. William Miller , Paul A. Volcker, Alan Greenspan, Ben S. Bernanke, JP Morgan James Piedmont, lucrative, venture capitalism, vulture, bears and buills, bullish, stock, equity, equities, markets, trader, day, selling short, capital, investment banking, banker, irrational exuberance, gordon gecko, greed is good, market cap, cnbc, fast money, ron insana, carlos quintanilla, joe kernan, bubble, nasdaq, dow, bill gates, jack welch, bernie ebbers, chair, board, ceo, compensation, declare bankruptcy, real estate, bottom, candlestick, options, bonds, liquidity, crisis in confidence, david faber, larry kudlow, republican bias, donny deutch, hang seng, deutchemark, yen, rupee, oil, commodities, bloomberg, news, aig, santinelli, maria bartiromo, todd, thompson financial, citibank, lehman brothers, holdings, stock market, volatile, volume, buy low, sell high, tips, how to, invest

Love him or hate him, Allen Iverson plays the game of basketball with a lot of heart. I remember him when he first came in to the NBA from Georgetown University and I followed his career through Philadelphia (76ers), Denver (Nuggets) and now the Detroit Pistons. Hes known for his killer cross over dribble and his tenacious drives to the basket, despite his small frame. He has not won a championship as of yet but reached the finals when he was with the Sixers- Practically carrying that team on his back. There are plenty of highlight / mix tapes out there so my tribute comes in the form of a drawing. I documented the different steps that I took: 1.) Pencil Drawing 2.) Markers 3.) Color Pencils and you can download a print version that shows you step by step how to draw AI at my website merrillk.com. The first part is stop motion with a scanner and the second part is a time lapse. Hopefully its a slam dunk. Please rate and comment! Merrill Kazanjian

Its time for YOU to draw Beyonce. All that you will need is a pencil with an eraser, a blending stump or Q-Tip and a large index card. Be sure to stop the video at the end of each step and look at the reference picture on the computer screen. No drawing experience? Doesnt matter. You are gonna surprise yourself!
Step 1- Make a rainbow shape at the top of your large index card. Notice that the top of the rainbow is at the very top of the card. Then make the oval Notice that the bottom of the oval is more pointed than the top.
Step 2- Continue the line at the end of the rainbow down to the mid point of the card and then curve it upwards to the bottom of the oval. Do this on both sides.
Step 3- Try to match the two lines that I just added. Use the sides of the index card to gage their accuracy.
Step 4- Use your observation skills to draw the two lines that I just added. This will eventually be the bottom of Beyonce's left arm.
Step 5- Do the same for the top of her left arm.
Step 6- Now, create the top of her forearm. Hint, notice the shape that is formed in the background, think of this shape as a puzzle piece and use it to tweak the shapes around it.
Step 7- Create the V shape on her dress. Notice that the bottom of the V ends at the mid point of the shape that was formed in the previous step.
Step 8- I slightly changed the shape at the bottom of the hair on the left and created a neck. I also made another shape within the hair.
Step 9- I created another shape within the hair.
Step 10- I changed the side of her hair. I made 7 wild curls at the bottom with a wave above it.
Step 11- Take a second to observe and draw the shapes that I just drew on the other side of her hair.
Step 12- I exposed the neck some more by curling up the bottom of the hair on the left side of her head.
Step 13- I put a line for the shadow under her breasts
Step 14- I added an earring
Step 15- I added a belt
Step 16- I added two ovals on the face for the eye sockets. These will be broken down in to smaller shapes.
Step 17- I added a shape for the shadow on the right side of Beyonce's nose. Put this in very lightly
Step 18- I added Beyonces top lip. The shape is similar to a flattened McDonalds arch.
Step 19- I added Beyonce's bottom lip. Notice that it is wider than the top lip and has a shadow at the bottom.
Step 20- I added the eyebrows at the top of the eye socket
Step 21- I added her eyes. In this picture she is wearing a lot of eye liner, so the lines at the top and bottom of the eye could be similar in width.
After the step by step, I talk you through she difficult shading of the hair face and body. You will see me demonstrate strategies on how to shade hair with pencil, a tortillion (blending stump) and an eraser. I will also show you how to get a soft (smoothly shaded) face and how to build up the tones through layers of hatching to do the clothes and the body.
Image courtesy of kalumba99 (creative commons license)
Su tiempo para dibujar Beyonce. Todo lo que usted necesita es un lápiz con una goma de borrar, un difumino o Q-Tip y una tarjeta de índice general. Asegúrese de dejar el vídeo al final de cada paso y mirar el cuadro de referencia en la pantalla del ordenador. Sin experiencia de dibujo? Doesnt matter. Estás va a sorprenderte a ti mismo!

http://merrillk.com/index.php?part=fineart&articles_id=5337&collection=114 This is a continuation of my series on how to draw facial expressions with drawing pencils. Today, We are going to concentrate on the expressions of shock and fear. I video taped the creation of 14 sketches, to give you a lot of chances to learn. You will see profile, 3/4 and frontal views and both male and female faces. But, before we begin, take a second to glance at the major differences. This information will be discussed in the video and you can download on my website Merrillk.com. Just type the words shock and fear in the search box to download this resource. Or, if you are watching on my youtube channel, hit the link to the right to view this resource. I hope that you learn a lot. Here we go.
Character 1- In the first character, I want to highlight the gaping mouth. Notice that the top teeth are exposed. When you draw this expression, the top lip is pulled up, which shortens the distance between the lip and the nose
Character 2- For this character, I want to highlight that the eyebrows usually separate and the forehead flattens for this expression. This is the opposite of the expression of anger where the eyebrows are pulled closer to each other.
Character 3- For this sketch I want you to notice the separation of the iris from the bottom eyelid as well as the perfect C shape that the mouth is in when it is in profile.
Character 4- For this character, take note of the separation between the iris and the top eyelid and the amount of space between the eyebrows- Both very common in a fearful expression.
Character 5- For this character, I want to highlight the lines on either side of the nose. For this expression you can make these lines more visible.
Character 6- This character has his eyes shut tight and his mouth open wider than any other character in the picture. To draw a scream, make the area between the eyelids as dark as the lashes and darken the area around the eye. Make the mouth extra wide.
Character 7- This character seems more startled than scared because her mouth is less open and there is relatively little shading around the eye.
Character 8- In this character, I wish that I left the mouth in the classic C shape for drawing this expression in profile view.
Character 9- Notice the dark rings under the eyes of this character. That and the separation between the iris and the upper eyelid makes him look distraught. Also notice that the mouth doesn't always have to be gaped open to convey fear. Instead, I filled the gap with teeth.
Character 10- This character has a lot of facial commonalities with the other characters that have been drawn so far. I added a still pose with a pointing finger to supplement the facial expression.
Character 11- A very common pose to convey shock and fear is to place both hands on either side of the face- Also known as the OMG pose.
Character 12- Notice that this character has separation on both sides of her iris. A great way to make someone look terrified.
Character 13- Since this character wears glasses, I made each eye seem magnified. I wish that I added a separation between the iris and the eyelid.
Character 14- I should have stopped at 13!. I made his head too small for his position in the picture. I know this because the people in the row behind him were significantly bigger- a mistake in perspective drawing.

Subscribe to kazanjianm (Don't miss any new videos that I make)- http://www.youtube.com/subscri....ption_center?add_use
Facebook: Like me on Facebook to find out about live hangouts or to post your work!- http://facebook.com/kazanjianm
Twitter: I tweet! Do you? http://twitter.com/kazanjianm
My Website: http://merrillk.com
Art Supplies I Use in my Art Work- http://merrillk.com/?sid=135&idpage=supplies_i_use
YouTube Visual Arts Category Petition: http://www.change.org/petition....s/create-a-visual-ar
Step by Step Drawing Playlist: http://www.youtube.com/playlis....t?list=PLD6E34C7CD58
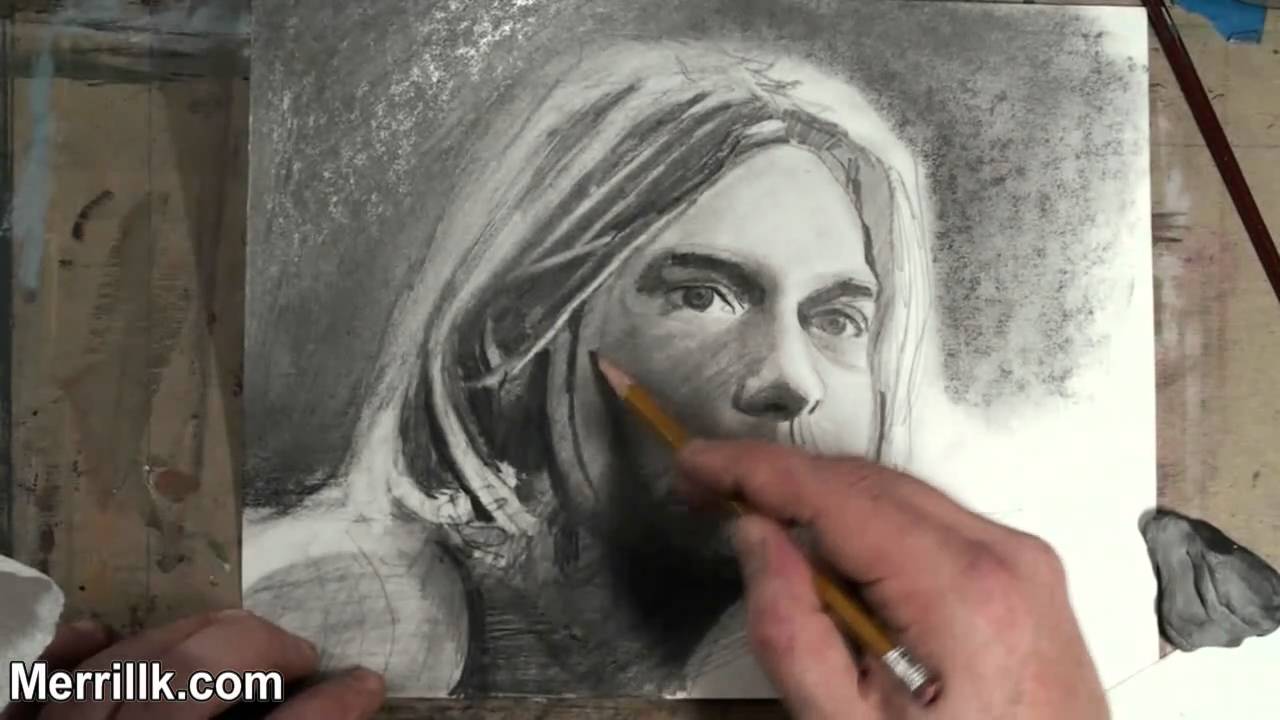
This is the extended shading tutorial on how to draw Kurt Cobain of Nirvana. Pause the video at different points and use the image on the screen as your reference image. I am combining two methods called 1.) cross hatching and 2.) smudging.....right now. Pause the video at different points and use the image on the screen as your reference image. It doesnt get very dark under the eyes.......however, above the eyes (between the eye and the eyebrow) it gets very dark. Kurt has dark and full eyebrows. Use a #2 (HB) pencil to start. Dont be scared to press hard in the eye region. The nose is tricky. The darkest part is the nostril (not part of the step by step video). But the entire shape of the bottom of the nose gets pretty dark. After, I fill it in, observe it, then draw it. I am using a #7 Bristle Flat brush for the shading. The top lip is dark and solid in shape. The LEFT side of his face (the side on YOUR right) is lighter in tone than the right side. The bottom left corner of the page will get very dark. I "went right in" with a 6B pencil. REMEMBER, shading is all about RELATIVITY, so compare the tones of the different areas of the image, The shape at the bottom of the face will eventually be blended in with other dark tones. In order to make the hair "pop out" you need to darken the background. (Its all about relativity!!!) The hair is a LOT of Adding....then erasing.....adding...then erasing ....Be sure to make your strokes in the same direction at the hair in this reference image.....Notice that I am using the eraser to "draw". Now the "PORTRAIT" begins....Now it looks like a human being......but I have to "wrestle" with it to make it look like Kurt Cobain. Use a slip sheet (look under my hand) when you get this far. The darkest areas have several layers of hatching. (8B pencil).
The Machine Thinks, Toccata and Fugue in D Minor and Waltz - Tschikovsky Op. 40 are by Kevin MacLeod of Incompetech.com and are under a Creative Commons license (attribution). I will credit Mr. MacLeod in the video description. All visuals are made by me (Merrill Kazanjian). I understand and choose to comply with the rules of copyright law.

WE NEED A VISUAL ARTS CATEGORY ON YOUTUBE THREAD-http://www.google.com/support/forum/p/youtube/thread?tid=2a9806f929074cbd&hl=en&fid=2a9806f929074cbd0004b630ad37cc3e
Facebook- http://facebook.com/kazanjianm
Twitter- http://twitter.com/kazanjianm
Website- http://merrillk.com
(Merrill) Supplies I Use- http://www.jdoqocy.com/click-4....247664-805536?url=ht
Ladies and Gentlemen, think about it. Santa Claus is a thug.
1.) Santa "Breaks and enters" illegally over a billion times each year........ on Jesus' birth day.
2.) Santa uses exploitative labor...... And the people who he exploits are shorter than three feet tall.
3.) Santa flies without a license and at his own leisure.....while the rest of us get molested at the airport.
4.) Santa wears red.......because he's a Socialist......just like Papa Smurf,
4.) Santa started a fistfight with a penguin........ just to prove that he is bipolar.
5.) While Eminem gets a lot of criticism about his lyrics towards women........Every other word out of Santa Claus' mouth is HO.
As a child, I was taught to leave Santa Claus cookies......But as an adult I know better. The following artwork will give a more accurate portrayal of Santa Claus.

This video will give you step by step instruction on how to draw Nicki Minaj. Grab a pencil and some paper and follow the steps at your own pace.
Subscribe to kazanjianm (Don't miss any new videos that I make)- http://www.youtube.com/subscri....ption_center?add_use
Facebook: Like me on Facebook to find out about live hangouts or to post your work!- http://facebook.com/kazanjianm
Twitter: I tweet! Do you? http://twitter.com/kazanjianm
My Website: http://merrillk.com
Art Supplies I Use in my Art Work- http://merrillk.com/?sid=135&idpage=supplies_i_use
YouTube Visual Arts Category Petition: http://www.change.org/petition....s/create-a-visual-ar
Step by Step Drawing Playlist: http://www.youtube.com/playlis....t?list=PLD6E34C7CD58
This one is for the boys who want a drawing system
Step One, Step Two, Ill share my drawing wisdom.
Gonna draw the mug, of Nicki Minaj
Just relax, grab a pen, park like garage
Im Merrill, and im real, Ill make you a deal
About Face all the time, a portrait revealed
My Pencil, it is dope, I draw for the pope
I always on the air, unless your internet is broke
Now Excuse me Merrill
Youre a hell of a guy
You cant rap for shit
But your drawings are fly.
You make me want to try
To draw portraits alright.
And your humor is dry.
You a troll? Hit the like
Your time I won't waste
Just draw at your pace
Sketch and erase
You wont have to trace
In the end youll have a Super Face.

My Alternative to oil painting by Merrill Kazanjian- Recently, I have made a lot of videos teaching about the techniques that I use to make art. But, for once, I want to talk to you about choices that I made with my own art. The first medium that I was proficient in was oil painting. But after college ended, I was too drained to paint after I got home from a day of work. The setup and clean up of paints took as long as the process of painting and the drying time was way too slow for my needs. I estimate that I painted only once or twice per week for about three hours per day and I only produced about two finished paintings per year. I did this for six years.
I slowly started dabbling with mixed media art. What you are seeing now is a process that I have worked out over the past 2 years for the past two years. This process allows me to have results similar to oil paintings, done in one day rather than six months. I even incorporate oil paint in to one of the steps.
Here it is:
1.) Pencil Drawing
2.) Illustration Markers (prismacolor, Ad, Decocolor)
3.) Color Pencil
4.) Thin Layer of Oil Paint
5.) Digital Additions (Photoshop, Paint Shop Pro)
I use this process to make my characters. Over the last 2 years I have made over 1500 characters. I scan them and save them as PNG files and I use them over and over in my artwork. PNG files stand for Portable Network Graphic and they are basically a filetype that works like a sticker. Stay tuned until the end of the video and I will show you what I mean. Contact me through my website merrillk.com or leave me a youtube comment and I will be sure to get back to you.

This video will teach YOU how to draw Simon Cowell STEP by STEP. Grab a pencil and paper and watch the video! Drawing from observation is a lot like putting a jigsaw puzzle together. In both a puzzle and a drawing, a person looks for shapes that fit together. Once a fit is discovered, a person moves on to the next piece. Remember this analogy when drawing today. This video will show you how to draw Simon Cowell. Each step will be shown in two second intervals. Pause each step, as you need to or download a print version of this lesson from my website, http://merrillk.com. Feel free to save a copy to your computer and print it. Pause the video after each shape appears and try to draw it. Press play when it looks similar to mine. If you follow each step and fit the shapes together correctly, you should have a decent contour drawing of Simon Cowell. Give it a try. I think that you are going to surprise yourself! To shade, I used a number two pencil and a blending stub. Search for my demonstrational shading videos online. It took me about fifteen minutes to do the contour drawing and about thirty minutes to shade. Merrill KazanjianCette vidéo vous apprendra comment attirer Simon Cowell étape par étape. Prenez un crayon et du papier et de regarder la vidéo! Dessin de l'observation est un peu comme mettre un puzzle ensemble. Dans les deux casse-tête et un dessin, une personne qui cherche des formes qui s'emboîtent. Une fois que l'ajustement est découvert, une personne passe à la prochaine pièce. Rappelez-vous cette analogie lors de l'élaboration d'aujourd'hui. Cette vidéo vous montrera comment tirer Simon Cowell. Chaque étape sera présenté en deux secondes d'intervalle. Pause chaque étape, comme vous avez besoin d'imprimer ou de télécharger une version de cette leçon de mon site web, http://merrillk.com. N'hésitez pas à enregistrer une copie sur votre ordinateur et l'imprimer. Pause de la vidéo après chaque forme apparaît et essayez de dessiner. Appuyez sur play quand il ressemble à la mienne. Si vous suivez chaque étape et le montage des formes correctement, vous devrez avoir un contour dessin de Simon Cowell. Give it a try. Je pense que vous allez vous surprendre! À l'ombre, j'ai utilisé un crayon, et numéro deux un mélange tampon. Recherche pour ma démonstration shading vidéos en ligne. Il m'a fallu une quinzaine de minutes pour faire le contour de dessin et une trentaine de minutes à l'ombre. Merrill Kazanjian.
Este video le enseñará cómo dibujar Simon Cowell paso a paso. Agarra un lápiz y papel y ver el video! A partir de la observación es muy similar a poner juntos un rompecabezas. En tanto un rompecabezas y un dibujo, una persona que busca formas que encajan entre sí. Una vez que se descubre un ataque, una persona pasa a la siguiente pieza. Recordar esta analogía, cuando dibujo el día de hoy. Este video le mostrará cómo sacar Simon Cowell. Cada paso se muestra en dos intervalos de un segundo. Pausa cada paso, como usted necesidad de imprimir o descargar una versión de esta lección de mi sitio web, http://merrillk.com. Siéntase libre para guardar una copia a su computadora e imprimirlo. Pausa en el vídeo aparece después de cada forma y tratar de dibujar. Pulse el botón de reproducción cuando se ve similar a la mía. Si usted sigue cada paso y colocar correctamente las formas, usted debe tener un dibujo del contorno decente Simon Cowell. Darle una oportunidad. Creo que va a sorprender a ti! A la sombra, he usado un lápiz número dos y una mezcla de talón. Buscar mi demostrativas sombreado videos. Me llevó unos quince minutos para hacer el contorno de dibujo y unos treinta minutos a la sombra. Merrill Kazanjian

WE NEED A VISUAL ARTS CATEGORY ON YOUTUBE THREAD-http://www.google.com/support/forum/p/youtube/thread?tid=2a9806f929074cbd&hl=en&fid=2a9806f929074cbd0004b630ad37cc3e
Facebook- http://facebook.com/kazanjianm
Twitter- http://twitter.com/kazanjianm
Website- http://merrillk.com
(Merrill) Supplies I Use- http://www.jdoqocy.com/click-4....247664-805536?url=ht
The Dark Ages (Middle Ages, Medieval Times) is my favorite period in art history. Monks did most of the artwork and kept literacy alive. The Roman infrastructure broke down after Constantine the Great (Constantine II) moved the capital to Byzantium (later Constantinople). Roads crumbled, barbarians sacked....people stayed still.....Latin broke down in to English, French, Spanish Italian, Romanian and Catalan. The artwork was called "gothic" by later art historians (which was an insulting term).
While the work lacked realism, it sure had a lot of character! I was inspired to do this mixed media work of art due to my fascination on this period in history. To make this artwork, Church vs. Crown, I used, pencil, color pencil, illustration marker,

Artist Merrill Kazanjian shows his technique for drawing from pictures. This technique is tailored for beginners. You do not have to have any experience to try this. Step one is called a mass drawing. Step two is called a line drawing. In step three, Kazanjian demonstrates how to do a rubbing. In step 4 the rubbing is reprinted. Step five is shading. This is an excellent process for beginners to learn how to render from a picture. All that you will need is. A yellow marker, two sheets of paper, a pencil, a picture to work from and a black pen. Drawing lessons for beginners. Drawing lessons for beginners.

How to draw the Bugatti Veyron Step by Step
bugatti veyron + bugatti veyron top speed - bugatti veyron top speed 434 km h top gear - bugatti veyron vs mclaren f1 - bugatti veyron vs jet + bugatti veyron vs koenigsegg agera r + bugatti veyron vs f1 formula + bugatti veyron crash + bugatti veyron in india + bugatti veyron prank bugatti veyron burnout + bugatti veyron build + bugatti veyron brake test + bugatti veyron black bess + bugatti veyron black +
bugatti veyron blue + bugatti veyron beaten + bugatti veyron birthday present + bugatti veyron birdman + bugatti veyron brakingbugatti veyron crash + bugatti veyron crash test + bugatti veyron crash in water + bugatti veyron commercial + bugatti veyron convertible +bugatti veyron custom + bugatti veyron crash caught on tape +
bugatti veyron convertible roof + bugatti veyron cristiano ronaldo +
bugatti veyron commercial 2014 bugatti veyron quarter mile +
bugatti veyron quicksilver exhaust + bugatti veyron quad turbo bugatti veyron supersport + bugatti veyron sound + bugatti veyron startup +
bugatti veyron singapore + bugatti veyron supersport vs koenigsegg agera r + bugatti veyron speed bugatti veyron super sport vs hennessey venom gt bugatti veyron sound exhaust bugatti veyron super sport acceleration bugatti veyron ss vs hennessey venom gt
asphalt 8 bugatti veyron bugatti veyron 0-60 +bugatti veyron 0-400 km h + bugatti veyron 0-100 km/h + bugatti veyron 0 to 60 +
bugatti veyron 0- + bugatti veyron 0-200 mph + bugatti veyron 0-400 + bugatti veyron 0-100 mph + bugatti veyron 0-200 + bugatti veyron 0-250
Subscribe to kazanjianm (Don't miss any new videos that I make)- http://www.youtube.com/subscri....ption_center?add_use
asphalt 7 bugatti veyron
Facebook: Like me on Facebook to find out about live hangouts or to post your work!- http://facebook.com/kazanjianm
Twitter: I tweet! Do you? http://twitter.com/kazanjianm
My Website: http://merrillk.com
Art Supplies I Use in my Art Work- http://merrillk.com/?sid=135&idpage=supplies_i_use
Petition: YouTube NEEDS a Visual Arts Category: http://www.change.org/petition....s/create-a-visual-ar
Step by Step Drawing Playlist: http://www.youtube.com/playlis....t?list=PLD6E34C7CD58
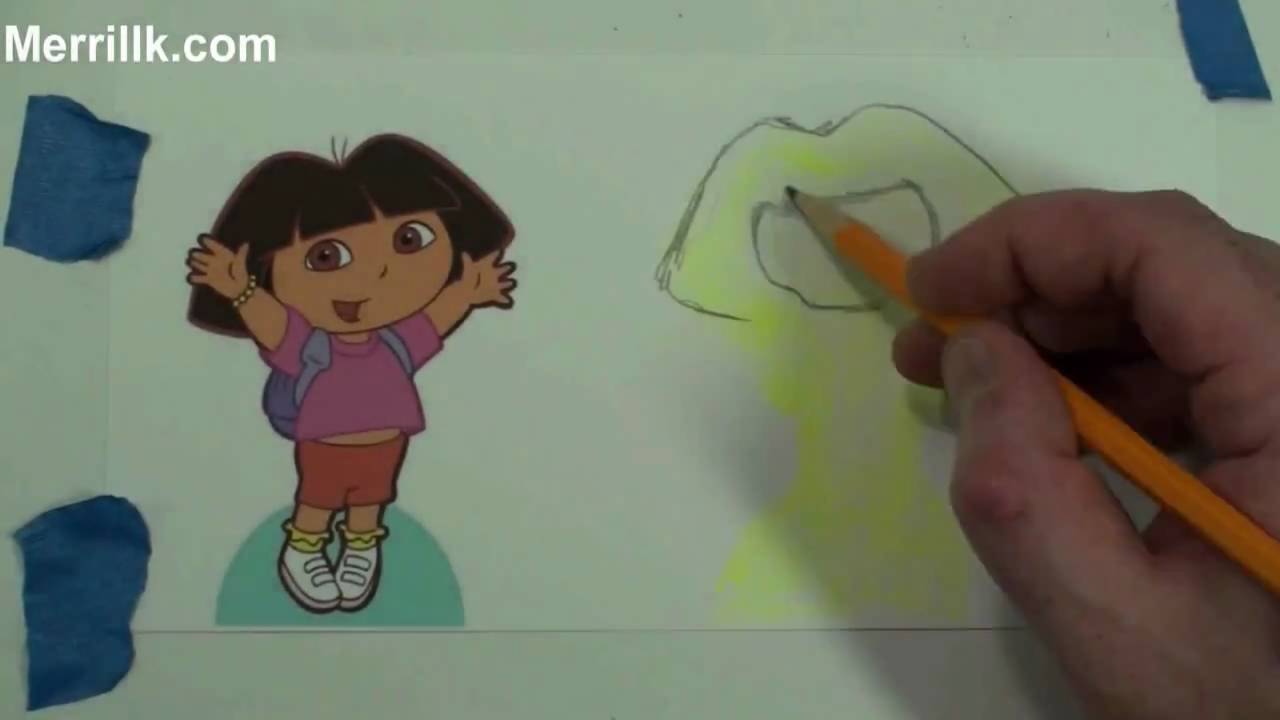
In this video I am going to share a very effective training technique that I use in my classroom. It is a strategy tailored for novice artists and it will make you better at drawing what you see (also known as the skill of rendering). I call this process mass drawing / line drawing. The process will seem awkward at first, but I have seen students get great results once they understand the process. So please give it a chance. All that you will need is a highlighter, a pencil and some paper. Lets begin.
This is a mass drawing. I used the highlighter to make a silhouette of the cartoon character, Ni Hao Kai Lan. I scribbled it in quickly and as a single mass. This will serve as a guide for the second step, the line drawing.
This is a line drawing. Notice that it is done directly over the mass drawing. But don't just outline; make corrections. The mass drawing will enable you to see the big picture and the mistakes that you made. Many of my students have found it much easier than guessing on a blank sheet of paper. So dont outline your mass drawing make corrections while doing the line drawing.
Take a second to look at how many changes I made to the original mass, such as the right arm, the shoes and the hair.
Still confused, thats ok, watch the process a few times and you will begin to understand it. Remember that it is just a drill and drills are used to build good habits for the future. This drill will help you build observation skills and comparative skills which will help you develop the ability to draw what you see. I don't expect you to use a highlighter for long. In fact, I will show you a more advanced method, later on in the video. I will also teach you a really cool trick that will get rid of the color from the highlighter.
But for now, remember that there are two steps to this process. Use the highlighter to create a mass drawing of what you are trying to draw. If you are very new to drawing, try to make your mass drawing a similar size to your reference picture or object. With more experience, you can experiment with scale. Remember that step two, the line drawing, is meant to be a correction of step one.
I have observed that when my students do this process for the first time, they struggle a bit, and complain that the yellow or pink from the highlighter "throws them off". Please remember that it takes three tries, on average, to get fully acquainted with this process. I have also observed that the students who improve the fastest, look at their reference image more often. Get in the habit of looking at your reference image at least once for every five seconds.
To get rid of the color from the highlighter, flip over your drawing and start to scribble all over the back. It is easiest to use the side of a graphite stick, but you could also use a pencil. Once the back of your drawing is covered, flip it over again and tape it down over a new piece of paper. Then, retrace over all of the lines. I used a blue pen for this step. When you remove the tape, you will see a perfect print of your drawing
Now, I am using the pencil to create a mass drawing. Notice that I am pressing very lightly while scribbling in the mass. I have observed that using a pencil is a little bit more difficult for beginners due to the tendency to apply too much pressure and leave dark lines. Also it is much easier to differentiate the bright colors from the highlighter then the subtle tones of a pencil. Still, after you feel that you are progressing with the markers, move on to this step. Do not worry about mastering the process with the highlighter, just get comfortable enough, and move on.
Thank you for watching my video, I reply to all of my comments, so feel free to ask me a question, or just let me know how it goes. Remember to try this at least three times before you judge the process. I guarantee that it will feel foreign at first, but I have used it for eight years in the classroom with a high success rate so give it some time. Happy drawing everybody!
In my demonstrations, I drew, Ni Hao Kai Lan, Spongebob, Homer Simpson, Moose A. Moose (Noggin), Characters from Yo Gabba Gabba, Lilo from Lilo and Stitch, Wow Wow Wubbzy, Dora the Explorer, Patrick Star (Spongebob), Stitch (Lilo and Stitch and Blue the Dog from Blues Clues (Nickelodeon Noggin). I am confident that this process could teach you how to draw any cartoon.

LINK TO PDF- http://merrillk.com/?part=fineart&act=artist1&artist=69&collection=186&articles_id=18075
Subscribe to kazanjianm (Don't miss any new videos that I make)- http://www.youtube.com/subscri....ption_center?add_use
Facebook: Like me on Facebook to find out about live hangouts or to post your work!- http://facebook.com/kazanjianm
Twitter: I tweet! Do you? http://twitter.com/kazanjianm
My Website: http://merrillk.com
Art Supplies I Use in my Art Work- http://merrillk.com/?sid=135&idpage=supplies_i_use
YouTube Visual Arts Category Petition: http://www.change.org/petition....s/create-a-visual-ar
Step by Step Drawing Playlist: http://www.youtube.com/playlis....t?list=PLD6E34C7CD58

Quick! Look in the mirror! I am hoping that you are smiling. If you are, you are seeing the Zygomaticus major, Zygomaticus minor and Risorius muscles working together to retract the corners of the mouth upwards and towards the back of your head. But, smiles are not just limited to the mouth. Your orbicularis oculi muscle has raised your cheeks and compressed your eyes.
Face proportions face anatomy head
Lets look at a smiling face and compare it with a straight face. Here are a few tips to remember. The forehead is very relaxed during a smile. The two eyelids get closer together and the top lid forms a less curved rainbow shape. The cheeks become pushed up like a mountain growing in height due to the movement of continental plates. In other words, the cheeks are literally pinched between the eye and the mouth, and this pushes the cheeks flesh away from the skull. There is little change to the nose.
There are common features to smiles. Notice how straight the top lip becomes and notice the trapezoid shape that forms above it. The corners of the mouth usually extend past the mid point of the eye. The eyebrows of most people remain neutral during a smile. Notice the symmetrical arcs that form which seem to connect the eyebrows to the folds in the cheek. Finally, notice that when people smile, the top row of teeth are often the only teeth, which are visible.
Now lets learn how to draw a smiling face. Please note that this is only the first of two videos which I plan to release on the topic. In this video, I will make eight cartoon like sketches. In video two will do a realistic two hour drawing. I hope that you will watch both videos, because they will give you a solid understanding of how to draw a smile. But, before the demo, we have an incoming message from the moon. Aw thanks, Little Old Man. It is OK to leave the whites of the eyes a little darker when drawing a smile! Trapezoid shape between the nose and upper lip. Slightly darker shadows around the eyes...especially if you are drawing an older person. This figure has eyes which seem totally shut (which is OK). Notice the strong line (arc) from the eyebrows to the folds in the cheek. Everything on the face can be a bit tighter. A smile tightens the skin like a face lift (with the exception of the neck). If the lighting calls for it, you can be more distinct with lines on the face. Notice the dark edges at the side of the mouth. These occur due to the rounded shape of the gums and teeth. Notice this in all of the figures so far. Drawing the head from three quarters (3/4) view.....General Tip: The eyes get foreshortened and the inner corners are slightly closer together. The trapezoid becomes more triangular. The rule about the mouth reaching past the middle of the eye becomes skewed. A more subtle smile. If the smile was more intense, his facial muscles would be more taut. Crows FeetT happen to older people when the eyes are taut!!!! CAW! The raising of the cheeks can affect the appearance of the jaw bone. (Mandible)
The song is called "Alien Restaurant" from Kevin MacLeod of Incompetech.com- a site recommended to youtube partners in the partner tutorial. The audio at the beginning is from Creative Commons Search and is listed in the public domain- http://blip.tv/file/2363588/. Some images are from creative commons search. For example the image of George Clooney- http://upload.wikimedia.org/wi....kipedia/commons/e/e9 The image of Beyonce- www.army.mil/.../army.mil-2007-08-30-154516.jpg "free online art lessons"

I was honored to do a live stream with:
http://youtube.com/sycra
http://youtube.com/cartoonblock
Links Mentioned
Lisa Irby's channel- http://youtube.com/lisa3876
DeviantArt - http://deviantart.com

While driving through Staten Island (one of the five boroughs of New York City), a field was ablaze and I drove though a HUGE plume of smoke after coming back from vacation on Easter Weekend. I estima
Facebook- http://facebook.com/kazanjianm
Twitter- http://twitter.com/kazanjianm
Website- http://merrillk.com
(Merrill) Supplies I Use- http://www.jdoqocy.com/click-4....247664-805536?url=ht
Music by Kevin Macleod- http://incompetech.com Rules- http://incompetech.com/m/c/royalty-free/faq.html Thank you Kevin!
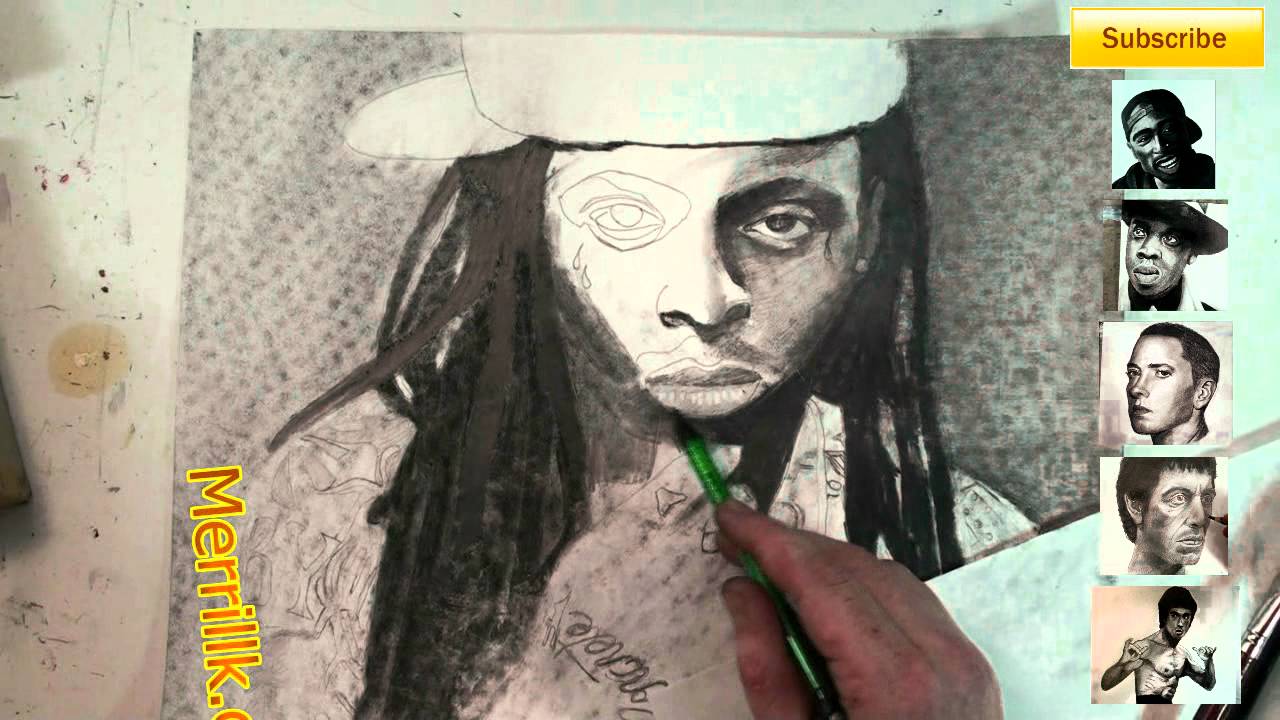
0:39 It is vine medium charcoal. I broke a stick and used the side to block in the masses for the hair.
0:55 There is a shadow that stretches across his neck. You can slightly see both sides of the neck. Under the lips is very dark.
1:24 Notice that I used a dry paper towel to blend the background (as well as the brush).
1:40- I am now adding pencil hatching directly above the charcoal.
2:01 To me, it is important to hatch over the charcoal, to UNIFY the surface of the drawing.....
HUH? What do you mean?- Charcoal is MATTE (Not shiny) and pencil is SHINY. -Charcoal MOVES and pencil is STABLE (doesn't move)
2:26 I am now using a graphite stick. Graphite sticks are really just BIG PENCILS!!!!!
They come in different tones like drawing pencils (HB, 2B, 4B, 8B, etc.)
2:51- Notice that I am holding my drawing in place with a paper towel in my hand. Try not to let your hands touch the surface of the paper (I always struggle with that.
2:51 I don't like to fasten my drawing with tape because I usually shade my background and the tape leaves white triangles in the corners where the tape was.....Maybe someone could give ME a tip on that!!!!
3:38 Eventually, the hair, the eyes, the area under the mouth and the area under the hands will be the darkest in tone.
4:03 The paper under my hand prevents my hand from touching the paper surface of the drawing.
3:52 Look at the C shape around the eye.
4:03 Also, notice once again, I laid the initial tones down in charcoal, and followed it with pencil hatching. I am using a CHEAP mechanical pencil now because it has thinner graphite, which helps me do detail work.
4:23 I am using the blending stump now.......and getting PISSED OFF!!!!!! The reason I am mad is because I made the mistake to put a piece of cardboard under the surface of my drawing (look at the dots in the background and on his face).....I gave Weezy Chicken Pocks!!!!! Argh! You'll see me remove the cardboard soon.
5:00 The top lip will be darker than the bottom one. Don't forget to leave the highlight over the top lip.
5:13 The shape under the nose (the nostrils) is not one tone. It is a complex shadow. The shadow under the neck is even more complex!
5:58 Our ultimate goal when we shade a drawing is to eliminate lines and maintain the likeness.
6:28- Eyebrows are never one solid tone, they are always darker towards the center of the face. The one exception is when a girl wears make up and darkens her eyebrows in to one tone.
7:00 Notice that I erased most of the original lines from the step by step.
7:50 I am breaking the rules a bit and using a prismacolor black colored pencil for super dark tones.
8:11 At this point, I only used the Prisma Black on one eye. Look at the difference.
8:33 The hat will be lighter than the background and darker than the highlights on the face
9:53 Have some fun with the tattoos! Know that I did not get them perfectly. Just mess around and practice your tones.
11:13 Don't get too complex with the shading of the hand. Focus on rounding the edges ar first. The spaces between the fingers are going to be dark.
11:32 The edges of the arm are going to be dark. DO NOT outline though!!!! Hatch (Cross hatching is adding line next to line next to line) and blend.
12:02 Highlight at the top of each shoulder. Use your kneaded eraser.
12:25 His chain can be carved out with an eraser.
13:09- Create a highlight on the upper tip of the hand.
14:01 To finish, I enhanced a few of the highlights with a white Conti Crayon.

http://merrillk.com/?part=publications
If you own a computer, and you have a myspace account, chances are, you have seen what is known as the myspace self photo....also known as the TOO MUCH INFORMATION profile pic! These photos are usually a combination of blatant misspelling and nudity. Sexxii Grannii (Sexy Granny) ON DECK (Whatever the HELL that means)!
As an artist, it is my job document what exists in the world around me. Right now (early 2010), the social networking sites are king......so I created this mixed media artwork, based upon a scary picture that I saw on Myspace.
I took a mixed media approach in creating this work.
1.) Pencil- I used the pencil to sketch the initial pose. I do not do any shading while working with the pencil (in step one)
2.) Illustration Marker- Prismacolor and Chartpak Ad markers allow me to put down layers of color quickly. These markers leave transparent marks of color, similar to watercolor paint and often, their vibrancy can be seen through layers of translucent color (added later).
3.) Color Pencils- The fine tip of color pencils allow me to make marks with extreme precision. I use prismacolor color pencils because they blend extremely well and are compatible with oil paint.
4.) Oil Paint- The most versatile medium. Oil paint can be applied in thick "impasto" style or in thin transparent glazes. In this case, I tried to finish my work......but I decided that I needed to make a few changes.
5.) In order to make those changes, I let my work dry, then scanned it, then opened it up in....
6.) Photoshop (And Paint Shop Pro 9)- THese two computer programs allow me to do digital collage and edit/refine my work. In this case, I changed the posture of the character.
7.) Print- On SPECIAL paper (hit the link)
8.) Color pencil- to bring out the tones (again) and prep the paper for oil paint (yes, it is a good primer). Also the color from the color pencils mix with the oil paint, which creates a cool effect.
9.) Oil Paint- Finishing touches
10.) Scan
11.) Save as a PNG file....so that I can use this character multiple times.
-Merrill Kazanjian
